Good afternoon everyone!
Today I would like to talk about installing blinds on plastic window. The opinion that window openings in residential premises should be covered with textile curtains is a thing of the past.
Blinds are diverse and functional so much that they will give odds to any curtains and tulle. Before buying a design of a certain color or size, you need to think about how it will be located on the window and how you can install it.
- vertical or horizontal slats,
- rolled or pleated,
- fabric or plastic - regardless of these indicators, blinds can be mounted using power tools and without it.
It is important to choose the location option:
- in the window opening
- over it
- or directly on the window sash.
Each of these cases should be considered separately.
Blinds are the most practical way to decorate windows. Easy to install and low maintenance blinds are very popular. Due to the variety of types and colors, they will harmoniously fit into any room and complement the interior of the room. In this article, we will consider the types of blinds and how to install them on windows. We will learn how to fix blinds on our own in different ways.
Kinds
 In building stores, eyes run wide from a variety of colors and textures of window decor. How to choose the right blinds and install them correctly? First of all, let's figure out what types of blinds exist.
- Horizontal blinds. The most practical, close the window tightly and protect from light and prying eyes.
- Vertical blinds. Most often they are installed in offices or used to decorate blind windows, as they make it difficult to open windows.
- Roller blinds. Close the window very tightly. I can be self-registration window opening.
- Cassette blinds. They consist of a special box, which is installed on the frame. Do not prevent windows from opening.
How to choose
When choosing blinds, start from functional purpose room and the general style of the room. Blinds can be fabric, plastic, aluminum, bamboo, etc.
The variety of colors and textures will allow you to choose the decor that suits your room. Be sure to measure your window before purchasing. This will allow you to choose the product of the appropriate size.
How to install blinds yourself
So, the blinds are bought. Do not rush to call the installation wizard. You can quite cope with this task yourself. In addition to acquiring a useful skill, installing blinds can be an interesting family pastime.
 Blinds are installed in three ways:
- In the overlay. The product is attached at the top of the opening, and closes the entire window to the window sill or below.
- In the window opening. Blinds are mounted in the window opening closer to the window. Also close the entire window to the windowsill.
- For each sash separately. The most practical way. The blinds are attached directly to the sash, thereby allowing the sashes to be opened or the window to be ventilated without lifting the blinds.
 Note!
Note!
When taking measurements, you need to make an allowance depending on the type of installation. If you are going to fasten the blinds overlay - add 10 cm to the width and height of the window opening. You will install blinds in the window opening - the height of the opening in its pure form, the width - minus 1.5 cm. When installing on each sash - the width of the sash is minus 2 cm, the height of the sash is minus 3 cm.
Each type of blinds has its own installation features. Next, we consider separately the principles of fastening products of each type.
Installing horizontal blinds
Usually, all necessary fastenings are included with horizontal blinds. Armed with a screwdriver, we proceed to the installation. They are installed in the window opening or on each sash separately.
- To fix the blinds to the window, measure the desired distance and mark the places where the top bar will be attached.
- Using a screwdriver, drill holes and attach the corners that will hold the top bar.
- Attach the plank to the corners. First on one, then on the second. You should hear a click when attaching.
- Dissolve the fixed canvas down, mark the points where the bottom bar will be attached.
- Install the bottom bar in the same way as the top bar using the corners.
Installation of vertical blinds
 Vertical blinds consist of a cornice with clamps that regulate the sliding / sliding and slats - a canvas that closes the window.
The kit contains all the necessary fasteners, as well as detailed instructions by installation. This type of blinds is installed overlaid.
- Attach the cornice with clips to the ceiling. You can use the same screwdriver to fix the eaves.
- Insert the slats into the eaves. Each part of the canvas must be mounted separately. To do this, insert each strip into the corresponding latch, wait for a characteristic click.
Installing roller blinds
Roller blinds have the same mechanism as horizontal blinds and are installed in the same way. The most convenient way to fasten roller blinds directly on the sash, then they will not interfere when opening windows. If you need to fix them in a window opening, it is better to use additional brackets, because the window handle protrudes several centimeters. Without brackets, the handle will stick out from under the canvas and spoil the overall look.
Installation of cassette blinds
Cassette-type blinds are a ready-made box with a mechanism that is attached to the window frame. Installation is quite simple.
- Attach the top bar to the canvas with screws.
- Then glue the side guides (usually on an adhesive basis) onto the sash vertically.
- Expand the canvas, adjust the borders of the upper and lower positions of the canvas.
- Install all accessories.
Helpful advice!
Blinds have a clear geometric shape, so carefully measure and calculate the attachment points to avoid asymmetry and unnecessary holes.
How to fix blinds on plastic windows
What to do if you need to fix the blinds to the sash, but you can’t drill plastic windows? In this case, you can install blinds using brackets. The devices are attached to the frame, and the supporting structure of the blinds is mounted on them. You can fix the bracket to the window frame using:
- double-sided tape;
- hook on the upper part of the frame of the opening sash.
This method will allow you to securely fix the product, and preserve the integrity of the metal-plastic profile.
To properly install blinds with your own hands, it is important:
- decide on the type of blinds you want to purchase;
- choose the best installation option;
- take measurements of the window, take into account the necessary margin;
- when installing, strictly observe the dimensions of the product;
- carefully mark the drilling points;
- follow the instructions included in the kit.
How to take measurements

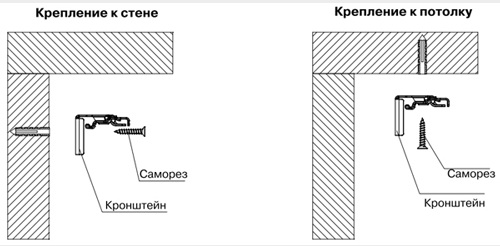
How to install blinds
Use dowels and screws that are appropriate for the fasteners and the material of the wall or ceiling to which the blinds will be attached.
Note!
Before installing fasteners, check if the folded blinds prevent the window from opening.
We advise you to carefully consider whether window handles, flower pots(and other “foreign” objects on the window sills) interfere with the opening and closing of the blinds and the rotation of the slats (window sill, radiators, etc.)
How to install horizontal blinds
- Measure the same distance from each edge of the window.
- Drill the wall and insert a dowel suitable for the wall material (concrete, plaster, etc.) into it, then screw the fixing with screws.
- Using a level and ruler, mark the location of the second fastener. Screw the second fastener in the same way as the first.
- When installing horizontal blinds, it is necessary to use an additional intermediate fixing if the width of the blinds exceeds a certain distance. For ceiling mounting vertical blinds over 1.6 m wide, 3 mounting brackets must be installed.
- Place an additional fastener 10 cm away from the control cord (this is where the louver mechanism experiences the most stress).
- Fasten blinds to mounts
Cutting horizontal blinds to width
- Lay the folded blinds on a horizontal surface and measure from each side the part that needs to be cut off. It is necessary to cut off equal parts of the blinds on the left and right.
- Cut off the cornice and rail. Be sure to cover the slats so as not to damage them.
Height cutting blinds:
- Remove the parts that are under the lower cornice at the bottom of the blinds in such a way as to release the cord.
- Untie the knots to free the slats.
- Remove excess slats to achieve the required blind height.
- Align the blinds by inserting the bottom curtain rod into the last link.
- Cut off the free ends of the cord, tie knots and put the lower cornice pieces in place.
Roller blind cutting

- Using a hacksaw, cut off the tube and bottom cornice.
- Cut the fabric with scissors. If a pattern is applied to the curtains, it is necessary to cut equal parts of the curtains on the left and right.
- Mounting roller blinds on the tube is carried out using the double-sided adhesive tape located on it. (Be careful not to unfold the curtains all the way: always leave some fabric on the tube).
Cutting vertical blinds
Cutting the control rail of vertical blinds.
The slats are easy to cut and install. Cut the slats with scissors to the desired height, following the instructions on the package. Cut off the control rail with a hacksaw.
When choosing the material of the blinds, it is necessary to take into account in which room they will hang. For the bathroom and kitchen, plastic blinds are best suited - they are not afraid of moisture and are easy to clean. For the kitchen, you can also recommend aluminum blinds that do not support combustion.
source: leroymerlin.ru
Why are blinds needed?
Their main characteristics are: the ability to easily attach to windows, ease of use and excellent performance of their main function - regulating the light in the room. With constant work at the computer, it is also impossible to do without the use of blinds.
The only question in this case is to understand how you can hang blinds on plastic windows in order to get the most out of their use.
Step-by-step instructions for installing blinds
Determine the size
So, the first step is to buy blinds of the selected production, the appropriate size and other individual characteristics. It should be noted that before going shopping, it is necessary to determine the size of the glass: taking into account this value, you need to know that the blinds must completely cover the glass (in width), slightly going to the limits of the frame.
Unpacking
 After the purchase, the initial business is to unpack and untangle the cord, as well as to make out the fasteners.
From what is included in the package, dowels can be set aside, because in this case the blinds will be attached directly to the window.
Deciding on fasteners
We find a mount for which we will mount our blinds. The second step in installing the blinds is to find two metal brackets with latches. This will be required in order to subsequently fix the container with the "blinds" on them.
We make the markup and install the mounting brackets
The next step is markup. For its correct implementation, first of all, you must carefully read the instructions. After all, you need to place the mounting brackets in such a way that it is easy to insert a container into them.
In other words, you need to find the optimal distance from the end of the markup. An important point at this step, there is a complete exclusion of amateur performance: everything on the window should be drawn with a pencil according to the level, but not by eye.
Otherwise, the curvature of the fit will immediately catch your eye when the plates rise, and this does not look very aesthetically pleasing. It is also necessary to pay attention to the fact that the bars do not move outside the glass, since if there is a shift, the adjustment of the container will be violated.
Helpful advice!
Brackets must be fastened with latches upwards. However, before that, it is necessary to drill the window with a drill (thin), and then direct the screws towards the plastic.
If everything is done carefully, then nothing terrible will happen to the window, because the remaining drilled holes removed with acrylic sealant. However, with the accuracy and caution of the execution of this step, they will not be at all.
We put on the container
Then the container is put on. We cover the latches and determine the correct fit. In the event that the brackets are firmly located on the window, and the container is easily removed or put on, it is required to say that the work was done perfectly. However, it is not yet fully completed.
The last thing left is to install the lower holders. Their role is to fix the web of slats and fasten it to protect it from free movement. When lifting, the lower edge of the web must be removed from the holders by hand.
Installing the bottom brackets
In order to mark the lower holders, you need to lower the canvas down. Then you need to estimate by eye their position in the case of a tightly stretched canvas.
With a dangling web, it is impossible to accurately measure the lower holders. After a correct measurement, it is imperative to drill holes and screw the holder with screws.
Mounting holders
At this stage, the question begins to disturb: how should the holder be twisted - outward or inward?
The answer is quite simple: both when screwing in and out, the result remains the same, in any case, no screws remain visible. Therefore, here it is already required to rely on your convenience and principles.
This completed the process of attaching the blinds to the window.
At first glance, it may seem that the installation of horizontal blinds seems to be an easy and simple process. However, it is worth considering that the windows and walls in houses are most often uneven, so the installation of horizontal blinds requires appropriate experience and knowledge.
If there is confidence that the blinds can be fixed independently, then it is necessary to adhere to a certain installation technology.
This will require tools such as a Phillips screwdriver, hammer, hammer drill or impact drill, drills and drills. The first thing to do is to decide on the method of mounting horizontal blinds - to mount them on the frame or in the window opening, to the wall or to the ceiling.

Only after choosing the place of attachment and correctly performed measurements, you can proceed with the installation of blinds. In order for the installation of horizontal blinds to be carried out reliably and efficiently, it is necessary to use fasteners - brackets or brackets that are equipped with any blinds.
Brackets can be made secure fastening blinds on almost any surface.
Video: Blinds on plastic windows. Measurement and installation.
Horizontal blinds installation technology:
1. Mark out the places where the brackets will be attached. When marking, it must be taken into account that the brackets must not fall on the latch and on the control device. Using a ruler and level, mark the location of the fasteners from each other at a distance of more than 60 cm and less than 25 cm from the uppermost sections of the blinds.
If the width of the blinds is large, you can use intermediate fasteners to increase the reliability of the installation. One of the brackets must be placed close to the raising-lowering device, since in this area the louver device is subjected to the greatest load.

2. Consistently drill holes in the wall, insert dowels into the marking places. Screw the brackets with screws. It is very important that the screws and dowels are completely similar to the fastening, wall or ceiling material.
If in the plans horizontal blinds are fixed to the PVC window frame, then it is not necessary to drill the window profile, as there are special brackets designed for metal-plastic windows. It is worth replacing that this method of fastening can only be suitable for a swing-out sash.

3. The installation of the blinds eaves on the fasteners is in progress.
4. The upper rod of the blinds is put on the brackets and locked with a latch. Moreover, horizontal blinds should already be assembled.
The installation of inter-frame horizontal blinds has some differences from the technology presented above. Such blinds should be installed in the internal space between the panes.

That is why, when installing them, the brackets are first attached to the upper eaves. Then, due to the compression, a flexible adapter is attached to the swivel rod.
The control device is brought into the room through a pre-drilled hole. Only upon completion of these operations, it is possible to proceed to fastening to the frame of inter-frame horizontal blinds.
Video: How to install horizontal blinds yourself
Ten years ago, blinds were considered exclusively an office window decoration item. But recently, the lamellas have changed, new design options have appeared. As production materials, designers began to use bamboo, linden log cabins, cherries and fabrics. It has become fashionable to select models for the arrangement of houses, apartments and public spaces. Turning to a salon or a specialized store for help, you will receive competent advice from a sales assistant on installation, care and selection. In the event that you are going to install blinds on windows with your own hands, read our article in detail.
This must be known in advance before installation!
In order for the blinds to last a long time, try to carefully carry out the installation. If you understand the details in advance, the installation process will not take much time. The main thing is to take into account the models, the method of installation and take this into account in the assembly. If you mount window blinds directly to the wall, you need to make sure that its surface is perfectly flat.
Important point! When buying, be sure to check with the consultant whether all the parts of the mounting headset are included. There are times when a purchase additional fasteners inevitable. It is better to take care of this in advance.
Blinds can be attached in one of four ways:
- to the ceiling;
- to Wall;
- inside the window opening;
- for each division of the window.
Which option you choose doesn't matter. It all depends on the individual preferences of the client. Installed on double glazing various forms. But the method of fastening is selected individually. The sequence of steps is roughly the same, but there are some distinctive details.
Universal step-by-step actions for installing blinds
- Many are sure that the models sell standard size and neglect the preliminary measurement of the window . We want to warn you: take the time to measure the height and width of the window opening.
- Be sure to note that the length of the lamellas should be two centimeters shorter than the length of the window. If you provide for the option of attaching the structure to the wall, then the canvas fifteen centimeters to the right and left should cover the window.
- Next, mark up the fasteners. Make sure that there are no difficulties with the operation of the mechanisms, and they will easily allow you to open the window.
- Guided by the markings, attach the necessary parts to the base. Dowels and screws are screwed into the wall or ceiling. Sometimes directly into the double-glazed window. Next, a cornice is hung on them, which holds the structure.
- As soon as you finish installing the blinds, check their mechanism.
Installation of blinds on plastic windows
Installing blinds on plastic windows is a common occurrence. Most modern double-glazed windows are made of plastic. This is a fragile material, so you need to work with it carefully. Now we will consider installation options where drilling is used:
We mount vertical blinds on plastic windows
This is one of the most common types. Functional features, wide color palette, ease of care and color combination attract customers. Because it is common in offices and public organizations. Installation of vertical blinds does not take much time.
- It is necessary to mark up for fastening elements.
- Next, attach the brackets and cornice.
- Put runners on the cornice, attach lamellas to them in turn.
- Attach weights to the control handle.
- Check the construction.
Scheme of fastenings of vertical blinds
For detailed installation instructions for vertical blinds, watch the video below:
We mount horizontal blinds on plastic windows
In most cases, horizontal lamellas are attached to the wall. They are able to close the window opening completely, but at the same time they look aesthetically pleasing and do not “squeeze” the space of the room. There are cases when they are mounted to the window. Here, the details of the lamella are attached to each sash separately. The system for installing horizontal blinds does not differ from vertical options:
- We mark places for fastening.
- Attach brackets.
- We put a cornice on the brackets.
- Checking the length.
- We check the installation and operation of the mechanism.
 Mounting scheme
 To make sure that the steps are correct, watch the installation video for horizontal models.
We mount blinds on plastic windows without drilling
If for some reason you do not want to drill a wall or a double-glazed window, you can use adhesive tape or special brackets. There are L-shaped brackets that are attached to the surface of the double-glazed window without drilling. They are easy to mount and dismantle thanks to a simple latch. But, they are attached only to those doors that open. To attach the brackets to a closed sash without drilling, use double-sided mounting tape.
Thus, with the help of L-shaped brackets and adhesive tape, you can maintain the integrity of the window profile. Mounting on adhesive tape is less reliable than others, but if you do not overload the structure, it will last a long time.
 Mounting on brackets
 We mount roller blinds on plastic windows
Roll models are installed in almost the same way as vertical ones. One of the most affordable options for mounting blinds is on two brackets that are attached using self-tapping screws.
- We make markup for the details.
- We fasten the brackets to the screws (at the same time, make sure that they are at the same level, otherwise the blinds will hang crookedly).
- Next, we attach the cornice with the canvas.
- Checking the construction.
 Scheme of mounting roller blinds
For more details on the nuances of installing roll models, see this video:
Installation of blinds on wooden windows
Modern models are attached to wooden Euro-windows and old Soviet ones. It should be noted right away that when installing on old-style windows, you need to carefully take measurements.
Please note: the glazing bead on wooden Soviet windows should not protrude beyond the plane of the frame!
Suitable models for wooden windows: isolight, isotra, roll and rollite. These are universal models. They harmoniously fit into the interior design, regardless of its style. They are distinguished by a simple control mechanism and high performance.
One of the most complex installations on wooden double-glazed windows– fastening to each section. All necessary parts are included in the kit. Installation principles, as for plastic ones: using brackets or screws. If you are not afraid to make a hole in the double-glazed window, you will be satisfied with the result. With the help of fastening on screws, the structure will last a long operational period.
Mounting on brackets is considered less reliable, but it has a huge plus - no holes in the double-glazed window. When you want to remove the blinds, there will be no defects left on the window.
We install blinds on wooden windows
Let's take a closer look at the option using drilling and fastening with screws.
- First you need to make a markup for each of the fasteners.
- Make sure that the structure does not interfere with the opening of the window sashes.
- Make holes for the screws. Install screws and dowels.
- Attach a cornice to them.
- Install another fastener at the control thread to save the structure from the accumulation of load in that area.
- Attach runners and slats to the eaves.
- Check the construction.
Using self-tapping screws, it is easier to attach the cornice to the window. Self-tapping screws will not bring harm window profile but be careful during installation. If you want to remove the slats after a while - no problem. After dismantling the structure, the holes are filled with special silicone glue white color- and not a single trace of the screws will remain.
Good to know! To begin with, it is better to drill holes according to the markup, and then mount the parts. Screwing in self-tapping screws individually is one of the reasons for the appearance of a crack. And this installation method guarantees the integrity of the plastic.
When the holes are prepared, the brackets are carefully screwed to them. Then install and close the eaves. The following steps are required:
- Install the hook in the control mechanism.
- Install the cane.
- Attach the tip to the cane.
- Fasten the thread with a knot.
- Check the operation of the blinds.
Installing the lamella design is not difficult if you follow all the requirements and work carefully. Also read the installation instructions, which are necessarily attached to any model.
The fashion for bulky curtains that collect a significant amount of dust in record time has already passed, so most people prefer to use light airy fabrics to decorate the window area. To protect the window of the room from strong sunlight and curious passers-by or neighbors, horizontal blinds are increasingly being used.
Horizontal blinds are easy to use, which is why they are popular.
It is not difficult to figure out how to install horizontal blinds, but in this matter there are a lot of subtleties that need to be taken into account so that in the future the mechanism works correctly and performs its function. Blinds can be made of wood, plastic and aluminum, the latter being the most common, as they are extremely easy to use and can be mounted on all types of window frames.
What you need to install blinds effectively

Blinds are sold ready to install and with a complete set of fasteners, so you can install them yourself. When buying these interior elements, you can order the desired size that will fit under the window. In addition, you need to pay attention to the type of fastening of the blinds, since in some cases, in order to fix the blinds mechanism, it is necessary to drill the window surfaces, while in other cases this can be dispensed with. The most common option is blinds that have standard twist brackets that are mounted on self-tapping screws, since with this type of fastening you can quickly.
Despite the fact that after reading the installation instructions it may seem to many that it is not difficult to install blinds, in fact, you need not only to have the whole range of necessary tools, but also certain skills, without which installing blinds on windows can take a long time.
Before installing horizontal blinds, you should take them out of the box and check if all the fasteners are available, as well as prepare all the tools that may come in handy during the work. To necessary tools relate:

- crosshead screwdriver;
- roulette;
- spirit level;
- a hammer;
- marker;
- cutter;
- pliers.
Then you need to think about how to install blinds on the window.
Back to index
Preparatory stage for the installation of horizontal blinds
During the preparatory work it is very important to do the markup correctly. First of all, it is necessary to ensure that the structure, after being attached to the window frame, does not close the window handle and does not prevent it from opening and closing. Next, you need to use the level and tape measure to determine the optimal place for attaching the brackets.
When choosing the optimal place for attaching the brackets, it is very important that one of the upper brackets is located in close proximity to the mechanism that controls the opening and closing of the horizontal blinds, since during use this place takes a lot of effort, and if handled carelessly, you can break the mount.
After defining optimal places fastening, you need to fix the measurements with a marker. Often, self-tapping screws are not included in the set of brackets for horizontal blinds. right size. It is best to use self-tapping screws for fastening the brackets, the size of which does not exceed 10 mm, since very long self-tapping screws can lead to a violation of the tightness of the window. If the tightness is broken in the middle of the plastic window, water vapor will accumulate and undergo a condensation process, which will eventually lead to accumulation a large number liquid inside the window and the failure of the mechanism that opens the window.
Horizontal blinds are made of wood, plastic or aluminium. They are highly resistant to sunlight. Depending on the type of fastening, horizontal type blinds can be inter-frame, attic and ordinary. A rich color range of products will harmoniously decorate any house, apartment or office space.
Aluminum blinds are considered the most convenient of all horizontal ones. These "light protection devices" have one very important advantage - the ability to be installed in places where other types of curtains or blinds cannot be used for a number of reasons. Aluminum blinds made from aluminum tape with high strength characteristics and covered with a special compound.
Advantages of horizontal blinds
Blinds are compact, reliable and affordable - it is thanks to this that they have long and firmly entered our everyday life. They are installed not only in offices or in the kitchen, but also in the living room, nursery and even in the bath! After all, their moisture resistance is beyond praise! Aluminum products provide sufficient light and sun protection for a comfortable stay in the room, and also reliably cover from prying eyes.

And more blinds:
- do not absorb dirt and dust;
- do not deform;
- easy to care for;
- do not accumulate static electricity.
Interesting! "Standard" aluminum horizontal blinds is a basic combination of functionality, reliability and elegance. This is the best choice for the kitchen, office.
Wood effect horizontal blinds allow you to successfully combine the affordability and reliability of aluminum construction with a "natural" interior, dominated by wood shades.
perforated blinds , with the effect of "dense tulle" are suitable for connoisseurs of soft diffused light. They are good for living room, nursery, bedroom.
But in order for the products to really serve your home faithfully, it is very important to know how to install horizontal blinds correctly.
Installation instructions for horizontal blinds
Fastening horizontal blinds can be carried out to the ceiling, to the wall, in the opening.
Measurement of horizontal blinds
- Determine the overall dimensions (height and width) of the product based on the design features of the window opening. If the installation of horizontal blinds will be carried out directly in the opening, it is advisable to subtract one or two centimeters from the estimated width of the product (correction for uneven slopes).
- Determine the optimal location of the controls - on the right or on the left.
- Determine what type of fastening will be used - standard twist brackets, fastening to tilt-and-turn sashes with or without drilling.
- Determine the length of the control handle: standard - 2/3 of the height of the product.
Note! The minimum possible width of products is 22 centimeters. As for its maximum, it is 220 centimeters with a guarantee of trouble-free operation. You can be tempted by 300 - but then no one will give you a guarantee.
Maximum height: 250 centimeters - if with a guarantee, 300 - if without.

Installation of horizontal blinds - step by step
Installation on twist brackets
- Based overall dimensions light protection device, mark the mounting locations of the brackets. The distance between them should be at least sixty centimeters. The brackets must not be caught in the control mechanism, rope retainer or caliper.
- Attach the brackets to the window sash, ceiling or wall.
- Turn the bracket latches until they stop (counterclockwise).
- Insert the upper cornice of the product into the brackets, turn the latches all the way clockwise.
Experts point out that self-assembly horizontal blinds video instruction from professionals is often not superfluous.
Installation on inclined windows with drilling
- Install the twist brackets on the top of the sash; on its lower part, install the corners (lower plastic brackets).
- Fasten the cables in special bushings; install the bushings through the springs into the holes along the edges of the upper cornice.
- Pass the cable through the holes along the edges of the lamellas.
- Insert the second pair of bushings into the holes of the lower brackets, thread the cable through them and fix it with a screw.
- Attach the handle hook to the control mechanism.
- Install the handle holder on the plate on the sash.
- Make sure the entire structure works.

Installation on inclined windows without drilling - on cap brackets
- Mark the mounting locations for the brackets.
- Fasten the twist brackets with the screws supplied to the swivel top brackets.
- Install the "structures" on the top of the sash and fix them with a special key.
- Install the slip-on bottom brackets on the bottom of the sash.
- Fasten the cables in the bushings; install the latter through the springs into the holes along the edges of the upper cornice.
- Attach the cornice to the twist brackets.
- Pass the rope.
- Integrate the plastic bushings into the holes in the bottom brackets.
- Fix the cable in the bushings with screws.
- Attach the handle hook to the control mechanism.
- Install the pen holder.
- Check the performance of all structural elements.

The mounting scheme for horizontal blinds, if you delve deeply, is quite simple.
Installation of horizontal blinds: video instruction for installation on a plastic window
Detailed installation instructions for horizontal blinds are presented in this video.
Horizontal aluminum light protection devices, of course, do not need any extra care. However, this does not mean that they can be "left to their fate."
About once a week they need to be cleaned of dust. For this purpose, you can use a vacuum cleaner with a soft fleecy nozzle. Manipulation with an ordinary dry soft cloth is also not forbidden.

If the blinds, for a number of reasons, require a thorough “big wash” (often these are structures on balcony or kitchen windows), then you should do this:
- dismantle the structure;
- rinse the slats warm water using detergent (soap, shampoo, a little washing powder). Boiling water is "contraindicated"!;
- rinse them thoroughly with water and wipe dry;
- return the blinds to their place for final drying;
- remove stains from dried water with a rag. And voila - your blinds shine again!
Please note - in no case should water get on the upper cornice with mechanisms. And one more thing: if your blinds are white, try to avoid detergents, which include ammonia- this can provoke the appearance of yellow spots on individual slats.


Chocolate biscuit: the secrets of cooking in a slow cooker and oven
Chemical composition and nutritional value
Apple chips at home
Braised cabbage with white beans, recipe
How to reduce the ass, hips and stomach at home?