All children love nooks and crannies. Only in solitude can you give free rein to your imagination and go on an exciting journey through imaginary worlds. That is why children often build homemade houses from pillows, blankets and other improvised means. But if you want your child to feel like a brave traveler or the hero of his favorite fairy tale, give him a hut. Moreover, it is quite easy to make a hut for children with your own hands, but the child will be able to fill his leisure time with exciting games. Today, "Dream House" will share with its readers ideas for building children's huts, which can be installed both in the children's room and on the street.
We make a hut for children on our own - some interesting ideas
1. Sheet and rope
To make a hut, it is enough to stretch the rope between the trees, throw a sheet over it and secure its edges with wooden pegs or other suitable means. To make the child comfortable, lay soft blankets or blankets on the ground. And even if there is nothing supernatural in such a "structure", but a child's imagination can fill it with an exciting story. Homemade hut for children on the street will give a lot interesting games And, besides, it will save kids from solar overheating.
When choosing a place for a hut, give preference to darkened and flat areas.


2. Hut from a gymnastic hoop and fabric
An ordinary gymnastic hoop can be an excellent basis for a children's hut. It is enough to sew a long fabric to the hoop and hang it in a horizontal position, for example, to a tree branch at such a height that the edges of the fabric reach the ground. Alternatively, you can simply throw a large piece of dense fabric over the hoop, build a cone-shaped roof and fix the frame at a convenient level. Then, to hang the hut, you only need a reliable strap or tape.


3. Hut of branches
Probably every child dreams of world tour, dangerous adventures and exciting journeys. It is possible to help a child realize his cherished dream without going beyond the aisles of his own suburban area. Since brave travelers prefer to sleep not in a warm bed, but in a hut made of tree branches, made by hand, the baby will surely be delighted with such a gift.
But how to make a children's hut from branches? There are several interesting options:
- Firstly, you can build a hut from flexible and long branches left after pruning trees and. To begin with, collect as many branches as possible and select the largest specimens. In place of the future hut, draw a circle and dig branches along its circumference, tilting them so that they create a cone-shaped frame. Install only two branches at a fairly wide distance from each other, because. they will serve as the entrance to the future hut. Make sure the branches are firmly planted and complete them with the remaining material. It's okay if the walls of the hut are "translucent" - being in such a house, the baby will still feel like at least Robinson Crusoe.
- Secondly, you can make a "live" hut by decorating it with foliage and plants. If you are not in a hurry to build a miracle house, plant climbing plants around the perimeter of the frame, for example, grapes, bindweed, etc., which, as they grow, will beautifully braid the walls of the hut. If you want to give your child a holiday "here and now", just cover the frame of the hut with branches with greenery.


4. Hut wigwam in the nursery and on the street
The wigwam hut is a traditional Indian home. This building has a conical shape and a strong structure. Previously, the Indians built their dwellings using thick branches, which were then covered with thick canvas. We can also make a children's hut on the principle of a wigwam. To do this, you need to pick up 5-7 flexible, but strong twigs, and then install them in the shape of a polyhedron or a semicircle. The tops of the twigs should be connected in such a way that they are combined like flowers in a bouquet, overlapping each other. At the junction, the twigs must be secured with a strong rope or piece of fabric.
If you are setting up a wigwam outdoors, dig the bases of the twigs into the ground a little. If the wigwam will be indoors, tie transverse twigs at the bottom of the structure, which will secure the structure.
After that, decorate the wigwam with a cloth. Most often, triangles form between the nearby twigs of the hut, so it’s enough just to cut out pieces of fabric in this shape and sew them around the frame. However, it is much more beautiful if the wigwam hut is decorated with a specially sewn cover, to create which you will need to carefully measure the height of the frame and the width of each of its parts.


5. Gable hut
Having done simple design from several wooden slats, you can create a beautiful gable hut or hut-tent. The most important thing in this building is to choose the right fabric. If you are setting up a hut in the yard, it is best to use a tent fabric that does not fade from the sun and does not deform due to high humidity. If the structure will be in the child's room, cotton or any other natural material will do.


Room huts
If you are not confident in your abilities or simply do not want to spend time making a homemade hut, you can purchase a finished design. For example, beautiful and easy-to-play huts are produced by the Swedish brand IKEA. Such structures are suitable not only for games, but also for. In addition, the branded hut will surely become the main decoration of the children's room.


As a hut, you can also use a stylized awning or roof on the bed. This accessory will not only give the baby a world of exciting games, but also provide him with a sound and restful sleep.


Hello! Today we will become real builders! I think that after what we will do with you today, our children will be truly proud of us! What kind of program awaits us today? Wigwam do-it-yourself patterns sizes! Did you have houses, tents as a child? I'm sure they were! No one grew up without having their own house, their own personal space! So let's go?
But first things first! First, it’s still worth saying a few words about what a house for a crumb is. Why does he need it and how can we help our little ones. And then a master class awaits you! Yes, not one, but 3 at once! I have compiled a selection of three wonderful wigwam models that are going different ways. You can choose exactly the one that you like best, suits and which seems more accessible to you.
Teepee for little ones
I’ll tell you right away why this tent is important for children:
- This is their personal space;
- as your gift.
- This is a space designed specifically for the crumbs. It is clear that the whole room can belong to them. But adults can also enter the room, no one will “break in” so easily into the tent.
- You have dedicated your time and labor to create a hut. And the kids, seeing how you try, felt your attention and love!
It is convenient to take such huts to the beach or to nature, they are easy to fold and can protect from the sun and wind.
Tepee Making Instructions
Now let's talk about how to make a wigwam. I will offer 3 options and tell you in detail and step by step how to make houses for crumbs. Which one will you do? The choice is yours. Just take into account:
- toddler age,
- its possibilities,
- how long it will be interesting for him to play in his hut,
- how much free space do you have,
- what "building" materials are available to you.
Our option. Hut in 10 minutes without sewing and patterns.

How you can design a house for crumbs in a few minutes, we showed with our son in the video:
Option two. Wigwam without patchwork

Any old things, fabric scraps will do. It looks bright, cheerful, and is done very simply and interestingly.


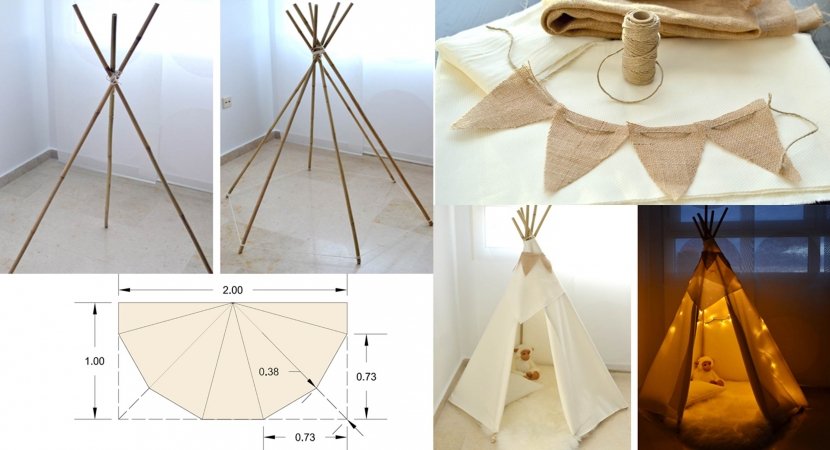
Option three."Triangle Tent" frame structure

What we need:
- Wooden slats - 4 pieces, each 2.5 x 4 x 150 cm;
- Dowel rod (round slats) - 3 pieces measuring 1.5 x 100 cm;
- Fabric - 4.5 m;
- Colored tape.

Option four. "Indian House" stable construction

We will need:
- Wooden sticks with a diameter of 2 by 2.5 cm and a length of 150 cm;
- Fabric - 137 by 315cm;
- Ribbon - 250cm;
- A strip of fabric - 7.5 by 700 cm.
This is a more complex design, and therefore attached step by step photo describing all the steps in detail.


- We cut the fabric rectangle so that on one side there are 2 triangles along the length of the fabric, on the other - 1 triangle and 2 halves of the triangle along the edges. The sizes of the triangles along the bottom are 152 cm (2 patterns) and 155.5 cm (2 patterns, one whole, the other of two halves of 77.5 cm each). Everywhere between the triangles the distance is 4 cm. The same amount, 4 cm, does not connect the top of each triangle.


Option five. "Shalash". Temporary structure

We will need:
- Sticks - from 4 to 6 pcs. about 1.5 long;
- Fabric - 1.5 by 3m;
- Rope - 2-3m;
- Plastic rings - according to the number of sticks.
This option is so simple that our child can help. A children's hut pattern is not needed here. The main thing is that the design itself is temporary and collapsible, but must remain safe for the little ones. What are we doing for this.
- Before starting work, we align all the sticks. This is important for the design to be stable.
- We firmly tie the ropes to the edge, stepping back about 20cm.
- We fold the fabric in half, and then diagonally. Cut off a semicircle from the top, and from the bottom. By cutting off all excess, we ensure safety. The fabric will not be under the baby's feet, and he will not trip over it.
- Now the fabric is simply thrown over the base of sticks, slats or bamboo. From above we firmly tie the rope to the sticks.
- We put rings on the sticks from below and sew them to the canvas of the tent.
- We hem the edges of the fabric. We put a blanket, wool or a warm rug on the floor in the hut.
If you want to better fix the sticks so that the ropes from below do not interfere, then the easiest option is to make a hexagon rug, in the corners of which sew rings or strings and insert parkas into these rings. Then they will not disperse and arbitrarily change position.
For children, the best gift is their childhood! To make it the best, sometimes it is enough to remember all the brightest moments of your youth. Remember how your parents spoiled you, gave you a lot of impressions and wrapped us in their love. Then it becomes clear that children need both pranks and funny games. They need us to make toys for them. They will never forget this! And in due time, these warm memories will help them become excellent parents.
Now it's time to say goodbye! I remind you of the subscription so that we do not get lost. You will not only be able to read the articles yourself and participate in our conversations, but you can also invite your friends! Then each topic will be even more widely disclosed thanks to joint efforts and comments!
So, I look forward to seeing you all. And now, bye bye!
Children love all sorts of houses and secluded places where you can play with friends or read interesting books. An excellent solution is a wigwam, which you can buy or sew yourself. There is simple options original houses and more complex ones that require certain knowledge and sewing skills. If desired, a favorite business can be turned into an excellent business idea. In order to make good money on the manufacture of colorful huts, you must follow some rules. But first, it’s worth figuring out how to sew a wigwam for children with your own hands.
Our business valuation:
Starting investments - from 50,000 rubles.
Market saturation is low.
The complexity of starting a business is 2/10.
What is a children's wigwam?
Parents often purchase a wigwam playhouse for a child, which is made in the form of an Indian dwelling. The design is characterized by simple assembly, original configuration and mobility. Product diagrams can be found on the Internet. Of particular importance is the quality of workmanship and the use of natural materials.
Children's wigwams can be different and have different designs. For example, designs with and without windows, with pillows and curtains. For boys, a children's wigwam tent can be in a brown, blue or green color palette. And for girls, the product is distinguished by more delicate tones and is complemented by ruffles.
The wigwam is very easy to install and takes up little space. When not needed, it can be collected and put away in the pantry. Interesting huts are great for very young children and for older children.

Business idea for creating wigwams
To create a small business out of sewing wigwams, you need to understand not only the nuances of their manufacture, but also the financial side. Approximate investments for the implementation of one product will be 1200-5500 rubles. Profitability depending on the quality will be 30-60%. Return on investment is possible within a month. If you create your own online store selling wigwams for children, then you need to think about hiring staff.
The nuances of starting a business
 To start a business, it is important to master the tailoring of a wigwam. For manufacturing, you will need a few materials: natural fabric, a wooden pole and 4 planks. The best wood for this kind of products is spruce or linden. Materials must be natural and double-sided. You will also need a wigwam pattern. The house must be stable, especially if it is intended for small children.
The original hut can become a real decoration of the room if you use additional decor. It can be balls, garlands and ruffles. You can make an exclusive embroidery with the name of the child.
In order for homemade wigwams to be in demand, some effort needs to be made:
- Develop interesting projects houses. The product must be exclusive.
- To find suitable premises for the workshop and recruit staff.
- Find ways of inexpensive and effective advertising.
- Establish contacts with suppliers who provide quality fabrics and accessories.
The price of a wigwam for children that can be offered depends on the quality of the products and the originality of the approach.
Business income
With certain skills and craftsmanship, you can make a beautiful wigwam in a day. Costs are determined by the quality of the material, the type of decor and design features. Most minimum investment are 1000-1500 rubles. Buy children's wigwam, inexpensive can be at a price of 2500-3000 rubles. First, you can try to sell homemade products to friends and acquaintances. This can be done through social media. networks. If the products are of high quality and unusual, then it will be possible to reach a good profit.
To earn more, you need to diversify the assortment with children's tents or different play areas.
How to sew a wigwam?
 First you need to master the technology and learn more about how to make a wigwam for children. This will require special tools and materials.
For the frame should be prepared:
- 6 bars, the length of which is about two meters, and the thickness is from 3 to 4 cm. You can also choose bamboo sticks;
- Rope of special strength;
- drill and drill;
- good gum.
To make a tent you will need:
- a piece of natural fabric (linen or cotton) with a length of up to three meters and a width of 1.3-1.5 meters. The material must be dense;
- 6 strips of fabric. You can take ribbons, ribbons or cords up to 30 cm long;
- threads to match the fabric and a needle;
- for finishing the edges, you can take self-adhesive tape or thread and a sewing machine;
- for the manufacture of the door you will need a lace or such accessories - rivets and buttons. Eyelets of small diameter.
You will also need a pencil and pins. The step by step guide includes the following steps.

Step 1
A frame element is made. It can be done in different ways.
All the bars are brought together and tied with an elastic band. At the same time, you need to retreat 10-25 cm from the top. The poles are widely spaced on the sides. The wigwam diagram clearly demonstrates how this can be done. The elements must be at the same distance. In this case, a wider space must be left for the door. The frame must be firmly installed.
There is another way. Each stick is drilled through hole using a drill. In this case, you need to retreat 10-25 cm from the top edge. Then the poles are connected to each other. Then the elements are spread apart to make a cone. The top should be wrapped with a rope.
Step 2
Then you need to make a wigwam canopy. To do this, you need to clarify the dimensions of the wigwam. The fabric is laid out on the floor in the form of a square with sides of 1.5 meters. The fold line should be placed on the left side of the square. The square is connected diagonally. In this case, you need to add two opposite corners to make a triangle.

Step 3
Cutting is in progress. First, the markup is drawn. In this case, an arc is drawn from the fold line to one of the sides. Then a second arc is drawn with a diameter of about 8 cm. Cutting is carried out according to the markup. The fabric can then be spread out on the floor. In this case, you should get an awning in the form of a rainbow.

Step 4
The frame is wrapped with fabric inside out. The ends must be fastened with pins. The fabric must be marked where it is in contact with the bars at a height of 22-25 cm from the floor.
Step 5
The material is removed from the frame part. In place of markings, pieces of twine or ribbon are sewn.
Step 6
All tissue sections must be carefully processed. For this, the edges are folded in half and stitched manually or at sewing machine. You can also glue them with a special tape.
Step 7
At the end of the tailoring, you need to think about how the edges of the awning will fasten. You can use eyelets that lace up. Buttons, ribbons or even buttons will do.
Step 8
The wigwam is covered with an awning. Its upper part should be fastened, and the doors should be tucked back. They are fastened with ribbons or Velcro. A blanket or rug is covered inside, you can put beautiful pillows. You can put flags on sticks, and decorate the canvas with tassels, LED garlands and pompons.
Such an unusual hut can be placed in the yard or on the playground, and brought into the house at night. If the awning gets dirty, it can be easily washed.
How to make a wigwam exclusive?
 To make the design original and unique, you can apply different design ideas. When choosing a fabric, it is worth giving preference to two options at once, which will be beautifully combined with each other. Especially convenient are houses with removable covers that can be removed and cleaned.
The frame can be made from a different number of sticks. It depends on the future configuration of the product.
The design can be supplemented with flags with a window or play with a color composition. The black and white solution looks unusual. The option for princesses can be made not only in pink, but also in yellow or lilac. color scheme. The option with garlands looks magical. To create a product in a marine style, you should choose the appropriate textiles.
The child must develop, find exciting activities and always be in good mood. Of course, this is impossible without the help of loving parents. A handmade Indian wigwam for children can be a wonderful gift that will delight any kid. Such a house will the best place for fun games, reading or relaxing.
Children often surprise others with their rich imagination, imagining themselves as Indians, captains, heroes or princesses. Whoever your child is mentally reincarnated as tomorrow, he will definitely like an exotic hut, which, depending on the decor, can be made into a girl's tent or a haven for a brave leader. Making a do-it-yourself wigwam for children is an easy task, especially if parents really want to help develop the child's creative abilities.
Moms and dads, who seriously decided to please the baby with a miracle tent, without giving money for a finished toy, strive to learn how to make a wigwam for children with their own hands, and immediately get to work. But first they need to memorize a few simple tips to make the hut comfortable and unique:
- when making a toy structure, it is not necessary to copy an Indian dwelling, but you need to give the tent a cone shape;
- the design should be strong and comfortable for the child;
- using the tops of the sticks, you need to create a hole in the roof for air to enter;
- for the decoration of the product, you can use any decorations: feathers, pebbles, patterns, pompons, flags, garlands or beads, make applications from pieces of other fabrics on the outer walls;
- inside the house you need to place a warm rug or blanket and pillows so that the little entertainer is cozy and warm.

To make such a hut, you need to purchase the following materials:
- bundle of natural fabric;
- thin synthetic winterizer;
- edging tapes;
- threads of the same color with the fabric;
- sewing needle;
- three wooden sticks 2 meters long with a diameter of 2 cm;
- scissors;
- long line;
- polyethylene;
- marker.
- Start making a wigwam with your own hands by drawing a pattern on polyethylene using a marker and a ruler. You should get triangles 1.2 m wide and 1.8 m high. Cut out the blanks.
- Connect patterns and fabric with needles, leaving 1.5 cm seam space on both sides.
- Cut out two bases of the tent from fabric, one base from sintepon.
- Prepare square pockets with sides of 10 cm at the base - they are needed to fix the sticks.
- Prepare four ribbons for ties (length 15 cm, width 8 cm) and the same pieces of fabric for edging.
- Connect the base with a padding polyester, sew on ribbons and pockets.
- Cut out the walls of the wigwam, on the blank for the front wall, make an entrance opening in the form of 2 cuts, turned with a tape. Above the incision, sew fixation ties from the outer and inside.
- Sew the walls of the hut tightly, but leave a small hole at the top so that the sticks are visible from the outside.
- Fasten the wigwam to the slats using the pockets, tie the structure with ribbons and ties.

The kid in the hut should have enough space, otherwise he simply does not want to be in the "room" where he cannot take a comfortable position. What to do if your child is tall or dreams of a big fabulous tent? Make a spacious wigwam for children with your own hands, using step by step description stages of work! The area of the building depends on the number of support points, so you will need 5 wooden slats of the same size. In addition, the "builders" need to stock up:
- a skein of twine;
- cotton and lace fabric (5 m);
- push pins.
Of course, you can act according to the previous scheme and replace the buttons with threads. But in this case, you will have to remember the skills of cutting and sewing again, and your wigwam will not be able to be disassembled and assembled again.
- Tie 2 slats tightly with twine, then fasten the second pair in the same way.
- Insert the fifth stick between the others.
- Tie the rack construction with twine and make sure it is strong.
- Make a narrow long ribbon out of cotton fabric, drag it between the rails and fasten it with buttons, and hide the end of the fabric inside the wigwam.
- Cut the same ribbon from lace fabric and tie a few centimeters below the point of contact of the sticks, also fastening with buttons.
- Wrap the slats in turn with two types of fabric, and at the entry point (between the first two slats) make an incomplete circle out of the fabric. Fasten the cuts with buttons on the rails.

How to make a wigwam for children with your own hands.
Modern children practically do not play "Indians" and, nevertheless, if you make a real wigwam for them, then there will be plenty of delight and joy from such a house, and given that the wigwam can be easily disassembled and assembled in a new place (on street, in the country, in nature), then the time and effort spent is not a pity for such a good deed.
Look at a few photos of wigwams for children that you can make with your own hands from available materials:


To make such a wigwam, you will need the following materials:
- fabric, 137 m wide and 315 cm long;
- tape, length 250 cm
- strip of fabric, width 75 mm, length - 7 m;
- sticks, diameter 20-25 mm - 4 pcs.
Cut the fabric into 5 parts in accordance with the following scheme:

The front panel is made from the two extreme parts of the cutting. Fold the parts on top of each other and grind off the upper section 30 cm long with an indent of 12 mm, the rest of the fabric is folded and stitched:

In the area where the fabric is sewn, make eight loops (or insert metal ones) and thread and tie a piece of ribbon.
The side and back panels are ground in the same way with an indent of 12 mm. When sewing the front and side fabric, do not forget to insert the tape at a distance of 50 cm from the bottom so that one end of the tape is on the inside and the other is on the outside. The length of the tape is 50 cm and it serves to tie up the entrance panels:


The supporting elements of the wigwam are four support sticks, which are inserted into a kind of "cases" sewn to the main panel. Such covers are made of strips of fabric 75 mm wide. folded in half and stitched to the side vertical seams. So that the sticks do not spoil the floor, the lower part of the cover can be sewn up:

If the base material is dense enough, then you can do without strips - when grinding parts of the fabric, indent 50 mm and, tucking the fabric,make another seam along its edge. In this case, the total length of the material used will increase slightly.
Below, in the center of the side and back walls, you can also sew tapes that fix the floor material (if provided) to the walls of the wigwam:

You might be interested in watching the following video.


The influence of the Internet on a person
Types of seizures Tonic-clonic seizures in children
Profession Internet project manager
best remedy for prostatitis
Symptoms and treatment of mastopathy of the mammary glands