Well, here I am again with you, hello! Recently, you and I learned how to make and decorated them ourselves right at home. What are they for? Well, of course, for the smallest symbol of a magnificent holiday. Did you guess? This is Easter!
And of course, we will talk about how to make a fragile and at the same time beautiful original egg and put it in a souvenir package to give it to someone who is dear to your heart.
How do you like this idea? I think that you will be happy if you put together a cool souvenir from what you have at hand, because it is so nice to give gifts and presents to your relatives and friends. Let's not waste time, let's start creating great toys.
What do you think of what you can make an egg for crafts for Easter? Write your assumptions and ideas at the bottom of the article, share new ideas with me and with other subscribers, if it’s not difficult for you.
Do not forget that you can not only build an egg yourself, but also take an ordinary chicken and it’s cool
DIY Easter eggs for kindergarten and school
Well, let's start with the simplest and most uncomplicated products, because preschoolers and children school age, especially if it elementary School too hard work is useless. They simply will not master them and will be disappointed.
As a basis, you can take such a beautiful masterpiece, which is made of cardboard and colored paper.
As always, plasticine will fit perfectly here, which can be decorated using quilling patterns. We will discuss this technique in more detail below.

After all, you can also sew an egg out of fabric yourself.
Also, for a change, first cut out the form from cardboard, and then lay it out and decorate with any patterns by smoothing it over the surface.

Now ball plasticine has also appeared on sale, you may have already heard about this one. So I propose to make such a craft out of it, take an ordinary eggshell as a basis. In this case, the help of adults is needed so that the protein and yolk come out, pierce the egg with a stick.

You can hide a note even with a message. Well, it is, between the lines.

Well, now she actually decorated the egg with such a miracle.


In fact, you can simply decorate an egg beautifully using all sorts of decorative things, such as stickers for example. Everyone loves this kind of work.

You can use thermal stickers, but this should only be done at home and only with adults so as not to get burned.

High school students can build something more complicated, for example, such a composition for an exhibition.

Use for this cardboard, scrap paper and all kinds of decors, such as openwork ribbons.


Or here it is in this scrapbooking technique.

Or this one made of threads and coffee beans:
And if something is simpler and at the same time unusual, then you should like this idea. Take colored plain napkins and cut them into small rectangles, and after each figure you have to crumple in your hands.

Cut out a chicken from paper and tie a ribbon or thread around its neck, tie a bow.

Now it remains to connect all the details, glue with glue.


It will turn out cool and beautiful!

You can create an entire composition.


You can use a large kinder egg, just glue it with paper napkins, or rather pieces, as if it were decoupage. It will take good glue- PVA.

Children will be happy to make such a souvenir.

It turned out great!

Do you need a glamorous idea for this craft? Then I am happy to offer you this option. I think you see something similar in stores, I recently met such a charm in a fix price.

How to make an egg from threads and a ball for Easter 2020?
Quite easy and simple. I think everyone has seen such a toy at least once, and maybe even made it themselves. If you want to learn this art, then read this master class.
We will need:
- styrofoam egg
- threads
- tassel
- food film
- liquid glass

Stages of work:
1. Prepare all materials for work, and then take the workpiece and wrap it plastic wrap.
Important! If this is not done, then the threads will stick to the foam form.
Stick the needles in this way.

2. Then start creating patterns by weaving the threads into a scatter. Note that another row of needles has appeared.

3. After you have finished the work, first grease the threads with glue, and then walk with liquid glass.

4. Let dry well, and then remove the first workpiece - half.

5. Now build the second part in the same way, you can somehow arrange the needles differently, depending on what you want, so that the result is.

Then you have to glue the two halves together or you can walk with duct tape.

Models can be completely different.

In this scheme, instead of a foam ball, an air balloon is used. Then it is simply pierced with a needle. Here you can not use liquid glass, go through the glue.

Remember, last time we did this))).

If you inflate a small balloon ik, then you can get this.

Egg in the technique of modular origami (step by step instructions)
Modular origami is a type of such technique in which crafts are assembled from special triangles. The main thing is that glue is not used here at all.
The module is done like this.

And then you start to connect them one to one, alternating colors and making fictitious patterns.

And in order to get to know the whole technology more clearly, I suggest watching this video from the YouTube channel.
It can be a white egg, with multi-colored circles around the diameter.

You can write letters symbolizing the holiday.

You can even do it on a stand, using all the same triangular modules.
In general, you can do a lot of everything, the main thing is that it will be beautiful and cool.

It will cheer you up, and such a paper egg will definitely never disappear and will delight you on the shelf for a single year.

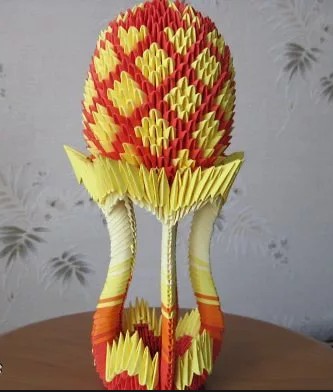
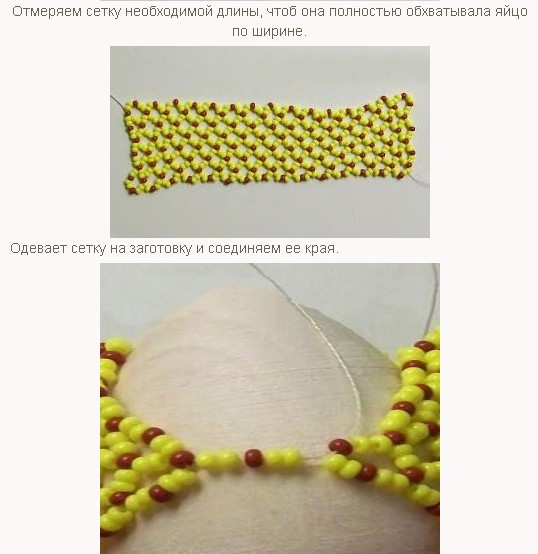
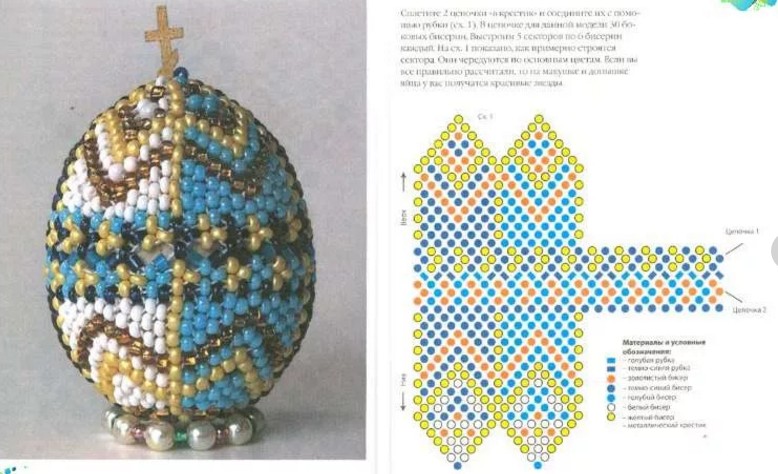
Beaded Easter egg with a weaving pattern for beginners
Such cool things are very cool to do, and then to give, to master such a technique for beginners will not be too difficult, but it will take a lot of patience and perseverance. And you can easily compose a plot or compositions yourself, the main thing is to think a little and everything will work out.
Take any workpiece, the main thing is that it is dense and not heavy in weight, so that it is convenient to work. For example, you can take wooden blank oval shape.

Stages of work:
Make a flower pattern.


These cuties turned out, bravo to the master!

The easiest option is the wire view, make an oval out of it and throw diagonal stripes. Then use the beads.

Come up with patterns and weave. This children's version).

You can also make it from beads and rhinestones-sequins and bases - paralon or polystyrene.

Do it so that there are no empty holes.


Decorate a tray or cup as well.

Also use this step by step instructions if you want to master this science.


And now knowing some basics, you can use these schemes. Such a dove decor, very cute and gentle.

You can even use large beads.

Or make an egg with pendants.


You can also choose an ornament scheme.

Or just do the work in the zigzag style.


In any case, you should be satisfied and your surroundings too.


After all, then it will be possible to start inventing masterpieces on our own.

This is purely your imagination.

And only your imagination.

Or set a goal, and do what you like most of all to do it yourself, but for this you need to find the right weaving pattern. I liked this chick in the form of an egg. And I finally found knitting patterns from her.

If you also need it, write, I will send it to your email for free.
Knitted souvenir Egg crochet with a diagram and pictures
If you are a lover of crocheting, and even knitting, then these product options will be within your power.

All the same, this one looks wonderful and divine.

Can be made as a cover, and put on an Easter egg.


You can make it as a souvenir, like a ball on a string and hang it on a decorated tree.


I personally liked this weirdo that just hatched. For you, I found his master class on the Internet.


We make crafts from satin ribbons in the style of kanzashi for a school competition
The first thing I want to show you is to watch this video.
To all those who want to learn how to work with fabric in an interesting way, I suggest mastering this technology - kanzashi. Also take as a basis any three-dimensional product that resembles an egg. And cut rectangular pieces from satin fabric.

2. Make a triangle out of the rectangle and stick with small special carnations into the foam product.


4. In principle, you can lay the fabric in any way, the main thing is that it looks aesthetically beautiful.

5. Take multi-colored materials, you can also with decors and sparkles.

6. In the end, you will still reach the result you need, the style is called this artichoke.

7. What a beauty!

If you don't understand something, take a look at this step by step description, maybe here it will be more convenient and easier for you to delve into.


You can go another way, arrange the triangles not like this, but like this, but for this the ends of the ribbon will need to be soldered a little, connected, do it with a wax candle, or rather a spark.


Choose your favorite option and create!

Create new images and motifs.

Because it's so fun and funny.

Even in the style of a mosaic, it also looks cool!


You can also arrange it in the form of a postcard, in the previous issue we did this with you.

Quilling eggs
For this work, purchase everything you need, first of all, it is special paper in the form of strips.

Then roll the strip in a spiral onto a stick.

Glue the end with glue.

There can be any number of such patterns, here is an approximate table.

From all this you can add up a whole composition, these are flowers and all sorts of things.

And then glue on any egg, such as foam or made from papier mache.

You can also, when you gain experience, make products without a base.

It's actually not hard to do either. Make a frame out of paper, and then get to work and go.

Lubricate the parts well with glue.
After all the actions, you will see a creative masterpiece.

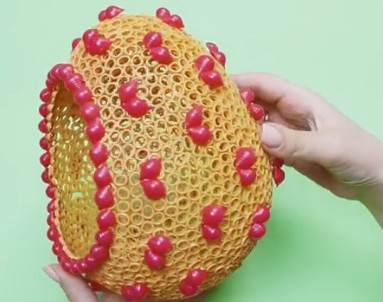
Beautiful egg made of pasta and a balloon
There are a lot of such masterpieces on the Internet now, so you can also get acquainted with one of them right now.
We will need:
- balloon — 1 pc.
- PVA glue
- spray paint
- nail polish
Stages of work:
1. Take a balloon and inflate it to the size you need.

2. Dip round pasta into PVA.

3. Draw an oval on the ball, this will be the future hole. And begin to carefully lay out with tweezers, as if a frame.

5. Let the product dry completely, and then blow off the balloon by piercing it with a needle.

6. Now you can start painting, spray.

7. Varnish can be used to paint shells - this is also noodles.

8. And then, how to make a bezel by gluing it here.

9. In general, decorate as you like.

11. Well, that's all, it looks cool! Good luck!

All works in principle come down to the same actions, only the images, the background can be different.

Use different horns and you will definitely succeed, take several types, both twisted and round, etc.


You can also make a special stand for such beauty, there would be a desire.

Even the brownie can be laid out))).

How to Draw an Easter Egg + Stencils to Cut and Color
After all, you can not only draw it yourself, but find a template and color it, plus make a chicken, and cut the egg in half and another feature, it will open.

You need to color with any colored pencils or felt-tip pens. You can also use gouache and watercolor elements.

It worked out great for the students.

Now choose, take any model you like. It can be painted and decorated with anything. Of course, there are options for children of different ages.


Р.S Well, in the end, it turns out they are also made of mosaics and glass.

By the way, who likes to felt wool, then you can take this masterpiece as a basis here.

In such a note turned out, small, but with interesting and new ideas, let everything work out for you! Good luck and be patient! Thank you all and bye! Put likes and subscribe to the group in contact.
Helpful Hints
Crafts for Easter from different materialsEaster is one of the most important and beautiful church holidays, which are loved not only by believers. This year Orthodox Easter celebrating quite late - 5 May. This means that you will have more time to prepare for it, to make interesting crafts gifts and decorations for relatives and friends.
most popular the symbol of Easter and the rebirth of new life is the egg. Chicken eggs are dyed in all sorts of colors, decorated with drawings and patterns, and given to each other as edible gifts. You can read more about Easter eggs and how to paint them. But you can make your own eggs.
DIY Easter eggs
Making an Easter egg craft with your own hands is not so difficult. To do this, you do not need to be a famous Faberge master or have unique artistic abilities. It is enough for you to apply a little patience and imagination.

For work we need:
Building gypsum (alabaster)
A saucepan to dilute the solution
measuring cup
Funnel
spoon and knife
Plastic egg consisting of 2 halves, or regular chicken eggs

Let's get to work:
1) From the blunt side of the egg, make a hole for pouring gypsum using knife or scissors. If your plastic egg has holes on the pointy side, cover them with duct tape. You can also use it as a form normal egg shell The from which to pour the contents.

2) Dilute gypsum with water at the rate 5 tablespoons of gypsum with a slide for 180 ml of water. You should get the consistency of liquid sour cream without lumps so that the liquid can be poured into the egg.


3) Pour the plaster into the hole of the egg and leave it to dry for an hour, then remove the plastic halves or peel the shell.

4) As a result, you should get perfect gypsum egg, which is ready for further processing and any possible decorations.

DIY Easter eggs (Video)
How to make Easter eggs from threads?
One of the easiest ways to get an original Easter egg craft is braid the shape with threads with glue. Usually used as a form balloon, which can be easily removed, leaving a wicker frame. You can also vary the size of the egg itself by inflating the balloon more or less.

For work we need:
Balloon
PVA glue or starch with water
Drying stand
Details for jewelry
Let's get to work:
1) Inflate the balloon of the desired size and pull it well with a thread so that it does not let air through.

2) Wetting the threads with glue, wrap them around the ball so that holes remain.

3) When the ball is completely wrapped, place it on the stand and let the glue dry during the day.

4) After drying, pierce the ball with a needle and pull it out through the holes. The thread frame will retain its shape.

5) To decorate the resulting egg from threads, you can use colorful ribbons, buttons, beads, toys and more.

6) With some imagination, you can get these original Easter crafts:

Easter eggs from beads
beading for some, it may seem like a rather difficult task that requires a lot of time and patience. But with the help of small beads, you can decorate an artificial or natural Easter egg in just a couple of minutes without complicated techniques.

For work we need:
Beads or decorative sprinkling in the form of balls
Glue and brush
Capacity
Drying stand
Details for jewelry

Let's get to work:
Coat natural or artificial eggs with glue and roll well in beads or sprinkles.

Sprinkling can usually be found in stores, at the hotel for baking decorations, it is often used to decorate Easter cakes and other sweets.

If you have very small beads, you can roll the testicle in them, however, for this purpose, you are better off using artificial eggs - wooden or plaster so that they serve as decoration for a long time.

If you still want to learn how to weave beaded jewelry, you can use the following video tutorials on beading:
Easter eggs from beads master classes (video):
Easter eggs from pasta
There are a lot of decorations for Easter eggs, but we would like to offer the most simple and original jewelry which are easy to make at home.

For work we need:
Wooden eggs or shells without contents
PVA glue and brush
Drying stand
Small star pasta
Dry glitter

Let's get to work:
1) Apply glue to a wooden egg and glue it to it in even rows raw star pasta. However, they can be placed in any order you like. Let the glue dry well.

2) Paint the eggs along with the stars with paint, decorate with sequins. In order for the glitter to stick well, apply glue to the egg in the right places, sprinkle with glitter, and in 15 minutes shake off the excess.

3) As a result, you should get an original bright craft:

4) Eggs can be placed in an Easter basket decorated with feathers.

Easter egg stand
You can make the simplest Easter egg stand with your children from the simplest materials: cardboard, lace, corrugated paper.
For work we need:
Not too thick cardboard or base from a roll toilet paper
PVA glue and brush
Lace
Needle and thread
Scissors
Details for decoration
Let's get to work:
To make the first version of the stand, take toilet paper roll base and cut it into several pieces so that the stand is not too high.
From corrugated paper cut a wide strip and stick it on the cardboard in the form of a skirt.
Top decorate soft wire or organza pieces. You can also add bright details in the form of artificial paper flowers. You can read about how to make corrugated flowers.

In the second option, you replace the corrugated paper lace, which with the help of a thread with a needle must be arranged in the form of the same skirt. used as additional decorations. string of pearl beads.

Easter wreath
A simple Easter wreath can be made with your own hands from egg cartons, as well as corrugated paper, ribbons, artificial flowers and other decorations.

For work we need:
Empty egg cartons
PVA glue and brush
Scissors
Details for decoration
Let's get to work:
1) Carefully cut out the core from the cardboard package and process it with scissors so that it turns out something like flowers with petals.

2) You should get enough of these "flowers" to put them one inside the other and get a wreath.

3) Use crepe paper thread to make leaves and stems. Also use ready-made paper flowers. Flowers can be easily made by yourself or bought ready-made. Insert "flowers" from cardboard one into another, shifting them with paper flowers and leaves, good fixing with glue.

Easter wreath It will look great on a festive table, or it can be hung on a door or wall as decoration.

Easter egg or Easter napkin for a festive table
This original napkin serves not only as a decoration for the holiday, it can be presented as a gift to loved ones, filled with Easter eggs and sweets.

For work we need:
Colored cotton fabric
Lace
Scissors
Ruler and chalk
Sewing machine
Interlining
pins
Let's get to work:
1) Prepare 6 identical circles fabric diameter 40 centimeters. Each circle must be glued with interlining so that the resulting product keeps its shape well even after you wash it. If you do not find interlining, you can do without it, but use thicker fabric.

2) Fold two circles wrong sides to each other and work the edges with lace. In the end, you should get three fairly dense round rag blanks.

3) Fold the three parts and secure them with pins. Then, using a ruler and chalk, draw four even lines, thus dividing the circle. for 8 equal parts . Use a saucer to circle the center with chalk.

4) Stitch along the chalked lines, stitching all three circles together.

5) Use a needle and thread to make wide stitches around the core, capturing the top two layers. Then pull the thread and tie it in a knot. On the diagram it will look like this:

You need to tighten the thread so that the upper layers straighten a little and rise:

6) Place in the egg holes colored eggs, and on top you can put Easter cakes, cookies, sweets or any other sweets. You can add a couple of details from scraps of lace.

DIY Easter basket for eggs
This simple basket can be made using scraps thick paper. Even children will help you with this.

For work we need:
Colored paper (heavy)
stapler
Scissors
Ruler and pencil
Let's get to work:
1) For the base of the basket, cut 5 strips of paper 25 long and 3 cm wide. Fold them side by side vertically, and in the upper part, using glue and a stapler, attach a horizontal strip-rim of a different color, the size of which should be 30 by 2 centimeters. There should be 2 more such strips.

2) Fold the headband into a circle and secure it with a stapler on the opposite side.
The bright holiday of Easter is approaching. Not only Easter cakes appear in shops, but also various souvenirs symbolizing the resurrection of Christ. But, it is much more pleasant to make them yourself at home.
Such an activity will appeal not only to adults, but also to children. Therefore, involve toddlers and older children in the process of making crafts for Easter with your own hands. In addition, in kindergartens and schools, teachers can give the task of preparing such souvenirs for participation in competitions. You can help them win.
At home, you can make almost any souvenir, and you do not need to have any skills. For manufacturing, you can use various improvised means that are in every home.
With the help of such products, you can beautifully decorate the room for Easter Sunday. So let's look at some interesting ideas.
Corrugated Paper Crafts
Corrugated paper is modern material, from which you can make various decorated elements. It can be of any color and holds its shape well. Therefore, it is often used to make holiday crafts with your own hands.
For Easter, you can prepare a cute chicken. In addition to corrugated paper, we also need a kinder surprise, satin ribbon, and threads.
paper to start yellow color(5X20 cm) twist in the middle, as shown in the photo below.

Now take any yellow thread, fold it several times and tie it on the fold of the paper. Trim the ends carefully.

Corrugated paper needs to be stretched a little to the sides so that we can fit a kinder surprise.

Toy egg, carefully packed.

We fix the lower part with a glue gun.

You should get something like this:

Now we need yellow strips 2.5x7.5 cm in size. We will make wings out of them. Let's add both strips and on one side and on the bottom side we cut off the corner along the arc.

We give the future wings a wavy shape along the edges, and on one side we twist the paper, then we wrap a small part inside. Look at the photo how it should turn out.

We fix the wing to the body of the chicken with glue.

In the same way, glue the second wing. Now we need to glue the eyes. To do this, you can use beads or small buttons. If you want, then draw them on paper and cut them out.

Cut out a strip of orange or red paper, a strip of 1X3 cm. Fold it in half, cut out a beak with scissors, and fix it with glue. And from paper 2.5X2.5 cm we will make paws.

As a result, we should get such a cute chicken.

You can find many ideas for Easter crepe paper blanks.
For example, such a decorated egg can even make Small child. It is enough just to glue the strips with glue.

To make a festive basket, just cut the bottom of a plastic bottle and glue it with corrugated paper.

You can also make petals from the strips, glue a whole chicken shell over them, the result is a beautiful rose.

If you show a little imagination, you can come up with other options for interesting crafts.
Easter products from felt
This multifaceted material allows you to realize various creative ideas. We will use it to make souvenirs for the festive Sunday.
The easiest option is to make decorative eggs with your own hands.

For manufacturing, we need to follow a few simple steps:
- Draw an egg on a regular sheet of paper and cut it out with scissors;
- According to the template, cut out two parts from felt;
- We sew both parts with a decorative seam, leave a small hole at the bottom, through which we fill the workpiece with padding polyester;
- Decorate with ribbons, beads, lace.
Chickens can also be made from felt. The whole process is easy.

Cut out two small circles, sew together, and then fill with padding polyester. And the beak, wings and other details will be sewn separately. Eyes can be made from beads.
If you have a little experience and enough time, then make such a chicken.

To do this, we need to sew and fill the individual parts with cotton. This craft would make a great gift or decoration.
For Easter eggs or sweets, you can make a felt basket with your own hands.

For the product, we need a thick material that will hold its shape. To begin with, we cut out two rectangles of 9x28 cm in size from woolen felt, a strip of 2.5x30 cm, and also a circle with a diameter of 17.5 cm.

Let's start building the basket. Let's tackle the wall first. To do this, sew two felt rectangles with neat stitches.

At the next stage, we apply a round base to the rim, fasten it with threads.

Now it remains for us to sew a thin strip to the frame, which will act as a handle.

Easter basket is ready.

If you wish, you can decorate it with thematic patterns, beautiful embroidery, beads or other decorated elements.
Souvenir egg from satin ribbons
Artichoke-style crafts look very beautiful. Using this technology, we will make a decorated egg for Easter. To do this, we use satin ribbons of various colors. To understand how to make such a souvenir, watch the video with a master class.
As a basis, you can use foam, kinder surprise. Or just make a small hole in the chicken egg and pour all the contents out of it. If you make several pieces of such eggs, you can create a colorful composition that will decorate festive table and room. Follow the instructions and you will definitely succeed.
Master class on making an Easter tree
If you want to create a festive atmosphere in your house or apartment, be sure to make a decorative tree with your own hands, to decorate which we will use eggs.

To begin with, we will need to cut some branches, but at this time of the year they are gloomy, and Easter is a bright and spring holiday, so we will color them in green color. Let's dilute a small amount of acrylic paint and decorate the base of our craft.

To add some shine, use a sponge to apply gold paint. And we get just a fabulous tree.

We fasten the branches together with glue.

When the glue base dries, then we will paint it too. We will decorate the tree with eggs. You can use an artificial base or extract all the contents from the chicken product through a small hole. For fastening, use a needle with an eyelet and gently pierce the egg.

We will decorate them using decoupage technology. We will need napkins with interesting patterns, diluted PVA glue and a brush.

Separate the top layer with the pattern from the napkin and cut out the fragments you like. Wet the brush in glue and smooth out the cut pieces with it.

While the eggs are drying, we will prepare a pot for the tree. To do this, we need plastic containers, buttons, paint and a brush.

We cover the surface of the pot with one layer of yellow acrylic paint.

Then we put various buttons on the glue in a chaotic manner, as you like best.

We moisten the sponge in undiluted yellow acrylic paint and apply it on the buttons with clapping movements. To add shine, as well as age the product, you can cover it with golden paint on top.

With the help of small stones, plasticine we fix the tree in a pot. Decorate with a decorated straw on top. But for this purpose, you can use various materials and hand tools.

Now it remains to hang the eggs. The Easter tree is ready.

You can use not only decorated eggs, but also various sweets. Children will like this activity, so connect them to the process.
Plastic bottle products
One of the most affordable improvised materials for the manufacture of various crafts are ordinary plastic bottles. From them you can make simple baskets for Easter. The process is quite simple, so even small children can handle the task.
Here's a basket you can make in a few minutes.

Manufacturing process:
- Cut off the bottom of the bottle with scissors;
- Cut out a strip of cardboard that will act as a handle. Glue corrugated paper on it;
- The cut off part of the plastic container is also pasted over with colored paper;
- Now it remains only to fix the handle, and a beautiful craft is ready.
But there is an even simpler option:

To do this, we need beads, glue, scissors, as well as the bottom of a plastic bottle.

We cut the container into thin shelves, not reaching the bottom of 5 cm.

Then we bend the edges, and attach the beads to their tips with glue.

The Easter egg stand is ready. As you can see, there is nothing complicated in the manufacturing process. If desired, the base can be additionally decorated with colored paper, buttons or patterns.
Easter fabric crafts
In almost every house there are shreds of fabric different colors. Don't rush to throw them away, as they are a great material for making crafts for Easter. You do not need to have special skills and extensive experience for this.
In just a few minutes, you can make such a beautiful egg stand with your own hands.

To do this, we need to prepare three circles of two colors with a diameter of 25 cm, ribbon suitable color and round blanks from sintepon.

The circle of fabric must be divided into 8 equal parts. To do this, we fold the workpiece in different directions, and each time we iron it with an iron.

Now we lay out the synthetic winterizer on one piece, and on top of the second shred.

Then we sew along all 8 lines.

Let's do a couple more circles in the same way. As a result, we should get three blanks.

We carefully cut the blanks along the edge and sew on the ribbon.

Now all three parts need to be sewn in such a way that such honeycombs or cells are obtained:

It remains only to stitch the middle in a circle. This place is meant for cake.

Here is such a cute stand for Easter products is ready. The only thing you need to make is a sewing machine.
From textiles, you can make such a chicken:

If you have enough experience, then make a wonderful holiday composition, as shown in the photo below:

Fabric can also be used to make decorative eggs. To do this, we draw blanks on white paper or find a suitable image on the Internet, attach a sheet to the screen and reduce the drawing. Then we cut out the necessary parts and simply sew them together, inside you can stuff a synthetic winterizer or cotton wool.
How to crochet an Easter Bunny
If you have a little experience with crochet, you can make a beautiful Easter bunny. Look in the form of a master class on the manufacture of such crafts. The video shows in detail how you can knit such a souvenir for a bright holiday.
Using the same technology, you can make beautiful Easter compositions, chickens, eggs, bunnies and other crafts. But if you do not have experience, then it is better to start with simple options.
Souvenirs from cotton pads in kindergarten
If the child needs to prepare a craft for kindergarten, and he wants to make it with his own hands, then use cotton pads. From this material you can make various souvenirs with Easter symbols.
So, for example, a bright cockerel can be made in 5 minutes.

The workflow is simple:
- Cut out wings from paper and glue them to a cotton pad and fasten them on a plastic spoon;
- On the other hand, we fix the second disk;
- It remains to draw eyes, glue the beak and scallop.
You can also make a beautiful composition.

To do this, perform the following steps:
- Let's color a sheet of paper green;
- We paint cotton pads with yellow paint;
- We make a tree from brown threads;
- From pieces of cotton we will make willow buds;
- From disks we will make chickens;
- The abbreviation XB can be made from braid;
- If desired, we will make a frame of tubes for juice.
With such a simple task even little kids can handle it. They will find this activity interesting.
We make crafts with our own hands from napkins
On the festive table there should be not only a variety of dishes, but also decorated elements. For decoration, you can use ordinary table napkins. Of these, we will now make Easter bunnies.

We need plain napkins without a pattern. First you need to fold it in half twice, as shown in the photo:

Then we gradually add up our material.

Now we bend both sides to the middle.

Turn over the workpiece and bend the bottom corner.

Then we need to carefully insert the lower part into each other.

We straighten the ears and our bunny is ready.

If you have very little time, you can simply wrap a decorative or boiled egg in a multi-colored napkin and secure it with a ribbon.

To create a composition, you can draw a certain plot on paper, or download suitable option from the Internet. Then cut napkins of different colors and stick them on the silhouettes. Get a voluminous festive picture.
Crafts from paper and cardboard
Plain paper is a versatile material for making various souvenirs. It is quite easy to work with it, so crafts can be created with children.
First, let's look at how to make a simple chicken.

We need a toilet paper roll. We cut off one part so that it takes the form of an arch. Then we cover it with yellow paint or glue it with colored paper. Now we will draw the necessary details on the cardboard, cut them out, and then fix them to the base with glue.

To make a nest, it is enough to cut a circle out of colored paper and make shallow cuts along the edges. Decorate with sweets.
From cardboard cells for chicken eggs you can make the original chicken.

Below is a photo instruction for making such a souvenir.


Can be made from paper beautiful postcards, three-dimensional drawings and other souvenirs for Easter.
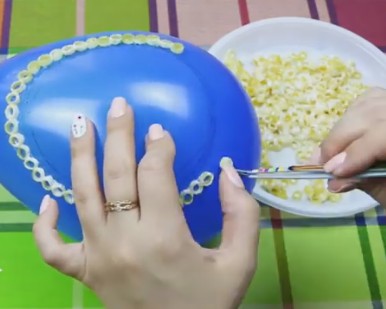
Holiday pasta crafts
Pasta allows you to realize various creative ideas. Let's make a decorative egg with you, in which you can serve food on the festive table.

First we need to inflate a regular balloon. Pour the PVA glue into the container and pour the pasta into it with rings. Thoroughly mix them in the glue base. At the next stage, we draw an egg on the ball and glue pasta around it.

When the glue is completely dry, then carefully burst the balloon and remove it from the workpiece.

Remove adhesive from holes where required.

We cover the craft with spray paint. Choose the color you like best.

Paint pasta shells with nail polish.

Leave to dry, and then fasten to the base with glue.

We coat an empty roll of adhesive tape with glue and fix our craft on it.

In this craft, you can put colored eggs and sweets.
It is also easy to make an exquisite vase for the festive table from vermicelli.

You need to do the following:
- For crafts, we need an empty plastic mayonnaise bucket;
- We glue it with pasta;
- Paint with golden paint.
Such crafts are easy to make, so you can connect a child to the process.
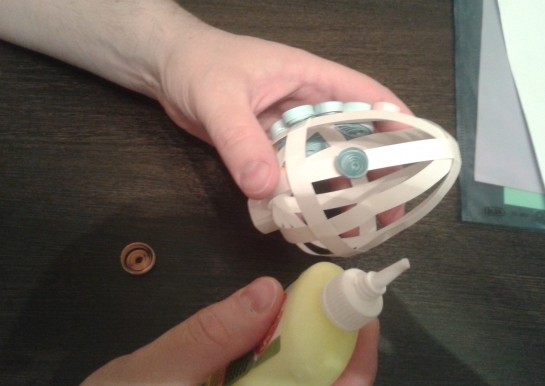
Do-it-yourself egg from threads and glue
The decorative egg will original gift and great Easter decoration. There are several ways to make such a souvenir. Consider three interesting options.
In the first case, we need glue, threads, a balloon. Let's start by inflating the balloon required size. Lubricate the surface with greasy glue, and then with PVA glue. Now we wind the threads on the ball, lubricate each layer with an adhesive base.

When we wind the required number of threads, we leave the workpiece to dry, after that we pierce the ball with a needle and remove it. If desired, the surface can be painted in any color, and decorated with buttons or beads.

If you fasten the thread at the top, then the craft can be hung indoors or on an Easter tree.
For the next blank, we need a foam base. We cut out an egg-shaped figure, cover it with plastic wrap and insert several rows of needles to make a beautiful pattern.

Let's prepare one part first. To do this, we wind the threads on the needles only on one side, lubricate them with glue and leave to dry. In the meantime, let's prepare the second part in a similar way. After that, glue both parts. If necessary, decorate as you wish.
Now we will make a decorative egg from multi-colored knitting threads. To do this, we will prepare the basis: kinder surprise or a devastated chicken egg. Lubricate the surface with glue and start winding the threads, as shown in the image below.

Such crafts are sure to please close people and friends. They will definitely ask you to tell about the secret of making such a souvenir.
Salt dough crafts
Before Easter Sunday, prepare holiday items with your child. As a basis, we will use salty dough. Below we will consider the option of making an egg, but by this analogy you can make various figures.
We need to prepare a cool dough. To do this, mix salt water with flour, in a ratio of 1: 2, then pour sunflower oil and mix thoroughly, adding wheat flour if necessary.

Now we roll out the dough with a layer no more than 1 cm thick. Using a mold, cut out the eggs and make a hole in the upper part. When the workpiece dries, we decorate it at our discretion with the help of paint of different colors.

We thread a thread or ribbon into the hole and hang the craft. Thus, you can make crafts of any shape.
Easter Beaded Crafts for Beginners
Beads are a versatile material from which many ideas can be realized. But what if you have no experience in making crafts in this way? In fact, there is nothing wrong with this, believe me, you will succeed. To acquire the necessary skills, watch the master class in the video clip below.
If you carefully looked at the instructions, then you should succeed. When you master this technology, you can begin to manufacture more complex structures.
Souvenirs from foamiran
This decorative material intended for needlework. It can be used to make colorful and original crafts for any holiday and occasion. We will make an Easter egg that will be a real work of art.

We will prepare the base from foam. The height of the workpiece is 7.5 cm.

Now we cover the artificial egg with a piece of foamiran. To do this, the material must be heated. We will use an ordinary hair dryer, here you will need an assistant. Try to stretch the material so that there are no wrinkles.

In order for foamiran to be fixed in this position, you need to wait until it cools down. Then, in the middle of the workpiece, we draw a line and cut the material along it.

In this way, we will prepare two identical parts and stick them on the foam base.

You need to cut a leaf out of green foamiran, twist it a little in your hands to give it a natural look. We need to make 25 of these parts.

Glue the leaves at the junction of the blue material.

Now we need to make small flowers.

To do this, we need small pieces of foamiran and a figured hole punch. We make a hole in the blanks, insert the stamens and heat the product to shape it.

Glue the prepared flowers on the leaves.

To make a cross on a craft, we need rhinestones.

For the stand, cut out a small circle of foam, glue it with foamiran and insert it into a small plastic box.

It remains only to fix the egg to the stand with a toothpick.
Try to make such a souvenir, after which, you can proceed to more complex tasks.
As you could already understand, Easter crafts can be made with your own hands from almost any materials at hand. Be sure to use some option if you have time before the holiday.
Bright Easter - the resurrection of Christ, the time of sweet Easter cakes and colored eggs. It is believed that a donated Easter egg has the power of a talisman and protects its owners from evil deeds and thoughts, both their own and those of others. The Easter egg-amulet was often made of wood. Those who were richer could afford malachite, turquoise or jasper. Well, the kings glorified Faberge eggs by ordering these precious masterpieces of jewelry art for themselves and their family members.
Few people dare to take a swing at the work of the great master, there are enough craftsmen of needlework, but it’s painfully expensive. Therefore, we take the most available materials and we create a no less exclusive gift - eggs for Easter with our own hands.
Here are master classes - how to make eggs for Easter with your own hands with step-by-step photographs using a variety of techniques. Follow our instructions to create your own unique gifts and unique Easter souvenirs.
How to make eggs for Easter
What to give for Easter? Of course, the egg! But not simple, but magical red gold.

We will need:
- Newspaper or magazine
- A couple of relevant pictures
- Threads
- PVA glue
- Napkins or soft paper towel
- Lentils
- Millet
- Gouache red
- Gold color paint
- Sequins, rhinestones, beads
- Glue type "Monolith"
Instruments:
- Tassels
- Pencil
- Marker in base color
- Scissors
- skewer
Let's get started:
1. We crumple a newspaper sheet and give it the shape of an egg. We fix the workpiece with threads.

2. We coat the PVA blank and glue it with pieces of a magazine page. Glue pictures. Let the paper blank dry.

3. We tear the napkin and repeat the process of forming a paper crust. Torn edges are less noticeable, smooth them with a brush, abundantly moistened with glue. Dry again.

4. On a dry blank, we make a sketch of the ornament, first with a pencil, then we circle it with a felt-tip pen.

5. We “spin” paper ropes from a napkin cut into strips. It is not scary if the paper breaks during the twisting of the flagella, our ornament does not contain long curls and waves around the entire circumference.
6. We glue the workpiece with cereals and prepared flagella. An indispensable assistant the tassel here is the skewer. We do not regret PVA glue, the cereals should be very thickly smeared, the excess will be absorbed into the paper itself. And again we send the product to dry.


7. We paint the egg for Easter in the main tone, we have it one of the shades of red, the color symbolizing health and wealth. We work with a brush, thoroughly painting over under each grain and curl. Now the expediency of using a red felt-tip pen is fully justified, there are no white slits.

Although in the paper art technique, which translates as paper plastic, it is customary to use dark or even black colors, in my opinion, this is unacceptable for Easter eggs.
8. We varnish the dried gouache and highlight all the bulges with gold. Everyone chooses the intensity of gilding for himself.


9. Glue decorative elements. The main thing here is not to overdo it, otherwise the Easter egg will turn into a Christmas tree toy.


If there is still not enough time for souvenirs made with your own hands, go ahead to the store for chicken eggs.
A consecrated egg dyed with pigments contained, for example, in onion skins, can be safely stored until the next Easter. Checked personal experience, stood on a shelf in a glass, did not deteriorate, it only shrunk and became the size of a quail.

Such a jute design using decorative ribbons looks very beautiful and natural. By wrapping such eggs in gift wrapping, you can safely present to all friends, family and relatives. Such a gift will remain with them for a long time and will decorate the Easter table every year.

To make such a souvenir you will need:
- Foam base in the shape of an egg.
- Jute twine.
- Glue gun.
- Decor elements (decorative tape).

The end of the twine is attached with hot glue in the middle of the bottom of the workpiece.

You need to wait until the glue is well taken and start gluing the cord in a spiral around this starting point.

It is not necessary to apply glue to the entire surface of the egg. You can use no more than two or three points of glue in one turn.

Thus, you need to wrap the entire Easter egg with twine.

Then you can start decorating. To do this, take three pieces of decorative tape.

Wrap the egg with one and secure with hot glue the junction of the tape and on the opposite side.


Glue the ends of the shorter segment on top of each other - this is the basis for the bow. Put the shortest one on the table inside out and glue its edges inward. It turns out the core.

Wrap this strip around the middle of the bow and glue it on the back.


Attach the bow to the front of the egg.

The decorative Easter egg is ready.

Felt Easter Bunny - Egg Cover
You can make such an original egg pad with your own hands from felt.


Knitted Easter egg
In this tutorial, I propose to crochet an egg. Such a product will be an excellent souvenir for this bright holiday.

For knitting you will need:
- Yarn "Children's novelty" blue, pink and green;
- Hook 1, 75 mm;
- Scissors;
- Needle;
- Sintepon.
You can knit such an egg from any yarn. But it is not advisable to use too thin. Then the finished product will be too small.
Let's start with ch 2. Then we knit 8 sbn in 2 loops from the hook. Then we knit 3 sbn, and in the 4th loop 2 sbn in a row. Then again 3 sbn and again 2 sbn in the loop.
We knit a new row. We will add to it too. We knit 4 sc, 1 in a loop. And in the 5th loop we will knit 2 sc. So we will repeat until the end of this series.

We now have 12 loops on the part. We continue to add. Now we knit 2 sbn 1 in a loop. In the 3rd loop of the row, we immediately perform 2 sc. So we repeat the whole series.
In the next row, first we knit 3 sc, and in the 4th loop we knit 2 sc. And so we knit the whole row.
We have 20 loops. On the next row, we will simply knit 1 sc in each of the loops. That is, at the end of the row there should still be 20 loops.

In the new row, we continue to add. We knit 4 sc, then 2 sc in 1 loop. So we repeat the whole series.
In the next row, you do not need to increase. Just do 1 sc in each loop.
In the new row, we continue to make decreases. Now you need to tie 9 sbn, and knit 10 and 11 loops together. So we knit the whole row.
We finish knitting. Therefore, we knit 1 sc, then 2 loops together. Then again 1 column and 2 loops together. So we knit the whole row.
At this stage, we fill the part with synthetic winterizer.

Then, to close the part, knit 2 loops together the entire row until the hole closes. We do 1 in. Cut the thread and tighten it. Hide the tail inside the egg.

The Easter egg is ready. We knit decorative elements.
For a leaf, take a green thread. We need to dial 7 loops. We knit 1 sl-st, then 1 prs, 1 prss, 2 prs. We knit everything 1 in a separate loop. In the last loop we knit another pssn. Such details need to be connected 3 pieces.

For a flower, take a pink thread. We make a sliding loop. We do 3 ch, then we knit 2 dc. Again 3 ch and 1 sl-st inside the loop.
So repeat 4 more times to form 5 petals.
We tighten the sliding loop.

Sew the leaves to the bottom of the egg.

We sew the flower in the center, slightly going to the middle leaf.

This is such an Easter egg! You can knit many of these products and decorate them in different ways.


01. Decoupage style


04. Crocheted egg for Easter


Decorate an egg for Easter with a thermal label
Easter is a magical and holy holiday filled with deep meaning and wonderful mood. Today I will teach you how to paint eggs for the holiday in an unusual way, namely, using a label.

We take medium-sized chicken eggs and boil them hard-boiled.

As soon as they are cooked, grab one at a time with a slotted spoon.

We take stickers of different colors and patterns, straighten them.

We put stickers on the eggs.

We lower it into boiling water, wait a few seconds (the main thing is that the shell does not crack from the temperature).

Carefully remove from the water, wait for complete cooling.

Eggs decorated with a thermal label for Easter
That's all, our colorfully wrapped eggs are ready to be presented for Easter or placed on the festive table. This way of decorating eggs will be very popular with those who honor traditions, but do not like to mess with onion skins. Even small children can put on labels.

Such stickers can be chosen not only with easter pattern, but also with cartoon characters or beautiful landscapes. Girls can choose from Cinderella stickers, while boys can get an egg decorated with Spiderman-themed stickers.

Crafts for Easter from jelly do it yourself video lesson
Master class on making a souvenir-egg for Easter from a light bulb with your own hands
Chickens are also a symbol of Easter. Therefore, you can make a souvenir that will be decorated with Easter chickens.
At the first stage, you will need materials:
- Light bulb (you can use a burnt one).
- Light bulb holder (a socket fixed on a piece of wood).
- Acetone.
- Cotton pad.
- A piece of sponge.
- White acrylic paint.

Stage 1.
1. We screw the light bulb into the cartridge.

2. Degrease the surface of the bulb with acetone and a cotton pad.
3. Let the light bulb dry.
4. Then you need to make a base. To do this, dip the edge of the sponge into white paint and go over the surface of the light bulb with dotted movements.

5. Let the paint dry and apply the second layer of the base.

After that, you should give the light bulb a light yellow tint. To do this, mix yellow and white acrylic paints in the palette and paint the light bulb with a sponge.

Stage 2.
The next step is to decorate the light bulb using the "Decoupage" method. For this you need to prepare:
- PVA glue.
- Synthetic fan brush.
- Napkin for decoupage (chicken drawing).

1. Select the desired pattern on the napkin. For a light bulb, 3 chickens are enough.

2. Leave 1 layer of napkin, detach 2 others.

3. Attach each chicken in turn to the surface of the light bulb and glue the chickens with a brush and glue.

4. Let the glue dry.
5. Then we color the empty space around the chickens. To do this, mix red and white acrylic paints until you get color pink. Then, using a sponge and paint, cover the light bulb in the right places.

Stage 3.
The final step will be varnishing the light bulb.
Necessary materials:
- Lacquer glossy yacht.
- Synthetic fan brush.

1. We cover the surface of the light bulb with a thin layer of varnish.
To get a beautiful souvenir, you should take care of the decoration of the basement. It can be hidden under a hat, which later will serve as decoration and pendant.
To make a hat, take:
- Thin cardboard.
- Simple pencil.
- Ruler.
- stapler.
- Knitting.

A cap.
1. We measure the cardboard with a size of 3 * 11.5 cm. Cut the cardboard to size.

2. We turn a strip of cardboard into a tube, and connect the edges with a stapler.
3. We measure and cut light and bright yellow threads 15 cm long.

4. We tie threads around the cardboard cylinder, alternating colors.

5. Thus, we tie the entire cylinder.

6. Using glue, glue the loop to the base of the light bulb.

7. We put a hat on the light bulb. Then we collect the protruding edges of the threads into a bundle and tie.

The finished souvenir can be hung on a willow branch.

Three easiest ways to decorate eggs for Easter with your own hands
As we all know, one of the attributes of the holiday, in addition to Easter cakes and the greeting “Christ is Risen! He is truly risen!" are Easter eggs. Now I will talk about the three most simple and original ways their decorations.
Method number 1 - Corrugated paper

What do you need for this? Actually, you will need a small amount of corrugated paper in different colors, as well as small strips of satin. You can also take lace or laces in bright colors instead.


Wrap the egg in a small paper square and tie the edges of the paper with ribbon or string.


Then carefully straighten the bow and the edges of the paper.


So our Easter souvenir is ready.


If you want to make your Easter eggs brighter and more beautiful with your own hands, you can use fabric or lace instead of paper.
Method number 2 - Lace and braid
You can also make your Easter souvenir more elegant and beautiful if you tie it with small pieces of braid or fine lace. In order not to spoil its appearance, hide the ends of the ribbons or lace. You can do this with buttons or beads.


Method number 3 - Eyes
Yes Yes! You didn't think so. Glue-based toy eyes can make your souvenir very funny and interesting. To do this, just stick them to the egg and draw some kind of uncomplicated muzzle. The best medium for this type of creativity will be colored pencils and paper.

How to paint Easter eggs
In order for the painted eggs on the table to look the most beautiful on the Easter holiday, they use the easiest and most inexpensive way. It is recommended to paint them the day before the solemn event.

Coloring Easter eggs with food coloring
Painting with onion skins
Would need:
- Eggs;
- Salt;
- Vinegar;
- Onion peel.
In order for the eggs not to crack, it is necessary to let them stand at a warm indoor temperature before cooking.
Then we take a large saucepan and fill it with the peeled onion peel and fill it by three centimeters. The more peel, the brighter the color. Pour water and put on fire to cook for an hour without eggs. When boiling the contents of the pan, reduce the flame and leave to cook under the lid.
After an hour has passed, add the eggs and add a large pinch of salt, as well as a teaspoon of vinegar. This will help save them from cracking, and the vinegar will give brightness. Cook over low heat for 15 minutes.
Turn off the stove and wait until the water cools down without taking out the eggs. Once the water has cooled, the pot with the contents is placed in the refrigerator and left overnight. Take out in the morning. The eggs will acquire a bright and very rich color and will be the most beautiful on the holiday.

Coloring with coffee
Would need:
- Eggs;
- Vinegar and salt;
- Brewed coffee.
Pour three large spoons of coffee into the bottom of the pot. Put to boil for twenty minutes. Pour vinegar and salt. Then, using a spoon, put the eggs into the pan. Boil up to 20 minutes. Allow to cool in water and put the pan in the refrigerator overnight to infuse. They will get bright Brown color. These recipes can be alternated and the eggs in the basket will be of different colors.

Now you know how to use simple means make your Easter eggs colorful, bright and original. You can please not only yourself, but also your family and friends with such creativity.
Create, create, be original! I congratulate you on the upcoming holiday of the Resurrection of Christ! Christ is risen! Happy Easter, good mood and more joyful days!
5 ways to paint Easter eggs in an original way video tutorial
DIY Easter eggs photo gallery


Unusual Options decorating easter eggs
Master classes presented in this article
Easter is one of the most important Orthodox holidays, he is very bright, kind and spring. On this day, each family colors dozens of chicken eggs in advance, consecrates them in the temple, in order to conduct a traditional rite on Easter with breaking and eating them. But in addition to edible attributes, decorative items in the form of eggs must be present. They decorate the festive table and give each other as a souvenir.
Read how to do it here.


Chocolate biscuit: the secrets of cooking in a slow cooker and oven
Chemical composition and nutritional value
Apple chips at home
Braised cabbage with white beans, recipe
How to reduce the ass, hips and stomach at home?