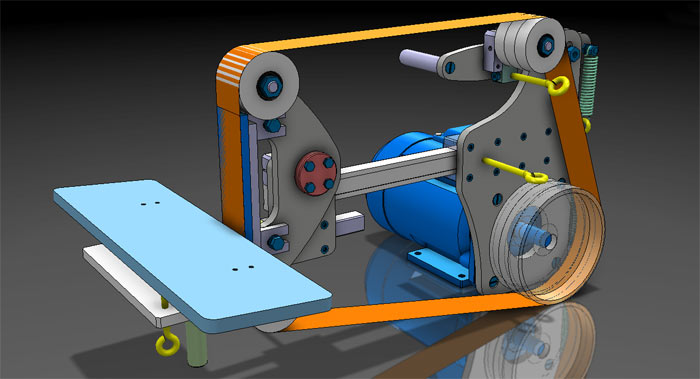
Belt type grinders are used in various applications, often in industry. Grinder is a belt grinder designed for dry grinding of a product that belongs to the category of equipment under consideration. In this case, the product can be metal, artificial or natural stone or others. You can create a grinder with your own hands using the recommendations and certain drawings.
Grinders are a must for any smoker. Sure, some people will tell you that shredders are overpriced, but they probably just wish they had one. If you don't have extra money to spare, or if you really don't think grinders are a good investment, we'll show you how to make a meat grinder at home quickly and cheaply.
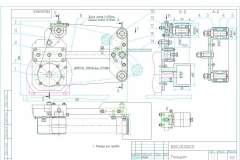
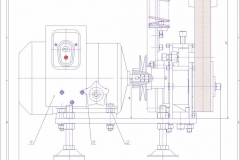
Do-it-yourself grinder. Dimensional drawings
Chopping weeds is a great method if you're trying marijuana. By shredding the buds, you increase the surface area and do it in such a way that instead of large tacks you can take small grass files. If you don't have a crusher but need to chop your material, follow these steps.
DIY manufacturing
Considering the possibility of making a grinder with their own hands, many home craftsmen have a desire to get the job done, since with the help of this equipment it is possible to carry out various technological grinding operations with details. In this case, the part can be made of metal or wood, plastic.
How to make a meat grinder - what do you need
Once you've stocked up, put the weed and the nickel in the pill bottle, cap it, and shake it like a Polaroid picture. Open the pill bottle and you should have a pretty good roll. Of course, this method won't be as effective as using a real crusher, but in traffic it will do. We recommend that you try using a weed that is on the dry side, as nickel will not do Good work bouncing off wet nuts.

Unfortunately, this method is not very helpful in collecting the powerful carpet that falls out of the buds. Traditional grinders often have a separate chamber that allows the short to fall through and be collected for later use. Of course, the pill bottle will pick up whatever you leave, but extracting it from the bottom will be a tough task.
Industrial versions, as a rule, have a high cost. Also, do not forget that the equipment requires periodic maintenance; a home-made belt grinder can be repaired on its own without special tools or equipment.
![]()
Another way you can assemble a homemade crusher is with a glass and some scissors. Just put the weed in the glass and then lift it up. This is probably the most common method for college students who turn out to be "ruthless", but trust me, you don't have to be in the dorm to use this method.
These methods of making homemade grinders at home will always work in traffic, but try to take on the real thing. These grinders will run throughout the week and you will most likely find small metal flakes.
The grinder can be used to implement the following technological tasks:
- deburring;
- elimination of small surface defects;
- flash removal;
- cleaning of the corrosion layer;
- elimination of the consequences of laser, plasma or other cutting;
- elimination of defects made during the welding process.
The figure shows the assistants of the grinding pigment masters: this was the first stage art education in a workshop. Mr Popham gave this drawing in the last phase of Parmigianino and compared the tightly twisted hair with that of a young man's head at Chatsworth.
Bibliographic references
Parmigianino, painting "garzones", grinding pigments on the lid of the chest. The Italian painter Parmigianino was an excellent draftsman. Copying old master drawings was a traditional part of an artist's training. Centerless grinding without a tip is similar to grinding on a central machine. The work is placed on the blade and the adjusting wheel is moved to the programmed feed to begin sanding. The work does not move in the axial direction in this type of centerless grinding.
Given the above features, many decide to make a grinder with their own hands.
Setting the workpiece centerline on the centerlines of the grinding and adjusting wheels will not result in rounding. In this setup, any high spot will create a diametrically opposite low spot. Over time, the blank will look like the exaggerated shape shown below.
Features of DIY work
The drawing shows how the diamond block can be adjusted to produce true linear contact on the control wheel. The figure on the right illustrates a quick check to determine if the trace setting is correct. The wear line of the working blade should be parallel to the top edge of the blade.
Features of DIY work
Not everyone can afford even a simple factory-made belt sander. This is due to the high cost professional equipment. Also, do not forget that the dimensions of the industrial belt grinder grinder are very large. With large dimensions, the belt grinder may not fit into the allotted room, its transportation becomes more complicated. The design of the grinder is relatively simple, which makes it possible to create it yourself.
DIY manufacturing
Grinding in feed is usually used for continuous production processes. The wheels are dressed in such a way that the workpiece passes through the cutting zone on the surface of the grinding wheel. Often a single pass is enough to complete a workpiece. To enable centerless grinding to create a rounding on the workpiece, it must be located above the center line of the wheels. In this setup, high spots no longer create diametrically opposed low spots. Instead, high spots are crushed and a gradual rounding of the workpiece occurs.
As with any other job from holding preparatory phase a lot depends. In order to create a grinder with your own hands, you need to consider the following points:
- First you need to sketch a drawing that will display the design features. Based on the drawing, it will be clear what materials and tools will be needed to carry out the work.
- Next we find necessary tools: drill, grinder, electric jigsaw. It is worth considering the fact that many grinder drawings determine the need to use metal elements to strengthen the structure, dampen vibration, and so on. Therefore, when choosing a tool, it is worth considering that you will also need to work with metal.
- You can’t create some details yourself, as you need lathe. Therefore, you need to be prepared for the fact that you will need the services of a turner.
It's good that grinding is the metalworking process most associated with "black art" and "smoke and mirrors". Much of this mythology is exacerbated common disadvantage understanding the basic fundamentals that make successful grinding applications.
Of the grinding processes, centerless is by far one of the least understood from a fundamental point of view. On the face of it, this really defies most of what we think we know about metal cutting. The most obvious is the apparent lack of jobs. The part is only between the adjusting and grinding wheel, apparently free to leave the cutting zone at will.
When choosing a drawing, we note the moment that the options used to create a belt grinder with your own hands are very popular, with which grinding can be carried out in a horizontal and vertical plane. This version, which can also be done by hand, will have great functionality, since the part can be processed at the right angle. As a rule, we take the industrial model scheme as a basis, and then change it to fit our needs.
So, how does centerless grinding work and what are the main components that need to be understood to successfully machine parts in a consistent and predictable manner? It differs from other cylindrical processes in that the workpiece is not mechanically constrained.
Unlike a center or cherry type grinder, parts made using the centerless process do not require center holes, drivers, or fasteners. Instead, the workpiece is supported on its own outside diameter by a working paddle located between a high speed grinding wheel and a slower speed adjustment wheel with a smaller diameter.
DIY manufacturing process
When creating power parts, metal should be used, the thickness of which is 10 millimeters or more. In order to facilitate the work, you can make a kind of marking on the surface according to the drawing. A marker is used for marking, the accuracy of manufacturing power parts does not play big role. Cutting can be done with plasma cutting, but such equipment is extremely rare in the home.
DIY manufacturing process
It's the relationship between these three main components - the grinding wheel, the adjusting wheel and the blade - that makes the difference between a successful centerless grinding application and one that gives headaches and poor detail. In cylindrical grinding, understanding the process is relatively simple.
There are no centers on a centerless grinder, so there seems to be no way to control the workpiece size or roundness. However, the opposite is true. Centerless grinding, when set up correctly, will provide roundness, surface finishes and dimensional tolerances that are among the best in metalworking. In addition, this process can improve the roundness of the workpiece blanks outside the circle.
In the manufacture of the base, it is best to use metal whose thickness is more than 12 millimeters. You can connect the elements with a screw and a nut - you just have to make quite a few different holes in the metal. Also, the assembly is carried out using electric welding.
Choosing a grinder belt
Creating roundness from extraordinary conditions is the claim to fame of the centerless grinding process. It does this through the connection between the grinding wheel, the adjusting wheel and the blade. From the operator's point of view, from the operator's point of view, a centerless grinder has a grinding wheel on the left, a working blade in the middle, and a smaller diameter adjustment wheel on the right. For most applications, the center line of the grinding wheel and adjusting wheel are in the same plane, at equal heights above the machine tray.
Difficulties in the manufacture of a belt grinder can create structural elements that are responsible for the rotation of the rotary mechanism to ensure processing in several planes. As a rule, the grooves for turning are made by a milling machine, but you can try and cut them yourself with a drill, file, drill.
To achieve rounding, the blade must be set so that the centerline of the workpiece is higher than the centerline of the grinding and adjusting wheels. This is a critical ratio for successful centerless grinding. If the workpiece rests on a flat working blade that is centered with the adjusting and grinding wheels, the contact points form three sides of a square. As the piece grounds in this setting, any high spot on the workpiece shifts the work slightly onto the blade, allowing the grinding wheel to cut directly opposite the low spot.
Special attention should be paid to how to make videos. In considering this issue, we note the following points:
- creating a mini grinder with your own hands, you should choose titanium or duralumin rollers. if you can not find rollers from these materials, then steel blanks can be used .;
- rollers must have an exact geometric shape. that is why the work on their manufacture should be entrusted to a qualified turner;
- the roller, which will be fixed on the shaft of the electric motor used, must be made of steel. this is due to the fact that the size of this roller will be quite large, it is quite difficult to find a titanium blank, and other materials may not withstand the resulting load.
In this case, it should be borne in mind that you need 4 videos:
Over time, this adjustment will create three lobes on the blank that may be dimensionally accurate, but far from round. Setting the angled blade so that it slopes towards the adjusting wheel and maintains the workpiece centerline above the centerline of the adjusting and grinding wheels is how centerless operation can create roundness. In this setup, if the high spot is in contact with the blade or the steering wheel, it does not create the directly opposite low spot due to the angle created between the centerlines of the wheels and the workpiece.
- drive (150 mm);
- tension (100 mm);
- two small ones for guiding the tape (70 mm).
When assembling the structure, it should be borne in mind that they must be located strictly on the same line. Otherwise, the tape being used will constantly come off. The width of the blanks is selected taking into account what width the tape will have. In this case, there should be a margin for this indicator of at least 20% of the total width. In some cases, the cylinder is barrel-shaped, for which a small bevel is made from each edge. The cylindrical surface must be smooth, the tape will not slip due to strong tension.
Instead of grinding the petal shape in the blank, the top spot is gradually reduced by the action of the grinding wheel. Therefore, instead of creating a low spot on the periphery of the work, equal to high place, the grinding wheel generates a proportionately smaller low spot when it contacts the workpiece.
To better visualize this rounding, imagine a blank with several high spots. Now imagine that the part was grounded with only one rotation. When a part is removed, it will only show high points were affected.
Bearings need to be given attention as they are an important integral part machine. They must be of an exclusively closed type. This is due to the fact that the process of using a belt grinder involves the formation of a large amount of dust, which, when it enters the internal cavity of the bearing, increases friction and significantly reduces the service life of the structure in question. Also, do not forget about the heavy load that will be transferred to the axle and bearings - you need to choose them only from the 6th grade.
The blade angle helps keep the workpiece in contact with and under the adjustable slow spin wheel to counter any tendency to "spin" up to the speed of the grinding wheel. This is not what you want to achieve. To start the centerless grinding operation, it is necessary to set the working height of the blade. This will control the centerline of the workpiece, the height above the centerline of the two wheels, which determines the rounding action of the centerless grinding operation.
Self-made grinder
One of the most common set-up errors we see, says Mr. Payne, is incorrect workpiece height measurement. This is a critical measurement and should not be guessed at. The rule of thumb for setting the correct height for workpieces up to 1" in diameter is to have half the diameter of the part above the center line of the grinding and adjusting wheels. Thus, for a workpiece with a diameter of 1 inch, the height should be half an inch above the center axis of the wheel. "This is the main the starting point for most centerless grinders,” says Mr.
Drive selection
When making a mini grinder with your own hands, you should choose the right drive. As a rule, the power of the electric motor should be at least 1.2 kW even under the condition of a small load. For domestic use, models that operate on a conventional 220 V network are suitable. You also need to pay attention to the fact that the electric motor must have a large number of revolutions to improve the accuracy of processing. Many models have blades for blowing the case, which allows you to reduce the temperature. Despite the primitiveness of the technology, it is very useful.
If you find an error, please highlight a piece of text and click Ctrl+Enter.
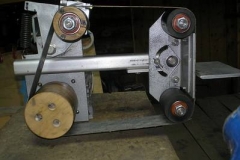
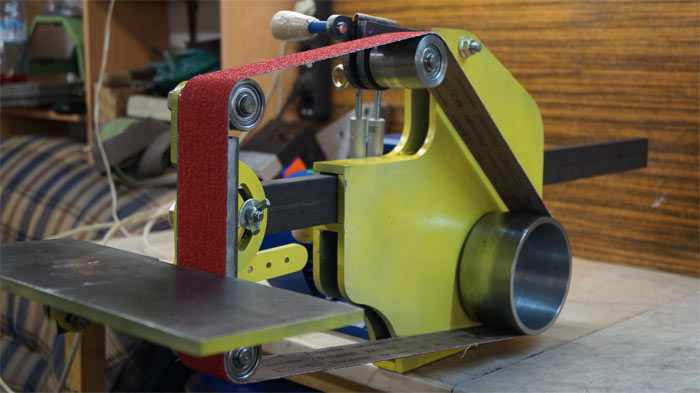
A desktop belt grinder or, in short, a belt grinder (although, if you really pronounce this English word, then a grinder) is a drive device designed for grinding and finishing flat surfaces, removing a layer of rust or paint, as well as eliminating sharp edges and burrs from steel and any non-metallic parts. But the price of industrial models, even domestic production, starts from 16 ... 18 thousand rubles. It is worth considering a homemade grinder ...
Operation and design of a belt grinder
The principle of operation of the grinder is simple. There is a group of rollers through which a sanding belt of the required grain size is passed. If you put into rotation the drive roller mounted on the output shaft of the electric motor, then the rest will automatically start to rotate. By adjusting the relative position of the driven rollers, it is possible to grind surfaces with defects of various depths. To compensate for the probable stretching of the tape (during its long-term operation), a tension mechanism is provided for one of the rollers (as a rule, the one that is located somewhere between the driving and driven in the kinematic chain of the machine).
The design of the belt grinder includes a table on which the workpiece must be fixed. It is better if such a table will be able to rotate along one of the axes at an angle of up to 90º: then it is possible to grind two mutually perpendicular planes from one installation of the part. As a safety feature, it makes sense to provide a folding protective glass made of transparent acrylic on the machine frame - then there is no fear that a flake of sanded paint or scale will get into the operator's eye. Naturally, you will need controls that are located in the bed or on the frame of the machine. Portable versions are supplied with a sturdy stand, on the basis of which there are mounting holes, with which the grinder can be fixed on a workbench.
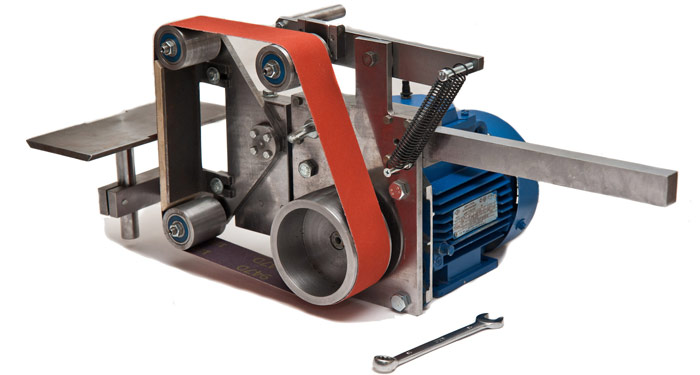
Let's try to abstract from the elegance of design and color, and take a sober look at the design. The visual instability of the machine immediately catches the eye: the overhang of the cantilevered rollers is much larger than the supporting surface under the bed. In addition, the lack of a table does not allow processing relatively massive surfaces that are simply inconvenient to hold the canopy for a long time. The increased length of the tape (and the accompanying mechanical friction losses) causes the use of increased power in the motor drive, and, consequently, energy consumption. The tension unit is elegant and easy to set up, and the machine comes with interchangeable grinding tips that allow you to grind even internal surfaces- but is it worth spending more than 100 thousand rubles for it?
Choosing a grinder belt
It is advisable to start the selection of a belt grinder from the end, namely, to determine what width and height of the surface will be processed by grinding. Then compare these needs with the actual sizes of sanding belts that are commercially available.
As you know, endless sanding belts differ in their length, width and degree of grit. The size range of grinding belts of domestic and foreign production, which are intended for use in grinders, is as follows: length 610, 915, 1230, 1600, 1830 mm, with a width of 50 and 100 mm. You can search for others, but with the unconditional fulfillment of the following requirements:
- The tape must have a fabric elastic base;
- Maintain angular speeds not lower than 1500 min -1;
- Possess high abrasive resistance;
- To allow relative elongation without breaking the material of at least 10 ... 15%;
- Minimum heating during long continuous grinding.
It should be noted that for a homemade grinder, sanding belts with a length of no more than 1230 mm are better suited. Short belts wear out more because they do not have time to cool down during their idle movement, and longer ones automatically increase the dimensions of the machine, without giving any visible advantages in return.
The indicators of the mechanical strength of the tape material are also important. It is strongly not recommended to focus on composite tapes, even if they are glued with double tape: during operation, the junction stretches, and the tension of the tape weakens. Moreover, a sudden rupture of the tape is possible with all the ensuing consequences. Given the fast speed of the belt on the surfaces of the rollers, the specific grinding effort should not exceed 0.7 ... 0.8 kg / cm 2. This corresponds to the parameters of the mechanical strength of the electrocorundum tape in the range of 800 ... 900 MPa.
It is important that the tape must be hung on a cylinder with a diameter of 50-60 mm for at least 48 hours before use. This will ensure the natural elongation of the product before its operation.
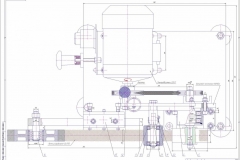
Do-it-yourself grinder. Dimensional drawings
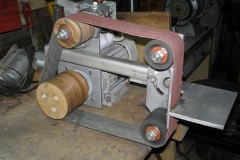
The main attention in the development should be given to the design of the rollers, fixing the product during grinding and choosing the power of the electric motor. Let's consider these points in more detail.
Roller design
It is especially important to correctly make the head, leading roller. It must be massive enough that, having a noticeable moment of inertia, it does not immediately accelerate the belt to the actual peripheral speed values. Let's take into account that a standard electric motor will obviously be adopted to drive a home-made belt grinder, with a slip of no higher than 9%, then this speed at a nominal 1500 min -1 will be no more than 1380 ... 1400 min -1. On the other hand, this roller cannot be made of steel either: when starting, the engine may not immediately turn the massive roller.
Solution: either use duralumin grade not lower than D16, or make a steel roller hollow. In this case, with an increase in the diameter of the roller, the cavity will have to be made deeper.
On the roller, it is desirable to provide an end groove, the width and depth of which will correspond to the cross section of the endless grinding belt intended for use. This excludes the possible descent of the tape from one of the rollers, if their axes are not located strictly in the same plane.
Similar grooves are made on the driven and idler rollers. They can be made of duralumin, and do not grind cavities in them.
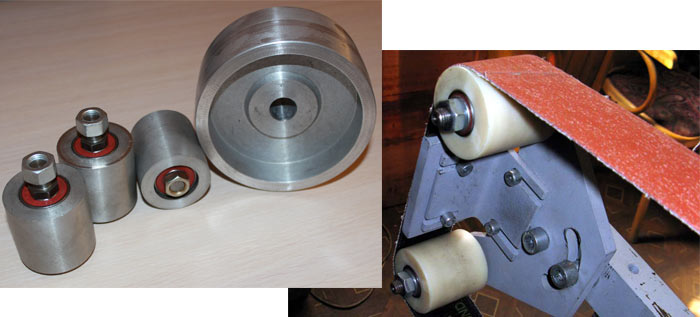
Particular attention must be paid to the surface roughness of the rollers. It should be within Ra1.25 ... Ra2.5. With a higher roughness, accelerated wear of the belt will be observed, with a smaller one, it may slip in the case of prolonged grinding.
The rollers of a belt grinder must necessarily be installed in closed bearing units based on rolling bearings: this prevents accidental ingress of particles of ground material on the roller axles. The main requirement for bearings is its compliance bearing capacity actual engine speed.
To fasten the rollers on the axles, you can use ordinary cotter pins, or make the axle in the form of a pin with a shoulder, as prescribed by GOST 9650. The output roller must have a keyway for installation on the motor shaft.
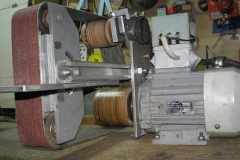
Choice of motor and turntable
In the process of making a grinder with your own hands, it is important to choose the right drive. In most cases, an engine with a speed of 1500 ... 3000 min -1 is suitable, with a power of 0.75 kW (more is possible - up to 1 ... 1.5 kW, however, in this case, the material of the endless sanding belt may not withstand increased grinding speeds) . The choice of power is dictated by the main share of the work to be performed on the machine. For example, with the predominance of rough, power grinding (removal of rust, scale, deburring), the engine is usually chosen more powerful, and the nominal speed, on the contrary, can be reduced to 1200 min -1. A drive roller is attached to the end of the output shaft of the engine.
Considering that a significant amount of dust-like waste is released during grinding, the engine housing must be closed and blown, therefore, recommendations for using an engine from an old washing machine should not be taken into account.
When designing a homemade grinder, it makes sense to put maximum manufacturability into the design. Two factors contribute to this:
- Turntable manufacturing;
- The presence of a clamping plane on which the workpiece can be supported.
The first problem is solved in this way. The table is made with a movable bracket, which can be rotated relative to the horizontal axis at fixed angles.
The table must withstand noticeable technological loads, and therefore it must be no thinner than 15 ... 20 mm (to reduce the weight of the part, it is advisable to use duralumin here as well).
It is advisable to use the machine frame as a clamping plane. To do this, one of the surfaces - the one that will be located at the stage - must be sanded, and provide it with maximum rigidity.


How to cook ham in the oven at home
Pain in the lower abdomen during pregnancy, reasons for what to do Can the lower abdomen hurt if pregnant
Protein for muscle gain
The best vitamins for men according to customer reviews
How to lose weight on a vegan diet?