A simple sequence of operations showing how to remove the switches from the wall if someone else installed them requires basic knowledge of handling a 220 V voltage indicator screwdriver and careful work.
You can also use a regular screwdriver, but there will be a risk of electricity in case of power supply failures, induced currents or voltage in the neutral wire from other sources with high ground resistance. To be sure, you can use thin rubber gloves.
The main situations
The differences in how the switch will have to be removed lie in several important features of the device of a particular network. 
These include:

Turning off the machine at the entrance to the room does not relieve the need to check the absence of voltage directly on the removed device.

 Strictly observe safety precautions when working with electricity
 Before starting work, a complex circuit for connecting electrical appliances must be de-energized completely, without exception. The result of deviation from the rules of electrical safety may be:
- hit electric shock, burns, eye damage;
- failure as a result of short-circuit currents of non-disconnected electrical devices;
- breakdown of insulation, switching fittings in the shield;
- fire.
Be sure to take measures to prevent accidental switching on: close the shield with a lock, hang a sign “Do not turn on - people are working!”.
Removing the circuit breaker
 All manipulations must be performed without undue force.
 The case of a modern switch is smooth, the fastening elements are hidden from view.
The material of most parts is plastic of various kinds, metal parts are installed in the most necessary nodes, sometimes ceramics are present.
All disassembly manipulations are performed without applying excessive force.


Contact density is provided in 2 ways:
- screw clamp (unscrew and remove the current core);
- self-clamping terminal (press the lever and pull out the conductor).
If the contact overheats during operation, metal parts can burn and the adjacent insulation can be charred. You can bite off the burnt section of the wire and not waste time and effort trying to break the soldered thread. It is necessary to remove the damaged part of the core in such a way that the remaining length is enough for a new connection. Detailed Instructions how to remove the switch, see this video:
For the convenience of subsequent installation in place of a new switch, the ends of the wires can be immediately marked (phase, zero, jumper). In case it will not be installed immediately new device, bare ends must be insulated.
And doubt your abilities? The advice of experienced professionals will help you avoid mistakes when working in difficult places: around switches and sockets.
Gluing wallpaper around sockets and switches is not so difficult
Preparatory work: do not forget about safety
The easiest way around the switch and sockets is to perform after partial dismantling of electrical appliances. Before starting this work, de-energize the room, and then:
- unscrew the screws and remove the protective cover of the socket. The contact group in the mounting socket is left in place
- gently prying off the switch keys with a screwdriver or a small chisel, remove the decorative frame panel from it
- insulate open screw terminals with wires with masking tape or securely cover them with dense polyethylene, tucking the ends into a technical hole.
Without insulation of the contact group is strictly prohibited in order to avoid electrical injury from electric shock.

Wallpapering near outlets
The next stage is the direct pasting of the walls. On a cut panel and it is attached to the wall over the technical hole. The strip is carefully rubbed with a roller or rag, after which the contours of the socket box become clearly visible on it. Now it is necessary to cross-cut the cloth in the designated place with a sharp wallpaper knife. The resulting valves are carefully refueled into the hole.
 We glue wallpaper in difficult places without errors
 Under round electrical appliances, star-shaped cuts should be made to make wrapping the trim more convenient. Special scrupulousness when performing this technological operation when bypassing sockets and switches is not required, because after installation decorative panel mistakes will become invisible.
Attention: when using wallpaper with metallized elements, the cut hole should be made more carefully, do not allow contact with electrical wires. The aluminum foil used in their production can act as an electrical conductor.
We glue the wallpaper near the switches correctly
Some switches have complex structure, and their dismantling is impossible without the complete removal of the mechanism from the mounting box. In this case, in hard-to-reach places recommends using the trimming technique without removing the protective panel.
The measured panel is attached to the wall only up to the location of the switch. With a sharp mock-up knife, punctures are made in the corners of the switch frame, which serve as a guide for making a cross-shaped hole. After making the cut, with a spatula, tightly press the edge of the valve formed against the wall along the perimeter of the switch frame. The excess is cut off with a spatula or a metal ruler, carefully roll the edges of the hole to the wall. And only after that the rest of the panel is glued.
A short one-minute video demonstrates this technology more clearly:
This method requires some skill and, while cutting round rosettes is especially difficult.
What to do, if …
If you have carefully studied all the materials on how to paste wallpaper in difficult places, but the results of the work performed are not encouraging, then you can:
- additionally cut out from the remnants of wallpaper or (optionally) contrasting finishing material masking cover. It is carried out taking into account the exact dimensions of electrical appliances and is glued to the wall, decorating sloppy cuts;
- purchase in the store and install a ready-made decorative polymer or silicone frame near the switch, which will not only hide defective places, but also protect the wallpaper from contamination during operation.
- send this work to us . Call now, our masters will come to you within 2 hours and do all the work quickly! For prices, go to .
For those who do repairs on their own, they are often interested in how to do it. Glue wallpaper near sockets and switches you need to be careful and follow the safety rules. If you are afraid of electricity, then turn off the breaker for a while.
Before starting work, you remove the front panel of the switch or socket. But do not forget to leave the box with the mounting group in place. Then unscrew the screw. Carefully remove the panel and use masking tape to isolate the contact group.
If you do not, then there is a high probability that you will be electrocuted while wallpapering.

You must also isolate the switches. If this does not work out, then you can use the pruning method.
The undercut is as follows. You stick a piece of wallpaper on the switch or socket from above. Then, through the cruciform slots, you take it out. With the help of a knife, the wallpaper edge is trimmed and very carefully removed.
All actions must be performed accurately and accurately. Also keep the following in mind when pruning:
- remember that wet wallpaper cutting is quite difficult and one wrong move can lead to a spoiled view of the work. For this you need a knife with a sharp blade.
- when you glue wallpaper on a socket or switch, do not forget to carefully smooth the area before and after them, and only after that do cross-shaped cuts.
You have the opportunity to order electrical goods with delivery in a fairly short time, and you will be satisfied with the service. If you cut the edge unevenly, then you can mask your errors with a special frame. You can buy them at hardware stores.
If you want the wallpaper to look beautiful on the wall, then before pasting the surface, all sockets and switches are removed from it. No jewelry precision will help to get around the fixtures without removing them - the wallpaper around the perimeter will be uneven, and after the repair there will be an aftertaste with bitterness.
Below short instruction with a photo, spending 5 minutes on it, you will not get an electric shock, and the wallpaper will look beautiful in the interior of the apartment.
Step one - preparation
Sockets / switches are removed immediately before wallpapering, it is not necessary to do this in advance, as you can get an electric shock when you turn on the light or, alternatively, sit in the dark and turn off electrical appliances.
- Take off old wallpaper
- Prepare the wall (if necessary),
- Glue is being prepared and new wallpaper is being cut,
- Turn off the light on the counter
- Remove sockets,
- Glue wallpaper.
So you can avoid some inconvenience and the use of swear words when you are closely acquainted with the discovery of Alexander Volt.
From the tool you will need a flat and Phillips screwdriver.
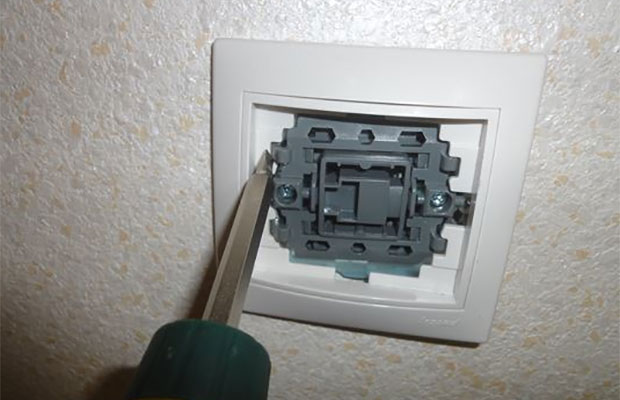
Step two - remove the switch
As a reminder, we remove, not dismantle, sockets and switches, so it is important to keep them intact if replacement is not planned. Using the one-button model of the Legrand Etika switch as an example, the essence remains unchanged for other mechanisms.
First, remove the button, for which we use a flat screwdriver or a sharp knife. We put the screwdriver into the gap between the button and the switch frame, pressing the pressure panel until the fastening antennae comes out of the side hole. Do not overdo it - you need to press the button until the antennae comes out - no more, no less.
Now we remove the protective panel, which gives access to the wires and the main fasteners of the switch. To do this, unscrew 1-2 screws from the top and bottom and hook the protection with a screwdriver. The protective panel presses the switch frame against the wall, after removing the first one, the second one is automatically released and removed.
If the switch or socket has been standing for a long time and began to stagger, then at this stage the mechanism is fixed. To do this, after removing the protective panel and frame, clamp the two main fastening screws. They are located on the sides of the push mechanism in the switch or to the right and left of the plug in the socket. Tighten the screws sparing no effort - it is difficult to rip them off.
It is not necessary to completely remove the light switch mechanism– just remove the button, the protective panel and the front frame!
Now it remains to glue the wallpaper, cutting the wallpaper sheets on the switch so that they go inside the perimeter of the switch by 1 cm, and install the mechanism back in the reverse order - the outer frame, fix the protective panel with two screws and install the button until it clicks.
- If you remove but do not change the switches, wash the button and top panel with soap and water after removal. Even for a good housewife, the switches become dirty over time, and it is impossible to thoroughly wash them on the wall.
- If the walls for removing old wallpaper were not wetted and there are no small children at home, then do not turn off the light when removing switches and sockets - do this immediately before pasting, when wet sheets become a current conductor.
Switches designed to switch the operating modes of lighting in rooms are distinguished by a high margin of safety. Therefore, they can last a very, very long time. However, sometimes there are situations when it is required to remove this element from the wall, for example, for wallpapering or replacing it with a new and improved model. The whole process will take on the strength of 20 minutes, even for a person who has encountered such a need for the first time. The main thing here is to adhere to safety rules, as well as perform all actions very carefully and carefully. After all, the switch is 90% made of plastic elements, which can be easily damaged if handled ineptly.
We remove the switch from the wall - what to look for first
To begin with, take care of the presence of special thin rubber gloves, without which it is not recommended to work. After that, you can proceed directly to the dismantling process. To properly remove the switch from the wall, you need to understand some of the features of the process.
Important points to highlight are:
- Safety machines. The network is connected to the apartment through fuse plugs or current protection circuit breakers. Before starting work, it is mandatory to turn off the voltage, for which the toggle switch of the machine is moved to the lower position. If in switchboard there are plugs, you will need to turn them off by pressing the red button located nearby, and also unscrew both plugs from the cartridge, which are responsible for the neutral wire and phase.
- Switch type. It is also very important point. Today, a wide variety of models are used, which differ in additional functions - remote control, smooth adjustment and so on. However, for our problem, only the type of fastening matters - hidden (the switch box is recessed into concrete) and external (the box is screwed to the wall with screws). The first type is somewhat more complicated, so we will focus on it.
- Connection diagram. Most often, the light switch is equipped with several keys, which makes it difficult to remove the device from the wall, since the number of wires suitable for each key increases. In addition, the more keys, the longer it will take to remove each of these elements.
Remove the keys from the switch - the first stage of dismantling
Although the process of removing the switch is not difficult, it is recommended to try to invite an electrician. After all, work can be dangerous, because you have to deal with electricity. If calling a specialist is not possible, you have to act on your own. Before performing, you need to make sure that it is he who is out of order. Often the problem is in the cartridge, which simply burns out over time.
If the switch needs to be dismantled in any case, for example, to wallpaper the walls when this element interferes with work, then it will be necessary to completely de-energize the circuit for connecting electrical appliances in the apartment. Neglect of electrical safety rules can cause the following problems:
- 1. Fire
- 2. Breakdown of electrical wiring insulation
- 3. Failure of devices connected to the network as a result of a short circuit
- 4. Electric shock, eye damage, burns.
It is necessary not only to turn off the power in the apartment, but also to close the shield with a lock. You can also hang a sign on the shield, indicating that work is currently underway involving electricity. Only then can you be sure that none of the residents will accidentally supply current to the apartment.
To remove the switch, we need the following tools:
- Portable light source
- Voltage indicator screwdriver
- Flat and Phillips screwdriver
We need a flat screwdriver to detach the keys. This must be done carefully so as not to scratch the keys and the frame, and also not to break them. The tip is installed between the frame and the key, on either side. Next, you need to apply a little effort, using a screwdriver as a lever, enough for the key to move away from its place. The remaining keys, if any, are removed much easier, already without the use of screwdrivers.

Now let's check if there is really no voltage. Here we need an indicator screwdriver, which we apply to each of the contacts. Suitable for keys. It is recommended to install a flashlight or any other light source so that you can see exactly what you are doing or touching. Therefore, it is better for beginners not to do such work on their own, it can be very difficult to do without help.
By removing the keys, the master gets the opportunity to check the integrity of the contacts, as well as determine the voltage in them. This will allow you to answer the question of whether the switch is out of order and whether it needs to be completely replaced. If further dismantling is necessary, we proceed to the next stage of work.
How to remove a frame - an algorithm of actions for beginners
It may be necessary to remove the switch from the wall in cases where it is necessary to completely replace the device, as well as to make a detailed inspection of the equipment. In this case, it will not be possible to limit yourself to just the keys, you also need to remove the frame in addition. Fortunately, this process is also not particularly difficult, the main thing is to act in accordance with the instructions and safety precautions.
We need the same set of tools as for working with keys. More often, the switch itself is fixed with several screws, for unscrewing which a Phillips screwdriver is useful. By unscrewing the screws, you can remove the frame. It is very fragile and thin, so the actions are performed as carefully as possible. Again, with a flat screwdriver, you need to pry off the frame, and then pull your fingers towards you. If everything is done correctly, the fixing frame will easily move away, after which you just have to get the light switch.
Socket with a switch - features of dismantling this device
Universal designs are very popular, including a socket and a switch, made in a single housing. Such devices are quite convenient during operation, since it becomes possible to connect lighting fixtures and power the outlet from one incoming line. The disadvantage is obvious - in the event of a breakdown of one of the elements, you will need to remove the socket from the wall along with the switch, regardless of the source of the problem. You should not worry, because this operation is performed very quickly.

Armed with a flat screwdriver, remove the keys, as described above. Under the keys are screws, which are removed with a Phillips screwdriver. This is not the only fastener element - the socket has its own screws, which will also need to be unscrewed to dismantle the entire case. Having unscrewed all the screws, it remains only to gently pull the body of the device towards you so that it moves away from its place. To help yourself, you can again use a flathead screwdriver, carefully prying off the case.
In cases where the source of lighting problems is the switch, you will need to replace it with a new one. When you go to a hardware store, be sure to take your old switch with you. This will ensure that the new model will fit the existing connector in size. By the way, if you previously had a keyboard instrument, this does not mean that you only need to buy the same equipment. So, a touch switch, or a switch with smooth light control, is perfect.
Connecting a new switch is done in the opposite order to dismantling the old one. The apartment, of course, is completely de-energized, after which the device itself is disassembled directly. Next, the wires are connected, this must be done in the same places where they were connected on the old switch. After that, the block is installed in the socket opening, fixed with four screws.
It remains only to fix the decorative frame and keys. This work can be considered fully completed. By turning on the switch in the switchboard, we make sure that everything works with a bang.


Sun skirt: types and how to wear it Black sun skirt with a T-shirt how to wear
Ground bird cherry Ground bird cherry cook
Own business: production of chips
How to care for your skin in spring Face masks in spring
Seizures in the corners of the mouth: causes and treatment in adults and children