During furniture repair, the seat of a chair, or even the top of a coffee table, can be woven from belts. Weaving, as a craft, is a rather complicated matter and requires certain knowledge and, most importantly, skills. But in this version, weaving is not even a process, but rather the result of work. The technology is simplified and does not require high level craftsmanship is available to anyone.
First of all, we need the frame of a chair or table. You can use old furniture, or make the base with your own hands. It is clear that at home it is easier to use the finished product.
But it must be borne in mind that the frame can also be assembled from ready-made bars, connecting everything without spikes, on self-tapping screws or eurekas (confirmations). A product of a different design, a do-it-yourself table, is also assembled on self-tapping screws.

For work, you will need belts, in the photo of a homemade table, they are leather.
There are other options, nylon tapes or sling - tapes. Only they should not stretch much, this will not work for a chair, the seat will quickly sag.

On one side of the chair (bars between the legs under the seat), we nail a number of belts with inside. We cut the belts in length so that it is enough to wrap them under the opposite side and nail them. You can fasten the belts with both small nails and short self-tapping screws. Wallpaper nails or self-tapping screws with a press washer are well suited. If you do not know what it is, ask in the store, this is not a shortage.
There should be a gap of 3-4 mm between the belts. The thicker and wider the belts, the greater the clearance should be.

Perpendicular to the base, we begin to weave the next rows of belts. We also fasten the ends with wallpaper nails with reverse side kings. In approximately the same way, the seat and back of the chair can be intertwined with a thick rope, halyard, or narrow nylon ribbon, without cutting the material into pieces. Nylon is wound across the seat with small gaps, and then we wind it along with one tape, interlacing it with transverse threads at the top.
So that the halyards do not move, from below on the edges of the tsarg, they must be fixed with a stapler.

You can twist the straps not only on the seat, but also on the back of the chair. In a similar way, entire sets of furniture are intertwined, from a table, chairs, cabinet doors. For example, wicker, to update the original vintage chair with a curly back.
The main thing here is to try to do something yourself, and when self-confidence appears, think about larger projects.
(Visited 164 times, 1 visits today)
A good thing is an old chair at home. One that is not to be thrown away and not to be used for its intended purpose. Like my chair, which I write about with enviable regularity, admiring this or that furniture restoration technique.
Not even so much furniture restoration, but any needlework, for example: weaving, decoupage, knitting, sewing - there are a lot of ideas. And I already have a philosophical attitude to the fact that things are still there, but what a theoretical base has gathered for this case. So, the idea closest to the furniture theme is to braid the seat of an old chair with cane chips or paper twine. Earlier, of course, I would have paid attention to the fact that the twine option is more budgetary, until I found out that the very rope with which I tied the parcels before would become not only a deficit, but also a very expensive pleasure.
Sometimes it's cheaper to buy a new one than to restore an old one. And it’s easier with a chair, but not everyone can restore a sofa. Inexpensive sofas from the manufacturer, in the online store Mebelvdom.ru a large assortment sofas of various colors, sizes, shapes and designs.
But remodeling furniture is not always a search. budget option, sometimes it happens the other way around, the materials cost a lot of money plus the time spent, but the main thing here is creativity, content home space things self made. Because it is also the energy of creation, the warmth of the hands, conveyed in familiar things.
This is a chair with a seat made of cane wood chips.
Chips differ from rattan in their flat shape, which is why the name is such, it is easier to weave patterns from it, it is akin to weaving.
First you need to take measurements

wrap in one layer, creating a surface for applying the actual pattern.


Here is the usual chess.


And you can weave with a shift, it also turns out beautifully, with a herringbone.

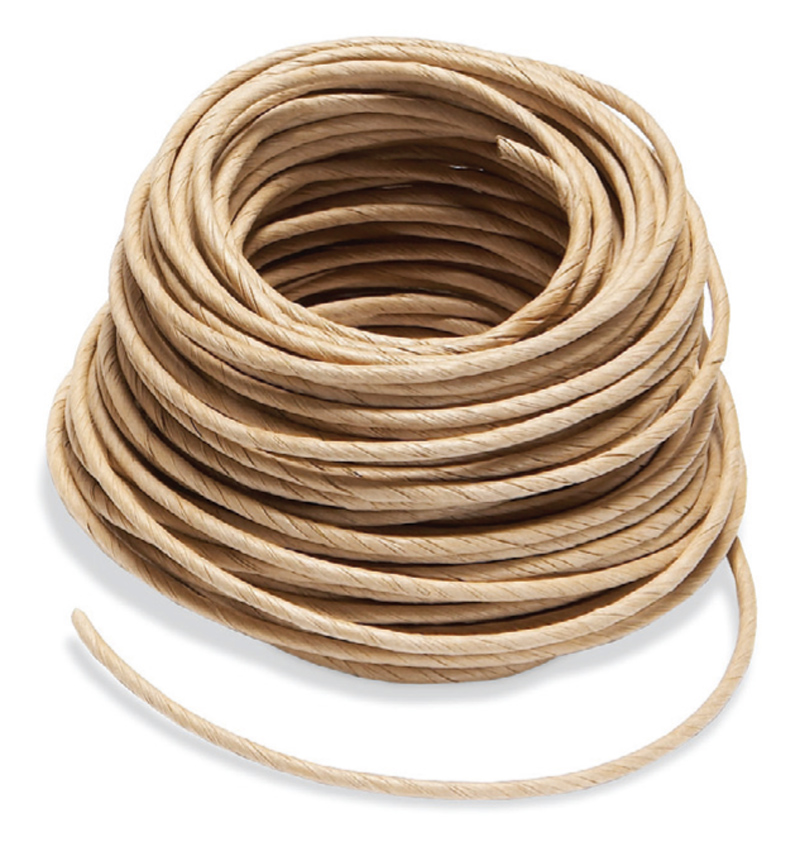
And this is weaving from paper twine
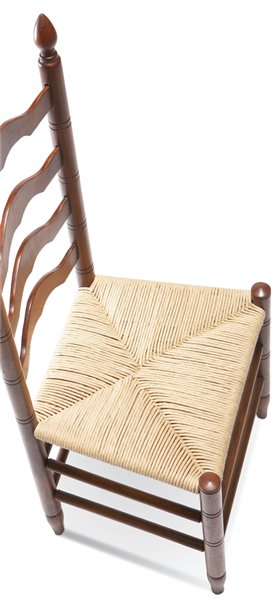
mmm ... for needleworkers such a hank is a real wealth.
Again, it all starts with measurements.
and the "herringbone" will be only in the corners with an intersection in the center.


For reliability, it is better to add cardboard. Like this.


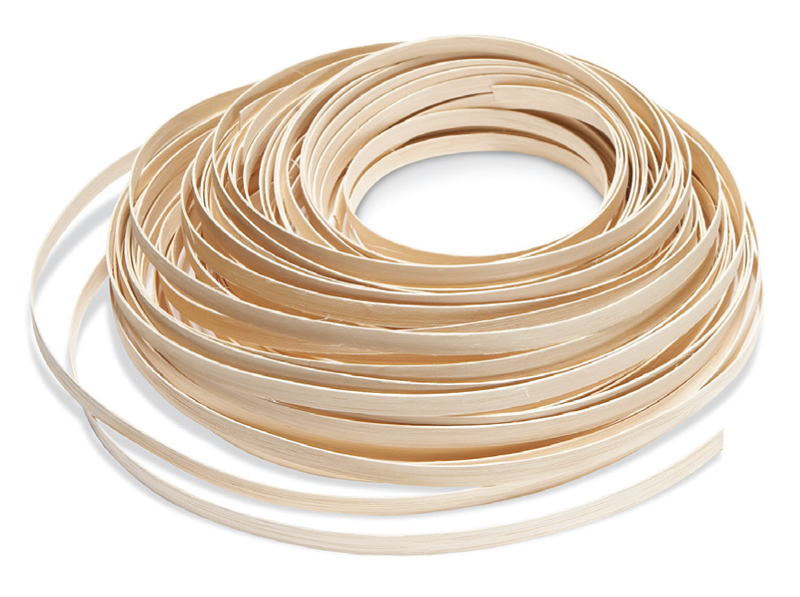
In Russian furniture, wicker inserts in the seats and backs of chairs, armchairs, sofas began to be used from the second half of the 18th century. The material for weaving was usually straw - strips of natural color or dyed, obtained by layering reed rods or rattan stems - a palm tree growing in Southeast Asia. Rattan weaving is widely developed in Vietnam, from where wickerwork and semi-finished products for furniture (mesh) come to our country.
When restoring a chair with a destroyed wicker seat, first of all, the old mesh is removed, cutting it off with a knife, and the holes in the seat sides are cleaned. Then the chair frame is restored and trimmed. After that, they begin to restore the wicker seat. If the work is being done for the first time, it is useful to first sketch the old grid, depicting each stage of weaving in a certain color, note the number of holes and the number of straws in each hole.
For the manufacture or restoration of wicker seats and backs, nylon strips are used, which imitate rattan straw well. To imitate rattan straw, you can also use nylon fishing line, which is used in tennis rackets. To make it flat, it is ironed through the paper with a hot iron. If desired, it can be tinted in any color. By the way, for restoration, you can also use tubes from newspapers, from which we weave baskets). In stores for the restoration of chairs, you can buy wood veneer, paper raffia, fishing line, clothesline ... everything will do, except for sleepers and rails))), which, by the way, are available from the Metal Invest company on the website http://att- rail.ru/. The company specializes in the sale of transport rolled metal required for the construction of railways. If you are interested in the construction, repair or installation of rail and crane tracks, take a look at the company's website, here you can also purchase linings, hardware, linings, turnouts and so on.
And now I propose to look at two photos of a master class on the restoration of chairs with wicker seats using wood veneer and paper raffia

In this version, paper raffia is used - twisted thick strips of wrapping paper

For work, we need a rectangular ruler, a pencil, cardboard and a hammer with small carnations


Wood veneer option 


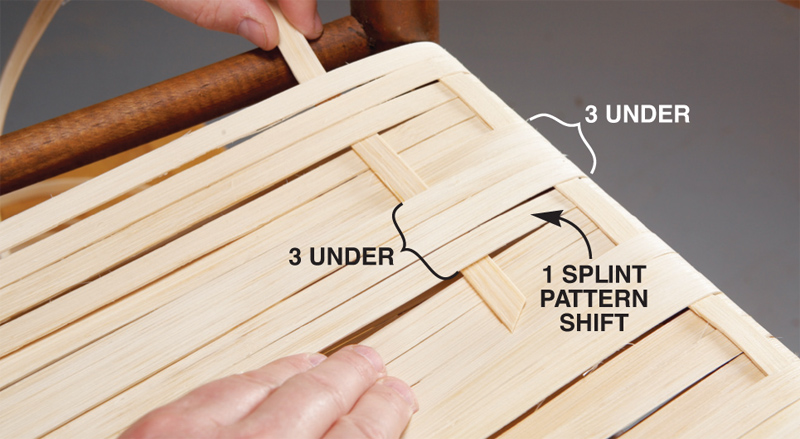
As an example, one of the simplest and most common weaving patterns is taken - the "octahedron" (Fig. 21, a). It is performed in seven operations: weaving the first vertical row; weaving the first horizontal row; weaving the second vertical row; weaving with interlacing of the second horizontal row; weaving the first diagonal row; weaving the second diagonal row; edging (in furniture of the 18th century, edging may be absent).

1. Fix the straw in the central hole of the back side of the chair with a wooden peg, leaving the tip about 7 cm. Pull it to the central hole on the front side of the chair, thread it through and pass it from the bottom side into the adjacent left or right hole, and then to the corresponding hole on the back tsar. Thus, half the seat is braided. Then repeat the operation, starting from the middle, and braid the second half. The corner holes must remain empty. The straws should be parallel to each other, perpendicular to the sides, well stretched.
Plant fibers (reed, rattan) must be moistened during work, passing them, for example, through a vessel with water or wetting with fingers inner surface straws. It is impossible to allow a sharp bending of the straw, twisting it, as this can lead to a break or splitting along the fibers.
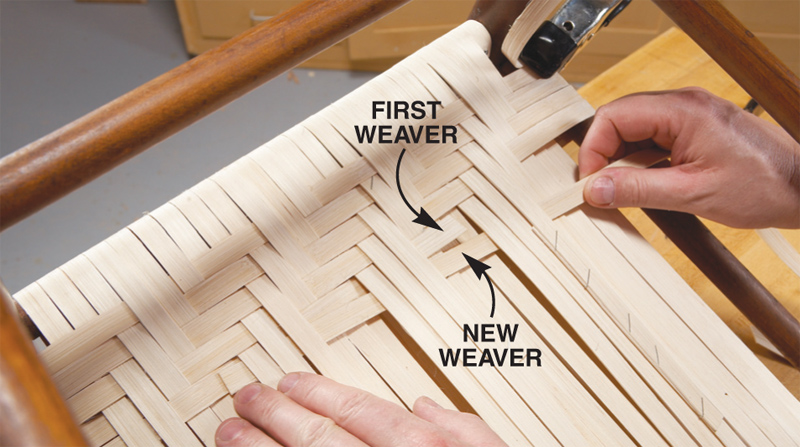
The ends of the straw are also moistened when one segment ends and a new one is tied to it. They do this as follows: the end of the first segment is wrapped around the end of the second and tightened with a loop. It turns out a movable unit, which is located on the underside of the side between two adjacent holes. The end of the first segment is fixed by wrapping it twice around the gap between the two holes and tightening the loop from the bottom side.
The ends of both segments are cut off with scissors. In the past, when short lengths of cane were used for weaving, they were not tied, but fixed in holes with nails or wooden corks that were not removed. The edging of the woven mesh was not done.
2. Weaving the first horizontal row of straws (Fig. 21, b) starts from the front side of the seat and goes to the back side, evenly stretching the straws, placing them on top of the first row and fixing them from time to time with wooden pegs to avoid their excessive stretching. The result should be a dense, evenly stretched mesh.
3. The weaving of the second vertical row begins in the same way as the first, from the middle of the back side of the seat frame. Straws are placed on top of the first two rows, parallel to the first vertical rows, but with a slight shift to the right so that a thin gap forms between them.
4. When weaving the second horizontal row, the straws are passed under or above the vertical ones (Fig. 21, c), placing them parallel to the first horizontal rows with a slight shift. They start weaving from the back side of the seat, skipping the straws under the first and above the second vertical rows. Great care must be taken when working with plant fibers, avoiding sharp bends and twists.
5. Weaving a diagonal row starts from the left rear corner of the seat (Fig. 21, d). Having fixed the end of the straw with a peg in the corner hole, they drag it diagonally, placing it above the horizontal and below the vertical rows. Having reached the opposite corner, they lead the straw back parallel to the first, pulling it through the adjacent hole on the front side and placing it above the horizontal and below the vertical rows. Thus, the lower left corner of the seat is braided, then, starting from the same corner hole, the right one.
6. Weaving the second diagonal row starts from the right rear corner of the seat, using the same holes and stretching the straw perpendicular to the first diagonal rows (Fig. 21, e).
The straws pass under the horizontal and over the vertical rows. This operation requires special attention and accuracy.
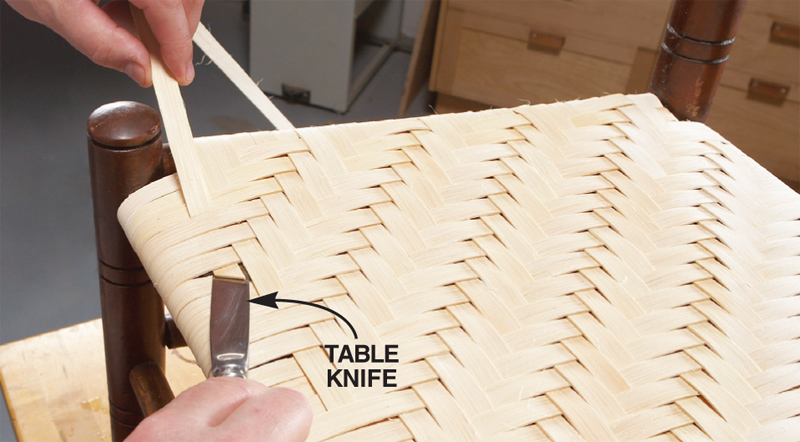
7. After finishing the weaving of the mesh and fixing the ends of the straws, they start edging. To do this, use two strips of different widths - wide for edging, narrow - for fixing it. A narrow strip is fixed in one of the corners of the seat and passed from the underside of the tsarg, periodically (through one hole) pulling out and making a loop. A segment of a wide edging is passed through the loops, which are tightly tightened (Fig. 21, e). The ends of the piping are fixed in the corner holes and cut off.
Rope balls for home decorationSea shells and other traditional decorations were used as the main decorations to create a nautical design. Today, they have been replaced by such non-banal accessories as a rope and a rope. Any decor with their help is easy to do with your own hands. And things will turn out interesting and original. Consider how to properly use rope and rope in the interior.
If you decide to use such non-traditional materials that are recyclable, you should familiarize yourself with their positive qualities:
- the rope can be used as a decor for hanging items, such as lamps, beds, shelves;
- the volume of the rope allows you to quickly decorate the selected thing, spending a minimum of effort and money;
- things turn out to be extraordinary and beautiful, which can not be found in every home;
- with the help of ropes and ropes, you can add brutality to the marine style.
Also, ropes and ropes are used not only for interiors in nautical style. This is a visiting card of eco and country style.
 Chairs decorated with rope in the interior of the kitchen
 Rope and rope can be used to decorate almost any thing:
- lighting devices;
- vases and bottles;
- paintings;
- chests and boxes.
Rope and rope will be an excellent furniture decoration:
- armchairs and sofas;
- chairs and stools;
- beds;
- coffee tables and other pieces of furniture.
Also, these materials are suitable for decorations of toys, small things for the bathroom and much more.
 Coffee tables framed with thick rope
 Rope and rope are perfectly combined with various natural fabrics, metal and natural wood.
How to use rope and rope in the interior
To make the interior really original, when using a rope and a rope, you should follow a few rules. Let's get to know them:
- Rope and rope began to be considered universal decorative elements but they are not always and everywhere.
- If your design of an apartment or house is made in the French or Victorian style, then the use of these materials for decoration is strictly prohibited.
- Do not abuse rope accessories. As a result, you risk getting a tasteless interior at home.
- Rope and rope are natural and natural materials. They need to be combined with similar materials, such as ceramics, wood, stone or leather.
 Thick rope in home decoration
 A little about jute fiber
Everyone knows rope and rope, but few will say what jute is. To begin with, it’s worth talking a little and finding out what kind of fiber it is. Jute is the material from which the same ropes and ropes are directly made. This is a bast plant that belongs to the Linden family. Height can reach up to 3-3.5 meters. There are up to 40 types of jute in the world.
 Cultivation of jute
 From jute fiber make:
- ropes;
- ropes;
- packaging and furniture fabric;
- basis for linoleum;
- leg-split;
- bag container.
Jute fiber is also used to make beautiful floor carpets.
 finished jute fiber
 Overview of ideas for decorating the interior with ropes and ropes
Rope and rope are suitable for making amazing things that will decorate your home. Let's take a closer look at the collection. best ideas for home art.
 rug and coffee table jute fiber
 Decorative rope partition in the interior
In some interiors, it is necessary to divide the room into several zones. In this case, you have to make various partitions. In order not to burden the room, we suggest making a rope partition. To do this, you will need two wooden planks and a long rope, cut into pieces. right size.
 Room divider from a rope
 Wooden planks are fixed on the floor and ceiling, and each piece of rope is fixed on them. It turns out an airy and beautiful partition. In the same way, you can hide any uneven wall or make an original false ceiling.
 Partition wall close up
 You can also correctly divide the space of the room with the help of a light screen made of metal and thin ropes of a light shade. Such a screen will original decoration your interior.
 Lightweight rope curtain
 Hanging bed on ropes in the interior
If you are a fan of swinging in a hammock or a regular boat trip, then organize a hanging bed in your bedroom. Thus, you will fall asleep easily and simply. The main thing is to choose a reliable and thick rope that is designed for such a load.
Hanging bed on ropesIf it is necessary to place two beds in the children's bedroom, then fasten one of them to the wall, and make the second one like a lounger in a train, which is held on a rope.
 Children's hanging beds on ropes
 Are you afraid to experiment? Decorate your headboard with rope or colored twine. This will give the interior comfort and warmth.
 Headboard decorated with colored rope
 Rope floor decorations in the interior
A house without carpet looks uncomfortable. You can fix this with the help of bright, decorative and original floor decorations - carpets and rugs. For needlewomen, you can weave a carpet of colored ropes and twine of different sizes.
 Woven floor mats made of colored rope
 If you don't know how to do anything like that, don't worry. Prepare the base of the desired size and twist the rope in a circle. Secure the end with clear glue. The result is a simple but original small size floor mat.
 Plain rug made of twisted rope
 Furniture decorated with a rope and a tourniquet in the interior
The simplest thing you can do with your own hands is hanging shelves. All you need is a few boards. We make holes in them along the edges, put the rope in and fix it with a knot. This is how quickly and easily you get a shelf for storing various accessories.
 Hanging shelves on ropes
 Almost every home has old furniture which is in need of restoration. Instead of the old and time-tested decoupage technique, we suggest using ropes and a rope. For work, it is best to use a thin linen or jute rope. The material is attached to ordinary PVA glue. Work begins with the legs. Spread them with a layer of glue, and then start wrapping the rope tightly. Next, move on to the tabletop.
 Rope-decorated coffee table
 According to the same scheme, you can make a stylish chair, ottoman or stool with your own hands. Use the old one for this. wooden box or a rubber car tire.
 Homemade table from car tire and ropes
 If you think that a completely rope furniture decor is not practical, then you can start with small details. For example, make rope handles for a chest of drawers. To do this, tie them in a knot and secure.
 Rope drawer handles
 Rope handles, additionally decorated with real stones, look original and beautiful.
 Cabinet handles made of rope and river stones
 A small but very functional console, which is great for storing photos, figurines and books, will be a great addition to the interior. This console can also be decorated with thick plain or colored ropes.
 Console decorated with ropes
 Staircase decorated with rope or rope in the interior
A boring staircase located between two blank walls can turn into a real designer thing if you make a thick jute rope railing for it.
 Railing on the stairs made of thick rope
 From the rope you can make handrails and balusters. The only thing is that this decor is not suitable for those who have small children in the house. Such stairs are not safe for them.
 Rope ladder handrails
 Lighting fixtures decorated with rope and rope in the interior
Rope-decorated lamps are nothing new. original chandelier you can do it on your own, having an old cart wheel and a rope at hand. Or upgrade existing fixtures in the house. To do this, decorate the leg and lampshade of the lamp with a thin rope.
 Chandelier decorated with thin rope
 Simple things in the interior, decorated with rope or rope
If you decide to experiment with a rope for the first time, then at first practice on small objects. Firstly, it can be nondescript and ordinary plastic flower pots. Take a thin rope, smear the vessel with PVA glue and start braiding it. Secondly, you can decorate candy bowls, fruit bowls and bottles in this way, which you can then decorate your home with.
Bought a hemp rope, then decorate it with a photo frame, Wall Clock or a mirror. You can also hang your favorite picture on it.
 Clock decorated with rope
 From the rope you can make an excellent decor for giving. This will be a regular towel holder. It will turn out simply, but with taste.
 Country towel holder
 TOP 3 most unusual ideas for the interior of the rope and rope
And finally, I want to surprise you a little. Below is a selection of the best ideas for your interior:
- Glass containers. If you have a coffee table that is made of glass and has an empty space inside, then you definitely need to fill it with something. Put a thick rope in there. It makes no sense to lay it evenly and beautifully. Everything must be done randomly. You can just take an ordinary small aquarium and put a rope in it.
- Knots and patterns. Learn to weave interesting patterns from rope or twine. Decorate your home with them.
- Hanger-lasso made of rope for clothes. This design idea is suitable for those who love cowboy movies. For the first time the idea was presented by German designers. But you can try to make this accessory with your own hands. For this you need to prepare metal carcass in the form of a lasso and wrap it around with a rope. Also, we advise you to read about how you can do

You are given many options on how to use rope and rope to decorate the interior of your home. Use ideas and surprise your loved ones with original things.
We also recommend viewing.
Hello to all brains! In today's project, we will make a small wicker chair. This type of activity was very popular in the 1800s in many countries of the world. For example, in India, some villages still use the weaving technique to make beds. This is quite a unique technique. The bed frame is traditionally made of wood and has four legs. The part of the bed where you sleep is made from ropes woven together.
Now let's get started!
Step 1: Materials Used


Shuttles 2 pcs. (I took wood, but you can use other material)
jute rope 2 pcs. (approximately 4 meters)
wooden frame(make it yourself or buy ready-made in a furniture store).
(For self-manufacturing legs will need a bar 2.4 meters long - aspect ratio 1 × 4, for jumpers a bar 2.4 meters long - aspect ratio 2 × 4).
Step 2: Start Weaving


First you need to weave the base. To do this, take the shuttles and wrap a rope around them.
Now try to tie a dead knot in the corner, then wrap the rope 5 times (from the beginning and every 5 turns around the crossbars, as shown in the image).
Insert a stick between the ropes as a separator. It will add slack when winding the rope.
Repeat this procedure until you get to the end and remember to make the last 5 turns for the crossbars.
Step 3: Finishing the weave


First, you need to divide the wound ropes into several groups using sticks, as shown in the images. Repeat this procedure for the back side as well. Make 5 turns and the sixth around for the crossbar.
Now count an odd number of ropes and separate with a stick. As you can see from the image you will get odd-even cross lines. Do again 5 turns and repeat the procedure to the end.
Tie the last rope with the crochet hook.
The seat of this wicker chair has 17 rows and 17 columns.
I hope that this weaving technique will not cause you any difficulties.


History of sky lanterns
Job description: concept, purpose, structure, procedure for compiling and formalizing Purpose and content of job descriptions for managers
Interview questions What job are you going to work on?
What to do if the boss criticizes all the time If the boss does nothing
How to understand: will the kitten be fluffy?