The art of wood carving. How long ago did it occur? Nobody will say now. Since ancient times, wood has been the closest material to the worldview for a person. It often seems that, they say, this knot needs to be slightly corrected, the excess removed, and it will become a work of art. But no, in fact, woodcarving is painstaking professional work. Skillfully, you can make a masterpiece!
- First, desire creativity and good mood.
- Second, the material. In principle, you can cut on any kind of wood. But it is easiest to work with birch, linden, aspen, pine, spruce and cherry. The tree must be well dried. In addition, wood needs paper for sketches, a template for smooth transitions of lines, a ruler, a compass, a triangle and a pencil.
- Third, tools. In general, a large set of tools is used for cutting. But for a beginner carver, a jigsaw, an awl and a knife will suffice.
- fourth, workplace. Before picking up a cutter, be sure to create a workplace for yourself. For this, you will need a table or bench. They must be stable and durable. But it's better to make a workbench. It is more convenient and reliable.
- Fifth, you need to create sketches for woodcarving.
Let's get acquainted with the main types of carving. We note 2 commonly encountered species: sculpture and relief.
- Sculpture - these are free-standing works and plots. Usually these are people, animals and abstract forms.
- With relief wood carving, images are made on the surface (background). For example, a bird soaring against the backdrop of a mountain landscape.
To get started, we need sketches. Where can you get them? This is your fantasy! Whatever you think of and put on the tree. But, if fantasy is tight, then you can find ready-made sketches on the Internet. The main thing is to start with simple sketches for stencils.
Found a sketch for woodcarving. You need to turn it into a stencil. What is a stencil? This is the transfer of a drawing to paper. The paper must be strong. It can be tracing paper or carbon paper. With the help of them, we simply transfer the drawing to the surface. Or create a stencil out of cardboard. After that, we attach it to the tree and outline the outline.
And if you use geometric carving, then you can simply draw a pattern on a blank. First of all, you need to select areas for yourself and determine which of them will be convex and which will be concave. Only in this case will the correct drawing on the tree be obtained. Incidentally, this is the light look threads. It is great for making boxes, boards, frames.
Gallery: stencil woodcarving (25 photos)


Stencils for contour carving
 It is also easy contour thread. Here, the main thing is the ability to correctly cut grooves of the same thickness and depth. Why do we use a variety of chisels. After cutting the canvas in this style, usually inner part grooves are tinted. Then the sketch is perfectly visible and looks very picturesque. . The advantage of this type sawing is the ability to take virtually any stencil and transfer to a blank. But there are many ready-made templates for those who want to try themselves just in this form of cutting. Animals, plants and landscapes look very good in this technique.
Geometric patterns for woodcarving
The simplest patterns are geometric shapes, floral ornaments (leaves, twigs), butterflies. They are often used in the manufacture of carved platbands for windows. In ancient times, it was believed that platbands protect the house from evil spirits. Therefore, they were often decorated with patterns in the form of laurel leaves, oak, lotus flowers and lilies. They also used Celtic (Scandinavian) braid. This is a braid pattern., various weaves.
Stencils for planar technology
And with the help of planar technology, you can create interesting figures of various animals. For example, put a wooden bear or a swimming swan in your garden. You can make fairy-tale heroes - formidable dragon or Serpent Gorynych. Or scare guests with masks of some mythical characters. By the way, the masks are made in three-dimensional technique. This carving requires skill and skill. Their sizes are different: from 25 to 50 cm in length. You can come up with sketches for mask stencils yourself or take ancient Slavic heroes from books, for example.
Stencils in Flat Relief Cut Styles
 Here the process will not be easy.. Here you need to make a deep background, it is located, as it were, under the relief. The relief itself, as a rule, collapses. Transitions are created smooth with a file or emery. We make the background even or leave it slightly textured. To artistic carving came out truly luxurious, we can’t do without a stencil either.
The ability to cut wood allows you to create many things that are amazing in beauty and inner energy. Developing technique and constantly learning, you can make real masterpieces of art. For example, you can start cutting out icons and paintings. This is a very painstaking and exciting task. Such canvases are quite expensive.
And with imagination, you can do Original gifts to your relatives and friends. For example, a wooden medallion engraved or carved clock. The latter can be both wall-mounted and floor-mounted.
So wood carving can be not only an exciting but also a profitable hobby. The main thing is to have imagination, creativity and put your soul into the work. Then the products will not only delight you and your friends, but also protect you from negativity.
Volumetric, contour and geometric wood carving are one of the most ancient methods of decorating a wide variety of products. By by and large, you don't need anything other than wooden blank and a sharp enough knife: with proper skill, you can get a carved casing, a beautiful toy or any other product.
Of course, you will get masterpieces only after many years of practice. But you can start mastering carving from the simplest details: just study this article and understand the basics.
Thread types

Despite the fact that in working with wood the most simple tools, and processing techniques are not difficult, the result can be very different. Depending on the appearance the machined surface is distinguished by the following types of thread:

- contour thread- perhaps the simplest (outwardly, not in terms of execution technique). The pattern is applied to a flat surface with shallow lines, forming the contours of the pattern.
- Geometric carving- the most common due to ease of development. Unlike contour, patterns are formed not by lines, but by a combination of geometric shapes, most often wedge-shaped recesses.

- Flat serrated thread - the technology of applying an ornament or pattern on a flat board. At the same time, recesses are cut out on a flat background, which form the pattern we need.

A variation of this technique is also considered a through thread, in which not only recesses, but also holes are formed in the workpiece.
- sculptural carving(volumetric) - the most difficult technique. A chock, branch or root is taken as a blank, after which the part is given the desired shape. Here it is important not only the skill of the carver, but also how competently the wood is selected.

Of course, this classification is very arbitrary, but it gives an idea of where you can strive to improve your skills.
What do you need to work?
Carver's tools
To do wooden Toys, carved frames, platbands and other decorative objects, the master needs the right tools. In addition to the usual carpentry (saw, drill, file), you need to use special tools:
| Illustration | Tool | Purpose |
 |
joint knife | A versatile tool that is used for both geometric carving woodwork and sculpture. |
 |
Chisels | The most extensive group of tools used to form recesses. Depending on the shape of the edge, the following varieties are distinguished:
|
 |
Cranberries | Special chisels with curved working part. With their help, a relief carving with a strong deepening is performed. |
 |
Spoon cutters | As the name suggests, special tools for making wooden spoons. The special shape of the blade (ring or semi-ring with one-sided sharpening) allows you to effectively select large volumes of wood. |
The price of professional cutting tools is quite high. And yet, a novice master should not save money: it is better to purchase several knives and chisels of decent quality. Then the first experience will not be spoiled, and it will be possible to focus on mastering the techniques and techniques of carving.
Choice of wood

Artistic carving requires the formation of a fairly clear relief. And for this you need not only suitable tools, but also the appropriate material. Not every wood is suitable for carving, and if you are just starting to master the technique, then you need to be very meticulous in choosing:

- Linden - perfect option for a beginner. The material is soft and homogeneous, therefore it is better to master the most complex patterns for woodcarving on linden.
- Alder (red and black)- also very a good option, albeit denser. Ideally cut, almost does not warp when dried. The main downside is hard to find!

- Birch- firmer and more resilient, but at the same time quite suitable for learning the basics of carving. When dried, it can be deformed, therefore, small products are usually cut from birch.
- Oak- a great option, but only for an experienced master. The relief is perfect, but you need a very sharp tool and a confident hand.

- Pear- wood with high density and good uniformity. The structure of the material allows you to make the thinnest products.

From a tree of these species, it is first necessary to cut blanks, dry them, and, if necessary, process them rough. Only after that, drawings and sketches are applied to them, according to which carving is carried out.

Techniques and techniques for geometric carving
In fact, all work on a carved detail comes down to three operations:
- Training- selection and roughing of the workpiece, transferring the pattern.
- Actually carving- drawing a relief pattern.
- Finishing- elimination of defects, grinding, varnishing, etc.
Instructions for performing basic threading operations are shown in the table:
| Illustration | Stage of work |
 |
Drawing drawing.
For workpiece right size we transfer the contours of the picture for processing. You can build a drawing yourself, using a ruler and a compass, or you can use ready-made sketches for woodcarving. In the second case, we print the sketch and transfer it to the base, making punctures with an awl at the intersection points of the lines. |
 |
Cutting contours.
Focusing on the drawing, we cut the contour lines with a cutter. At the same time, we observe the depth and direction of cutting. |
 |
Cutting out triangular elements.
After the basic cutting, we move on to the main part of the work. We cut each triangle into a wedge on both sides. After that, we cut out the third side, removing a piece of wood. |
 |
Cut out other elements.
After all the triangles are selected, we move on to other details of the thread - bevels, planes, arcs, etc. We cut them, trying not to damage the already processed area. |
 |
Clear cut.
After completing the main operations with a sharp cutter, we process problem areas, removing defects and forming even, clear lines. We carefully grind the planes, trying not to remove the relief. |
 |
Staining / varnishing
We process the product with stain or varnish, or apply decorative impregnation with a tinting effect. |
Conclusion
By no means do I want to say that woodcarving is easy. To achieve results, you need to study and practice, preferably under the guidance of a mentor. But the tips and videos in this article will help you take the first steps, and in the comments you can get answers to all your questions.
All photos from the article
Artistic wood carving for beginners can seem like a rather complicated process. In principle, at first it is so, but having mastered the basic techniques and methods of processing the workpiece, we will be able to gradually improve our skills, each time creating much more complex jewelry.
Naturally, this requires various devices, and among them you should definitely include templates, stencils and patterns for woodcarving. It will be much easier for a master mastering the technique to navigate the finished drawing than to try to improvise.
General information about sketches and stencils
Image creation
Before proceeding to, we need to decide what exactly we will cut. An ornament for woodcarving can be very different, and if we are talking about creating a plot composition (flat or three-dimensional), then the list of available options will be endless in principle.

Note!
You can find a variety of sketches on the net, but stencils for woodcarving for beginners, i.e. not distinguished by complexity, among them are quite rare.
Much more often, authors lay out schemes for mid-level crafts, but they should be used only after mastering the basic techniques.
When making a sketch, it is best to follow this algorithm:
- First, we select the workpiece and decide what exactly we will cut out of it.. Beginners should give preference to carving on a plane or making a simple figurine.
- Then we create a sketch of the future sketch, highlighting the main parts and marking the places where the ornament will be applied..

- At the next stage, using a compass and a ruler, transfer the sketch to graph paper. If the part is large enough, then graph paper can be abandoned in favor of tracing paper, on which we apply a scale grid for convenience.
- If there are several repeating elements in the ornament, then for them you can make separate stencils from thick cardboard by cutting out the part along the contour.
Separately, it is worth mentioning the technology of mechanized carving using milling machines. In principle, milling cutters quite allow you to select by marking, but most often metal or polymer stencils for wood carving with a milling cutter are used to decorate flat parts. They limit the movement of the cutting edge, and therefore practically exclude the influence of the human factor.
Note!
Such products are quite difficult to manufacture, because their price is appropriate.
So it's worth buying them only if you need to perform a large number of similar images.
Transfer to workpiece
So, we already have a template or sketch, now we need to understand how to transfer the image to the blank.
The instruction involves the use of several methods:
- Templates for wood carving with a router are the easiest to use - just fix the plate on the surface of the product so that the grooves are exactly opposite the location of the ornament.
- Cardboard templates are also not difficult to use: we apply them according to the markup and carefully trace with a pencil along the contour.

- When transferring simple geometric shapes, you can use the puncturing technique. To do this, we fix the sketch on the part and mark all the key points with a needle / awl. Then we connect the marks on the wood with straight lines.
- Finally, you can use carbon paper: put it under the sketch and circle the lines in the drawing, transferring the image to the tree.

Threading technology according to the finished contour
When the drawing is transferred to the workpiece, the most difficult part of the work begins, namely, the woodworking process.

- If our task is a through thread, then first you need to make a starting hole in each element. This is done using a drill with a drill, the diameter of which corresponds to the width of the canvas used.
- After that, a saw is inserted into the hole, and part of the wood is sawn out. The edges of the hole are then leveled either with a knife or using files and abrasives.
Flat and volumetric threads are performed differently:

- First, the contours of future recesses are cut with a sharp knife.
Note!
It is advisable to draw a cutting line along the inside of the contour, since usually the area of the treated area increases slightly during operation.
- Then, with the edge of the jamb or cutter, we perform the central slot of the deepest part. After that, we begin to form the recesses, choosing the wood between the contour and the central recess.
- Small details and textures are formed using a chisel. Ideally, it should be sharp enough to cut through the material without the use of a mallet, but sometimes (especially if you have to cut oak, beech or maple) you cannot do without additional effort.

- It is convenient to choose deep grooves with chisels with a curved blade - the so-called cranberries. In this case, care must be taken that the cutting edge does not sink below the selected level.
- After completing the carving, it is worth once again walking along the contours with a knife, restoring even edges. When this stage is completed, you can proceed to grinding the surfaces.
Conclusion
Do-it-yourself wood carving will be much easier to master if you early stages work you will use suitable sketches and stencils. To understand the intricacies of using these devices, we recommend that you carefully study the video in this article.
Artistic wood carving always looks very impressive. Most people do not even know how such products can be implemented. It seems that this requires great physical strength, and in addition, artistic taste and education. However, cutting a beautiful ornament is not as difficult as it seems, you just need to learn a little technique and, as they say, fill your hand. We will show popular drawings for learning wood carving techniques, which will be useful for beginners and masters!
It's not a secret for anyone that for manual creative work it is necessary not only to master the skills of this art, but also to have inspiration, desire and, of course, time. In order for all these parameters to come together, drawings can help the master to study simple woodcarving. For the birth of an idea, not only drawings help, but also photographs of the work of other craftsmen.
There are sketches for various kinds woodcarving, and here you can find a suitable sketch for yourself for free.
Parsing drawings for woodcarving: sketches for geometry
For beginners, drawings for geometric carving are well suited. This is an easy and effective type of wood carving. To do this, you just need to determine for yourself which sections are convex and which are concave, in which case the correct picture will come out on the tree.
Boards in geometric and flat-relief technique.
Stencil.

Stencils can be changed - for example, reduce the number of elements, or, on the contrary, add details for a more interesting result.
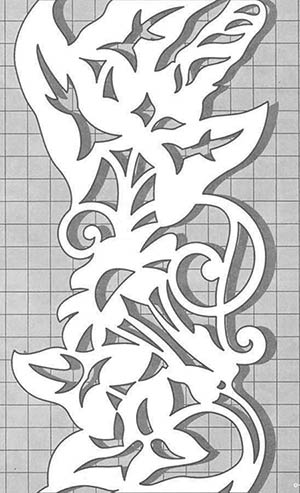
Stencils for slotted carving.Artistic carving is also of other types. One of the simple cutting techniques with the right tool, such as a router, is a slotted thread. It is also called openwork because the finished product, made accurately and accurately, looks like lace. It has no background - it is cut out of the pattern. Hence the name. To practice this type of wood carving, you need to have a firm hand and cut clearly along the contour of the stencil. A fabric or foil of a contrasting color is placed under a product made using this technique with a milling cutter or jigsaw. The photo shows examples of finished work, as well as sketches suitable for this technique.

Contour carving is different in that a contour drawing is cut out on a tree. In this technique, you can make a lot of different paintings; it is not necessary to take a ready-made stencil for carving for it. For the decor of the nursery, you can circle the coloring and use it as a sketch. Also, if you do not know how to draw, you can take any pencil sketch and transfer it to the tree. In this technique, images of animals, birds, as well as landscapes and still lifes are well obtained. The images clearly show examples of what can be carved on wood using this technique.

Black-lacquer carving is a kind of contour carving, where painted wood a light outline is cut out.
Examples and stencils for flat-relief woodcarving.This view differs in that the drawing is above the background. In this case, the pattern has the same height. The background is textured, and it is smooth. The edges of the cut pattern, as a rule, are ovalized, that is, they are carefully sanded so that they are smooth, as if oval. This technique requires a little more skill than others, but the products made in this way look amazing. The photo shows examples and sketches for carving in this style.

Drawings for caskets can be distinguished as a special kind. They can be performed in various techniques: slotted thread, laying a base of fabric, foil or noble woods under the drawing suitable color; flat notched thread, which includes geometric and contour, or another subspecies. It differs in that recesses are made to the same depth in a flat background. In the case of the geometric technique, the recesses are usually in the form of triangles or quadrilaterals. In addition, there is also bracketed carving, which is also a kind of flat notched carving and is well suited for decorating caskets. In the images you can see boxes made in various styles.
Consider what wood carving stencils are, how they can be used and what they are. Today it ancient craft captivates many, but this is a rather complicated and painstaking task, which requires not only talent, but also artistic skills. If everything necessary for this case is acquired and it is known how to work with each of the tools, then they are determined with a drawing.
Stencil pattern for drawing a picture on a tree
But it is not always possible to choose and draw the right one. In this case, they acquire stencils for woodcarving, which help the novice master to do everything correctly.
Consider what a stencil is. This is a device that helps to apply a pattern or identical characters to the surface. For example, they occupy a special place in this niche, since they are produced specifically so that the master can perform complex work designed for and external walls.
Stencils for wood carving with a jigsaw exist for the following interior items:
- pilaster;
- towels
- brackets;
- and etc.
 Stencil with a complex pattern for carving
 These are specialized templates, it is on them that three-dimensional ornaments and patterns are created. They greatly facilitate the task of changing the appearance of the interior. After all, you don’t have to look for a stencil, but you can simply download it or order it through the worldwide web. And then create your masterpiece.
How to choose and where to find a stencil
There are a large number of different patterns for: from simple ornaments to an animal, bird, person or a whole picture. When making a choice, you must remember the following rules: 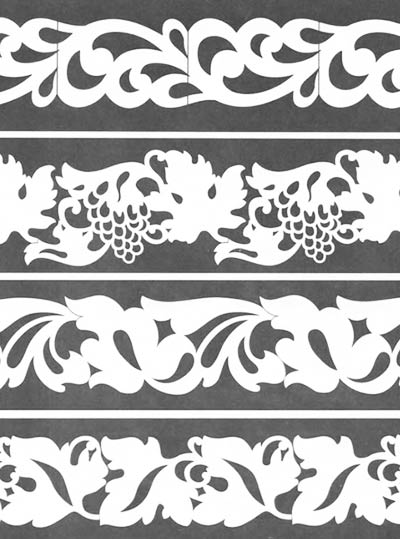
- if they are held in their hands for the first time, they do not acquire the template of an old painting or engraving, since working on it is quite difficult and can be spoiled raw material;
- for a certain type of thread, there are stencils;
- in order to perform the work accurately, all lines on the source material are transferred accurately.
 Stylish stencil ornament for carving
 And nowadays it is available through digital libraries who publish full editions. Therefore, you can look into these rare publications and "take inspiration" from there. An artist, decorator, designer or wood carver will appreciate such a source of information, as it makes it possible to understand and feel not only the past era, but also the spirit of that time. After all, it was then that everything was made by hand, and objects were decorated with bizarre patterns.
Before choosing a pattern, compare the dimensions of the workpiece and the image. For a correct and good reading, the following points must be remembered:
- if the product is large, then do not choose an openwork or small ornament;
- a large drawing is not suitable for a small one;
- proportions must be observed.
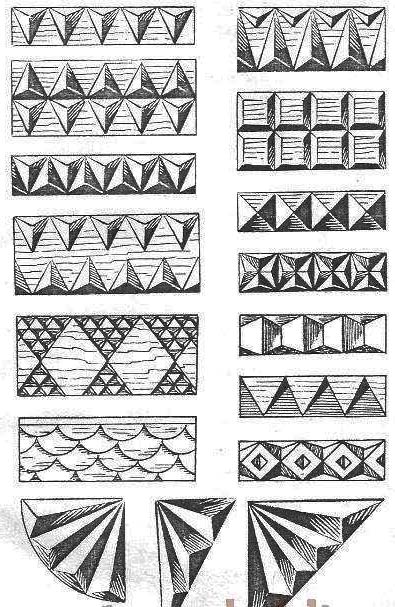 A selection of various geometric carving patterns
 All this applies not only to the floral pattern, but also to the image of an animal, bird and ethnic ornament.


Sun skirt: types and how to wear it Black sun skirt with a T-shirt how to wear
Ground bird cherry Ground bird cherry cook
Own business: production of chips
How to care for your skin in spring Face masks in spring
Seizures in the corners of the mouth: causes and treatment in adults and children