Compressor in the garage always useful: pump up the wheels, tint, "blow out" any details, etc.
Somehow I came across a single-cylinder compressor of a GAZ 66 car, an electric motor and a couple of receivers, I took the main ideas from the Internet. Therefore, I will not dwell on the principle of work (and so everything is clear), but I will only post a photo and small description homemade garage compressor.
receivers
Two "scuba" turned up on the occasion, which gave birth to the idea to build a compressor. Below are two drain valves for draining condensate. On the right receiver there is an outlet valve, on the left there is a hose for connecting containers with compressor.
I attached three wheels, weak, but enough to move around the garage, the top one with a turning axle. The wheels are taken from an old cart for honey. appliances.
Crankcase for homemade compressor
The GAZ 66 compressor did not have a crankcase cover, I had to make a homemade one. I used a pipe sector with a diameter of 300 mm and a thickness of 5 mm. He bent the edges of the sector and leveled it into a plane, welded a corner of 25X25 mm to the ends. Cut off the excess corner. From below in the lid, I drilled a hole and installed a drain plug (bolt 10 mm). I made guides for fastening from a corner of 30x50 mm.

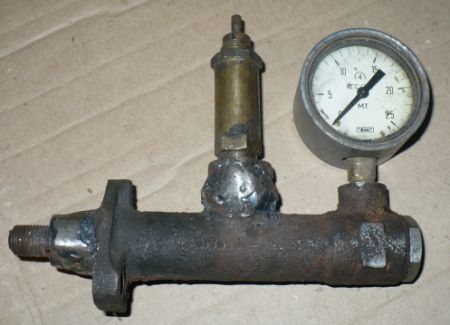
Instrument manifold
There were no additional holes in the receivers for installing instruments (pressure gauge, emergency sensor).
For a long time I thought about what to make a collector for their installation on the pipeline. There was an idea to use the old VAZ clutch master cylinder. At first glance, everything is simple - to weld two fittings and that's it. But I came across the fact that it is impossible to make a high-quality weld, the metal from which the cylinder is made contains a lot of carbon. "Boils" during electric welding, welded in several layers, filled from the inside with glue for sealing. In the future, this technology did not justify itself, and the collector was replaced by a GAZ-66 receiver, it has enough holes for devices.
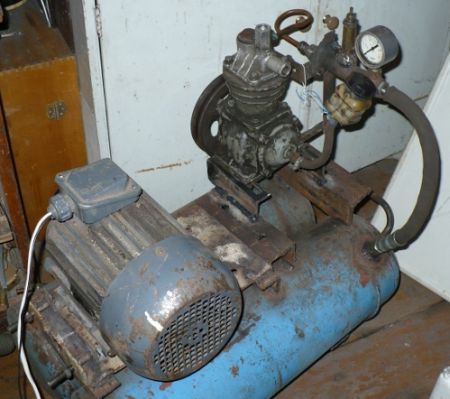
The layout of the compressor, made by hand.
Electric motor 1.5 kW, three-phase 220/380, 1500 rpm. mounted on skids, it is possible to move to tension the belt. fastened with 4 M10 bolts.
The compressor is fixed on skids with crankcase cover bolts.
Homemade compressor starting capacitors
For the operation of such an engine, according to calculations, Srab 152 μF and Descent 250 μF are necessary, however, it turned out to be sufficient for operation and start-up at pressures up to 4 ATM C = 106 μF. But if the pressure is higher, then it is necessary to add a starting capacitor. I estimate that at a pressure of about 8 ATM, a nominal power of 1.2 kW will be required, at 4-5 ATM it will be lower. Conclusion: the capacitance of the capacitors I selected is enough. Capacitors of different types for a breakdown voltage of 500-630V are placed in boxes around the engine. The boxes are fixed on the frame and covered with a steel casing. The condenser housings are isolated from the compressor housing by rubber gaskets. Gas station 10A was used to turn on. Connection to the network is carried out using a 3-wire circuit (the case is connected to the "ground")
The picture shows a homemade air filter. Made from a bottle of liquid for washing the injector and a coffee can, mesh and foam rubber inside.

Compressor drive and cooling.
A VAZ 2101 belt was used for the drive. The drive pulley is self-made, the driven pulley is from the ZIL 130 compressor. For cooling, a VAZ 2121 car fan is planted and centered on the compressor axle, over the pulley, and centered with a washer. The drive is protected by a casing.

Lubrication and crankcase ventilation.
To improve the lubrication of the crank mechanism, three holes were drilled in the connecting rod and liners. The central channel of the crankshaft is connected to the tank (GCC tank of a VAZ vehicle) with a flexible oil-resistant hose. Excess oil enters it, when the compressor is running, oil can also be topped up.
A feature of the GAZ 66 compressor is that it is a single-cylinder one; during operation, the pressure in the crankcase changes, which is not desirable. I got rid of the drawback: I drilled a hole in the body, cut the M10 thread, screwed in the fitting and connected it to the oil tank. In the tank lid, I increased the hole to 8mm and put a slotted rubber membrane.
General view of the compressor.

All parts are covered with shields made of 1.5 mm steel. That's all. There was an idea to add a box to save space in the garage, which does not happen much.
Place for the instrument.
An aluminum box was attached to the top of the engine and the "battery" of capacitors. I plan to store tools and accessories in it. It can be seen in the photo at the beginning of the article.
An air compressor operating from 220 V in a home or garage is necessary for various purposes: it is easy for them to pump up tires, make repairs by setting pneumatic tools in motion, blow dust and chips from treated surfaces, use as a spray gun. Available in specialized outlets a large assortment pneumatic compressors, and such a unit costs enough big money. But if you wish and have certain skills, it is possible to make a compressor at home with your own hands.
Self-manufacturing of the device
Any compressor, or do-it-yourself, works according to a simple principle - the motor pumps air into the tank, where it is under the required pressure which is controlled by a manometer. When the pressure drops to the lower limit, the engine starts its work, and when the set value is reached, it turns off. Depending on the purpose that the compressor will perform, it is possible to manufacture both a simple and a semi-professional device.
The unit is mounted on a base or frame, which can be any material at hand, for example, a sheet of chipboard or plywood of the right size, where all parts are placed in such a way that they are easily accessible in case of maintenance, or if necessary, make repairs. The old KamAZ brake tanks are perfect for the role of the receiver, where there are already threads for fittings and a condensate drain valve, or an empty fire extinguisher bottle.
Sometimes several containers are used, and then the necessary bushings and tubes are welded into them to connect the rest of the system. The design must install a dehumidifier and an air filter, which are sold ready-made. As connecting tubes, metal or oxygen hoses used for gas welding are used. From automation, a starting and pressure switch are separately purchased.
What will be needed?
The main part of the handmade product is the motor-compressor.
It can be purchased separately, but such devices do not differ in power and reliability, and are also quite expensive. For this purpose, it is suitable, which is devoid of such shortcomings, and repairs to such a unit during normal operation are extremely rarely needed. Also you will need the following materials:
- Receiver balloon. The larger its size, the less often the motor will turn on.
- Air filter (suitable from a car or motorcycle).
- Bypass, it is also a check valve operating at a pressure of 6 atm.
- Copper connecting pipes and fittings.
- The synthetic hoses maintaining pressure of 6 atm.
- Platform for fastening units and parts.
Staged assembly
After preparing all the necessary parts and details, start assembling:
- Engine preparation. Its task is to force air into the receiver. For this purpose, it is advisable to use a unit from an old Soviet refrigerator, since it is able to create more pressure than newer imported counterparts. It is desirable to make repairs in the form of changing the oil to semi-synthetics. The work is carried out with a syringe through a sealed tube, which is previously opened, after which the old oil is removed, new oil is poured in, and the tube is sealed.
- Preparation of the air reservoir - receiver. To do this, a container from a 10-liter fire extinguisher, an oxygen cylinder or a receiver of the pneumatic system of the car brakes are cleaned of rust both outside and inside, if necessary, repairs and painting are done. To connect to the system, install the necessary fittings and adapters, as well as a water cross.
- Assembly of the device. The engine and receiver are attached to a solid foundation with the help of studs, clamps, nuts and washers, having previously marked and made the necessary holes. According to the diagram, the engine-compressor is connected to the receiver, from which the connecting hose goes to the filter. After the filter, the pressure is regulated by a reducer with a pressure gauge. The assembly is completed by installing a switch, a tube where an airbrush, air gun or other load is connected, and small wheels are attached to the platform for better mobility.
The scheme of operation of a self-made compressor is as follows:
Product options
Depending on the complexity of the tasks performed, various do-it-yourself compressor schemes have been developed, among which there are both simple and semi-professional options:
The simplest compressor. Capable of handling small jobs where air pressure requirements are not too high. For its manufacture you will need:
- A camera from a car wheel that will replace the receiver;
- Pump equipped with a pressure gauge;
- Nipple from the camera;
- A set of tools, including those used to repair car tires.
The manufacture of the compressor is as follows:
- The car camera is checked for tightness, if punctures or damage are found, it is repaired;
- An additional hole is made in the chamber, where a nipple is inserted through which compressed air or excess pressure will exit;
- The pump is connected to the main nipple of the chamber, and to an additional hose through which compressed air will exit.
Semi-professional compressor. There are a number of requirements for such devices, such as the uniformity of air supply and the absence of any mechanical impurities in it. They must have the necessary performance, reliability and long service life. Such a device, according to the principle of operation, does not differ from the simplest compressors, but the difference lies in the use of a more powerful and reliable engine and receiver, components, instruments and automation:
- An automobile unit or a powerful electric motor is used as an engine;
- As a receiver, empty fire extinguishers, receivers of the pneumatic system of trucks, oxygen or propane cylinders, as well as home-made containers that can withstand the required pressure are used;
- Tubes, pressure gauges, filters, automation and switches are selected depending on the conditions and load to which this or that part of the product will be subjected.
To assemble a cheaper version of the compressor with your own hands than the factory options, but not inferior to them in terms of capabilities, you need to carefully study the theoretical and information base, as well as find a video that describes in detail the process of manufacturing and assembling the product.
The video shows a manufacturing option from an old refrigerator
Test and setup
The finished air compressor must be checked for performance. To do this, a device is connected to it (a tire inflation tip or an airbrush), the supercharger is inflated, after which the pressure gauge is controlled. During the check, it is important to make sure that when the set pressure is reached in the cylinder, the engine will turn off and all connections remain tight. After that, the pressure is released until the engine starts. If everything went in the normal mode - the compressor is tested.
Caring for a self-assembled product consists in monitoring the condition of the filter and oil, and replacing them. From timeliness Maintenance the service life of the unit depends - the more often it passes, the longer repairs will not be needed.
If you have enough money, it is much easier to purchase a factory-made product, which will save a lot of time and labor costs. But experienced people say that a do-it-yourself unit with a receiver and a relay is in most cases more durable and much more efficient than serial samples, and manufacturing and repair will cost its owner much cheaper.
Contrary to popular belief, a factory compressor is often less reliable, durable, and in many ways performance characteristics inferior to a similar product made by hand. This requires a minimum experience in the implementation of such work, knowledge of the device diagram, assembly order and the availability necessary materials. Repair, maintenance and cost of the compressor will be an order of magnitude lower than the factory product.
The compressor is one of the tools necessary for do-it-yourself car maintenance. Moreover, it has a wide scope, that is, using this device, you can carry out various car maintenance operations, such as providing air to pneumatic tools, repairs. This article discusses how to create do-it-yourself compressors for painting cars.
Operating principle
Compressors according to the device principle are divided into several types. The general principle of operation of these devices is described below. It consists in the fact that the air pumped by the engine enters the tank, where it accumulates, reaching an increased pressure. When an excessively high pressure is reached, excess air is removed from the tank through the bleed valve.
That is, compressors function on the basis of maintaining the pressure at a constant level. Especially important is the constancy of pressure for devices intended for painting. In any case, air pressure is considered the main parameter of such a device, so the technology for creating car compressor and the choice of materials for it is determined based on the required pressure value.
Building a simple compressor
The easiest way to do it yourself is based on a car camera. This item in this case will play the role of a receiver. In addition to the camera from the car, for the described work you will need: a nipple from another camera, a car pump with a pressure gauge, materials for working with rubber, a set of tools.

It is important to find a whole chamber from the car, since the functions of the receiver in this case are to accumulate air. The role of an air blower in a home-made car painting device will be performed by an automobile pump with a pressure gauge.
Work begins with the fact that a hole is cut out in the chamber from the car and a nipple is glued into it. The nipple with a nipple, which is present on the chamber initially, will serve during operation to pump air into it with a pump, and the glued one will supply air to the atomizer hose. After that, you need to adjust the pressure in the chamber. This is carried out by selecting its value on the pressure gauge, based on practice, that is, by spraying the paint.
If the car pump you are using is not equipped with a bleed mechanism, you should slightly unscrew the hose from it, as this will avoid pressure drops during operation.
If there is a release mechanism, the pressure will be stable without this action.
The following are some recommendations to simplify the work of creating such a compressor for painting a car with your own hands and achieve the desired result. So, you must first fix the chamber to avoid its fluctuations when the air is supplied by the pump.

It is unacceptable to fill it with any bulk materials, as this can clog the channels, causing the paint to mix with this substance. The same rule applies to liquids. That is, it is possible to mix the liquid in the chamber and the paint. This will cause the paint to lose its properties and, moreover, will be sprayed unevenly.
Building a Compressor with a Receiver
Such a homemade compressor for painting a car is more difficult than the one discussed above. He is considered semi-professional. Therefore, in order to make this do-it-yourself airbrush device for a car, you will need a larger assortment of tools and starting materials:
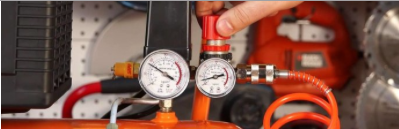
- manometer;
- pressure switch;
- gearbox with oil separator;
- crosspiece and adapters;
- nipple;
- clutch;
- oil separator filter;
- a tube;
- receiver;
- clamps from the car;
- furniture wheels;
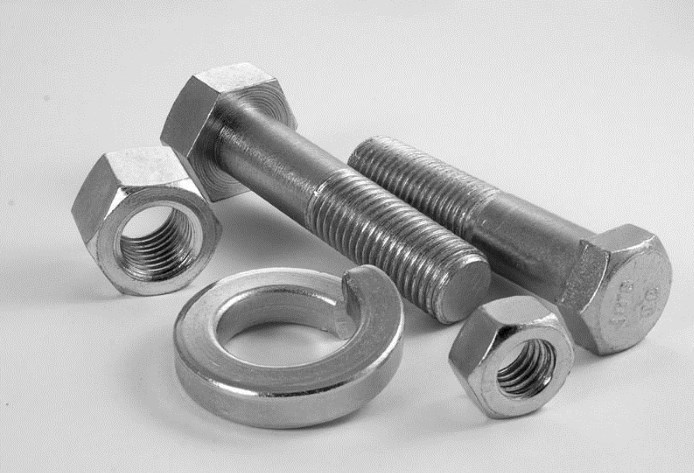
- fitting, nuts, washers, screws and studs;
- toggle switch;
- motor oil;
- fuel filter and oil and petrol resistant hose;
- plug and cord;
- refrigerator compressor;
- plywood panels (chipboard);
- dye;
- sealant, fum tape;
- rust converter.
Get this a large number of devices separately, of course, is difficult. Therefore, it is desirable to find old refrigerator- it will serve as a source of some parts for the compressor. So, you can use a cylinder with a built-in relay. However, you first need to make cosmetic repairs, that is, clean them of dirt, as well as rust, which is present on many elements of old refrigerators.
It is advisable to treat the cylinder with a rust converter to avoid subsequent oxidation of this part.
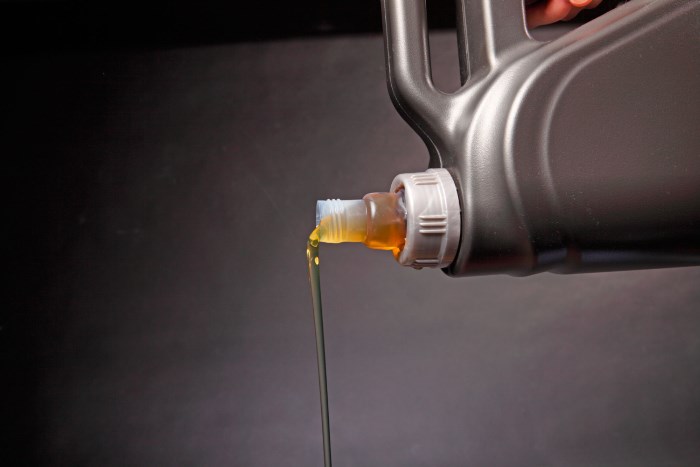
In addition, it should be taken into account that during the operation of the refrigerator, the compressor may have lost its sealing, which led to a change in the conditions of its operation. Therefore, you should replace the original oil with an analog for a car, since the latter endures much more severe operating conditions.
Suitable synthetic motor oil for cars. To change the oil, a tube soldered in most cases on the side of the device is used. First you need to file it with a file, and then break it off. In this case, precautions must be taken so that fragments of the material do not get inside the tube. Oil for cars is poured with a syringe in a pre-calculated volume. After that, the tube is plugged with a screw of the appropriate diameter with a rubber gasket to ensure tightness.
As a receiver, you can use, for example, a case from a OP-1 fire extinguisher with a volume of 10 liters, after sawing off the handle from it. Due to the fact that the refrigerator compressor is characterized by abundant oil evaporation, an oil and moisture separator filter should be installed at the inlet to the receiver, which will prevent foreign liquids, such as water or oil, from entering the paint.
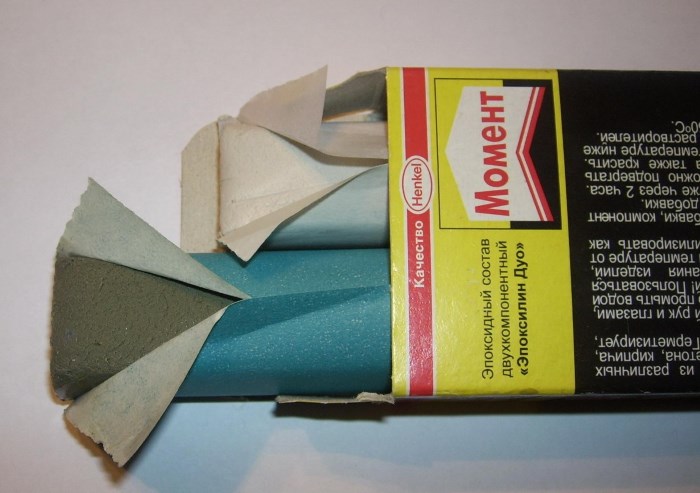
Next, you need to drill a hole for the adapter and fix it. The easiest way to do this is cold welding using Epoxylin. First, it is necessary to repair the bottom of the receiver, namely, clean it from all dirt and rust for effective interaction of Epoxylin with the working surface and to avoid paint contamination during subsequent operation. Cleaning is carried out by grinding sandpaper circular movements of the bottom of the fire extinguisher until a metallic sheen is achieved. After that, the adapter is fixed on the front side with a nut and left for a while (the exact dates are indicated in the instructions) for the Epoxylin to dry.
The base for a compressor for painting a car can be created from three wooden planks or plywood 30 x 30 in size. To increase the mobility of the device, you can equip the base with furniture wheels.
To fix the device, you need to drill holes for it and studs in the base. The latter are fixed with nuts and washers.
An automobile filter with a paper core should be put on the inlet, as this will prevent contaminants from entering it.
To increase ease of use, it is necessary to equip the compressor for painting a car with a pressure switch (for example, RDM5 or PM5), which will turn it off when the maximum pressure value is reached and turn it on when this value drops to a minimum. The maximum and minimum pressure values can be set independently by the relay springs. The relay has 2 contacts intended for connection to the network. One of them must be used for its intended purpose, and the other must be connected to the compressor.
In addition, it is desirable to equip the compressor with a general shutdown switch, which will allow you to de-energize the entire installation at once. It is installed on the gap between the network and the pressure switch.
Next, you can paint the receiver and begin the final assembly. A nut with a fitting must be screwed onto the filter-oil-moisture separator. One of the ends of a reinforced, oil-resistant hose is put on the latter. The second end is put on the compressor tube. Connections should be clamped with clamps, and threaded connections seal with fum tape. The filter must be screwed to the bottom of the receiver and treated with a silicone sealant. Next, screw the cast-iron cover with the thread pre-treated with sealant, placing under it rubber gasket. A tube with a quarter-inch thread is screwed onto the lid, and a crosspiece is screwed onto it. To tightly fix the receiver on the base, it should be pressed with a plywood cover with a pre-made hole for it.

A relay is screwed to the left of the cross, a gearbox with a filter is screwed to the right, and a pressure gauge is on top. At the end of the work, connect the wires to the relay.
The last step in preparing the car paint tool for work is to set it up and test it. Such a compressor for painting a car is much more difficult to set up with your own hands than the one discussed above, but it is easier to paint and repair with it. Moreover, this airbrush device can be used not only for painting, but also for other purposes, that is, it is universal.
Expediency
Considering how much branded compressors cost, creating such an airbrush tool with your own hands turns out to be very profitable. Thanks to this, it is possible to provide maintenance and repair of the car without incurring high costs. In addition, homemade compressors are also more profitable in terms of maintenance. So, if branded devices need to be taken to a service center for repair, it is easy to repair home-made compressors with your own hands. In addition, since all their components are easily accessible, repairs are carried out in a short time and do not require high costs. Moreover, due to the simplicity of design, home-made compressors are very reliable, therefore, repairs will not need to be carried out often.
In some cases, to perform various works housework is indispensable air compressor. With sufficient skills, as well as some initial components and parts, such an assembly can be made independently.
When do you need a compressor for household chores?
First of all, it will be needed by owners of individual vehicles. Painting the car, cleaning the interior and engine from dirt and dust, bringing the tire pressure to the required value - only a small list of operations that a homemade compressor can perform. The scope of the unit will increase dramatically if pneumatic tools appear on the farm. For example, in the country, their use in many situations turns out to be more profitable than electric ones: there is no connection to a stationary power line, and designs based on the use of pneumatics often turn out to be more reliable.
Before embarking on the manufacture of a home air compressor, an initial technical task should be drawn up, in which the following requirements should be clarified:
- what excess air pressure is required;
- from what and how the drive will be made;
- from what components it is possible to assemble the device;
- how long will the compressor run non-stop;
- what should be the minimum acceptable energy consumption;
- whether the quality indicators of the energy carrier are critical: its humidity and temperature.
To perform most housework, 4 ... 6 atm is enough, however, it should be noted that with prolonged use of the compressor, its moving parts heat up, due to which this characteristic over time, it can fall by 20 ... 30%. Performance is determined only technical specifications pneumatic tool. The minimum consumption is usually for drills, wrenches and dowel mounting guns (up to 100 ... 120 l / min). At the same time, impact tools or grinders will require a flow rate of up to 350 ... 400 l / min. When performing outdoor work (in particular, painting), higher performance values \u200b\u200bmay be required, so it is necessary to provide a margin for given parameter in 20 ... 30%. The same approach is necessary for estimating the power consumed by the unit.
Any compressor needs a receiver - a storage tank that maintains air pressure within the limits necessary for stable operation of the tool. With an increase in the volume of the tank, the functionality of the air compressor increases, although dimensions settings will increase. However, the volume cannot be less than 10 liters. It should be borne in mind that for the purposes of painting, the length of pipelines (and, consequently, losses) will increase.
How to make a compressor, and in what sequence to work?
Components of the future compressor
To make a compressor with your own hands, you will need:

Mounting order
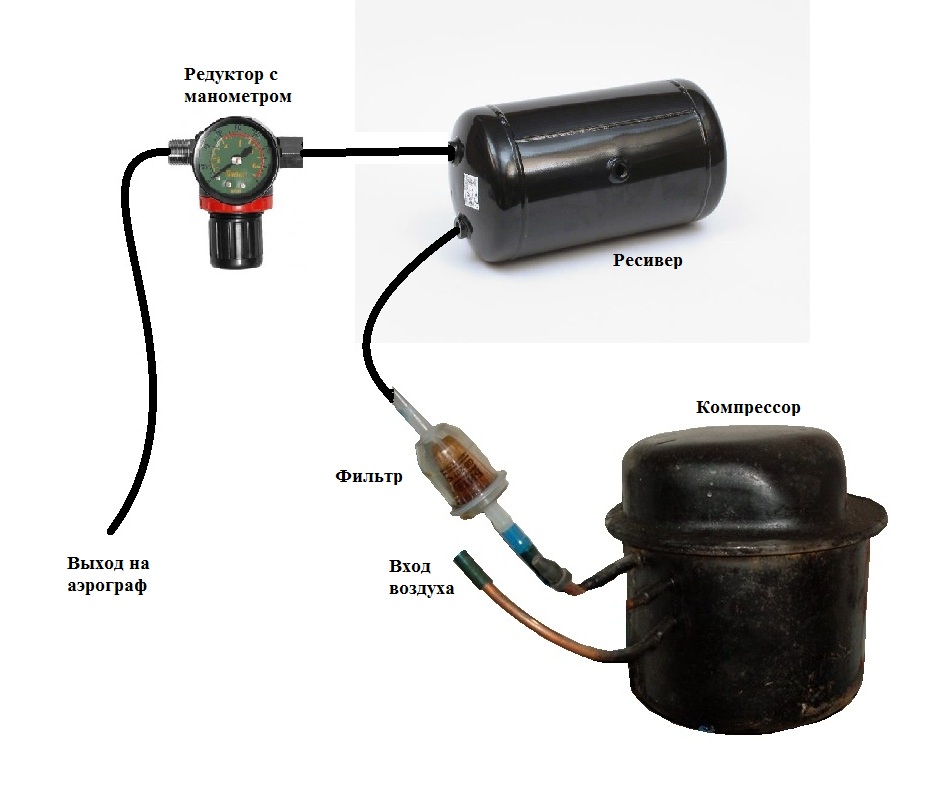
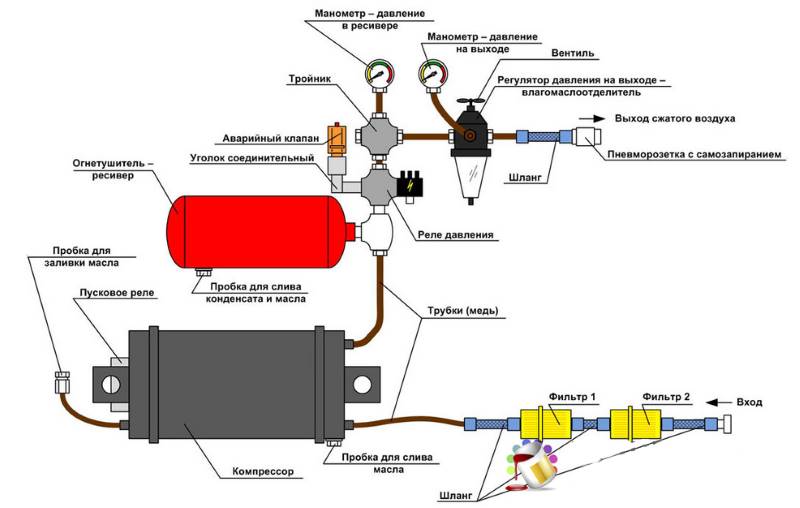
How to make a compressor? The following sequence of preparation and assembly of elements is recommended: inlet intake hose with a pipe → pre-filter → final filter → rigid inlet pipe to the compressor → compressor → oil change pipeline → outlet pipeline to the receiver → tee → receiver → RD relay with emergency safety valve → tee with pressure gauge → regulator with valve → combined outlet filter → hose with self-closing pneumatic socket.

On the initial stage the compressor from the refrigerator will have to be prepared for installation. It is cleaned from the inside of dirt and impurities, painted, and the oil is drained (it is more than likely that this has not been done during the entire period of work; however, there is no particular need for a refrigerator). The compressor already has a start relay set to its parameters, and it is not recommended to change it. The sealed hole in the lower part of the housing is designed to drain the oil. This hole is carefully opened (chip particles should not get inside), after which the old oil is removed with a syringe and the cavity is filled with fresh oil (any synthetic or semi-synthetic oil is suitable, the characteristics of which are almost constant). Oils must be poured 30 ... 40% more, taking into account the natural loss, for example, during continuous painting of large surfaces.
The next step is to prepare the air storage. The internal volume of the fire extinguisher body must be thoroughly cleaned using a rust converter. After that, in the lower part of the body receive threaded hole, which is drowned out with a stopper: it is necessary for the periodic draining of condensate. A tee is attached to the outlet. Possible problem- thread discrepancy - is solved by re-cutting it. Attached to opposite ends of the tee safety valve(its parameters are selected according to needs) and a second tee, also equipped with a pressure gauge. Storage capacity must be painted.
The installation is completed by connecting the second tee of the filter-oil-moisture separator to the outlet. This tee should be equipped with a manual valve and a resulting control pressure gauge. By attaching the last outlet hose, the assembly process will be completed.
It remains only to install all the assembled components on the frame. It is better to use aluminum corners or thick plywood for these purposes. It is recommended to install the compressor from above: this facilitates the subsequent use of the unit. To avoid unnecessary noise and vibrations, all components must be rigidly fixed to the frame, with the exception of the compressor itself: it must allow some vibrations. To do this, it is better not to dismantle the fasteners remaining on it, or, in their absence, provide for mounting the compressor on spring compensators.
Adjustment and testing
The main test of a homemade compressor is to determine the possibility of effectively regulating the pressure that is created in the assembled system. The easiest way to do this is to test paint any surface. In this case, the following is sequentially performed:
- Set the relay to 4 ... 5 at.
- Connect the compressor to the network.
- The pressure gauge monitors the stability of the parameter. If the relay is operable, then when the pressure is exceeded, it will turn off the compressor, otherwise open the relief valve and immediately turn off the unit.
- Check the system for the absence of spontaneous bleeding of the energy carrier, for which you can use a regular soap solution.
- When the pressure drops to a level below the minimum allowable, the relay should automatically turn on the compressor.
- After painting any surface, it is necessary to check the quality of the paint applied to it - during an external examination, traces of moisture, foreign particles and dirt should not be detected. If such defects still occur, you should additionally check the operation of the output filter - oil and moisture separator.
The work of a do-it-yourself unit will be long and reliable if you periodically carry out routine maintenance on it. It comes down to replacing the inlet filters, periodically blowing out all air lines, and also changing the oil in the compressor.
If you find an error, please highlight a piece of text and click Ctrl+Enter.


Chicken in kefir - recipes for marinated, stewed and baked poultry for every taste!
Simple Chicken Recipe in English (Fried) Recipes in English with translation
Chicken hearts with potatoes: cooking recipes How to cook delicious chicken hearts with potatoes
Recipes for dough and fillings for jellied pies with mushrooms
Stuffed eggplant with chicken and mushrooms baked in the oven with cheese crust Cooking eggplant stuffed with chicken