Modern man spends a lot of time at the computer, both at the office and at home. It is obvious that it is better to work not sitting on a hard stool or listening to the creak of an old chair, but sitting comfortably in one of the chairs offered by the manufacturers. office chairs. Unfortunately, from active use, the upholstery of the chair quickly becomes unusable - the artificial leather cracks or becomes frayed, the fabric gets dirty and torn. What to do - throw away an expensive office chair or try to restore it?
Cleaning chairs or updating them is quite possible at home - drag given subject furniture, standing near the computer, you can do it yourself, without going to any special workshops.
How to replace the upholstery or remove ugly stains, you will learn from this article.
To fit an old chair, you should not buy artificial leather or thin fabrics - the first one will quickly lose its attractive appearance, and fragile material can even be quickly wiped off. Also, during a process such as reupholstering a computer chair, foam rubber may be needed, since the old lining, as a rule, sags and loses its qualities over time.
If only the seat is damaged in the furniture, then the upholstery of the back of the office chair can not be overtightened and vice versa. But to create a sample with an attractive appearance, it is better to make sure that both parts of the chair match each other in color and texture of the selected fabric, that is, we are waiting for the restoration of the chair as a whole.
Best Option- dense upholstery fabric Artificial leather will quickly acquire scuffs and lose its original appearance due to constant friction.
Thin, lightweight fabric is susceptible to damage from sharp objects, including pointed elements on clothing. Foam rubber will be required to replace the lining.
To carry out the stretching you will need:
- furniture stapler;

Furniture stapler
- screwdriver or screwdriver;

screwdriver
- scissors.

Repair principles

Having prepared everything you need, you can get to work
How to drag a chair and what are the stages of this process?
First you need to disassemble the chair and get rid of the old upholstery. When it comes to repairs, we do a few simple things:

When choosing a fabric, it is important to purchase as much of it as you need for the waist - to do this, measure the chair and add another 5-7 centimeters to the resulting figures, which are necessary for the waist.
How to clean at home?
Sometimes you can update an office chair by doing without such an operation as replacing the upholstery, simply by removing the greasy gloss that has appeared over time, as well as greasy spots. How to clean the upholstery of computer chairs, even if it stinks, for example, because beer or soup was spilled on it? It's easy to do. Applying a soap solution to the surface with a sponge, then remove it in a circular motion. Some dirt can be removed with a conventional vacuum cleaner - by soaking the brush in saline and wrapping it, for example, with gauze, you just need to vacuum the chair.
Stains from household dust are easily cleaned with a solution of vinegar (2 tablespoons per liter of water).
Chair cover
In order for the chair to last longer and not require re-upholstery, you can equip it with a cover that will protect the piece of furniture and allow it to fit more organically into the interior. Most often, this requires sewing two separate elements - a back cover and a seat cover. But if the chair is a single structure, the approach will be somewhat different:
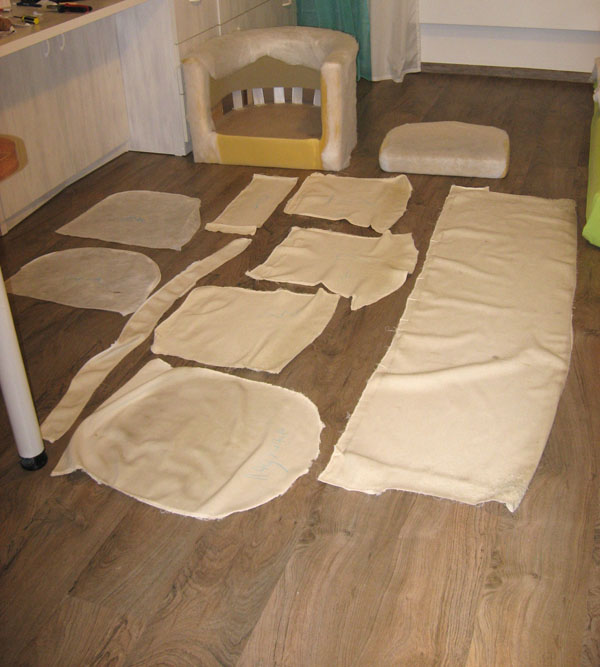
- Let's take a tracing paper and attach it to each of the elements of the chair, circling them with a marker. Having cut out these outlines, we will get patterns, according to which we will create these elements already from the fabric.
- If you are going to cut the future cover, do not forget to leave allowances for the seams. Also, when creating the elements of the seat cover, you can leave a few centimeters of fabric to create a "tunnel" in which you can place the elastic. Such a cover will tightly fit the skin without causing trouble.
"Clothes" for the chair are easy to remove and wash. In case of scuffs or holes, the cover can be simply replaced - the chair will remain safe and sound.
Learning how to drag computer chair with your own hands, you can update the interior at a minimum cost, postponing the purchase of a new one for a long time. Do-it-yourself upholstery of an old office chair is an easy task, the result of which will surely please others. Repairing chairs at home without giving them to the workshop is simple, this process does not take much time.
And armchairs), which, after time, fell into disrepair. “It’s a pity to throw it away, and it’s not always enough to buy a new one,” many people immediately get upset about this, without even suspecting that old furniture can be restored and restored. As an example, in this article we will do the upholstery of an old chair with our own hands.
Let's move from words to deeds. In order to make the restoration of an old chair, we need the following tool:
- Hammer, pliers, screwdriver (flat),
- Manual stapler, staples from 4 to 6 mm, scissors,
- Sling wide (textile),
- Foam rubber, batting, synthetic winterizer,
- Fabric (1.5 - 2 m),
- PVA glue, gauze.
Chair disassembly
Before starting work, you need to disassemble the old chair and see what is inside it.
As a rule, this wooden frame, foam on the back and seat. It is held by rubber or textile slings.
Also in the composition of the components we see legs, armrests (polished or fabric-like). The back wall of the chair is fixed with plywood. That, perhaps, is all.
After parsing:
- Determine what needs to be replaced. All spike parts are carefully knocked out with a rubber mallet so as not to damage the edges and preserve the polish.
- With a scalpel or a knife with a thin sting, we clean the grooves so that there are no glue residues inside.
- We coat the spike parts with PVA glue, after which we wrap the bandage directly on the spike.
- We carefully hammer everything into place and wait a day for complete drying.
Do-it-yourself chair upholstery
Let's take a step-by-step look at the chair upholstery process
Foam rubber replacement
The next step in the restoration of the chair with your own hands will be the replacement of foam rubber. The list of brands that are used in furniture production:

- EL - characterized by an average degree of rigidity,
- HS - soft type,
- HL - extra hard,
- HR - low degree of rigidity, most often used in the manufacture of upholstered furniture.
In our case, HR is the best option.
It is best to cut foam rubber with a knife with a long blade, sharpened on an abrasive stone. We cut in several steps.

Change of passes (belts)
After we have decided on the foam rubber, we check the passes. They can be made of rubber or thick tarpaulin.

They are fixed on a wooden frame with nails, in rare cases they are pierced with staples.
We remove the old belts, measure their length and, with a slight stretch, change them to new ones. The edges of the belt must be wrapped (folded at least in two). In this position, they will last a long time and will not stretch with a lot of weight.

The belts are tight, now you need to fix the foam rubber. We coat the passes with glue for foam rubber and carefully set the seat first, and then the back.
After we have the frame ready, we proceed to the choice of fabric.
Chair upholstery fabric
Today, the textile industry offers a wide range of fabrics for repair and upholstery.
Seat upholstery fabric:

You need to remember one simple truth: if the fabric has a pattern or abstraction, you need to make sure that the image does not move during the pattern.
We cut the front and back of the back from the first meter of fabric, the seat from the rest.
Having made a cut, you need to check whether we have kept the dimensions correctly by covering the seat with a cut-out piece of fabric. Having set the corners correctly as shown in the figure, we begin to “shoot” our cover to the chair frame.
We fix the rest of the fabric with staples, make a mandatory stretch - to ourselves.

The corners can be sewn on a typewriter or, if not essential, by hand, with a small seam.
At the moment of fixing the cover to the frame, we pierce the staples with an interval of 3-4 cm. If these are nails with a wide hat, then the distance should be slightly less.

As soon as we changed the seat upholstery, we do the same with the back.
You should always remember that the restoration of a chair with your own hands always requires consistency in work, as well as attention.
When removing each of the details, you need to remember in what place and how it stood. Some masters use a camera for such purposes.
Restoration of frame parts
The concept of "restoration" includes not only the upholstery, but also the restoration of the wooden parts of the chair. Over time, the decorative details (armrests, chiseled elements, curly legs of the chair) become unusable, that is, they fade, the lacquer surface is erased, and small cracks appear on the furniture frame.
What can be done in such a case?
To solve this problem, we need:
- Sandpaper,
- Scraper,
- Blade from a clerical knife.
- Lacquer, stain.
Every detail must be sanded. You need to start with a large grain, gradually moving to a smaller one.
It is necessary to sand only in the direction of the fibers. If you make movements against the fiber, then the varnish will definitely show transverse lines.

Many master restorers use drill with special emery drums. They come in different widths and lengths, very convenient for grinding in hard-to-reach places.
- After the parts are sanded, carefully remove dust with a damp cloth or foam rubber sponge.
- Apply with a soft brush nitrolac until completely dry.
- After the varnish has dried, you can run your hand over the surface and feel how the pile has risen. With the finest sandpaper, we carefully “knock down” the risen fibers, that is, we make the surface smooth.
- Then you can apply a stain (alcohol, water or based on white spirit) and only then cover it with any varnish available in the production.
Video: do-it-yourself restoration of an old chair
That's the whole wisdom - how to easily and efficiently restore the chair at home.
Good luck to all masters!
Computer chairs are very popular among schoolchildren and students. In addition to accessibility, these pieces of furniture are distinguished, if not by increased reliability, although this cannot be taken away, but also by maintainability.
All replacement parts are offered in stores specializing in the sale of office furniture. The armrest costs from 120 rubles, for the crosspiece they will ask from 300. There are also control levers, although they rarely break.
But there is one element that is not often changed and this service is not offered everywhere. This is for the seat and back. The materials used here are simple, but resistant to abrasion. And more often chairs are thrown away due to broken mechanisms than because of shabby upholstery.
True, if the chair is in order, you can change the coating material for purely aesthetic reasons. Why not update workplace and not please the eye?
First you need to unscrew all the bolts and screws. Get a few separate parts:
- Two armrests.
- Crosspiece with wheels and lift mechanism.
- Seat.
- Back.
- Control levers.
For work you need:
- Linear meter pleasing material.
- Scissors.
- Staple pistol.
- Staples, size 10 - 14.
The arrangement of the seat and back of the computer chair is the same. Between the plastic cover and the foam rubber, you need to stick your hand or some object half a meter long and separate one from the other. It is necessary to disconnect the latches, clips, caps.
Remove the lift mechanism from the seat base
There are only 4 of them, located closer to the corners. Whatever it is called, it unfastens, a characteristic click will be heard. In the photo, the holes under them are marked in red.
 Remove back cover
 The result is a cover and seat base covered with material. Staples are visible along its perimeter, they must be pulled out of the plastic, prying with a thin screwdriver and removing with pliers. So you will remove the old coating and foam rubber, it can also be replaced.
 Lid removed
 Assembly
The foam rubber is cut to the size of the base, a couple of centimeters more can be. It is better to cut out the upholstery material with an allowance of 5-6 cm. You don’t need to make it wider, otherwise, while driving the staples and pulling the material, extra folds will interfere.
 Seat base with new foam
 The most difficult moment during assembly is to evenly stretch the upholstery and “shoot” it to the base. It is important not to overtighten in order to avoid distortions and not to loosen. In the second case, the foam rubber will walk under the skin.
 The process of stretching new upholstery
 It's not about saving
Any repair is done not only because the time has come. But also to improve the environment.
Take the same computer chair , you can change the color of the base, usually it is black. You need to buy a can of paint for automotive plastic, any color. It's cheap and dries quickly. Dismantle the chair, paint over all the plastic parts and now you have an updated piece of furniture, good mood and cause for pride.
 The chair is ready!
 After calculating all the costs, you get a new chair for a third of the price. Don't be afraid to start something new and see it through to the end. Good luck!
A computer or office chair is a fairly common type of furniture, as it is widely used not only in the office, but also at home. Unfortunately, like other things, such furniture also becomes unusable over time due to torn or cracked upholstery. In addition to being uncomfortable, such a chair has a very unaesthetic appearance. Accordingly, you just have to buy a new one or replace the upholstery with the old one. The first option is quite expensive and not everyone can afford it. The second one is much cheaper, but at the same time labor intensive. Therefore, if you decide to save on purchasing a new one and give an old item a second life, we will tell you how to reupholster a computer chair with your own hands.
Advantages
Do-it-yourself upholstery of a computer chair has a lot of positive advantages in relation to acquiring a new upholstery or replacing an upholstery in a workshop:
- You will save money on purchasing a new one or paying for the work of a master;
- The duration of the work takes about 30 minutes;
- There is no need to carry the chair anywhere;
- Everyone in the house has the right set of tools;
- Even a beginner can handle the job.
Necessary tools and materials
To make a do-it-yourself computer chair upholstery, you first need to purchase fabric.
Important! Try to avoid artificial leather, as well as light and thin fabrics. Such materials are very impractical and wear out rather quickly.
As for calculating the amount of material you need, it can be calculated in two ways:
- Take measurements from the seat and back. To the data obtained, add 5 centimeters on each side.
Important! If you plan to replace the foam rubber, its amount must also be calculated at this stage.
- Dismantle the old coating, then take measurements from it, taking into account allowances and tucks.
Also, to replace the old upholstery with a new one, you will need the following tools:
- Furniture stapler;
- Staples;
- Screwdriver or screwdriver;
- Scissors or utility knife.
Do-it-yourself computer chair hauling: instructions
This process is quite easy, it will not be difficult for you, and you can even cope with it alone. In order to replace the old upholstery with a new one, you need to follow this course of action:
- Disassemble the chair. In order to dismantle the backrest, you need to turn the screw located at the back, then open the latches and, pulling on each side, remove the back panel. As for the seat, in order to remove the chair, you need to turn it upside down and unscrew all the screws that fix the armrest.
Important! It is best to put all the screws in one place, so that at the end of the work you can count them.
- Pull off the old upholstery, while removing the old staples at once.
- Attach a piece of foam rubber and cut it along the contours of the seat / backrest. Fix the finished workpiece with staples.
- Now you can drag the cloth. To do this, stretch the fabric and fix it with reverse side backs/seats. Try to do this carefully so that there are no bends.
- Fix everything again with a stapler and cut off the “tails”.
- Assemble the chair back, following the same scheme as when dismantling, only in reverse order.
How to reupholster an office chair with your own hands?
Padding office chair done as quickly and easily as a computer. In order to replace the old chair upholstery with a new one, you will need the following tools and materials:
- polyurethane foam;
Important! Polyurethane foam should be 25 density and have a thickness of 3 centimeters for the seat, and 2 centimeters for the back.
- A flap of fabric (flock or microfiber);
- Sintepon;
- Staples;
- self-tapping screws;
- Odorless adhesive for polyurethane foam;
- Glue sprayer;
- Air gun;
- Stationery knife;
- Phillips screwdriver.

Once everything you need for work is prepared, you can begin the process of reupholstering the chair. The sequence of actions is as follows:
- Unscrew the back and remove the plastic trim.
- Remove the back itself, remove the old upholstery.
- Apply glue to a piece of foam rubber, glue to the back. Cut off the excess.
- Cut out a piece of fabric to the desired size.
- Pull it over the surface of the workpiece and fasten it from the inside.
- Assemble a chair.
We sew a cover for a chair
In order for the chair or chair to last longer and not require re-upholstery in the future, you can sew a cover. This is an excellent accessory that will protect this piece of furniture from damage, while it can become a bright accent of the entire interior. You can make a cover in the form of two separate elements: for the back and seat. If the chair is a single structure, it is better to sew the cover according to this principle:
- Take a tracing paper or other paper that is convenient for you, attach it to each of the elements of a chair or armchair.
- Cut out the outlines and transfer them to the fabric.
- Cut out the blanks taking into account the allowances.
Important! You can leave a few extra centimeters of fabric when cutting out for a “tunnel” into which you can thread the elastic.
Old furniture is in all houses. Some prefer to get rid of it, while others continue to use it as it is. However, there are those who restore furniture, namely, they fit it. How to drag a chair with your own hands step by step - this question worries many people.
Initial stage: devices for work
How to drag a chair with your own hands: a question that worries many housewives who want to tidy up an outdated headset. Before starting the operation, you need to stock up on the necessary tools:
- stuffing material (batting, foam rubber, etc.);
- linen canvas;
- upholstery fabric;
- stapler;
- nails;
- hammer;
- scissors;
- chalk or soap;
- centimeter.
Step-by-step instruction
Below we will consider the process of reupholstering the chair in stages at home.
Dismantling the bottom
After choosing the tools, we proceed to disassemble the lower part of the chair. Inside it usually has a frame made of wood, foam rubber on the back and seat, and also plywood, with which the back wall is fixed:
- Be sure to remove the spiked parts with a rubber mallet.
- It is important to keep the polish and not ruin the edges.
- The grooves are cleaned with a knife or scissors.
- First, the back wall is removed, then the plywood bottom, then the foam rubber is removed, the nuts are twisted and all metal parts are removed.
- You also need to get rid of all fasteners and foam pads.
Removing external parts
Here you need to remove the upholstery material. It is done like this:
- with the help of a screwdriver, all the staples from the back of the chair are unbent and the fabric is cut off with a knife;
- then all the foam rubber is removed, if it is worn out, it must be replaced;
- the frame must be completely removed from the glue;
- the old fabric should be leveled and fixed on the back with a stapler.
You also need to get rid of pillows and other external details that exist on the old chair. Don't throw them away unless they're worn out and look good.
How to cut new material?
When there is a pattern on textiles, you should consider how the elements will look and fit together. If the fabric is fluffy, then it is important to check the direction of the pile. It should be pointing down.
Important! At this stage, you need to be careful so that the furniture in the future does not look ridiculous.
Cutting should be done with a margin, since the fabric does not always lie evenly and it is ideally enough. After a few fittings, it will be clear how much is required. When trying on, you need to use needles. With their help, the fabric is attached and the appearance is evaluated. Such a basting will not leave traces.
Advice! It is better to take the material in in large numbers. Extra useful for pillows. This will also avoid errors in fabric calculation.
How to fasten the fabric?
Before fixing the fabric, you need to lay the parts on the frame and put foam rubber on them. If the foam rubber is thick, the corners that protrude can be cut off. Next, a synthetic winterizer is placed on top of the foam rubber and fastened with a stapler. Directly the fabric is attached like this:
- The material is applied to the base and straightened.
- It is necessary to fasten according to the scheme in order to avoid displacement and skew.
- Using staples, textiles are attached to the ribs in the middle.
- Then stretch the fabric proportionally, securing with staples. Enough for two on each side. The fabric should not sag, so it should be pulled very tight.
- It is desirable to cover the back part with lining material for an attractive look.
- After the last part is re-tightened, assembly is performed. If you remember what the chair looked like, then that's good, but it was better to take a few shots so as not to make a mistake during assembly.
- Further, in reverse order, as dismantled, you need to fold the chair. It is important not to make a mistake so that the furniture looks diligent.
- All screws and fasteners are tightened. If the chair is on wheels, for example, office or computer, then it is reasonable to replace these parts with bearing ones. When all operations are carried out correctly, the chair will look like new.

Some are interested in how to drag a computer chair with their own hands? It is easier to carry out these works than to drag a home chair, as they are smaller in design. By following the rules and instructions, you can put your computer chair in order, bypassing the waste of a new one. How to drag an office chair with your own hands, masters of their craft can tell.
Video
This video shows how to drag a chair with your own hands.
How to properly drag a computer chair, you will see in the video.


How to cook ham in the oven at home
Pain in the lower abdomen during pregnancy, reasons for what to do Can the lower abdomen hurt if pregnant
Protein for muscle gain
The best vitamins for men according to customer reviews
How to lose weight on a vegan diet?