TERMS AND CONDITIONS FOR SALE AND RETURNS (HEREIN THE "TERMS")
Thank you for shopping at Apple. We appreciate that you buy our popular products. We also want to ensure that when you explore, evaluate and purchase our products, whether you visit our online store or telephone conversation with Apple Contact Center employees, you have gained valuable experience. (To make this material easier to understand, we will refer to ourselves as the “Apple Store” throughout this policy.) The Apple Store is operated by a company with limited liability"Apple Rus", which was created in accordance with Russian law and is located at: 125009, the Russian Federation, Moscow, Romanov per., 4, building 2., the main state registration number 5117746070019 (hereinafter: "Apple").
As in any commercial activities, Apple Store purchases are subject to a set of terms and conditions. By placing an order or making a purchase in the Apple Store, the buyer agrees to the terms and conditions below, and . You must be 18 years of age to place orders in the Apple Store.
Standard return policy
You have the right to cancel your order, return a product, or cancel a service agreement for any reason. To return an Apple Store product or cancel a service agreement, please notify us of your intent at any time prior to 14 days from the date you or the person you designate took physical possession of the product(s), or from the date conclusion of a contract for the provision of services. If you purchased multiple products in the same order, please notify us of your intention to return the product at any time prior to 14 days from the date you or the person you designate took physical possession of the last product in the order. To exercise these rights, you only need to expressly inform us of your intention to return a product, cancel an order, or cancel a service agreement.
After notifying us of your intention to return the product, simply return it within 14 days - in the original packaging, with the receipt and with the accessories that came with the product. We will refund your funds in the same way that payment was made within 14 days from the moment we pick up the product, or, if you handed it over to the carrier, we will receive the product itself or notification of its shipment.
Please note that you are not eligible to return the following items except in cases of defect or non-compliance.
- Uploaded software if you have given your express prior consent and acknowledged that you forfeit your right to opt-out prior to downloading.
- Subscriptions to software updates, iTunes gift cards, Apple Store gift cards, and any Apple Developer products.
- Services, such as packaging of products, after their full performance, if before the start of the performance you gave express prior consent and acknowledged that you lose the right of withdrawal after the full performance of the service. If the services have not been fully performed and you have requested that they begin within 14 days from the date the service agreement was entered into, you will be charged a pro rata cost for the services provided prior to you notifying us of your intention to cancel the service agreement .
- Software in a sealed box that was opened upon delivery.
If the product is damaged, we have the right to reduce the amount of your refund by the amount of the reduction in the value of the product.
We will refund all amounts paid by you in connection with a product or service, except for express shipping charges (unless you have opted for standard shipping).
For complete information about returning products purchased from the Apple Store, see the Returns and Refunds section of the help page at .
Buying an iPhone
The purchase and use of iPhone is subject to the terms and conditions found on the and . In addition, by purchasing an iPhone, the purchaser expressly acknowledges that any unauthorized modification to the iPhone software is a violation of the iPhone Software License Agreement. Warranty repair shall not be performed if the use of the iPhone product is rendered unusable due to an unauthorized software change.
Mobile Services
Some Apple products include mobile services, which may incur additional costs and are subject to separate agreements between the purchaser and the mobile service provider of their choice. For more information, contact your wireless carrier.
Pricing, price cuts and price adjustments
Apple reserves the right to change prices for products offered in the Apple Store at any time and to correct inadvertent pricing errors. In the event of a price error, Apple notifies the customer and determines whether the customer intends to purchase at the corrected price. If the buyer refuses to make the purchase at the adjusted price, Apple will cancel the order at the buyer's request and refund the amount paid. Additional Information For information about pricing and sales tax, see the Payment and Pricing page.
If, within 14 calendar days of the date the purchaser receives the item, Apple lowers the price of any Apple-branded product, the purchaser may contact the Apple Contact Center at 8-800-333-51-73 to request a refund of the difference between the price paid and the current prices or crediting the difference to the buyer's account. Buyer will be eligible for a refund or credit if contacted by Apple within 14 calendar days of the price change. Please note that the above does not apply to time-limited price reductions during special sales promotions.
Getting an account from Apple is the first task of any owner of an iOS device. And it is better to do it immediately after its purchase. Without an ID number, it will not be possible to use the functionality of an iPhone or iPad at 100%. If you want to purchase software in the AppStore or reflash your gadget, all these tasks will require ID verification. This number will allow you to activate the search option, and if you lose your device, you can easily find it. The same function will help you put a block on your gadget if it is stolen.
But the most attractive thing about owning an ID is the ability to download hundreds of applications for free from the Apple store. Anyone here will find software to their liking. Programs are presented in a wide variety of categories - for work, entertainment, leisure ...
In the "cloud" you will have access to 5 GB of space. All copies of your device data will also be stored here. And if you set up automatic backup, they will be generated daily.
As a rule, an account is created during the very first launch of an iOS device. But if you prefer the representative of the sixth line to the old iPhone model, tie it to the current number.
To start registration, create a new e-mail intended for this purpose. All data must be entered correctly so that in case of problems when you need to put a block on the gadget or remove it, you can easily remember everything.
Next, let's talk about various options creating an account. This operation is performed both from a PC / laptop through the well-known iTunes application, and through the device itself. Both methods do not require high costs strength and time. Read on for the steps to follow for each.
Here it is possible to pass the usual registration with the indication of the bank code number and without it. It is necessary to indicate payment data for those who plan to purchase many different products in the AppStore. If you do not need this, feel free to choose the second path.
In any case, you will have to go through the following steps to create an account:
- In the usual situation with a card, go to the iTunes Store section and select the item to create a new ID. If for some reason you absolutely do not want to indicate the card number, go to the AppStore and find any free access software there. Download and install it on your iPhone. A window will immediately pop up with a proposal to enter under the current account or create a new one. Choose the latter.
- The next steps will be the same, regardless of your attitude towards using the card. You will need to select your country of residence. Here it is recommended to choose Russia, even if you are in the CIS. The fact is that for the Russian-speaking public, the list of applications is more diverse.
- Read the license agreements and accept them.
- Drive in the requested e-mail data, a complex combination of password characters, remember. That it cannot be identical to the login, that is, the ID itself.
- When entering age data, remember that there is an age limit. Thus, the company does not allow persons under 13 years of age to register. Downloading software is possible from the age of 18.
- Provide answers to questions and be sure to write them down on paper so that you can recall if necessary.
- A window will pop up for entering payment data or with the line "No", depending on the previously selected method. Write whatever you need.
- Click on the "Next" element, this step will complete the operation. It remains to proceed to the mailbox. There should be a message from apple asking you to verify your ID. It will also contain a link that you need to follow.

Using iTunes to create an ID
As in the previous method, there are 2 possibilities here - to work with or without a bank card. Choose what you need. And the algorithm of work will be as follows:
- Go to the iTunes menu, and then to the store. But this is when providing a card number. If without this - select any free software for downloading and proceed to the menu through it.
- From this step, everything is normal for both methods. We get into the login field through the current or new account - to choose from. We stop our attention on creating a new ID-number.
- We provide real information about ourselves. If possible, write down the answers and store them in a safe place.
- We drive in the data on the bank card, that is, payment. If you logged in through free software, select "No".
- We find the button for creating ID - numbers from below and click on it.
- We expect messages from the "apple" company to your e-mail and follow the link. Keep in mind that it does not always come with lightning speed, sometimes you need to wait 1-2 minutes. In situations like this, it's a good idea to check the spare box. If you incorrectly indicated at least one character in the main, then the message will come there. Double-check your spam folders and trash. Not always postal workers correctly determine them.
Benefits of having an ID number
As you have already understood, creating an ID is a simple and time-consuming operation. But the result will be excellent. It will be expressed in such pluses as:
1 Access to a variety of software and other products. Other manufacturers of mobile devices cannot boast of something similar. Moreover, most applications are distributed freely, that is, they can be downloaded without any payment. And if you decide to purchase a paid product, its cost is unlikely to exceed 7-10 dollars. Downloading can be done directly from an iPhone via the "cloud" or via a PC / laptop using iTunes. 2 Lots of free iCloud storage. From here at any time you can get any file or perform a backup. It is very convenient that there is an option to create copies on the machine. If you activate it, they will be prepared daily. 3 Ability to activate the iPhone search option. This will protect the device in case of theft, as it will turn it into a useless piece of metal if the rightful owner activates this mode. The option allows you to put a block on the gadget and erase personal photos so that they do not fall into the hands of scammers.Thus, the ID number is our "passport" in the Apple ecosystem. By acquiring it, we can enjoy all the benefits available there and at the same time provide effective protection of your device.

How to remove Apple ID: choose the best way
There are two options for how to do this:
- Change account information on the account management page.
- Write to support on the company's resource on the network.
The second method is not particularly difficult - you just need to fill out a form on the site. Let's talk about the second one in more detail. To implement it, we need a PC / laptop on any operating system (or any iOS device) and a stable network connection.
Changing registration data is the easiest way to remove an ID. Moreover, you can change the information in any order. For example, it can be an address or any other data. The account is saved.
On a PC, you need to launch iTunes, go to the software store and click on the sign in button.
We go into its settings and drive in the necessary changes in personal data, save them.
Keep in mind that connecting an invalid e-mail to your account will not work, because to confirm the changes you need to follow the link that should come to the e-mail.
The same process can be performed through a resource on the network. To do this, follow the address: http://appleid.apple.com/en/. Enter your username and password characters. After completing these steps, the Apple ID account will be deleted. Is it possible to delete an ID on an iPhone 5 or other device in a different way? Of course, this has already been mentioned above. If it's easier for you, contact support directly.
In general, both creating an Apple ID account and deleting it are standard operations that do not require special knowledge. Even a schoolboy can handle them.
Will be created when the gadget is activated. However, when setting up a smartphone for the first time, users often skip this step for one reason - device requires credit card details. Russian users, accustomed to suspecting fraud in everything, are delaying the creation Apple ID trying to find a way to do without a card.
There are several options for registering an iPhone account - among them there is one in which you do not need to enter credit card data.
Without Apple ID the user will not be able to:
- Download applications from the AppStore (neither paid nor free).
- Buy music and videos from the iTunes Store.
- Synchronize "apple" device with cloud storage iCloud.
- Find a lost gadget using the " Find iPhone»
About fully using iPhone without Apple ID there can be no talk. The legendary versatility of this smartphone is due to the huge amount of heterogeneous software available in the AppStore. iPhone no apps- just a stylish and high-quality assembled gadget, but by no means not multitool capable of handling any challenge.
How to create a new account through iTunes?
If you don't have iTunes, start by downloading latest version this program from the official website of Apple. Once you have downloaded and installed the media combiner, proceed as follows:
Step 1. open iTunes and click on the " Account» in the horizontal menu at the top.
Step 2. Select " To come in…".

Step 3. In the window that appears, click " Create a new Apple ID».

Step 4. You will be on the welcome page iTunes Store- here you need to click on the blue button " Continue».

Step 5. At this point, you need to read the document titled " ' and check the box next to ' I got acquainted…”.

If you do not confirm the fact of familiarization, registration will not be completed.
In the absence of the ability to read the position of Apple immediately you should use the link "Print version". An HTML document will appear in the browser, which should be printed out so that you can familiarize yourself with it as soon as you have free time.
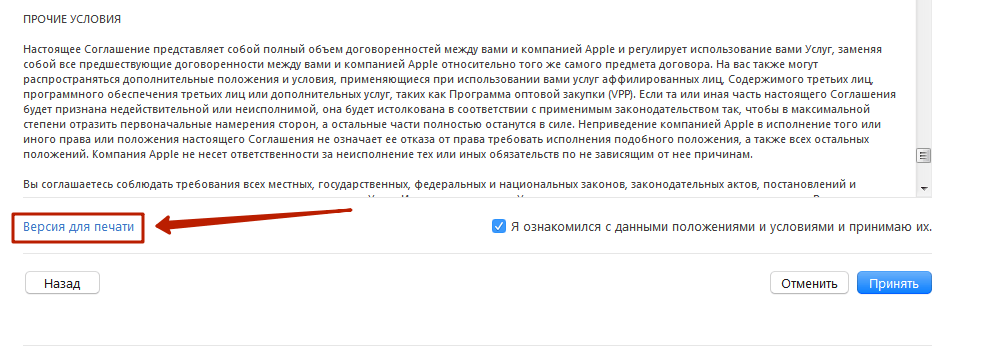
After confirming that you have read the terms, click " To accept».
Step 6. Fill out the form - you must enter the following data:
- The address Email . It is important that the address is valid and that you have access to it. Optionally, you can specify an additional postal address.
- Date of Birth. By date, you must be over 21 years old - otherwise you will not be able to purchase content and software in the AppStore and iTunes Store.
- Invented password. The password requirements for an Apple account are very strict: it must contain numbers, lowercase and uppercase letters. Plus, one character cannot be repeated three times in a row.

The user will also have to answer three questions - for example, What was the name of your childhood best friend? This measure is necessary to ensure the security of the account.
Step 7 Unsubscribe if you do not want to receive information about Apple products and movie and music releases in your inbox. To do this, uncheck the boxes next to " Recommendations and information…».

Then click " Continue».
Step 8. Choose a payment method for purchases and enter the required details. note that Entering credit card details in iTunes is in no way a threat to your well-being. Money will be written off only in case of purchase of content or software and only with your consent.

If you chose a plastic card as a payment method, you will have to enter its number, expiration date, as well as CVC2 - the security code on the back. If you chose the option Mobile phone ”, it suffices to indicate cell number and confirm it via SMS.
Step 9. Fill in the fields of the block " Billing address". You need to specify:
- Last name and first name.
- City code and name.
- Street of residence and zip code.
- Contact phone number.
- Form of appeal (" mr" or " Ms.»).

Once you fill in the required fields, click " Create an Apple ID". You will see a window directing you to the mail.
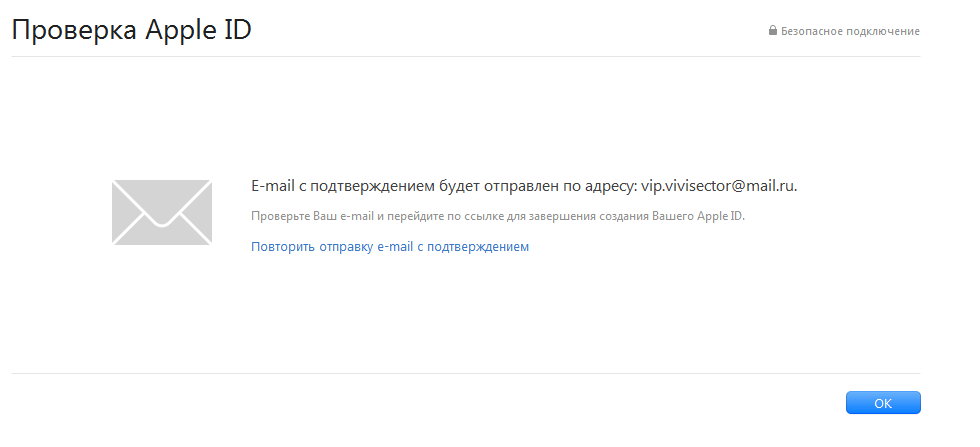
Step 10. In the mailbox you will find the following letter:

You should click " Confirm Address', after which you can assume that Apple ID successfully generated.
How to create an Apple ID without a PC?
Start account Apple will succeed without a computer, but in this case, the device must be connected to 3G or Wi-Fi. Once you have access to the internet, do the following:
Step 1. V " Settings» iPhone find section « iTunes Store App Store' and go into it.

Step 2. Click on the button " Create a new Apple ID».

Step 3. On the next screen, you will see a list of countries - Russia is selected by default. Without changing anything, click " Further».

Step 4. You should read the document titled " Apple Media Services Terms and Conditions". The document is quite capacious - on an iPhone it turns out 29 pages in small print; that is why most users neglect to read it.

Anyway, confirm that you have read " Regulations and agree to the terms, you will have to. To do this, click " To accept» in the lower right corner and then click on the button of the same name in the window that appears.

If you want to read the terms, but not from the phone screen, but from paper, use the "Send by e-mail" link. From email you can print the document.
Step 5. Fill in the form. You will have to enter the same data as when registering an account in iTunes– e-mail, password, date of birth, questions and answers necessary to ensure security.

If you don't want to subscribe to news about Apple services, apps, and content, toggle the sliders at the bottom to the inactive position.

Step 6. Choose a payment method and enter payment details. The same data is required as when registering through iTunes.

After entering the required information, click on " Further».
Step 7. Log in to the email you provided during registration Apple ID, and press " Confirm Address».
Create an account Apple ID in the "Settings" of the device and registration through iTunes– similar procedures: in both cases, the same information is required.
You can also access the Apple account creation service through the App Store. Go to the app store and scroll to the bottom of the main page. Click on " To come in».

Then click " Create an Apple ID».
How to create an account on iPhone without a credit card?
At least one way to create Apple ID without a credit card. If you don't want to share payment details with Apple, please do the following:
Step 1. Go to iTunes and from the drop down menu select " Programs».

Step 2. Find free application (any) on home page and click on its icon.
Step 3. After the description of the application opens, click " Download».
Step 4. In the window that appears, click on the button " Create a new Apple ID» - this is how you start the account creation procedure.

Continue registration in the usual way until the moment when you need to decide on the payment method.
Step 7. On the page " Specify payment method» instead of a bank card, select the option « Not».

With this choice, you will be relieved of the need to enter payment details. However, numerous fields of the block " Billing address You still have to fill it out.
Conclusion
Create Apple ID You can do it with or without a PC. However, if you use a computer to perform this task and iTunes, less time will be spent - there will be plenty of typing, and it is more convenient to do it on a PC keyboard.
In addition, when registering from a computer, you can do without specifying the details of the selected payment method. This is important because many domestic users of Apple technology are suspicious of the requirement to leave card data.
How to create an Apple ID? This question is asked by many users of Apple technology. If you are one of them, then this article will be useful to you. In just 10 minutes, we will learn how to create an Apple ID. It's very simple. But before that, I want to tell you a little about what an ID is for and why it is important that it be on every apple device.
With an Apple ID, we can install various applications, programs and games from the App Store in order to expand the functionality of the iPhone (iPad). In addition, we will have the opportunity to use the iCloud service, where contacts, notes, logins and passwords, photos, backups, which means that we can always restore them if something happens to the iPhone.
How to create an Apple ID on an iPhone or iPad?
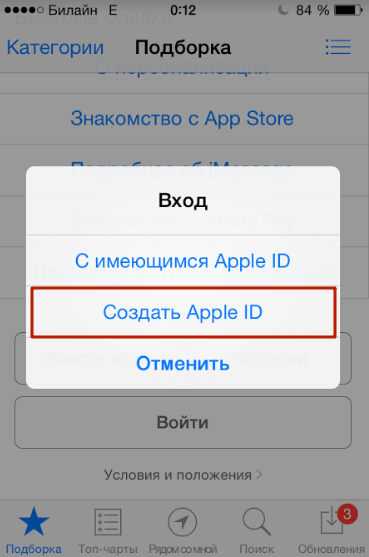
Launch the App Store app. Go to the bottom menu in Top charts - Free and click "Download".
Click on "Create an Apple ID".


- Enter your email address in the "Email" field.
- In the "Password" field, create and enter a password. IMPORTANT: the password must be at least 8 characters, it must contain both letters (Latin) and numbers, and one letter must be uppercase. For example: Popov2017.
- Next, you need to choose 3 security questions and come up with 3 answers to them. Try to choose questions that you can always remember the answers to. I also advise you to write all the answers in Russian, so as not to get confused in the future. The answers to these questions are needed to reset your password if you suddenly forget it. Therefore, approach this responsibly.
- In the "Backup E-mail" field, enter a spare email address, if you have one, but this is not required, you can leave the field blank.
- Then enter your date of birth. Be sure to enter the correct date. Click "Next" in the lower right corner.
Here you need to fill out another small form. But before that, you need to decide whether you will link the card to your Apple ID or not. An Apple ID with a linked card will give you the ability to download PAID apps from the App Store, respectively, an Apple ID without a card will only allow you to download FREE apps. Remember that a card can be added at any time.
Instructions for creating an Apple ID without a card.
- Select "No" in the payment details.
- The "Code" field is optional.
- Next, fill in the fields "Greeting", "Last Name", "First Name", "Street", "Zip Code", "City" and "Phone Number". Click "Next" in the lower right corner.
- Now you will receive an email from Apple. You must open the email and confirm registration.
That's all. You now have your own Apple ID with which you can download apps. If something is not clear, be sure to ask questions below, we will quickly answer them.
Sincerely, iFIX!
Apple fans will sooner or later face the need to change their ID. It is assigned to each user and serves for authentication in the system. Its presence makes it possible to perform a number of important operations:
- Make purchases in the App Store and iTunes.
- Order items from Apple online stores.
- Work in the iCloud service.
- Ask questions to the technical support of the manufacturer.
The advantage of an account is that it is not tied to a specific device. It is enough to register once, and you will get a chance using your data to enter your profile from your phone, tablet and computer.
In what cases is it necessary to change the identifier
When buying an iphone, many people start working on it, not paying attention to the fact that the apple id is already installed, and they start thinking about how to change it in the iPhone settings much later. If you deal with this issue in time, you can warn yourself against serious mistakes, and in some cases even benefit. We will talk about the details below, and now we will list the situations in which you need to change your account data:
- Bought a used phone. It has already been used and activated.
- They took the last sample from the shop window. Consultants enter their details to enable and demonstrate capabilities.
- Received as a gift. If it was launched before you, then someone else's login and confirmation code are already registered.
The first thing to do in the described cases is to set your identifier. It will allow you to save all settings, contacts, applications and information about other services.

How to change active Apple ID account on iPhone without old password
The phone that was in unauthorized hands is assigned to the owner, who has passed the authentication procedure on the device. To exit the profile, the personal data of the previous owner will be required. Everything becomes more complicated if there is no way to know them. In some cases, you have to completely remove the software from memory or reflash the device. Consider an easier way out of this situation.
The active identifier stores all the information that was entered during the work. To use this for your own purposes for a painless restoration of rights, it is enough to make sure that the email account is signed in on the phone. Follow the step by step instructions below:
- Overwrite existing id. It must match the activated e-mail address.
- Go to https://appleid.apple.com and enter it in the appropriate field on the contact form.
- Scroll down and select "Forgot password". You will be redirected to the recovery page.
- Duplicate your login, enter the captcha and move on.
- In the drop-down menu, check the box "I want to reset the verification code." After that, an email will be sent to your email box with a link to change the secret key. Replace the old one with whatever is convenient for you, but do not substitute existing personal data.
You have received the necessary information to successfully delete an outdated profile. To activate the correct Apple ID, please read the following descriptions.
How to change apple id account on iphone: sequence of actions on iPhone
There are several simple ways with which you can correct identification materials directly from the phone. This will significantly reduce the time and save you from having to register on the official website of the manufacturer. At the same time, all installed software, photo archive and other information are saved. No bank card details and its binding to the device are required. All you need to do is enter your email and password.

Through the App Store
To set up your own entry, follow the step-by-step instructions:
- Open the program.
- Scroll down the page to the Quick Links section.
- Click on the Apple ID button. Log out of your account by clicking the corresponding button.
- In the window that appears, go to the "With an existing ID" section and enter your registration information.
- Confirm the action with the "Login" button.

Using phone settings
You can enter the correct owner data without using additional services by using standard commands:
- Proceed to the corresponding menu item.
- Highlight iTunes and the App Store.
- Select the Apple ID label.
- Click the "Exit" button.
- Enter the correct username and password.
- Complete the step.
Create a new account
Not all users have an iCloud login account. Beginners who first bought a device of this brand will not have to think about how to change Apple ID on an iPhone. It is enough to register a new one and enter the data. There is nothing complicated about this and with the right approach it will take about five minutes.

The main mistake that many people make is that the profile is filled out incorrectly during the setup process. As a result, you are not completely authenticated, and you lose the opportunity to confirm the information. To log out and log in again, you may need a password sent to a non-existent e-mail. To avoid such miscalculations, indicate only genuine information. If you are afraid of getting confused, use the instructions:
- Launch the App Store on your phone.
- Scroll to the bottom of the page and click the "Login" icon.
- In the drop-down menu list, click "Create an Apple ID".
- Set the region. For Russian-speaking users, it is better to set Russia. This somewhat expands the functionality and list of programs available for download.
- Accept the agreement. You can refer to it if necessary. In particular, pay attention to the terms of confidentiality. This will help you be more prudent when transferring personal information to third-party resources.
- Indicate in the questionnaire all the necessary personal data: date of birth, password, login mailbox and security questions for recovery.

It is important to create a strong secret code. To do this, use not only letters, but also numbers. It is better to enter them in a different register: uppercase and uppercase. Even if over time such a combination is forgotten, you can restore it by e-mail, but during possession, protect yourself from unauthorized entry by other people.
7. Choose apps from the app store as your payment method bank card or phone.
8. Check your inbox on the e-mail registered during registration. The letter from the company will contain a link. Go through it and confirm the correctness of the data. After that, you will be able to sign in to iCloud using the specified password.
The instructions above will help you authenticate. This method is only suitable for a new device or a device on which information about the previous owner was deleted.
Using apple id to download software for free
Active users of iPhone software know that it is possible to use information on how to change an Apple ID account for personal gain. Let's reveal the secret mentioned above.
The identifier contains materials about all purchased applications, and makes it possible to install them on a new phone. Having paid once for an electronic product, whether it be a movie or music, you get a chance to use them constantly on all devices. This can be practiced not only when buying the next device, but also repeatedly applied on the old one.
You can enter into iCloud not only your personal data, but also the information of other users and install their programs for free. Questions may arise about the ethics of these actions. The right to use what you read is yours.
If you switched to an iPhone that previously turned on and are in a hurry to find out how to change apple id to iphone, take your time. View your App Store history. There may be interesting applications that the former owner bought.
You can install them for free. A lot of choice remains when you pick up the device from the storefront. Salon owners often install software for testing or use by employees.
This can also be practiced with friends. It is enough to log out of your account and enter the username and password of a friend, according to the instructions described above. It is important not to forget to change the profile back, otherwise the directory or file added to the cloud will remain with the friend.
You should not practice this with everyone. It must be remembered that by transferring your account to another, you give him the right to temporarily view contacts and other personal information. At the end, make sure that the friend logs out of your account.
How to change apple id on iphone from computer
Sometimes it happens that when selling a phone, the old owner transfers data from iCloud with the right to use it. This will be useful for those who first bought a device from this manufacturer and have not yet started a personal Apple ID. You can avoid linking a payment card. If it doesn’t exist at all, someone else’s profile will be the ideal solution.
To avoid the unfair use of information by the previous owner, it is necessary to correct them by replacing them with your own. It is convenient to do this on the official website of the equipment supplier. A little guide will help:
- Go to https://appleid.apple.com in your browser.
- In the contact form, indicate the login and password of the existing ID received by you and click on the “Login” item.
- In the "Account" section, click "Edit".
- Enter the required information and save it.
- After the changes, a confirmation letter will be sent to your e-mail. Follow the link and approve it.
It is important to know that not only Apple ID information, but also email registration materials and security questions can be used for authorization or recovery. To fully protect yourself, you must definitely change all the information. Otherwise, the old owner still has a chance to restrict access to you or even prohibit access from this apple id.
Modern gadgets of the American manufacturer are attractive for their simplicity and functionality. They provide many features and additional services. To guarantee security, they are protected with an identification code. We have reviewed the most frequently asked questions about setting it up. Detailed Instructions help you change or set authentication data for both a new and used device.


Chicken in kefir - recipes for marinated, stewed and baked poultry for every taste!
Simple Chicken Recipe in English (Fried) Recipes in English with translation
Chicken hearts with potatoes: cooking recipes How to cook delicious chicken hearts with potatoes
Recipes for dough and fillings for jellied pies with mushrooms
Stuffed eggplant with chicken and mushrooms baked in the oven with cheese crust Cooking eggplant stuffed with chicken