If you needed to install Windows 7 from a USB flash drive via BIOS, then our article will be a great help to you.
Installing a new operating system on a computer is a fairly common problem that can occur due to the slightest malfunction of the system or the actions of an inept PC user.
This issue also became relevant in connection with the statement of official representatives of the Windows company about the suspension of technical support for the XP operating system.
To date, almost all users have completely switched to the so-called seven.
Our step-by-step instructions will help you quickly and easily bring your computer back to life.
Preparing your computer to reinstall Windows
Before you start working on new software, you need to properly prepare your PC. First you need to remember what important information stored on your computer and save it to a portable storage device.
Particular attention should be paid to the local drive C, it is on it that the the largest number information. Almost all users store their media files (photos, videos) in the My Documents folder or directly on the desktop.
These files are often located on the disk along with the already installed OS. You can also use the free space of another local drive to save information.
very important before reinstalling Windows check if there are drivers for the network card on the PC.
If you install new system via USB, and then it turns out that the distribution does not have drivers for the network card, then you will not be able to configure the drivers and the Internet connection.
For your own confidence, it is better to once again make sure that the drivers are available. Also, be sure to check if you have drivers for your sound card, audio card, video card, etc.
Preparing a flash drive for software installation
To install the operating system from a flash drive, we recommend that you adhere to the following rules:
- The minimum size of the flash drive must be 4 GB. This is the amount of space required to save all important components and files;
- Mandatory preparation of the Windows 7 distribution kit for recording and saving its image (*iso format);
- Choosing a program to create a disk image.
Advice! One of the best disk imaging utilities is UltralSO. latest version located on the developer's site
Install and run the utility on the PC, and then select the pre-selected disk image in it. Step-by-step instruction using the program will help you quickly understand all the subtleties.
- launch
2. Now the main working window opens in front of you
3. Proceed to recording the hard disk image
4. Now you need to connect the flash memory and enable formatting. When the process of formatting the flash drive is completed, you can start recording.
5. At the end of the recording, there will be Windows on the space of your flash drive, with the help of which you will reinstall.
Comment! To create a flash drive to install the system through the BIOS, you can use the toolsWindows.
Configuring Bios to work with a bootable USB flash drive
One connection of the installation USB flash drive to a PC is not enough to install new software; a preliminary configuration of the computer is required so that when it is turned on, it starts to boot from it.
All settings are made in BIOS. Any laptop, computer has a BIOS that stores important settings, among other things, it remembers the order in which devices should be loaded. It is this setting that we now need for further fruitful work.
To start the BIOS, you must hold or press a certain key on the keyboard when you turn on the computer.
You can find out which key we need from the information on the monitor. Typically, these keys are Esc, Delete, F2. If you entered BIOS, then one of the following screens will appear in front of you:
If the login attempt fails, restart the computer again and try to start the BIOS again. To make it easier for you, we have posted a table with the main options for enabling Bios.
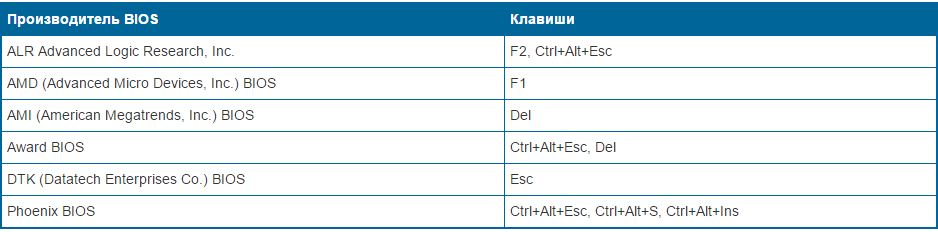
Keyboard shortcuts to enterBIOS depending on manufacturerBIOS
Basic keyboard shortcuts for launchingBIOS depending on laptop and computer manufacturers
After you get into BIOS, you need to find the option that is responsible for loading devices. Usually it is in the menu and the word BOOT is present in its name. Other options are not excluded, you may even have to look.
Here are some examples:
As a rule, the choice of the main device for loading occurs by pressing the arrows on the keyboard, although sometimes there are other ways to control it. If you can’t figure it out on your own, then refer to the help that glows in the BIOS.
In our case, the USB-HDD (there may be another name) acts as the first boot device. After selecting it, you must exit the BIOS with saving all settings using the Save and Exit Setup item.
After this step, the computer should restart and we will move on to the main stage for which we are here.
Installing Windows 7 using a bootable flash drive
If everything was correctly written to the space of the flash drive, and the correct settings were made in the BIOS, then you will see the following message on the monitor screen in front of you, which says that you should press any key to activate the download.
If there is no such inscription, then you will have to check your actions. To do this, go to BIOS and make sure that the boot from USB flash drive setting is saved. If there are no errors in the BIOS, then most likely you were unable to create a bootable USB flash drive and you need to repeat the whole process again.
If there is an inscription, then congratulations, your Windows installation new version through the bios started. Some installation images, in addition to the operating system itself, also contain various additional programs, then you will have to select the required item from the menu.
It is also worth saying that some of the disks by default perform most of the settings described below. You should not worry about this, since all settings can be changed after the software installation process is completed.
A welcome screen appears in front of you, on which you select the desired data. After the configuration is done, you should click on the "Next" button, and then "Install".
In a new window, the terms of the license agreement appear in front of us, which you, of course, read very carefully, and then agree by checking the box in the designated box and clicking the "Next" button.
The final stage of installation
In the new window, you will have to choose which type of installation we want. We need a complete type. Next, you will have to work a little with the disk, on the space of which the new version of the software will be written.
To do this, select the required disk partition in the menu and click on the "Disk Settings" button, after which we start formatting.
We have already described how this is done above. Here you just need to change from USB-HDD to the name of your drive. This is a very easy action that should not cause you any difficulties.
Once the reboot is complete, Windows Setup will continue.
- We enter names for the computer, laptop and for users.
- Set a password if needed.
- Enter the name of the license key, if any (you can skip this step).
- Select security settings ("Recommended settings").
- Set date, time.
- We are setting up the network.
Thanks to these simple steps, you can install Windows 7 through BIOS using a USB flash drive.
There are many types of BIOS: Ami, Award, Phoenix Award, UEFI. Let's figure out which buttons to press when loading a computer or laptop in order to go to BIOS and put the boot from the USB flash drive to install windows. I want to note that the traditional key delete, F2 to enter bios. Below are button combinations on how to enter BIOS to boot from a USB flash drive.
Buttons for entering bios from laptop and computer manufacturers.
Buttons from BIOS manufacturers
How to boot from a USB flash drive in BIOS to install Windows
To begin with, it is not always necessary to go into BIOS to swap the bootloader for installing windows. For this, there is a so-called launch menu. To go there, you need to turn on the computer, sometimes a key is written. In this case F12. Press the key that is written in the word boot menu.

What will we start the computer with: a USB flash drive or other devices. The next step is to install windows.

How to boot from a USB flash drive in Ami Bios
- Click device priority.
In line 1st Devise set priority from the flash drive. This is usually all, but many have come across why I did everything right, but the computer does not start from a USB flash drive. It is just necessary to indicate sometimes, in addition to priority, forced loading in the line Hard Disk Drives.

- AT Hard Disk Drives we set a forced launch from a flash drive.
- AT 1st drive choose a carrier.
- Press F10 to save.
It turned out that in the settings of 1st Devise and Hard Disk Drives there is a bootloader from USB Flash i.e. we put a priority option, tried and failed. Then we set a forced launch and everything worked out for us. And so in all versions of the BIOS, if the priority boot did not work.

How to boot from a USB flash drive in Award Bios
- Go to advanced features.

- Click First Device, in the context menu we set from which bootloader we will start the computer. We have selected the primary devices to launch.
- Hard Disk Priority put the flash drive in 1st place. (If in First Device chose to start from the drive, then you need to put a USB flash drive in Hard Disk Priority).
- Award is ready, press F10 to save.

How to boot from a USB flash drive in Phoenix Award Bios
- Setting Advanced, in line First boot device put a flash drive or other device.
- Click F10 to save.

New UEFI BIOS in which you can control the mouse.
- Line Boot Priority, change places by dragging with the mouse. Can be done through advanced settings > Exit/Advanced mode and choose advanced mode.

- presses Boot and choose in Boot Option #1 loader.

It turned out to be very simple to go into BIOS and boot from a USB flash drive to install Windows, you just need to change just the type of boot. And remember about the priority and forced bootloader.
In past articles, it was described in detail how you can get into the BIOS on different models laptops and computers. But what is the purpose of this? In most situations, entering BIOS is required to change the default boot disk.
This text discusses how to boot from a disk or flash drive on several computer options. The same principle applies to different devices. Moreover, its observance requires only a minimum of logic and attentiveness.
Two methods to boot from a disk or flash drive
In the first option, it is proposed to put in SETUP(aka BIOS) the desired device to boot by default. In practice, it will look like this: every time you turn on the computer, it will start from the specified hardware. In case the device is unavailable or not suitable for booting, the system will try to do it from the next one in the list, which can also be designated. If that doesn't work, the computer will move on to the third device, and so on.
The following method is supported by almost all modern laptops or desktop solutions. It is enough to turn on the menu during the start of the computer to select the boot. Thus, the device is determined from which the system will start only once. This is a more convenient method in a situation where you need to boot the system from a USB flash drive once.
When using the first method to select a boot device in BIOS, you should go into it and see the available interface. If you are met by blue windows, then in front of you - Award, differs in gray AMI, and the graphic design indicates UEFI. There are others. To decide, just study the screenshots and compare with your interface.
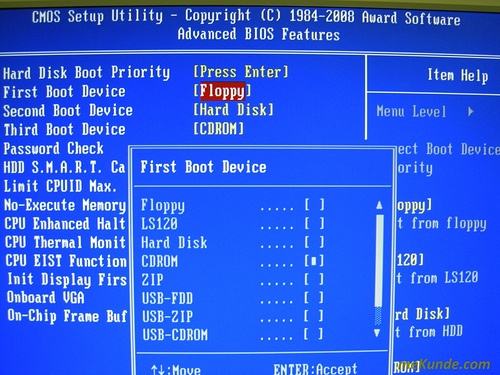
If you have an Award
Enter SETUP, go to " Advanced BIOS Features". By default, this item is placed second or third, starting from the top.


In another situation, the required partitions can be seen immediately.

Now let's decide on the necessary items on the menu.

First boot device means the hardware from which the computer will start in the first place.
Second boot device used by the system in the event that the first device is not suitable for booting.
To Third Boot Device the computer will pass if the second equipment in the list also has problems.
Any item from such "X Boot Device" corresponds to a hard drive, flash drive, CD / DVD disc or other device for booting.
If none of the options fit and the Boot Other Device is set to Enabled, then the operating system will be searched for on other drives.
When you select opposite any "X Boot Device" Hard Drive, i.e. hard drive, the Hard Disk Boot Priority item allows you to specify in more detail which particular disk to use. This point also applies to flash drives, since this type of boot device is defined by the computer as an external type of hard drive.
Therefore, to start from a DVD or CD, you need to assign “ATAPI CD” or “CDROM” in the “First Boot Device” item and do not select anything else. However, to boot from a USB flash drive, you need to not only click on "Hard Drive", but also go to the "Hard Disk Boot Priority" section. There, using the "PageUp" and "PageDown" or "+" and "-" buttons, move the flash drive up to the very beginning of the list.

Please note! The flash drive connects to the computer until it is rebooted or turned on. Otherwise, it is far from certain that the BIOS will see it.
The name of the flash drive may look different. Usually it starts with "USB ...", "Generic USB ...", and sometimes "External Device". The result of all actions performed must be saved. All you have to do is press the " F10" (for clarification, look down the screen at the prompts: there should be the words "Save" and "Exit") or even return to the main menu and select " Save and Exit Setup". In the red window that appears, use the "Y" button to agree with "Yes" and press "Enter".


The literal translation of the phrase: "Press any key to load CD or DVD ...". This means that you can press any button and the computer starts from disks. If nothing is done, it will boot from the next equipment in the list.
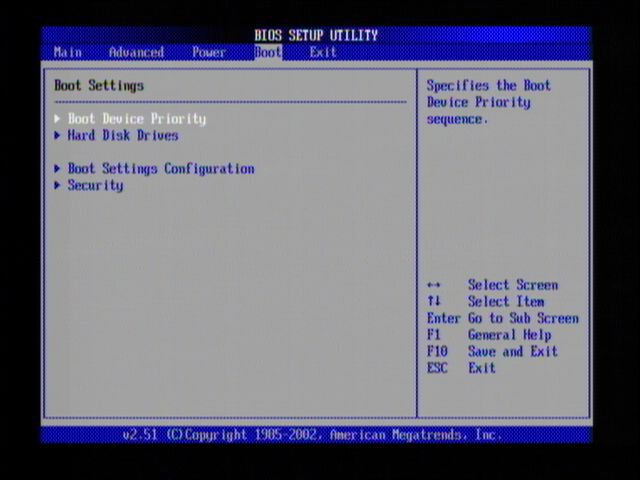
Boot selection process in AMI BIOS
Such BIOSes have a completely different look compared to the Award option. To begin with, we get into SETUP and look for the section " Boot» button to the right. There are two necessary points here, they can be clearly seen in the screenshot.

To put a boot from a hard disk or flash drive, you need a tab Hard Disk Drives. We select it and in the line “First Drive” (sometimes called “1st Drive”) we put our flash drive (USB device). After that, you should return to the previous section. Let's press the "ESC" button.

Then we move on to Boot Device Priority. We select 1st Boot Device and again from the list - a USB flash drive.

Be careful, the selected devices must match! If a hard disk is assigned in the first step, then you need to put it in the list not a flash drive, but it.
When you need to boot from a CD / DVD, you should select "CDROM" (sometimes "ATAPI CD-ROM") in the same menu. And in this case, the “Hard Disk Drives” section is no longer needed. Save the settings with the " F10" or you can just go to the "Exit" item and press " Exit Saving Changes».

A prompt will appear, answer "OK".
On different models of laptops and computers, everything is quite similar. For example, on a standard laptop from Lenovo, the “Boot” section includes all the hardware at once, which is very convenient for users. Eliminated confusion with additional subsections and priority. To set the boot order of the equipment, you just need to use the keys " F5/F6". Therefore, to start from a flash drive, simply advance it to the very top.

Some users will need a detailed transcript.
- USB HDD means an external hard drive or flash drive.
- How ATAPI CD is defined is CD or DVD-ROM.
- HDD (sometimes ATA HDD) is a hard drive.
- USB FDD is an external floppy disk drive.
- USB CD is an external drive.
- PCI LAN stands for LAN Boot.
On models from Lenovo belonging to the G500 line, you must press the OneKey Recovery button when the laptop is turned off.
Below you can clearly see the BIOS EFI (UEFI), which differs not only in the graphical interface, but also in the working mouse. If you have a computer with EFI, then when you enter the BIOS, you will be greeted by such an image.

Menu at the bottom of the screen Boot Priority. Here you can directly drag and drop the mouse to make the required boot order. In addition, by pressing the "Exit/Advanced mode" button located in the upper right, you can go to the advanced version. To do this, select Advanced mode in the window that appears. Then find the “Boot” section and in the “Boot Option Priorities” tab, in the “Boot Option # 1” field, put the required boot device: DVD-ROM, flash drive, hard drive, or other available equipment.

But the owners of computers Hewlett Packard usually waiting for the next picture when going to the BIOS.

In the menu section “Storage –> Boot order” find the required device and press “Enter”. Move it up and when it is at the beginning, press "Enter" too. To save the settings, select "File -> Save and Exit".
Ways to boot from a disk or flash drive without entering BIOS
It has already been mentioned above that almost any modern laptops and computers are designed for a one-time boot from the required device and for this you do not need to go to BIOS. You only need to press a certain button when you start your computer. For example, in this BIOS Award it is proposed to select " F12» and bring up the boot menu.

Usually something like "Press F12 Boot Menu" is written. This means: press "F12" to select boot hardware. We do this and see the image, as in the screenshot below.

The list contains the found devices. Select a CD / DVD drive, USB flash drive or something else and press "Enter". However, other options are possible in the AMI BIOS.

The inscription "Press F8 for BBS POPUP" requires pressing "F8" for a menu with a choice to appear. On laptops, sometimes you need the F12 button to call it. The boot menu looks like in the screenshot.

It is enough to select the required one and wait for the download from a CD or USB flash drive.
Possible difficulties when booting from USB devices
Problems sometimes arise and the computer does not boot. Let's take a look at the common problems. First, make sure the USB controller is not disabled in the BIOS. In Award, this information is checked in the "Integrated Peripherals" or "Advanced Chipset Features" item. You need to see the function "USB Controller" and "USB Controller 2" their status should be "Enabled".

In the case of AMI, you need to find "USB 2.0 Controller" in the "Advanced" menu. The position should be "Enabled". The "USB 2.0 Controller Mode" option requires the "HiSpeed" status.

In addition, the reason may lie in the sockets located in front of the panel system block. It is worth trying to connect a USB flash drive to the rear inputs of the computer.
If your SETUP resembles this photo, then in the "Startup" section, change the "UEFI / Legacy Boot" parameter to the "Legacy Only" position.

In addition, the problem may be in the disk or flash drive. Bootloaders are required! You can check this on another working computer.
For fairly old computers in general. If there is no newer BIOS version, then the PLOP solution can help. Download last option Plop Boot Manager, extract the archive. You will see the files, of which plpbt.iso is the image for the CD, and plpbt.img is for the floppy disk.
It is clear that if there is a floppy disk, then the corresponding image is written to it, and the image for the disk is placed on the CD-R / RW disk. Just writing the file to the media will not work: there are special software. This topic was described in the instructions for installing the OS. Then you start from a CD or floppy disk, select the device in the window. The method helps to boot from flash drives on the most ancient computers.
Summarize
you studied detailed guide by loading from a disk or flash drive in the most different occasions. If you only need this once, then it is better to use a menu that does not require going to BIOS. With constant downloads or if there is simply no such selection menu, then just set the BIOS well. Don't forget to return everything later.
In order to install an operating system on a computer, you need to configure it to boot from a USB flash drive or disk. Therefore, in today's article, we will consider how to boot from a USB flash drive in BIOS. This must be done to begin installing Windows. Since if you just insert a bootable USB flash drive with the system, then nothing will happen. Your old OS will start to boot. If you have not yet downloaded the latest version of the operating system, then read the article - How. Let's now proceed directly to the configuration process itself.
After restarting the computer, it is not always necessary to enter the BIOS of the motherboard to configure. First, let's try to use the Boot Menu (boot menu). To do this, before the system starts to boot, you must press the "F8" key, thereby a special window should appear with a list (boot menu) of connected drives. In this menu, you need to select our flash drive with the OS recorded on it.
After that, it should begin, namely copying the installation files to the hard drive. After the computer restarts itself, Windows installation will begin from the hard drive.
If for some reason you are unable to open the boot menu, then let's start figuring out how to boot from a USB flash drive in BIOS. But first, I want to briefly tell you what a BIOS is. 
BIOS (basic input / output system - "basic input / output system")- a special set of embedded software that implements the application programming interface necessary to work with computer components and devices connected to it. 
In order to get into the BIOS settings, you need to have time to press the “Delete” or “F2” button or any other, depending on when the computer boots up. On the monitor you will at this point in time display the logo of the manufacturer of the motherboard or information about the processor, memory and hard drives. At the same time, something like this will be written at the bottom of the screen:
- "Press Del to Enter Setup"
- "Press F2 for Settings" or similar.
After clicking on one of the buttons, you will have to get into the BIOS settings. Depending on the board, the software for the basic I/O system may be different. I propose to consider the most popular options, as well as configure them to boot from a USB flash drive.
If AMI BIOS is installed on your board, then in order to set the disk boot order, you and I need to perform the following steps:

Note! The USB flash drive must be connected even before you enter the BIOS, otherwise it will not be detected for you.

If your motherboard is with AWARD or Phoenix BIOS, then to set up Windows boot from a USB flash drive, we take the following steps:

On many modern laptops, the InsydeH2O bios is installed and many are faced with the problem of setting the disk boot order. Let's deal with this problem together. We will do everything step by step so as not to make a mistake.

Note! If you need to install a boot from a CD or DVD, then in the first place you need to put the item "Internal Optic Disc Drive"
- After the settings have been made, go to the "Exit" menu section and select the "Save and Exit Setup" item, thereby we will save the changes made and exit the BIOS.
Currently, many motherboard manufacturers install UEFI software instead of the usual BIOS, which has a graphical interface, as well as mouse control support and a Russified menu. Thus, it makes it easier for us to solve the problem of how to boot from a USB flash drive in BIOS.
If you are lucky, and when you enter the BIOS you see that the graphical interface has loaded in front of you, then you need to go to the advanced settings by pressing the "F7" key or the corresponding button in the main window. In the menu that appears, you need to go to the "Download" tab and in the "Disk loading order" item, put our bootable USB flash drive in the first place. 
After making the changes, press the "F10" key and select the "Save settings and restart the computer" item.


When is the new year in China. Blog about China. When does Chinese New Year start and end?
Who are the victims of the Manchester bombing?
Diana Shurygina ended up in a psychiatric clinic
You can swim for baptism all week
The Martens family from Kyshtovka "is now hiding from everyone" in Germany The German Martens family