Incorrectly partitioning into several smaller local hard drives is more trouble than it's worth. An example of this might not be a large number of memory on the system drive C, which will end very soon if you actively use the computer and install different programs. But nothing is unreal. Today we will learn how to enlarge the C drive.
The essence of the problem
The need to add a few gigabytes to the C drive is a fairly common occurrence. This problem occurs when, during the initial installation of the Windows operating system, the disks are incorrectly divided and the system drive C is set to no more than 20 GB. 10 years ago, this would have been enough. However, now computers are more powerful, and the list of programs has noticeably expanded, not to mention online games and updates that weigh tens of gigabytes. Therefore, 20 GB, given that Windows has just been installed, will be enough at best for a month of work, after which the PC user will begin to seriously think about how to increase the C drive. The C drive means the system drive, i.e. the one on which the operating system stands, since in most cases it is he who performs this role.
In fact, it is much easier than it might seem. There are a large number of utilities that relate to hard drive partition managers and are able to manage it, including increasing the capacity of one by taking a piece of memory from another. A good program for managing a hard drive is Acronis Disk Director. The only downside is that it is paid. Of course, you can find a pirated version, but why break the law if there is a good, absolutely free AOMEI Partition Assistant Standard Edition utility.
A couple of lines about the program

AOMEI Partition Assistant Standard Edition is a great hard disk management utility. The license is absolutely free for both home and commercial use. The utility is completely in Russian, as a result of which problems with the use should not arise. In addition, its interface is similar to Acronis Disk Director, and those who used Acronis will practically not feel the difference and will not have to think for a long time how to increase the C drive. But even those who encounter this for the first time will be able to intuitively level to understand what and how. This utility has shown itself the best way, as evidenced by a bunch positive feedback on various websites and blogs.
No preparation anywhere
Before you increase the C drive, you need to download and install this utility. We go to the official website of AOMEI, find the desired program and download it. We start the installation process. Click "Next" and wait for the end. If it was downloaded not from the official site, but from a third-party site, then the installation process must be controlled so as not to install Sputnik Mail and the Amigo browser. The utility is installed, but we are not in a hurry to run it.
Create a backup
Before you increase the C drive in Windows 7, you need to backup the system. Backup is a function that creates a copy of the data (restore point) of one or more disks in order to return to this point in case of problems. This is done very simply:
- Open the properties of my computer, where you can find the "Advanced system settings" section.
- When the options window appears, click on the "System Protection" tab, where the available disks and information about their security should be displayed, i.e. whether a restore point was created on them or not.
- Select drive C, click "Configure". Here we put a tick on "Restore system settings ...", if not, and allocate space for backup (5-10 percent). This must be done so that you can save several restore points and roll back from an earlier one, since they constantly replace each other. We press "OK".
- Now click on the "Create" button. Give a name to the future backup, click "Create".
- The same procedure can be carried out with the D drive.

You can view the newly created restore point in the "Start", then "standard: / service: / system restore".
Of course, it is absolutely not necessary to make a backup before increasing the C hard drive. But it is worth remembering that AOMEI Partition Assistant Standard Edition is a manager hard drive, and if some error occurs, then all information can be corrupted.
How to enlarge drive C?
We start the program. You can immediately notice that it displays all the disks on the hard drive plus the reserved area. So, our goal is nothing more than to increase the C drive at the expense of the D drive (Windows 7) without losing data. To do this, right-click on drive D and click on the first item from the list "Resize partition". Now either move the delimiter from left to right, marking how much to separate, or in the "Unallocated space before" column, type the required number of gigabytes. We press "OK".

As you can see, the picture has changed somewhat: an unallocated area has appeared, which needs to be attached to C. Right-click on it and act in the same way as with D - "Resize partition". Here the window already known to us opens, in which you need to move the delimiter slider to the right to the end. To start the process, click "Apply". But before increasing the C drive with the D drive, we will double-check the operation parameters in the window that appears. If everything is in order, click "Go" and "Yes". After that, the process of transferring free space to C will begin. That, in fact, is the whole division operation.
Acronis Disk Manager
As described just above, Acronis is similar in interface to AOMEI Partition Assistant Standard Edition. However, the problem regarding how to increase the C drive with the D drive (Windows 7) is solved a little differently here.

First you need to have a license for this utility, since the demo version only allows you to transfer a few gigabytes. Install, create a restore point, run. Select drive D and click on the left toolbar "Resize Volume". Up to this point, it was necessary to decide how to increase drive C at the expense of drive D (Windows XP or 7). Drag to the right as far as necessary for C. After that, click on the "Apply Pending Operations" button, which is distinguished by a black flag. As you can see, the utility began to separate the place.
We do the same with the C disk, namely, go to the volume resizing section and move the slider to the maximum to the right. The only difference is that here you need to check the box "Add unallocated space to volume". After that, click on the black flag in the same way. However, after partitioning the memory with this utility, you will need to restart the computer.
It is also best to do disk partitioning with Acronis using a boot disk or USB flash drive with the program. The program itself will help you do this.
Every time there is less and less free space on the C drive. The problem of running out of memory is common to all computers, even those who have an HDD or SSD with a large amount of free space. At the same time, Windows cannot work normally with a shortage of memory, so it is imperative to provide enough space for the system. There are two ways to achieve this goal: remove existing files or increase the size of the disk. At the moment, I'm more interested in the second direction - increasing disk space.
The problem appears due to one feature of Windows - a gradual increase in the size of the system and the constant addition of temporary files. Over time, system files, as well as temporary files, tend to increase in space. All versions of Windows “sin” with this, without exception.
Initially, the lack of space can be corrected by deleting useless programs, temporary files, downloads, etc. Anyway, the situation is inevitable when only important applications are left on the disk, and, alas, there is not enough space. Some users give up, but this is not worth doing, as the system starts to process requests very slowly, programs are often criticized, and errors become the norm.
To continue to use local applications normally, you need to provide enough free space on the C drive. So, how to increase the size of the C drive? We will tell in our article.
How to clean the disk from garbage?
The easiest way to free up space is to remove all trash. If the problem of lack of space has appeared recently, it is still possible to get by with just deleting useless data. For some time, this will be enough for the normal operation of the system. It is necessary to clean up the garbage in several stages.
Action algorithm given below.
- We clean temporary files (inevitably accumulate when all applications are running). The program "CCleaner" effectively and quickly copes with the task. It is enough to download the utility from the link, on the first tab, click on the "Analysis" button, and then - "Cleanup".
- Removing useless files. By default, browsers in Windows download all files to the "Downloads" section located on drive C. There may be a lot of unnecessary here: distributions of programs for installation, obsolete files, torrents, etc. It is worth checking the sections where files are downloaded and deleting everything is useless.
- Uninstalling programs. Many users sort through 2, 5 or 10 applications in search of suitable ones. Having found a good utility, the search stops, but previously installed programs remain in the system. They should be removed by going to the "Programs and Features" section, menu - "Control Panel".
- Transfer media files to another drive. Photos, movies, music, games, etc. are best stored on the D drive. Such files should be cut from the C drive and moved to D.
How to increase the size of the C drive at the expense of the D drive?
Add free space to a logical drive With really standard Windows tools or through applications. The main drawback of the first method is the forced formatting of the partition. Programs cope with the same task, but without deleting files, so this option is a priority.
Using Aomei Partition Assistant
A free utility with a good reputation successfully copes with the transfer of space and saving data.
Its advantages include:
- simple setup;
- the ability to run several actions at once;
- reliable work;
- Russian interface.
The whole procedure is absolutely safe for the computer and hard drive.
The main functions of the program:
- creating and deleting logical drives;
- transferring free space between disks;
- formatting;
- merge, split, copy partitions.
Of greatest interest to us is the transfer of free space.
To do it, follow the instructions:
- download the app from site;
- install and run the program;
- right-click on the disk where there is free space intended for transfer, and click on "Resize partition";
- reduce space on drive D to create unallocated space.
Important! The slider should be moved from left to right, the freed volume should appear in front of other disk data.
- repeat point 3, but for drive C, and expand its place due to the space on the right;
- in the main window, click on the "Apply" button.
Healthy! The program supports delayed action, which means that until you click on "Apply" no changes occur. Before starting the procedure, all changes can be corrected.
Using MiniTool Partition Wizard Free
This is another similar program that is not inferior to the previous one. Has the ability to move space without formatting disks. The only drawback is the English-language interface, but it is intuitive, so it's quite difficult to get confused.
The way to add free space to drive C is the same as the previous program. The instructions from the previous section also apply to "MiniTool Partition Wizard". With the help of breakpoints, you first need to reduce one disk, and then increase the other. If you need to allocate the exact space, you can specify the desired amount in numbers (indicated in megabytes).
All of these methods create free space on the C drive, so the reader can independently choose the method he likes. Usually, after the procedure, the system starts to work much faster and failures appear less often.
It often happens that one hard drive runs out of space, while another has plenty of it. Usually running out of space on drive C, because. under it, initially, when installing the OS, the least amount of memory is allocated. So what is the way out in this situation?
Consider two absolutely safe ways.
Method number 1
If you have an operating system on your PC Windows system 7 or 8, then everything is easy for you. You can use the standard Disk Management utility, which is used to change and view hard disk partitions.
Method number 2
If you are still "sitting" on XP or, even worse, on Vista, then in this case you need special programs. Personally, I advise - Acronis Disk Manager or Partition Magic.
Now let's go through each method in more detail.
In the first case, the procedure is as follows:
We click RMB (right mouse button) on the Computer icon on the desktop, go to the context menu in Manage. A window opens, find and run the utility - Disk Management.


Next, let's assume the most common case when we "expand" drive C with drive D. To do this, find drive D in the window, right-click and select - Shrink volume. A window will open where you will need to specify the amount of memory that we want to transfer to the system drive. We drive it in the paragraph - The size of the compressible space (MB).


After that, a free memory area will appear on our hard drive, which we can transfer to any other disk, in our case, drive C. To do this, then right-click on it and select - Extend volume. The Extend Volume Wizard will open. In its window, select the expandable volume (disk) and the amount of space to add, click next and voila - after a short wait, we get disk C with increased memory. Well, after such manipulations with the hard drive, be sure to restart the computer.
.png)

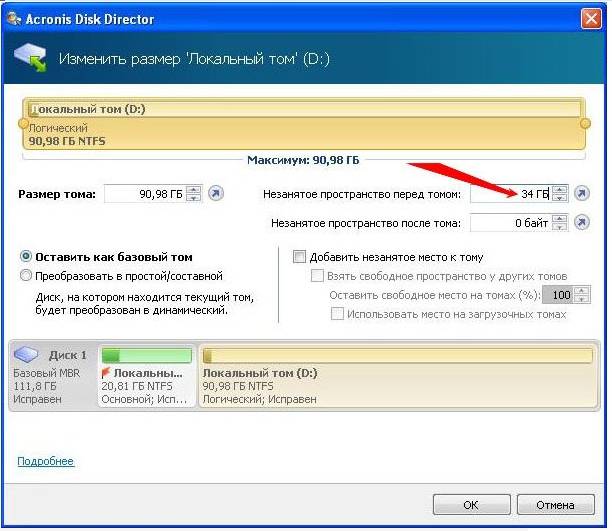
The second method should not scare you, in fact it is even easier. The only thing you need to do is download and install the Acronis Disk Director program on your computer. I advise her, as she has great functionality, allows you to do backups OS and hard drives and many other disk operations. But more on that later. In the meantime, we are interested in increasing disk C at the expense of disk D.
.jpg)
After installation, we launch the program, a fairly clear program interface opens, which displays all the disks of our PC. To increase the C drive, click on it and select "Operations" - Resize volume. After that, in the new window that opens, check the boxes next to the items - Add unallocated space to volume and Take free space from other disks. At the window with percentages, we select how much space we want to borrow from other disks. After all the changes, click - OK. After that, as in the first case, the system will ask you to reboot for the changes to take effect.

In both cases, you will get the same result and will no longer worry about running out of space on your drives.
I hope my article was useful for you and will help you when you need it!
You can move space from drive E (or any other drive) to drive C using Disk Management. Please note that you cannot take space from another physical disk, you can only take space from one physical disk, which is divided into several.
The first way is to expand the disk by removing another disk.
ATTENTION! Before doing this, copy all the data from the disk from which you will take the place. Since, in order to expand the disk, we need to delete files from it.
Here I have 1 physical disk of 25 GB, but it is divided into 2 disks:
Disk C (Local Disk) - 18.2 GB.
- Disk E ( New volume) - 6.64 GB.
Right click on Computer(not on the label, which has an arrow at the bottom left) and click on Manage.

Computer Management opens, select here in the Storage devices tab - Disk management.

Here we see all the disks that we have on the computer. Right click on the disk from which we want to take a place (I have this drive E) and select Delete volume.

We are warned that deleting a volume destroys all data on that volume. Archive any data you wish to keep before deleting. Do you want to continue? We press Yes.

Now we have one C drive. And then there is 6.65 GB. unallocated space.

Now right click on drive C or on that disk a place (6.65 GB.) to which we want to add and select Extend Volume.

The Extend Volume Wizard opens, click Next.

We select the space (place) how much we want to take (in the screenshot, I took all 6.65 GB or 6807 MB.) and click next. It is not necessary to select the entire space, you can select half, for example, or as much as you want to increase your disk at the expense of space from another disk. Just then it will be necessary to create a simple volume so that there is no unallocated space left.

Click Finish to close the Extend Volume Wizard.

That's all. Now we have 1 disk of 25 GB.

The second way to expand the disk without losing data. Using the free program Minitool Partition Wizard.
Download Minitool Partition Wizard from the official website partitionwizard.com/free-partition-manager.html
Here I have 1 physical disk of 50 GB. divided by 3:
Drive C (Windows 8) 25 GB.
- Disk Q (Multimedia) 9.76 GB.
- Disk T (Programs) 19.5 GB.

The program menu opens, select the left option to launch the Partition Wizard.

Here is a menu that displays all of our drives and their size.

Right click on drive C and choose Extend(Expand) to expand the C drive.

Now we select the drive from which we will take space for our C drive. I will choose the Q (Multimedia) drive.

Use the slider to select the size which we will take from disk Q (Multimedia). I chose 5.02 GB. AND click OK.

Now, on the top left in the program, click Apply to apply the changes and transfer the space to 5.02 GB. from drive Q (Multimedia) to drive C (Windows 8).

If the system gives an error when loading new files, then you should worry about the amount of system storage. No need to panic clear everything that is stored on the computer. You do not need to remove installed components. It is enough to understand the methods of increasing the capacity of the system drive C without losing data.
When is it necessary to increase the disk size?
It happens that the system media (often it is C) overflows. New programs are not installed, the system constantly reminds you of a lack of memory, and the color of the local drive becomes annoyingly red.
The reason for this may be:
- very small amount of allocated memory. When installing the operating system, the HDD must be partitioned rationally. It is on the C drive, according to the standard, that all programs and games are installed, which become more and more over time. Desktop documents are also stored on the system drive;
- even if most of the memory is allocated to the system media, it can fill up very quickly. Unnecessary components, countless installed games, and simply inappropriate use lead to the fact that the full indicator turns red.
Due to the overflow of information, the computer ceases to function normally and refuses to install anything new. Therefore, it is worth increasing the system memory partition.
Video: drive C increase
Ways
Expanding your system storage is sometimes very easy. But in some cases, it is enough just to clean the computer by reviewing the information on it. This does not require the installation of additional components. Most often, a regular user can simply clean the desktop, delete temporary files, or use the command diskmgmt.msc.
Clean desktop
The desktop is best used simply for placing shortcuts to the most used programs. But many users create countless folders that store a lot of information. Most often, this information is multimedia in nature, which means it takes up a lot of memory.

Cleaning up some (and often a lot) of memory is as easy as cleaning up your desktop. To do this, move all folders with movies, music and photos to the media intended for this (D, E). Each partition of the HDD must be used rationally.
Cleaning up temporary files
Temporary data can also replace the lion's share of system memory.
Therefore, it is worth getting rid of them. Temporary files include information that the browser saved while browsing web pages, namely:
- visit log;
- files Cookie;
- download log;
- temporary files of the world wide web;
- site settings;
- saved passwords;
- autocomplete.
- deleting temporary data manually. To do this, you need to empty the trash and delete the saved information from the browser you are using yourself. Each of them does it in their own way.
Such information speeds up the launch of many sites. It is convenient for personal use. But if the computer is family, it is better to get rid of them.
There are three simple and convenient ways to clean them:


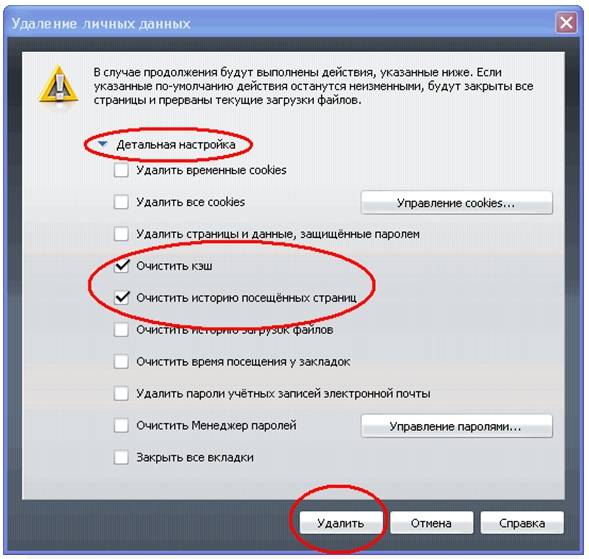
- Internet Explorer. You need to clear the log in the window "Internet Options". The section is located in the browser itself in Service;
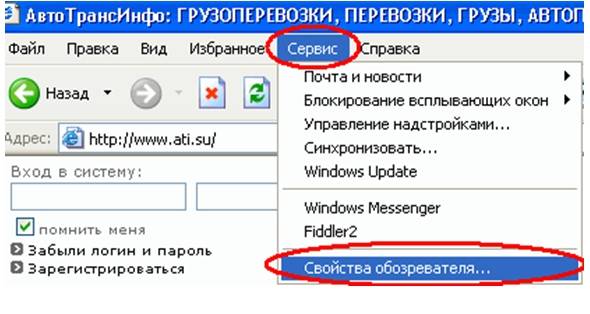


- Opera. You need to get to the removal of personal data by Menu - Tools - Delete personal data.

To select the desired items, it is worth opening Detailed settings;
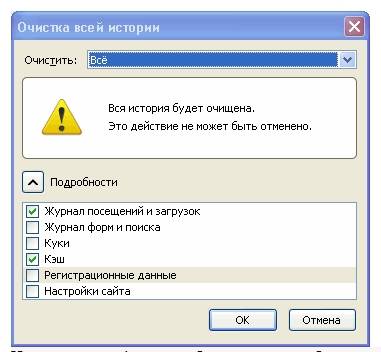
- Firefox. Here you need to go Tools - Settings - Privacy.

- function usage "Disk Cleanup". It helps to get rid of a lot of unused data stored on the drive.
To do this, do the following:

diskmgmt.msc utility
With this utility, you can partition, create a new one, delete an unnecessary one, or format the HDD.
Further actions depend on the required task. storage capacity on the computer can be due to other media:

How to increase the amount of memory on drive C
Increase the media capacity when the media is set. operating system possible with the help of special programs. The most popular and frequently used for these purposes is Acronis Disk Director.
Acronis Disk Director
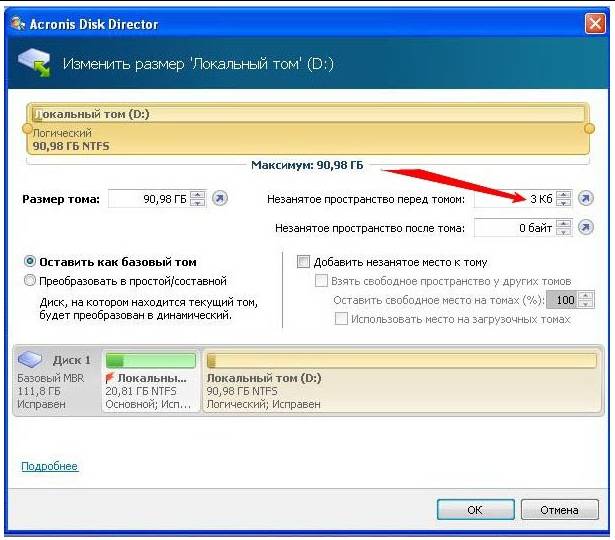
It does not require special skills and works both from the boot disk and from the installed software. Acronis Disk Manager refers to disk partition managers. Therefore, you need to be careful with it, otherwise there is a possibility of deleting absolutely all HDD partitions.
To enlarge the media, do the following:
- create unallocated space.
To do this, you need to reduce the partition of another drive (for example, D):
- open Acronis Disk Manager;

- move the mouse over the media, select it;

- resize the volume down.

So in a simple way you can significantly change the amount of memory of any media.
These methods are very easy to use. They are available to every user who knows how to click the mouse button. Most of them do not even require the use additional programs. Such simple operations increase the capacity of the C drive without losing data. This will take a little time, desire and effort. Try it yourself.


How to understand: will the kitten be fluffy?
What kind of light alcohol can be drunk for pregnant women: the consequences of drinking
Why do the legs swell in the ankles and ankles of the feet in pregnant women: causes and methods of treatment
The wedding of Prince Harry and Meghan Markle: scandalous and secret details of the marriage (photo) The future marriage of Prince Harry year NTV
How to close white plums for the winter