Have your own home drilling machine- the dream of any master. The most popular are designs from a hand drill. But this option has a drawback - if necessary, use a drill as an independent tool - you have to disassemble the machine.
However, there are a number of solutions for the manufacture of a drilling machine without the use of a ready-made power tool.
How and where do you best hold the drill?
However, it is important to pay attention to the individual characteristics of the drill, because not every device is suitable for every application. A good workout is just worth your money. Of course, there are "cheap" models that do the job if you only want to drill a few holes. But if you need to exercise more often, you should resort to a model that is really durable and can actually handle any material. There is a wide choice, you just have to find the right one. electrical appliance.
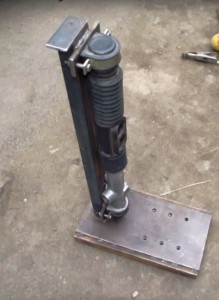
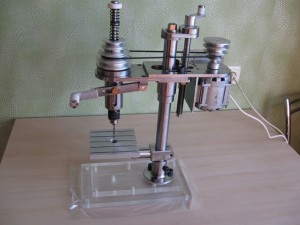
Powerful steering rack drilling machine
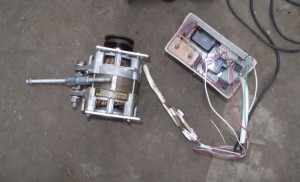
For manufacturing you will need:
- steering rack from a car, with dismantled elements of the amplifier. Of course, used, but preferably not very loose;
- Several steel corners and profiles of different sizes;
- Steel sheet 2-3 mm for the manufacture of the bed. You can pick up a suitable finished spare part from old large household appliances;
- Drill chuck;
- Electric motor and pulleys with a belt. Perfect option- from the Soviet;
- Bearings in good condition;
- Access to welding machine and lathe.
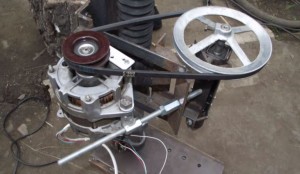
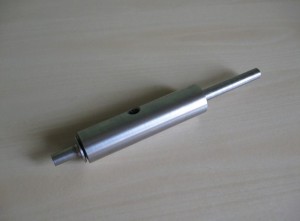
The most critical part is the axle with the pulley. Turned on a lathe. In this embodiment, the chuck mount is threaded, so the corresponding thread is cut on the bottom of the shaft.
The impact drill is a true all-rounder because it is suitable for hard and soft materials. When buying, pay attention to the power, because the higher it is, the more powerful the device. Buy the right drill, even if it's a little more expensive. A good home improvement requires high quality equipment, a drill is just one of them.
After use, the electrical appliance should not be carefully thrown into the next corner, necessary care, which you must process with your new device. It's certainly not much work, just clean the car and handle it carefully. Most of the instructions in the manual already tell you how to handle your machine, but often it is simply not found or no longer available. But it doesn't matter, even without instructions, common sense tells you what to do.
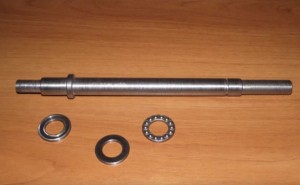
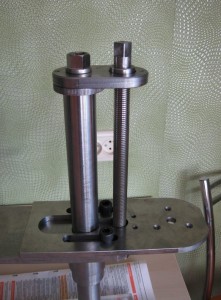
For mounting, 4 bearings are used, 2 regular and 2 thrust. Pulley used from the same washing machine.
We assemble a carriage from suitable corners, on which the working shaft and engine will be fixed. We pay special attention to the placement of bearing surfaces for thrust bearings. The load must be evenly distributed, otherwise one of the bearings will wear out faster.
You don't have to just keep the device casually in a corner in the basement, there is indeed a toolbox. In addition, drills are often transported in a car, unprotected and completely unprotected, they are simply placed on the back seat and of course from falling. and other strikes are not protected. While a suitable tool box is not a "must have", it is indeed the right place for a drill. Before it finds its place in it, you must clean it, but with a light stroke and wipe it with a dry cloth.
This removes the coarsest dust and does not settle in the gearbox or drill chuck. You also need to protect the device from moisture, moisture hitting the electronics. Sometimes mixing dust and moisture and hardening that mixture can damage your car. Storage on a balcony or garage is not recommended, so it's best to pick up a car in a dry basement or workshop. Once the storage and maintenance are clear, you quickly get used to it and you enjoy a reliable workout for a long time. Of course carbon brushes should be replaced regularly, the manufacturer gives you details on this.
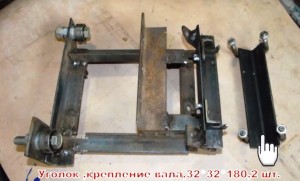
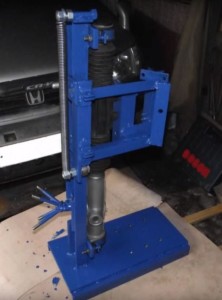
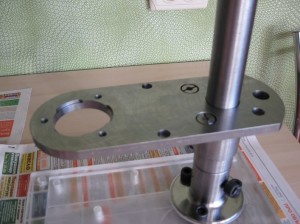
The bed is welded from a 4 mm steel plate and similar corners. A support rod made of a metal profile is welded strictly vertically. On a horizontal surface, we make 6 holes for attaching a vise or support stand. WITH reverse side nuts are welded on.
There are also machines that use a warning light to indicate when it's time for a change. Store the device properly, because then you will enjoy the machine for many years. The electric motor can only rupture if moisture and moisture can get in, and the chuck can become clogged if it has not been properly cleaned. These are just a few tips, but they can do a lot.
How long does a drill last?
Drills are one of the tools that you usually rarely buy. On average, a high-quality drill has a lifespan of five to eight years, depending on the quality, frequency and intensity of use. But that is why it is important to choose a model that is durable and durable. It is good to know in advance what to look for when buying and how to extend the life of the device.
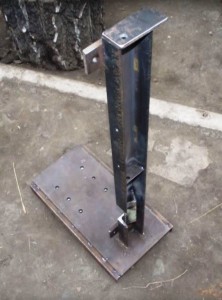
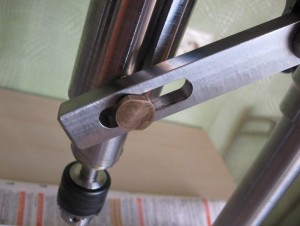
With the help of powerful clamps, the steering rack is installed on the profile. Installation is carried out once, with strict control of the vertical movement. At this stage, a decision is made on which side the steering wheel will be - under the left or right hand.
Here's how a drill works. Basically, a drill consists of two parts: a motor, which is usually powered by electricity, and a gearbox. In most cases, electric motors run at extremely high speeds to ensure high performance. The transmission, in turn, provides speed control. High quality drills have multiple gears - one for fast drilling and one for precise slow drilling. Often it is possible to change the direction of rotation, it depends on the device.
The teachings are not only for professional masters, but also for home cultivation, which you should not do without, since it can be used in many areas. What to Look for When Buying a Drill. Anyone who wants to drill with the longest possible life should know the criteria that play the most important role in choosing such a device even before purchase. For example, the use of a drill is an aspect that should not be overlooked. Of course, you don't know in advance what exactly should be drilled in the coming years, but you can see, for example, on the construction fabric, what materials you will be dealing with.
The fact is that the direction of rotation of the rack mechanism is somewhat unusual for those who worked on a classic drilling machine.
A carriage with a cartridge and a bracket for the engine, additionally supported by two bearings on a profile rod. This is done to compensate for steering rack play.
Very hard surfaces such as reinforced concrete are best machined with a special form of the classic drill, the impact drill. If instead you prefer to drill holes in more soft materials such as plaster or even wood, you will generally get along well with a high quality impact drill. Velocity and speed are measured in revolutions per minute, torque is also in Newton meters.
Probably, best advice for a successful purchase of a drill is: do not save at the wrong end! Many features of such a tool that you might not be able to do much with at first will really help over time. One example is the choke, which is now equipped with many high quality devices. The throttle lever provides stepless speed control. This is especially useful when drilling with extreme precision. It's best to start at a slow speed to make sure the hole is drilled in the right place.
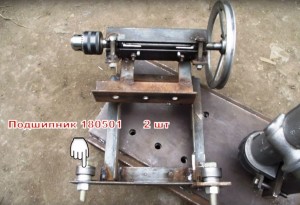
We collect the mechanism, check the verticality of the course. If necessary, adjust it by placing washers under the rail mounts.
IMPORTANT! If the direction of movement of the cartridge is different from the vertical, the drills will always break.
Drills in which the throttle valve is complemented by a special speed limiter are highly recommended. This can be of great help to prevent the drill tip from building up and damaging it. While drilling fluid is used in the industry for cooling, rate limiting for work at home is the right feature.
The principle of the machine
So maintain and clean your tools properly. While most people don't use exercise every day unless they depend on it at work, there's no reason not to take care of it. Because: It can also greatly extend the life of this tool.

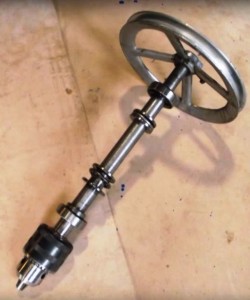
The steering wheel is made of a steel bar of 10 mm. For aesthetics, you can carve knobs. The travel of the carriage is 160 mm, which is quite enough for most drilling jobs.
Proper storage of the device is the first important point here. You usually store your exercise at home in the basement or pantry. Basically this good idea until the environment is damp. Such a tool can only be stored correctly if the surrounding air is absolutely dry, because the moisture can permanently damage the engine and thus significantly reduce the service life.
It is also very important to take care of brushing in good regularity. This the only way prevent dust particles from entering the device or interfering with operation. It doesn't matter if you work with simple exercise, use an impact drill or work with an impact drill. Don't be fooled by the tool's supposed reliability, because even the highest quality requires proper maintenance so that it remains functional and holds securely.
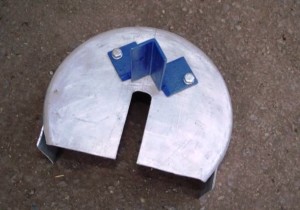
For safety, a protective cover made of thin metal. You can use an old pot of a suitable size.
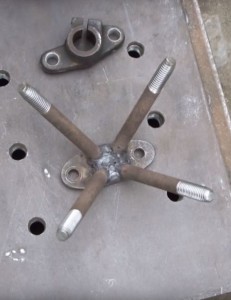
We assemble the engine control unit in a separate box. You don’t need to invent anything, the speed controller is left from the washing machine. This variant has a reverse rotation, which adds functionality, especially when threading or milling work.
Of course, during the drilling process, chips are formed that contaminate the device more or less. They can often be wiped by hand, but in most cases this is not enough: coarse dirt particles are indeed released in this way, but really fine dust can also enter through the louvres in the tool body or the surface on the make the duration porous. The fact that the optics also suffer goes without saying in this case.
If you take these tips, you will certainly enjoy your exercise for a long time - perhaps even more than eight years if you maintain the device properly. At present, the drilling rig is at the forefront of all hand power tools. At that time, Wilhelm Fein founded his own company, "Electrical and Physical Equipment Workshop". He was an inventor who was constantly striving for new things and exploiting new opportunities. It was with 50 watts of power, two handles and a chunky body, not what distinguishes the exercise today, but each development is finally preceded by a base.
We install the motor on the carriage. On the one hand, a hinged suspension, on the other - a hairpin, a belt tension regulator. Given the age of the washing machine, it is better to replace the wedge-shaped drive belt with a new one, and at the same time, the distance between the pulleys can be set to a more convenient one.
Drilling machines are ubiquitous today and are among every functional piece of home improvement equipment. In the craft sector, they are long gone. This article looks at how to handle electric drill presses safely. These considerations do not include impact drills, no rotary hammers, no cordless screwdrivers. These power tools again require other processing methods. This is a simple drill that is used for drilling without impact on various materials from wood to metals.
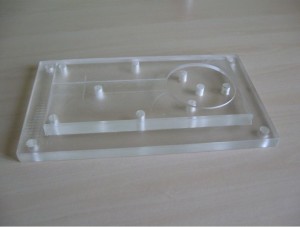
After setting up and final assembly, we cover the metal parts with paint, and the homemade drilling machine is ready to go.
To secure the workpiece, you can use a vise or stand, which is made to fit the specific dimensions of the machine.
Electrical safety of electric drilling machines. Electric hand drills have a power cord that connects them to a standard outlet. Today there are no manufacturers whose models do not have the degree of protection "isolated". It can be seen on the rating plate or in the double square symbol documentation. called "Insulated", which is an electric drill structurally encapsulated in such a way that when correct use any electrical components can get connection with the body.
The body of the machine is made of an electrically insulating material, so that the user is no longer physically closed. On the other hand, this means that it cannot be manipulated on a drill with leakage protection. For many models, it is enough to set aside a broken connecting cable. When the machine or its switch is opened, the "isolated" protection degree will be canceled and cannot be restored by a layman. On the other hand, protective insulation does not mean that these machines can be safely exposed to moisture.
IMPORTANT! The metal case must be grounded.
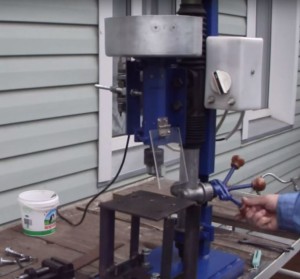
In the video, a home-made drilling machine, a demonstration of work on metal and wood.
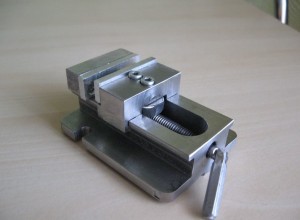
Compact drilling machine
A home-made machine for metal does not have to be large and powerful. Most jobs can be done on a small table fixture.
Machine parts such as the switch, locking device, fast action chuck or gear can corrode from moisture and be damaged. Conclusion: Drilling machines require careful processing without exposure to moisture and the least possible amount of dirt. The repair of electric hand drills falls into the hands of specially trained specialized workshops.
Drilling with or without goggles? Simple hand drills are almost always used for drilling holes in various materials using twist or special drills. They can be used for violin holes or can accommodate a large drill bit. All these operations are associated with the removal of chips. These chips are removed from the height of the drilling tool or between the teeth of the drill bit and fly around uncontrolled by their rotation. This answers the question of whether safety goggles should be worn when drilling with a hand drill.
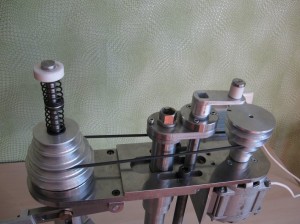
The tool is completely made of metal blanks, except for the electric motor and fasteners from finished parts. All structural elements are made using a CNC milling machine and a lathe. If you do not have access to machines, you can pick up components in a furniture fittings store.
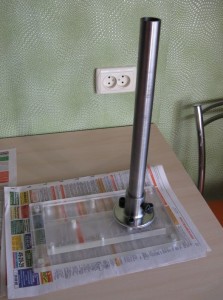
The bed is made of plexiglass 20-30 mm thick, the base is two-layer. The bottom layer is attached to the table (workbench), on the top we provide a place for installing the heel under the column.
The heel and the column itself were purchased at a furniture fittings store.
The retaining sleeve is made on lathe, and finalized on the milling machine. At the rear, a mother brass nut is installed to adjust the vertical position of the carriage. The sleeve is fixed on the column with a locking screw.
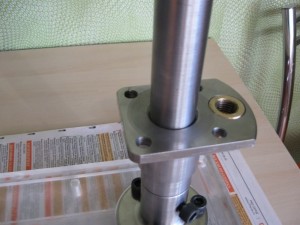
The spindle plate is made on milling machine with CNC. Don't let the manufacturing technology scare you, the same part can be easily made with a drill and a file. The plate is mounted on a retaining sleeve.
A bracket for the engine with grooves for longitudinal movement is installed on top. This is necessary to tension the drive belt, and rearrange it along the pulleys when changing the rotation speed. The bracket is made similar to the spindle plate.

The motor used is asynchronous, with a power of 60 watts. The capacitor starting block is made in a separate box.

The spindle plate, together with the engine, moves vertically with the help of a lead screw, the mechanism is visible in the photo, the element is optional, but it adds convenience.
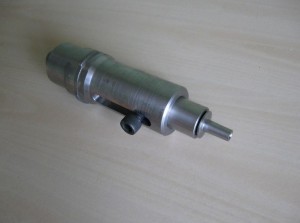
The spindle consists of a housing with bearings and a shaft on which a chuck is mounted using a Morse taper.
The spindle body is mounted in a sleeve along which it will move vertically when drilling.
Movement is carried out using a lever in which a longitudinal groove is cut.
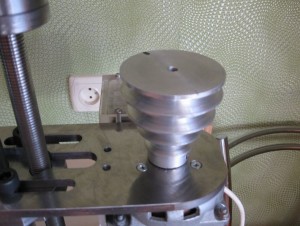
A pulley with variable diameters is put on top to adjust the speed of rotation and torque.
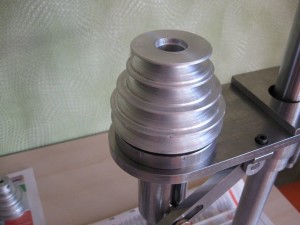
A similar design, only inverted, is placed on the drive motor shaft. By rearranging the belt from one pulley to another, you can easily achieve the required rotation speed.
We assemble the structure, check the performance. The drive belt can be round or flat, depending on which pulleys you will use.
Initially, the desktop machine was created for drilling printed circuit boards, but was later upgraded as more versatile. For drilling holes at any angle, a three-dimensional coordinate vise for a drilling machine is made.

The design consists of a coordinate plate, machined on the same CNC router and a vice, also made by hand.
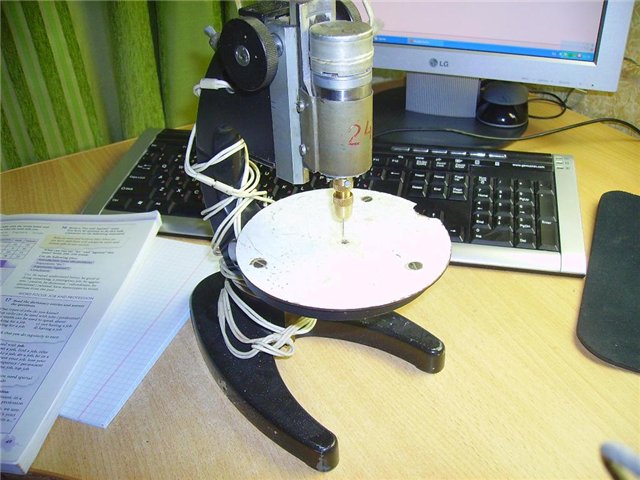
We looked at ways to make a drilling machine from improvised materials. There are many execution options. You can make a frame from a photographic enlarger or use the mechanism of an old microscope. The principle of operation will not change from this.
The main condition is a reliable working surface with a plate or vice, and a mechanism for moving the spindle vertically. The presence of backlash of the mechanism and the overall comfort in work depend on the accuracy of manufacturing.
In the video, a homemade drilling machine from an old photographic enlarger. To work took a tripod and mount.
You can develop a drawing and order the manufacture of components at the factory, or pick up items from junk in a barn and garage. A machine made with your own hands will not get worse from this. You still make it “for yourself”, which means that there are no universal designs.
A mini drilling machine, despite its miniature dimensions compared to other machines, perfectly performs the tasks assigned to it, not inferior in quality to large machines. Some desktop machines also have milling functions and are often used in repair shops or in educational institutions. Mini drilling machines are used for drilling holes in microcircuits, as well as circuit boards.
The rotation of the drill is the main movement that is used in the operation of the drilling machine. The drill holds the spindle. The drill is fed in a vertical plane, and the part itself is located on the desktop.
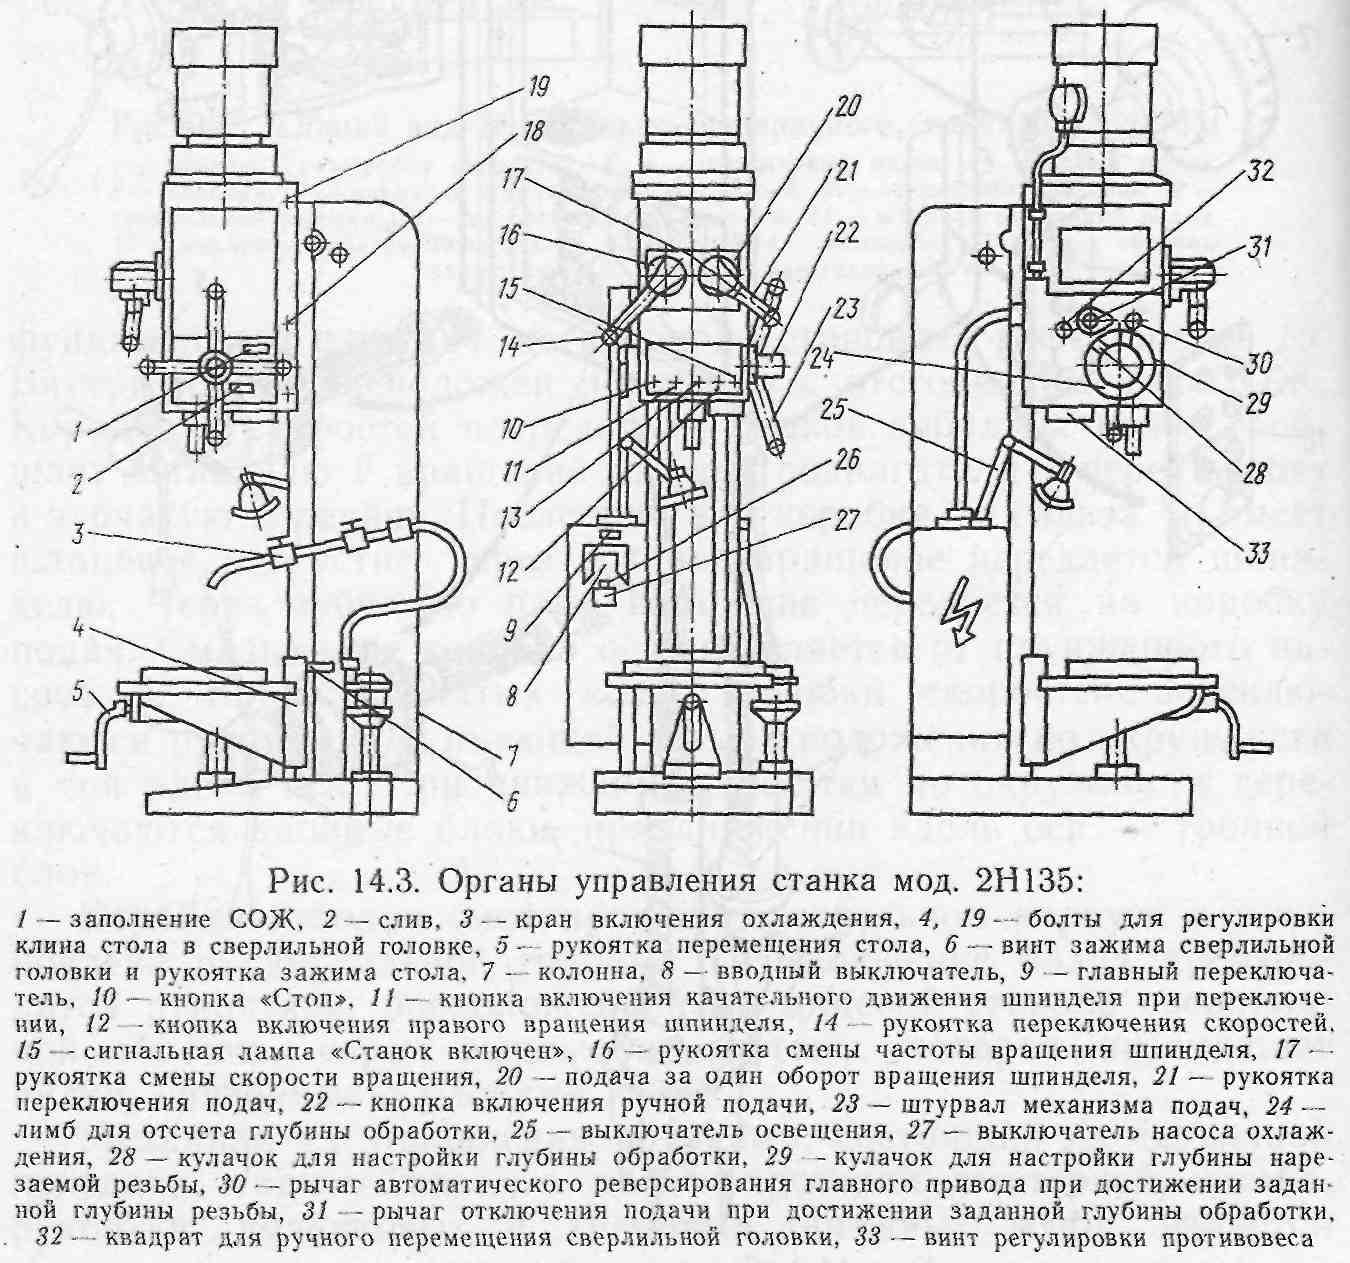
All elements of the drilling machine are located on a stand placed on a massive frame, which is the base. The working head with the spindle moves along the rails, and the engine is located in the column. In the event that it is possible to switch the speed, then this is done using the buttons on the handle. In modern units, these parameters are monitored by an electronic system.
The working head must be lubricated with oil, which is supplied to it by means of a pump (the pump also supplies the coolant for the head). The working head is made mainly of cast iron. In the head, as a rule, the feed and speed device is located. The gearbox works with the help of gears that are switched by the handle. The work of the mini drilling machine is carried out from a standard household network with a voltage of 220V.
Operation of the mini drilling machine
When the machine is turned on, the spindle starts to move. Power desktop machine can range from 150 to 300W. A belt drive is mainly used, but a gear transmission system can also be used on very small units. The feed rate is changed using the handle.
The working element, the drill, is inserted into the chuck (collet or cam), which tightly clamps its end. In a collet chuck, the drill is clamped automatically, and in a cam chuck with a key.
With the help of the feed handle, the drill is lowered to the material being processed. The handle resembles a lever in appearance and, as a rule, is located to the right of the head. Thanks to the built-in spring, after drilling the hole, the head returns to its original position by itself. Also, in some machines, the head can be fixed in a certain position.
Machine characteristics
An important parameter that affects performance and economy is power. The minimum power for simple work - drilling a hole for printed circuit boards, is 150W.
The drill rotates from 200 to 3000 rpm. This happens thanks to the gearbox, which gives the master 12 speed modes.
50 centimeters is the maximum height of a part that can be used to work with a mini drilling machine. The head with the drill moves vertically along the rails, this happens as a result of manual control and, having reached the desired height, the head is fixed.
You can make a homemade miniature drilling machine yourself, with your own hands. Often the need to create this unit arises when periodically there is a need for drilling holes, which is often the case with radio amateurs, since they need the device for drilling printed circuit boards. It is worth saying that a home-made mini machine may have high level work, but only if everything is done correctly and correctly.
It is worth saying a few words about printed circuit boards. Drilling holes for printed circuit boards is a rather laborious task, since the diameter of the holes is very small. Therefore, on an industrial scale, laser equipment is increasingly being used to drill boards, but for an ordinary radio amateur, a home-made drilling machine with small diameter drills may also be suitable for processing boards.
Homemade mini drilling unit from a drill
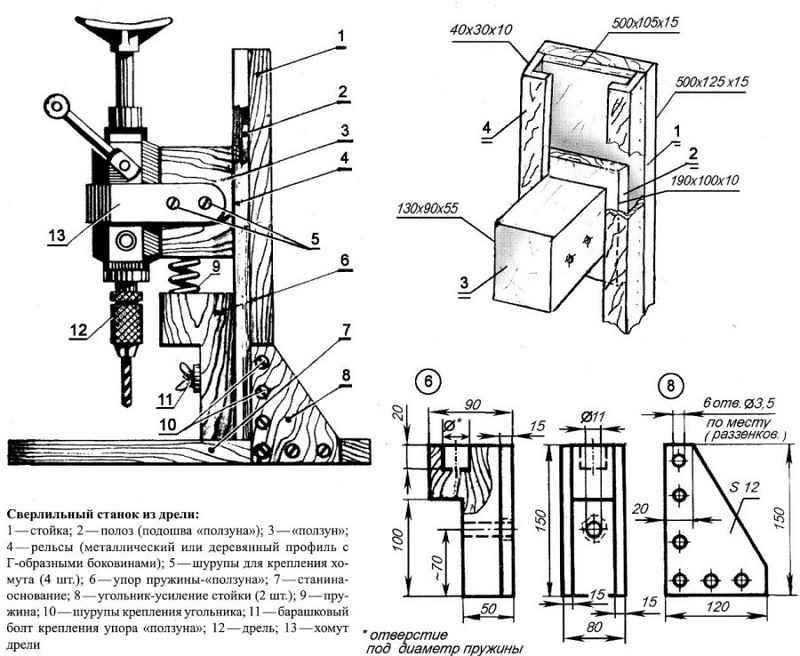
In order to make a homemade mini machine, you do not need to have special components or materials. The whole structure of this unit consists of the following units:
- The bed, which is the base.
- The mechanism of rotation of the working element.
- Feeder.
- A vertical post to which the rotation mechanism is attached.
bed under homemade apparatus can be made of wood, you can use chipboard. The only thing to consider when creating a bed is that during operation, a home-made unit can vibrate, so the base must be heavy enough so that this unwanted vibration does not occur.
The quality of work will directly depend on the reliability of fastening the frame to the vertical stand. Important details that a home-made drilling unit should have are the guide rails along which the working mechanism will move (in our case with a drill). It is best to make guide rails from two steel strips that must be fixed to the rack.
When creating pads with your own hands, you can use steel clamps. They will securely attach a drill to the block. To avoid unwanted vibration, a rubber gasket can be placed at the junction of the drill and block.
The next step is to create a feed mechanism that should move the drill in a vertical position. There are plenty of options for making a feed mechanism and circuits with your own hands, but usually it consists of a lever and a spring, which is attached on one side to the block with a drill, and the second to the bed. The spring allows you to make the feed of the mechanism more rigid.
If you do not need a drill for further operation, you can disassemble it and make the unit more convenient. To do this, remove the switch from the drill and make a separate button attached to the bed. This button will always be under your control and will give you the opportunity to turn off the drill in time. That's all, making a mini drilling machine with your own hands is not difficult, just watch videos and photos on the Internet, in which the whole process of creating a machine from a drill with your own hands is perfectly shown.
Mini drilling machine W10005
Amateurs and professionals often have to work with drilling machines at home, in their workshops. Often it is also necessary to drill a very small hole diameter, for example 0.3mm. An ideal option for such cases is the W10005 mini drilling machine. The idle speed reaches 2000 rpm and is ideal for drilling wood, soft aluminium, brass, copper, plastics and other soft, non-ferrous and precious metals.


How to understand: will the kitten be fluffy?
What kind of light alcohol can be drunk for pregnant women: the consequences of drinking
Why do the legs swell in the ankles and ankles of the feet in pregnant women: causes and methods of treatment
The wedding of Prince Harry and Meghan Markle: scandalous and secret details of the marriage (photo) The future marriage of Prince Harry year NTV
How to close white plums for the winter