Have you repeatedly wanted to know the possibilities milling machine CNC? Before you start looking for such a machine for your purposes, you need to determine what exactly you will use it for. Size and Functions of CNC Milling Machine for Machining various materials may differ significantly, but in general they are similar for all types of machines.
Let's further assume that this is a mill and you will be primarily focused on cutting metal. Remember, you have just received a car and you are a beginner. You are not yet ready for these projects. If you don't, and you want to see the whole process of making a part detailed in detail, take a break and read ours. It will fill in the vague information that you were thinking about, then you are ready for this article.
Here are 10 things you should focus on to maximize your chances of becoming successful quickly. Do not receive a package of different sizes of imported Chinese boats of uncertain quality. Try the brand name, perhaps the one that is being sold. If you don't know what good brands are, check out ours. It will show you which brands are the most popular and have the highest customer satisfaction.
First of all, you need to determine the size of the machine and make sure that there is enough space for it in the room (workshop or workshop). Then you need to study the latest news in the CNC world and make sure that the machine you buy corresponds to all the innovations (only if it is important and not financially critical).
One of the significant factors influencing the choice of CNC milling machine is the cost of purchase and installation. CNC, which stands for "Numerical Program Control”, is the process of controlling the machine with the help of computer program. In the recent past, quality machines were very expensive, but now their price has dropped significantly.
Ranges of mechanical movement
Knowing you have a smart cutter eliminates a whole bunch of variables that determine your success or failure. Nothing is in the way at this stage until you learn about less delicate cutters. Buy 2 or 3 flutes for aluminum and 4 flutes for steel. You're about to break some cutters, so just get over them and get used to this idea.
At this stage, it's good to be reminded that you are wearing glasses, because you will break some of the cutters! While you're at it, buy a full range of drill bits. So my most used sizes end up being higher quality. Get a decent Kurt-style ticket for your windmill, that will be money spent on a valuable tool that will last for years. There's mean stuff that goes on when you clamp the workpiece in a vise. If you don't have a good one, the workpiece will move and you'll wonder what happened.
Before purchasing, be sure to find out about the accuracy of the purchased machine and its speed, as well as how their change will affect the cost.
Faster machines that can cut and mill to a certain tolerance will cost more, while slower, smaller, less accurate machines will cost less. For amateur purposes or a home workshop, a low-speed machine is enough, but for professional use, in order to cope with the entire workload, it is better to opt for an automatic machine with high processing speed and high accuracy.
Buy the one sold by your favorite supplier. Finally, you'll need a set of parallels, at least until you're comfortable with stepped jaws. Get yourself a foggy coolant setup and use it while being paranoid about crystal accumulation.
If your car isn't equipped with and tuned for flood coolant, give yourself a misty tune. There are many different brands. Get a jug of coolant to go with it. Now practice to be paranoid about crystal accumulation. Trimming chips is bad for cutters, and in the worst case results in breakage.
Classification of CNC milling machines
The classification of CNC milling machines is quite different. Some models of machine tools will differ in design, namely, the ability of a CNC milling machine to independently change the tool. This function allows the machine, by selecting according to the program, to replace the working tool (milling cutter) without human intervention. The machine knows which cutter should be selected and used for certain tasks, which allows continuous processing of the workpiece without stopping.
Coupling selection
It's very handy to be able to do this trick and you can learn all about it in our article on the topic. Until the cutter goes where you want and you don't make any mistakes. You will have much more time to react in this way if he starts to bother you.
Get yourself a feed and speed up the calculator and use it. You're approaching your first cuts, so why not do yourself a favor and get yourself a feed and speed calculator so you can make sure your spindle speed and feed is ideal for that first cut?
Cheaper machines need to manually change the cutting tool, which adds work to the operator and slows down the whole process. The machine cuts edges and even shapes inside the workpiece, where tool changes are difficult, with the help of fast-rotating milling cutters mounted on the engine. Manual replacement of the working tool will require constant attention to the process.
It's a lot more up to you to get your channels and speeds straight from the go. So, get the Channels and Rates Calculator. Also take a look at our 2-part series on tool data management for. Learn to fuck your mill and vise.
Tramming is what machinists call "square things" by sweeping the indicator around. This is a basic skill that everyone should learn. When you start machining, get into the habit of checking your factory's tram every time you go to the store. You'll find out later if you need to do this every time, but for now, you can use this practice. While you're at it, make sure you know how to trample the vise so that the jaws are correctly aligned with one axis or the other. Let's not try to direct you to the mill after all, but trampling the mill and vise is a good step at this stage.
Other features to consider when choosing a CNC router are:
- spindle cooling system (air or liquid);
- a wide platform on which you can easily fix the part for milling;
- high quality frame materials such as steel and aluminium;
- easy to use CNC Programs.
Which CNC router to choose based on such features?
Start with aluminium, brass and mild steel. Okay, next step is to make some cuts. Another is to avoid difficult materials for your first cuts. Attach aluminum, brass, or non-metals such as plastics and wood. It's much cheaper than metal! When you get it right with program materials, come out of mild steel. Only after you feel that you have mastered the cuts in these materials well, you do not break and wear cutters too quickly, and your surface finishes no longer as if the material was attacked by a pack of rabies-infected beavers, if you even consider difficult material such as stainless steel.
One of the very useful options for a milling machine is a dust collection and removal system (exhaust), which removes dust directly from the cutting site, which allows you to keep your work area clean. The dust collection system will prevent the accumulation of small particles in the air, thus avoiding breathing problems, poor visibility, etc.
Examples of machines and their models
Look at some metal supplier directories. Get an idea of what "Mild Steel" is and the different shapes and materials that are available to you. For your first project, learn how to square a block of material and make yourself some sets of stepped jaws out of aluminum.
Let's stop procrastinating and do some tricks. At this point, you will start by learning how to square a block of material. Get your saw and cut out some pieces of material that are slightly enlarged to serve as a vise. As mentioned, the stock is cut slightly oversized from aluminum. Now you need to connect these blocks.
How to choose the right CNC machine
There are many types and manufacturers of CNC machines. When buying a new or used (used) CNC machine, there are a number of key features to look out for.
The correct steps for squaring a block of material are described on mine. You can brake the spindle, pull the work out of the vise and throw it around the room, and other shenanigans that a beginner could start with. With the material squared, your next task is to cut it to size, continuing to hammer it until it's perfect for your vise. The last step is to drill and unscrew the mounting holes.
Now you can use this step instead of the parallels when you throw the material into the vise. You'll learn a lot more tricks with aluminum jaws over time, but remember: it all started here with your first set. Friend, now you can do the basics. This will be your biggest step. If this is your first time, get ready to drink from the fire.

The picture shows simple design CNC milling machine, it consists of the following parts:
- X axis;
- Y axis;
- Z axis;
- X axis drive;
- Y axis drive;
- Desktop;
- Spindle;
- Cartridge for installation of the cutting tool;
- Machine body (in this case aluminum).
Consider the most important characteristics of the machine:
If you can, choose which programs you will use based on the ability to get help from someone. Ideally, help from a friend who already uses the software and has experience. If not, consider taking a course at a nearby college - it will be a good investment of time and money. If you don't have help in your area, you'll have to go back online. Start by watching a bunch of videos. Try to follow along with your software if you can. Find online forums where people go to get help with these programs.
Number of axles
This is the most fundamental quality of any CNC machine. In most basic designs, the cutting head moves in three directions - X, Y, and Z - and the tool itself is always pointing down and aligned with the Z axis. This design is a little limited compared to multi-directional machines containing a fourth and even fifth axis.
I have two thoughts to simplify this part of the learning curve. Unfortunately, it's more than that. Right now you need the shortest way to create some parts. We also did a survey that might give you some insight into the relative. Most of these programs have a demo or trial version.
Congratulations, you've learned enough to start doing some useful things with a little confidence. But stay tuned because we're coming back in a week or two with another bundle of things you can do to reach the next level of ownership.
The material from which the machine is made
Cast iron or steel construction provides more high level rigidity and the ability to produce even the largest workspace but is very heavy. If moving the machine around the workshop is not planned, then this option is optimal, but if frequent rearrangements are planned, then it is better to pay attention to machines made of aluminum, they are much lighter, and practically as strong as steel ones.
Just enter your name and address Email below. These machines will let you join the developer community without being too devastated by steep learning curves, complicated builds, or high price tags. Suitable for milling wood, plastic and aluminum, the machine is undoubtedly the main one. Even better, you won't need any power tools to assemble the machine, just some basic tools - perfect for beginners.
Despite its impressive size, Maslow is not intimidating. Its creators envisioned it as a "machine for everyone", promising ease of assembly and focusing on helping users build great new products. Similarly, the founders of the company encouraged manufacturers to issue their own stock-based designs. The bad news is that Maslow is too popular - the first two batches are already sold out.
In the event that you will process soft materials and the machine will not experience heavy loads during operation, then you can make a choice in the direction of the design of polymer materials(acrylic, PVC).
Using a dedicated spindle
The spindle that connects the motor and the rotating tool provides big influence on the accuracy of the CNC machine. Its main task is to ensure that the rotation of the tool is concentrated in one point, has a minimum of vibration, and that these conditions are met even at maximum load.
There's no soldering, no drilling and no gluing required. Just screw in the pieces and you'll be up and running within hours. Its linear guides and mounted spindles ensure fast running and precision. The design is inexpensive to manufacture, which means a lower cost for consumers: only €850. The machine is modifiable and compatible, as well as open source and open equipment. Instructions for assembling and operating the machine are extensive and available online.
The machine's modular design means it fits almost any application. Each of these machines performs its specific function and fulfills a specific need. However, sometimes it can be difficult to unravel which machines are best for each specific situation.

A higher quality spindle improves accuracy by reducing the total amount of side to side oscillation and also reduces the difference between the intended and actual tool diameter.
For non-ferrous metals, wood, plastics and similar materials, a high spindle speed is recommended. When cutting soft materials at low spindle speeds, the flutes in end mills will become clogged with chips and ruin the part. The only way to avoid gumming cutters in soft materials at low spindle speeds - this is to reduce the feed rate.
So, whether you're a beginner just trying to figure out exactly what each machine does, or a business owner looking for guidance on what equipment to invest in, you'll find all the information you need in this handy summary.
To do this, they must execute a programmed sequence of commands. It also controls the tool travel speed, rotation speed, type of motion required, etc. In the last two cases, users must convert their bitmap to a vector. This is necessary because raster images are made up of pixels, while vector images are made up of mathematical coordinates.
Ranges of mechanical movement
Large tool travel ranges allow you to process a large area of the workpiece in one pass. To determine the dimensions of the machine that you need, consider the maximum size of the products with which you are going to produce on it.
Travel speeds
There are many factors that affect the amount of time it takes to machine a particular workpiece, but the main one is always the performance of the CNC machine itself. “Why not do the processing at maximum speed?” - you ask. As already mentioned above, high movement speed does not always have a positive effect on quality finished products. For example, acrylic, at a high feed rate, begins to melt and deform, the wood is charred, this has a bad effect on the working tool, the cutters also “burn”.
Which car to choose?
Think about the materials you are going to plan, the parts you want to produce, as well as the size of your workshop and other relevant factors for you. Check section. Among the pioneering startups awarded by Republic President Sergio Mattarella at the end of September in Rome was Spring, who with the project created a robot using 3D printing.
We interviewed Lorenzo Franchi, one of the three founders of the Milan-based startup at Polihub, along with Alessandro Trifoni and Davide Cevoli. The simple and innovative idea allows for large-scale workmanship at a very low cost. It all started with the thesis of Lorenzo Frangi, whose theme was table cutting for producers. After studying this topic, Frangi realized that these machines have a big limitation: the size of the working surface, which significantly affects the price and performance.
If you are wondering: “How to choose a CNC milling machine?”, Then it is very important to pay attention to the maximum speed of movement if it is used for non-amateur purposes.
Stepper motor or servo: advantages and disadvantages
The types of drive motors for each of the axes are divided into stepper motors and servos.
Servo drives have higher accuracy compared to stepper drives and are much more expensive. The main advantage of the servo system is that it checks its position with each movement relative to an independent measuring device - a glass scale. This is a whole complex.

Servo
Stepper motors are open loop systems that execute a chain of commands without checking the position relative to the measuring device.

stepper motor
Definitely, servos are more accurate, but stepper motors do not add a very large error in operation. The choice between a servo and a stepping system only depends on how precise the end product needs to be.
Now a little more detail on the main assembly.
So, to assemble the frame, you will need the following components:
- Profile sections 2020 (two longitudinal, 5 transverse, 2 vertical parts)
- Profile corners 16 pcs
- T-nuts M3 or M4 for groove-6mm
- Screws for installation with T-nuts (M3 or M4 respectively, 8...10 mm, plus M3x12 for fastening motors)
- Spacer (45° angle)
- Tool (screwdriver)
Since I started talking about the profile, then just in case I duplicate about the purchase and cutting of the profile from Soberizavod
This is constructive.
I bought a set of profiles cut to size for 2418 right away.
There are two options - uncoated profile (cheaper) and coated (anodized). The difference in cost is small, I recommend coated, especially if used as roller guides. 
Choose desired type profile 2020, then enter "cut to size". Otherwise, you can buy one piece (whip) for 4 meters. When calculating, keep in mind that the cost of one cut can be different, depending on the profile. And that 4 mm is laid on the cut. 
Enter the dimensions of the segments. I made machine 2418 a little larger, these are seven pieces of 260 mm and two vertical pieces of 300 mm. Vertical can be made smaller. If you need a longer machine, then two longitudinal sections are larger, for example, 350 mm, transverse ones are also 260 mm each (5 pcs). 
We confirm (must be added to the nesting map) 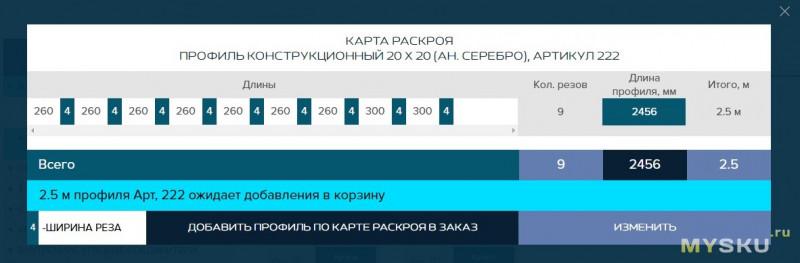
Checking the cart 
The profile is obtained at 667r along with the cutting service. 
Delivery is carried out by shopping mall, you can calculate the cost using the calculator, since you know the dimensions of the profile, the weight is very well calculated in the cutting chart. For the calculation, you need the option "cargo collection from the supplier". Delivery by business lines will cost less, about 1000 rubles.
Can be picked up by self in Moscow. 
In one place there is an office, a warehouse and a workshop where the profile is cut to size. There is a showcase with samples, you can pick up a profile on the spot.
Profile cutting with a Metabo end saw 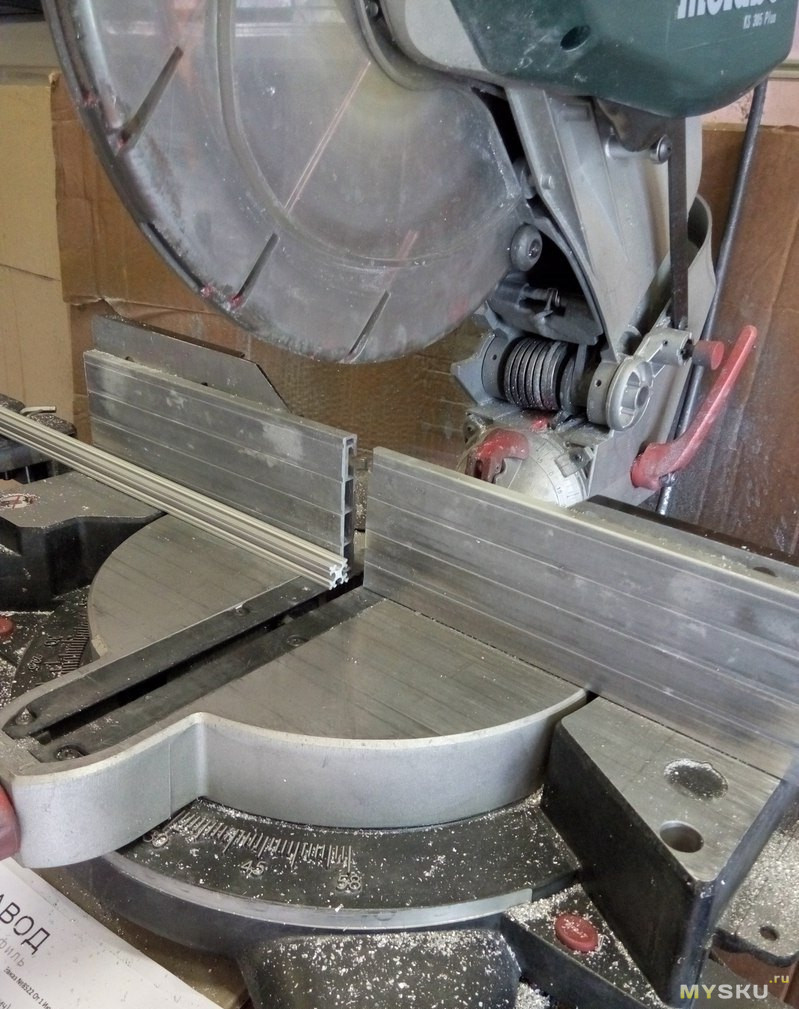
So let's start building the frame. desktop machine 2418.
Here is the cut profile.

In this design, I increased the Z axis (a little more than a couple of cm than others) in order to use the machine as a CNC drill.
In the original, the Z axis is the shortest. It is up to you to decide what your goals are. To lengthen working field, you need to buy two sections of the profile (longitudinal pair) more by the desired length (for example, +10 cm), respectively, the guides (+10 cm for a pair of 8mm shafts) and the screw (+10 cm for the T8 screw) are lengthened. In terms of money, the voiced +10 cm comes out very cheap: the cost of a 10 + 10 cm profile is about 40 rubles, the guides and the screw will cost plus $ 6 (check).
Here are the corners prepared for assembly 
This is how the T-nuts should be installed in the slot. You can not thread it from the end, but install it directly into the profile groove sideways, but then control the rotation and installation of the nut, since this does not always happen, some skill is needed. 
Profile cut is clean, no burrs 
Profile-twenty, that is, from the 2020 series, with a corresponding change of 20mm x 20mm, a groove of 6mm. ![]()
So, first we assemble the U-shaped part of the frame, we fasten two longitudinal parts of the profile and one extreme cross member. It doesn’t matter which side to assemble on, but keep in mind that there is a central crossbar that is shifted closer to the back. It is part of the vertical plane, and the size of the offset depends on the overhang of the Z-axis and the spindle. Placed in such a way that the axis of rotation of the spindle was in the center of the machine (Y axis).
Next, assemble the middle cross. It is more convenient to first install both corners on a section of the profile and fix it, and then install it to the frame.
We apply a section of the profile, measure the same distance with a ruler, tighten the screws. The screws must be tightened slowly, giving the T-nut time to turn and take its position in the groove. If it doesn't work the first time, loosen the nut again and repeat. 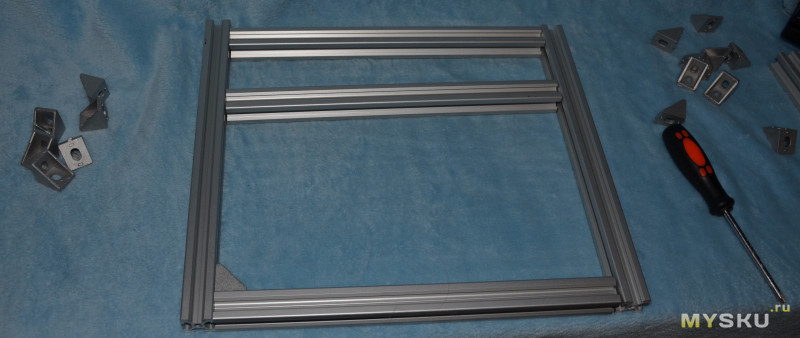
We install the last part of the horizontal frame. It is more convenient to crawl with a long screwdriver. Do not be lazy and check the right angles of the resulting structure with a square and a diagonal with a ruler. 
Since the corners of the structure are directed towards each other, it does not matter in what order to assemble. I did as in the basic CNC2418 design. But intuition suggests that it makes sense to increase the distance between the profiles, especially when higher altitude portal. Okay, that can be done later. 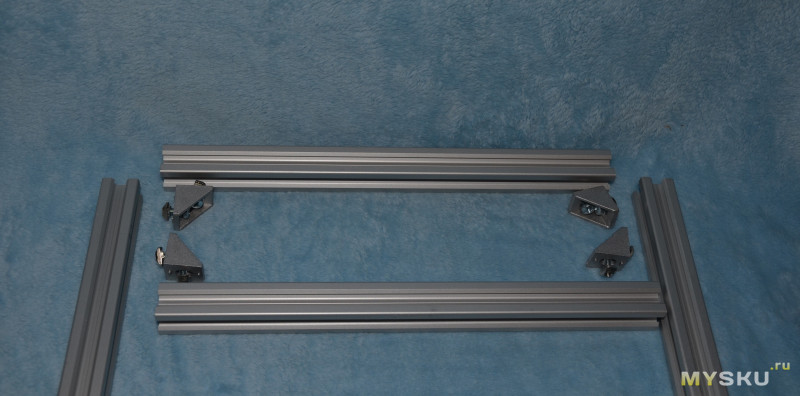
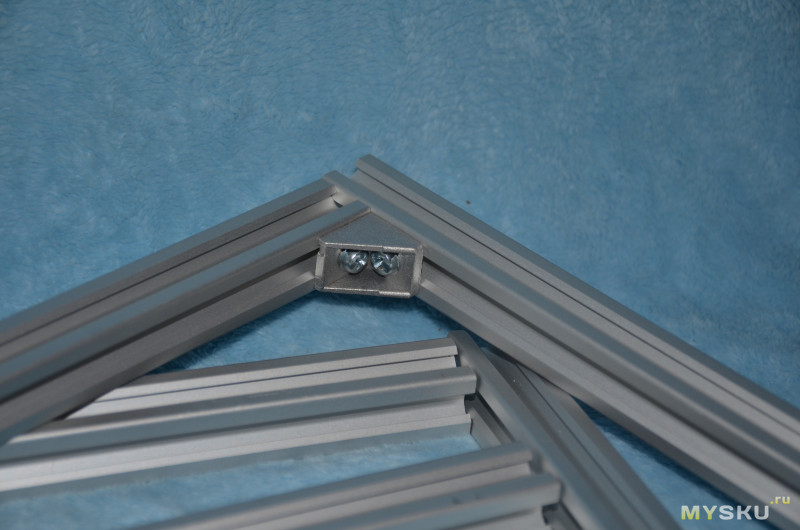
Next, we begin to assemble the mount of the vertical portal 
We install the assembled portal on the horizontal part, fasten it with 6 corners (installed in the direction in three directions from the vertical profile). 
We establish, observe the perpendicularity of the segments (along the square). Then I tightened all the screws one by one. 


In the original, a special 45° extrusion angle is used to reinforce the vertical. I could not find a similar one for sale, I replaced it with a 3D printed one. The link to the model is at the end of the topic.
update A: turned out to be original 3D printed too.
If anything, you can replace it with perforated fasteners from stores, or furniture corners. It won't affect the quality in any way. 
The design turned out at first glance strong, not shaky. It can be seen that the plate with the engine is shorter than the KP08 + SK8 caliper bundle. I will spread it wider. 
In fact, this frame is a copy of a similar design of the CNC2418 machine, except that I did not directly copy the dimensions, I did a little more in order to have less trim from the guides and screws.
The assembly of the frame is completed, now you can start installing the engines. I use 3D printed flanges to mount motors. It is advisable to make the upper ones assembled with guide holders, the lower ones - without holders, since the Y-axis should be wider. It is advisable to install the Y axis on SK8 and KP08 calipers, as in the original machine. The calipers themselves can be printed on a printer or bought (links at the end of the topic, and were also in the first post).
For one of the axes (the X and Y axes are the same length for me), I took a “sighting” one. I did not yet know my “Wishlist” for the dimensions of the machine. As a result, the trimmings from the screw will go to the Z axis, you will only need to purchase a T8 brass nut. 
Was packed in a cardboard box, inside each item in a bag separately 
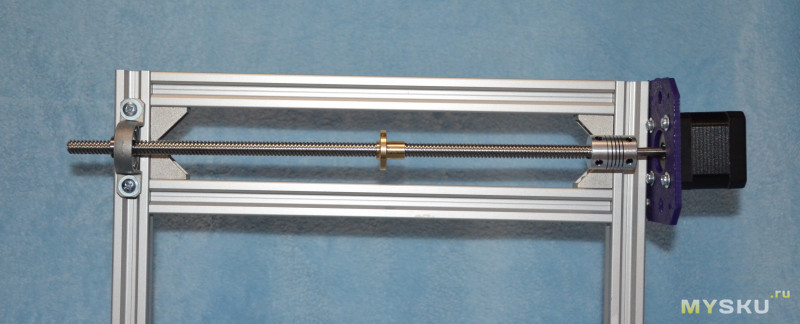
The kit looks like this: a motor with a short wire, a T8 lead screw, two KP08 calipers and two 5x8 couplings. 
There is a similar and, as well as without an engine on (with calipers and a nut).
If you take without a large margin, then the 400 mm option will work well for the “larger version” of the machine
Additional information - photo of the kit separately
Engine marking RB Step Motor 42SHDC3025-24B-500, seat Nema17 
Comes with a short cable for connection. Conveniently, you can simply increase the length without touching the connectors. 
T8 screw, nut 
Calipers KR08. 
Easy to mount on the profile. If a wide flange is used for installation, then it is better to use the version of the KFL08 caliper, it allows you to mount the screw not on the profile, but on the flange. 
Coupling 5x8 - a split coupling for connecting the motor shaft to the propeller. 

This is how the engine is mounted in the original on the X axis. On a small aluminum plate.

I did the same, only with a printed plate. At the same time it will be a support for the guides.

I already cut off the excess length of the screw for the Z axis (the Z axis is in the process for now, the information will be separate, most likely also 3D printed).
With a high probability, it will be necessary to lengthen the wires of the motors in order to carefully lay it along the profile in the upper part to the electronics board (most likely it will be a CNC Shield). Yes, and it would not hurt to install limit switches for extreme positions.
The basic information on the assembly is already there, you can start estimating the costs))))
Calculation
Now, as requested in the comments in the first part, I propose to discuss costing. Naturally, I spent less than indicated, since I had the engines and most of the components in stock. Strongly cheaper will be if you use home-made printed corners for the profile, calipers, flanges and so on. To the work of the drilling machine printed circuit boards and milling soft materials this is unlikely to affect. Yet a good option- the use of perforated plates from construction / household stores. Suitable for reinforcing corners, including vertical ones and for installing an engine, provided that the central part is drilled under the shaft. In place of perforated fasteners, you can use self-made aluminum sheet or plywood.
Definitely a must buy profile 2020 otherwise it will be a completely different type of machine. You can do the same from an aluminum corner or a rectangular pipe, but only for the love of art))) There are more optimal designs in terms of rigidity for assembling from a corner / pipe.
Definitely needed for the profile T-nuts. You can buy T-bolts, but T-nuts are more versatile (as any length of screw can be used).
But the rest can be changed at your discretion, you can even instead of running screw T8 use hairpin from stainless steel. Unless the number of steps per mm will have to be recalculated in the firmware.
Engines can be removed from old devices / office equipment and plan seats already under a specific type.
Electronics almost any (Anduino UNO / Anduino Nano, CNCShield, Mega R3 + Ramps, A4988 / DRV8825 drivers, you can use an adapter board for Mach3 and TB6600 drivers. But the choice of electronics limits the software used.
For drilling, you can use any engine DC, which allows you to install a collet chuck and has a decent speed. In the basic version, there is a high-speed 775 motor. For milling, you can use 300 watt b / c spindles with an ER11 collet, but this greatly increases the cost of the machine as a whole.
Approximate costing:
profile 2020 (2.5 meters) = 667 rubles
profile 2080 (0.5 meters) to the desktop = 485 r
Two 300 mm 2x$25
. Lot of 20 pieces comes out to $5.5 with delivery
about 4r / piece if you take a large package. You need at least 50 pieces (mounting engines, calipers). I don’t count the screws for them, usually a few kopecks / piece, depending on the quality. Total about 400 ... 500 rubles.
Engines 3 pcs $8.25 each
Electronics $2
$3.5
A4988 three pieces for $1
The machine comes out around $111. If you add a spindle.


Can't understand the meaning of life
Mate Brewing Methods
Trollface quest games Black humor games
Dark spots in photos?
Rules of the game Bald in VK. Scrabble nerd. The purpose of the game Balda