Today I will tell you how to enable booting from a USB flash drive in the BIOS of various manufacturers. It doesn't matter which version you have, the order of gestures will be as follows:
1. We insert our bootable USB flash drive into the USB port of your computer. I recommend inserting it into the port located directly on the motherboard, i.e. from the back of the system unit.
2. Turn on the computer and press the key Delete(or F2) to get into the BIOS. Depending on the manufacturer and BIOS version, other keys (Esc, F1, Tab) may also be used, so you need to carefully read the prompts on the screen.
In BIOS, we can only navigate through the tabs using the keyboard.
Below I will describe this process in detail using the most used BIOS versions as an example.
Attention! Please note that if you install operating system from a flash drive or CD and have selected a boot device in the BIOS, and not in the boot menu, then after the first automatic reboot of Windows, you must enter the BIOS again and return to boot from hard drive. If this is not done, autoload from a USB flash drive or CD will work again, and Windows will again begin the first stage of the procedure. installation.
Configuring Award Bios to boot from a USB flash drive
Award Bios:
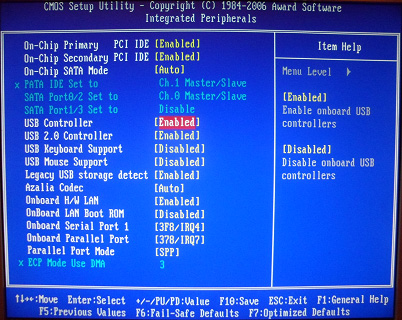
First, let's check if the USB controller is enabled. We go to "Integrated Peripherals". We go down with the arrow on the keyboard to the item “USB Controller”. Press the “Enter” key and in the window that appears, select “Enable” (also using “Enter”). Opposite “USB Controller 2.0” should also be “Enable”.
 Exit this tab by pressing Esc.
Then we go to "Advanced BIOS Features" - "Hard Disk Boot Priority".Now in my example, the hard drive is in the first place, and the flash drive should be.
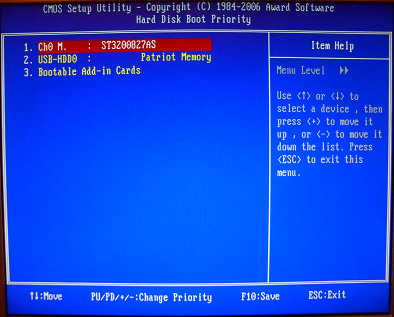 We stand on the line with the name of our flash drive (Patriot Memory) and raise it to the very top using the “+” key on the keyboard.
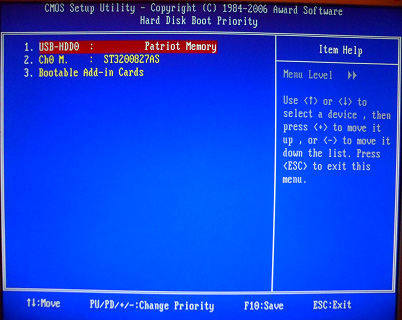 Exit here by pressing "Esc".
Configuring AMI Bios to boot from a USB flash drive
If, upon entering BIOS, you see such a screen, then you have AMI Bios:
 First, let's check if the USB controller is enabled. Go to the tab "Advanced" - "USB Configuration".
 Opposite the items “USB Function” and “USB 2.0 Controller” should be “Enabled”.
 If this is not the case, we stand on this line and press the “Enter” key. From the list that appears, select “Enabled” (also using “Enter”).
Then exit this tab by pressing “Esc”.
Go to tab "Boot" - "Hard Disk Drives".
 Now I have a hard drive in the first place, but I need to put a USB flash drive here. We become on the first line, press “Enter” and in the window that appears, select our Patriot Memory flash drive.
 It should be like this:
 We leave from here through "Esc".
Select "Boot Device Priority". Here, the first boot device must be a USB flash drive.
 Press Esc.
Then we exit the BIOS, saving all the settings made. To do this, go to "Exit" - "Exit & Save Changes" - "OK".

Setting up Phoenix-Award Bios to boot from a USB flash drive
If, upon entering BIOS, you see such a screen, then you have Phoenix Award BIOS :
 First, let's check if the USB controller is enabled. We go to the “Peripherals” tab - opposite the items “USB Controller” and “USB 2.0 Controller” should be “Enabled”.
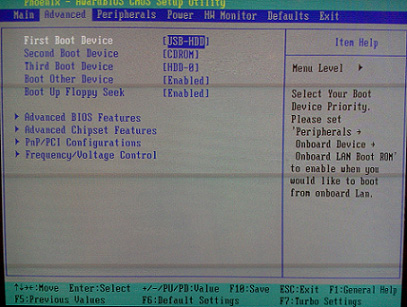
 Then we go to the “Advanced” tab and opposite “First Boot Device” we set “USB-HDD”.
 After that, exit the BIOS, saving the changes. To do this, go to "Exit" - "Save & Exit Setup" - press the key "Y" - "Enter"
 That's practically everything you need to know in order to boot from a USB flash drive. In my article, I described the process of setting up the Bios of the most popular versions: Award and AMI. The third example shows Phoenix Award Bios, which is much rarer.
In different versions of the BIOS, the described procedure may be slightly different. But the main thing is that you understand the principle of tuning itself.
By the way, I would also like to add: in order to choose which device to boot your computer from, it is not necessary to change the settings in the BIOS. You can call up a special menu immediately after turning on the computer to select boot devices (this can be done by pressing F8, F10, F11, F12 or Esc). In order not to guess with the keys, we look carefully at the monitor immediately after turning it on. We need to have time to see an inscription like this: “Press Esc to selest boot device”. In my case, it was necessary to press “Esc”.
Operating systems accumulate unnecessary files over time, parts of remote programs. There is a need to reinstall Windows or another OS. Most modern laptops (and sometimes desktop computers) no longer have a CD-rom, so you need to know how to launch a bootable USB flash drive through BIOS, set the startup priority.
Bios setup for booting from a USB flash drive
Every modern PC user should know how to boot from a USB flash drive in BIOS. This is due to the phasing out of disks and the convenience of using removable drives. It is much easier to copy the distribution kit (installer) of the system to the media and install from it. The only difficulty that everyone who decides to install the OS from the drive faces is the correct BIOS setup. It should change the boot priority, which will force the computer to first read data from removable media, and only then run files from the hard drive.
Some PC owners are faced with the problem that BIOS does not see a bootable USB flash drive. To avoid this situation, you should follow these recommendations:
- The drive must be in USB before starting the PC.
- Connect the media to the 2.0 connector, because the 7th version of the OS does not have drivers for the 3.0 input.
- Sometimes in BIOS there is no boot from a USB flash drive just because the USB controller is turned off (Award version). It must be enabled from the Integrated Peripherals/Advanced Chipset Features section. Make sure that the word Enabled is in front of this line.
Boot from flash drive to Award Bios
Global laptop manufacturers (Lenovo, Asus, Sony, HP) can install different BIOS versions on their devices. Below is an example of how to boot from a flash drive of the Award version in BIOS:
- Restart your computer, press Del or F2 until you see blue screen.
- Go to Advanced BIOS Features.
- If an option called First Boot Device is immediately present, then you should click on it and switch to removable media with the OS.
- In newer versions of the system firmware, there is an additional menu section called Boot Seq & Floppy Setup. Inside it, prioritize the drive again as First Boot Device.
- It is advisable to set your hard drive as the second device. You will need this during the installation process so that it does not start in a circle.
- Use the Esc key to go to the main menu, go to Save & Exit Setup. Confirm saving changes.
How to boot from a flash drive in AMI BIOS

Do not forget that the bootable media must be inserted into the slot in advance. The following is an instruction on how to set AMI BIOS to boot from a USB flash drive:
- go to the settings using the Del button (press during the initial splash screen until the BIOS appears);
- using the arrows, you need to select the Boot partition;
- go to the Hard Disk Drives menu, then press enter on the line 1st Drive;
- select the name of your OS drive from the list, press Enter.
- go to the Boot device priority section;
- enter the First boot device menu by pressing Enter;
- put the removable media back in;
- go to the top menu, select Exit saving changes or Save changes and exit, confirm your consent to make changes.
How to boot from a USB flash drive in Phoenix-Award Bios
There is another version of global settings. Below is an option on how to set Phoenix BIOS to boot from a USB flash drive. This option is much less common, but the principle remains the same: you must assign a boot priority in order for the program to launch the OS installer. To go to the settings, press Del or F2, then:
- Check if the USB ports are enabled. Go to Peripherals and opposite the line “USB 2.0 Controller” must be the word “Enabled”.
- After that, go to the Advanced tab, there opposite the line “First Boot Device” set the USB-HDD value.
- Exit the settings with saving through Save & Exit Setup.
How to boot Windows from a flash drive into EFI (UEFI) Bios
The latest versions of Windows offer the easiest and most intuitive option on how to boot from a USB flash drive in BIOS. If in previous firmware the menu looked like a regular list in which it was necessary to use the arrows on the keyboard for manipulation, then the new UEFI interface includes graphic elements and supports the use of a mouse. For different models laptops, the transition occurs using special buttons, for example:
- HP - first ESC, and then F10;
- Asus - Del, then F2.

Some Windows 8 users have reported that they are having trouble switching to the UEFI version of the BIOS. To resolve this issue, use one of the following options:
- Go to the PC settings through the control panel, select the section with power settings. Here you need to turn off Fast Boot mode.
- Reboot the computer and press the buttons that are indicated on the start screen to go to the BIOS.
- To restart Win 8, press the Shift+Restart key combination. In the menu after the reboot, select the Troubleshoot section. Go to "Advanced options". Here you need to click UEFI Firmware Settings: you will be redirected to UEFI immediately after rebooting the PC.
There are two ways to start from a drive through a new BIOS. Do not forget that after reinstalling the OS, the boot priority settings will need to be reset to their original form (so that the hard drive is loaded first). Graphical global settings are very clear, any user will be able to navigate the sections. To set the priority for the drive, there are two simple options:
- Go to the Boot Priority menu, it is located at the bottom of the screen. Drag the removable drive image to the first position instead of the hard drive and release.
- Click on the Exit/Advanced mode button, confirm your consent to go to advanced settings. Here everything is done according to the previous scheme: you need to click on the Boot Option Priorities item in the Boot section. In the Boot Option #1 line, select your removable drive. Save and exit settings.
Video: how to set up BIOS on an Asus laptop
Hello! Today I want to tell how to boot from flash drive in bios. For what it may be needed, for example, you have made a bootable USB flash drive and want, for example, to install Windows 10. It may also come in handy: when necessary, put the boot from the DVD and CD in the BIOS. Many administrators who only encounter this for the first time, for example, when restoring the system, can lose a lot of time due to ignorance, not understanding what they are doing wrong. I hope that this instruction will be useful to you and you will once and for all understand the principle of this action,
Through the Boot Menu to boot from a USB flash drive
In most cases, booting from a USB flash drive into BIOS is required for some one-time task: installing Windows, checking your computer for viruses using LiveCD, resetting the Windows password.
In all these cases, it is not necessary to change the BIOS or UEFI settings, just call the Boot Menu (boot menu) when you turn on the computer and select the USB flash drive as the boot device once.

For example, when installing Windows, you press the desired key, select the connected USB drive with the system distribution kit, start the installation - configure, copy files, etc., and after the first reboot occurs, the computer will boot from the hard drive itself and continue the installation process in the regular mode.
Very detailed about entering this menu on laptops and computers various brands I wrote in the article How to enter the Boot Menu.
How to get into the BIOS to select boot options

AT different occasions in order to get into the BIOS setup utility, you need to perform essentially the same actions: immediately after turning on the computer, when the first black screen appears with information about the installed memory or the logo of the computer or motherboard manufacturer, press the desired button on the keyboard - the most common options are Delete and F2. Usually, this information is at the bottom of the initial screen: "Press Del to enter Setup", "Press F2 for Settings" and similar. By pressing the right button at the right time (the sooner the better - this must be done before the operating system starts loading) you will be taken to the settings menu - BIOS Setup Utility. Appearance This menu may vary, consider some of the most common options.
I want to throw you a summary table of all buttons for entering the BIOS of different manufacturers.

Changing Boot Order in UEFI BIOS
On modern motherboards, the BIOS interface, or more precisely, UEFI software, is usually graphical and, perhaps, more understandable in terms of changing the order of boot devices.

In most variants, such as Gigabyte (not all) or Asus motherboards, you can change the boot order simply by dragging and dropping the disk images accordingly with the mouse.

If this is not possible, look in the BIOS Features section, in the Boot Options item (the last item may be located elsewhere, but the boot order is set there).
Configuring boot from a USB flash drive in AMI BIOS

Please note that in order to do all the steps described, the flash drive must be connected to the computer in advance, before entering the BIOS. To set boot from flash drive in AMI BIOS:
- In the menu above, pressing the right key, select the item "Boot" (Download).
- After that, select the item Hard Disk Drives (Hard drives) and in the menu that appears, press Enter on 1st Drive (First disk)
- In the list, select the name of the flash drive - in the second picture, for example, this is Kingmax USB 2.0 Flash Disk. Press Enter, then Esc.

Menu for BIOS Boot Settings

Next step:
- Select the item "Boot device priority" (Priority of boot devices),
- Select "First boot device", press Enter,
- Again, specify the flash drive.

If you want to boot from a CD, then specify the DVD ROM drive. Press Esc, in the menu at the top from the Boot item (Download) we move to the Exit item and select Save changes and exit (Save changes and exit) or "Exit saving changes" - to the question of whether you are sure that If you want to save your changes, you will need to select Yes or type "Y" on the keyboard, then press Enter. After that, the computer will restart and start using the USB flash drive, disk or other device you selected for booting.
Booting from a USB flash drive to BIOS AWARD or Phoenix

In order to select a device to boot into the Award BIOS, in the main settings menu, select Advanced BIOS Features (advanced BIOS settings), then with the First Boot Device selected, press Enter.

A list of devices from which you can boot will appear - HDD-0, HDD-1, etc., CD-ROM, USB-HDD, and others. To boot from a flash drive, you need to install a USB-HDD or USB-Flash. To boot from CD DVD or CD - CD-ROM. After that, we go up one level by pressing Esc, and select the menu item "Save & Exit Setup" (Save and exit).
Configuring Boot from External Media in H2O BIOS

To boot from a flash drive into the InsydeH20 BIOS, which is found on many laptops, in the main menu, using the right key, you need to reach the “Boot” item (Download). Set the External Device Boot item to Enabled. Below, in the Boot Priority section, use the F5 and F6 keys to set the External Device to the first position. If you want to boot from DVD or CD, select Internal Optic Disc Drive (Internal optical drive).
Then go to Exit in the top menu and select Save and Exit Setup. The computer will restart from the correct media.
Booting from USB without entering BIOS (only for Windows 8, 8.1 and Windows 10 with UEFI)
If your computer has one of latest versions Windows, and the motherboard with UEFI software, you can boot from a USB flash drive without even entering the BIOS settings.

To do this: go to settings - change computer settings (through the panel on the right in Windows 8 and 8.1), then open "Update and Recovery" - "Recovery" and click the "Restart" button in the "Special boot options" item.

On the Select Action screen that appears, select Use Device. USB device, network connection, or DVD.

On the next screen, you will see a list of devices that you can boot from, which should include your flash drive. If suddenly it is not there, click "View other devices". Once selected, the computer will reboot from the USB drive you specified.
So just choose to boot from a USB flash drive in the BIOS. Site material
Hi friends! Today I will talk about how BIOS set up booting from a flash drive, and what to do if this same flash drive is not displayed in the BIOS settings. I already wrote an article about that, but today I want to write in more detail about that how to boot from usb drive after configuring the BIOS.
What is it for? Well, if you are reading this, then I think you already know what it is for you. Well, if not, then I’ll tell you a secret, you can create bootable flash drives and install operating systems from them or run other boot disk images, for example. This is very convenient, flash drives are more resistant to mechanical damage compared to disks, and they can have more memory.
Before you start writing instructions, be sure to read the article, it says how to enter BIOS.So, you have already created a bootable USB flash drive and are ready to boot from it. First of all, we need to set up the system so that our flash drive is in the first place, and the system first starts from it. There is one trick here, through which questions arise such as a USB flash drive is not displayed in the BIOS settings.
BIOS won't boot from flash drive?
Everything is very simple, when the USB device is not connected to the computer, then it will not be displayed in the boot options.
We set the boot from a USB flash drive in the BIOS
We do this: connect the flash drive, go into the BIOS (if you don’t know how to read the article above, usually these are the DELETE or F2 keys). And go to the page with setting the order of boot devices. I'll just show screenshots. Remember, everything may look different for you, and menu items may be called differently. Look for an item with the word "Boot".


If the flash drive is connected, then we will see it in the list.

Now we need to install the flash drive in the first place in the boot list. To do this, press “Enter” and select “”.

We save all our changes by pressing F10 and restart the computer. If everything is done correctly and the USB drive is created correctly, then the USB drive will also start loading. Indeed, it may be that USB is not displayed in the settings, then most likely because you have an old computer and it does not support this function.
After a boring story about setting up BIOS, I would like to advise you to think about the security of your home or office and video surveillance, in my opinion, is the most the best remedy protection. Moreover, with new technologies, you can install IP video cameras, which will give you many new and modern opportunities. For example, creating a network from several cameras and even broadcasting video to the Internet.
More on the site:
Updated: January 12, 2015 by: admin
Have you already burned a bootable USB flash drive, but do not know how to boot from a flash drive? There is nothing complicated here. Booting Windows from a flash drive is very simple, and for this you just need to go into the BIOS and change one setting.
If you have not yet recorded a licensed digital copy of Windows, I recommend reading -?
If you simply plug a USB stick into your PC or laptop and reboot it, Windows installation won't start. After all, for this you need to enable boot from a USB flash drive in BIOS.
This is done easily. But there is one nuance here. The fact is that loading Windows from a USB flash drive on PCs and laptops is carried out in different ways. First, it depends on the BIOS manufacturers. And, secondly, from the brand of the laptop (Asus, Acer, Samsung, Lenovo, HP, etc.).
However, booting from a USB flash drive in the BIOS is carried out according to the same principle. Yes, the BIOS menu will always be different, and this can cause difficulties. But below we will look at a few examples so that you understand how to install a boot from a USB flash drive and be able to navigate the BIOS menu on your own (in case you have another option).
So, let's begin. To enter the BIOS, you must immediately press a certain button on the keyboard when you turn on your computer or laptop. Which one? This can be found out when loading on the screen.
You can find out that you have entered the BIOS by seeing the corresponding menu in front of you. Usually there are the following options:


If loading the BIOS failed, then wait until the PC or laptop turns on, reboot it and try again by pressing another key.

In this case, the item "Boot" was selected, and then "Boot Device Priority" (i.e., the priority of starting devices). As a result, a menu like this will open:


As you can see, they are different, but in each case there are lines we need - First (1st), Second (2nd) and Third (3rd) Boot Device. It indicates which device boots first, which one second and third in turn. As a rule, the hard disk drive (HDD) always comes first, followed by the disk drive (CR-ROM).
When you connect the USB flash drive, the USB-HDD item will also appear. And to set up booting from a USB flash drive, you need to select the option - USB-HDD in the First Boot Device item. Example:

Next, be sure to save the changes, otherwise you will have to repeat everything from the beginning. Which save button? This information is written at the bottom of the screen. For example, in the screenshot above: F10 - "Save", ESC - "Exit". Save the changes and exit the BIOS. Congratulations, the BIOS setup for booting from a USB flash drive is complete.
The computer (or laptop) will automatically reboot, after which the following line will appear:

Press any button - and the installation of Windows will begin.
If you have a UEFI BIOS (that is, you recently bought a new PC or laptop), then booting Windows from a USB flash drive is a breeze.
Go into BIOS and you will see something like this menu:

To configure booting a flash drive in UEFI, we are interested in the “Boot Priority” item. Drag the USB device icon to the top of the list (so that it is the first one) and exit (exit button in the upper right corner). When you exit, the system will ask you if you want to save the changes. You agree, after which the PC or laptop will reboot, and Windows will start loading from the USB flash drive.
By the way: it doesn’t matter at all what kind of image you have on a USB flash drive - Windows 7, 8, 10 or XP. It doesn't affect anything. Booting the OS from the flash drive will start anyway (of course, provided that it is written correctly).
And finally, one more important point. When the unpacking of the Windows files is completed, the computer will restart.

After that, you need to go back into the BIOS and return the previous device startup priority. That is, put the hard disk (HDD) in the first place, and the USB flash drive in the last place. This should not be a problem, because you already know how to boot from a USB flash drive, right?
Basically, you don't have to. In this case, when a black screen appears, NOTHING don't press.
Otherwise, the Windows installation will boot again and you will be installing the operating system again.
But when Windows is installed, you still need to go into the BIOS and return the previous device startup priority. Otherwise, the computer (or laptop) will always load data from a USB flash drive first (provided that it is connected).


Sun skirt: types and how to wear it Black sun skirt with a T-shirt how to wear
Ground bird cherry Ground bird cherry cook
Own business: production of chips
How to care for your skin in spring Face masks in spring
Seizures in the corners of the mouth: causes and treatment in adults and children