Fans of making homemade liquor eventually come to the need to improve quality. The best solution is to obtain pure alcohol and dilute it according to the required recipe.
A distillation column will help you get pure alcohol. More recently, information about home rectification was unavailable, today a large number of specialized forums and blogs covers in detail the process of home rectification and the construction of related equipment.
Rectification is the process of cleaning alcohol from light ether and heavy fusel components, getting rid of the product from glucose, sugars and acids. The rectification process allows you to get pure ethyl alcohol up to 96 °.
The resulting raw material is used for technical, medical purposes, as well as for the preparation of high-quality alcohol.
Reference. In order to make the device without errors with your own hands, you need to understand the physics and chemistry of rectification processes.
Raw alcohol or mash is heated in a cube. Vapors rise along the side, the heaviest parts condense at the bottom of the packing and flow into the cube. Vapors rise more easily above the packing, condense and flow into the cube. A new portion of vapor rises, heats the already flowing phlegm, light fractions evaporate from it - the fundamental principle of heat and mass transfer comes into force.
The lightest particles reach the Dimroth refrigerator, where they cool and drain. When in distillation column the couples "lined up" on the floors in accordance with the density, the selection of alcohol begins in the upper part of the column. Novice rectifiers make a mistake at this very stage - or they make a "choke" - an excessive occurrence of phlegm, or they take a lot of product, then the "number of floors" suffers and the resulting alcohol will be with impurities.
Make a distillation column home environment pretty hard. Serious manufacturers calculate and test their product in detail, apply detailed instructions.The do-it-yourselfer has a choice:
- Repeat the idea of popular manufacturers, copy an existing device. If necessary, changes and improvements can be made to the proven schemes.
- Design your own scheme, different from others.
What does a distillation column consist of, and its drawing?
A home master can make a tsarg distillation column. She forgives many mistakes, and the result will be guaranteed.

Drawing of distillation column
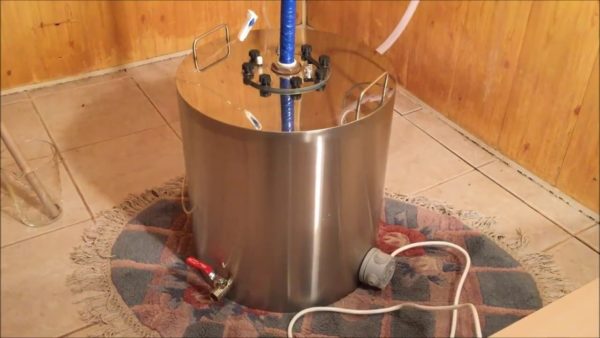
alembic
This is a container where heaters are built in, mash or raw alcohol evaporates.

Capacity specifications:
- Strength. The weight of the distillation pipe will be on the lid, so the cube must be rigid.
- Chemical neutrality to alcohol. The ideal material is food grade chromium-nickel steel (stainless steel).
- Convenience. The container must be lifted, moved, and the bard (distillation) drained from it. The volume of the container is calculated depending on the required performance of the apparatus, the power of the heaters.
- Warming. Heat loss should be kept to a minimum. therefore, both the walls and the bottom must be “packed” in insulation without cold bridges.
Tsarga for moonshine still
The tsarga is a pipe that is installed on a cube. In fact, this is the main frame of the distillation column. There is a plate-shaped tsarga, but it is rarely used at home.

Characteristics:
- Strength. The wall thickness of the drawer side is usually taken from 1 to 1.5 mm. This creates sufficient strength at low weight.
- chemical neutrality.
- Warming. In order to line up a pair of different fractions “by floors” in a column, the tsarga must be well insulated. A sleeve made of expanded polypropylene or expanded polystyrene trays used in plumbing is perfect.
- Collapsibility. For ease of cleaning and storage, the drawer can be made collapsible - from knees of 30-40 cm. This will allow you to adjust the height of the device, which affects the speed and quality of products.
- The presence of viewing glass areas.
- Diameter. If it is a thin tube (up to 2 inches), packing is not needed - all processes take place on the walls. Such a column is called a film column. Diameters higher require the use of a packing - sealing packing to increase the area of heat and mass transfer.
Stuffing or nozzle
The stuffing is needed for the deposition of phlegm, its re-evaporation. Main characteristic stuffing - area. Stones of certain breeds, a stainless steel sieve, and stainless steel chip spirals are used as packing.

There are many on sale ready-made solutions, home craftsmen have come up with various inexpensive substitute options. Most often, metal dishwashing nets or metal shavings are used to replace factory packings.
The alignment of vapors by floors depends on the volume and density of the nozzle. If fine chips are used in the column prismatic attachment, you need to make a lattice support so that the nozzle does not fall into the cube.
Dimroth cooler
At the top of the distillation column is a cooler - a tube twisted into a spiral.

Cold water circulates through it. It completely cools all light vapors. It is characterized by the plane of inclination, power, length.
Selection node
It serves to select alcohol from the upper "floor". The selection is not carried out completely, most of the phlegm returns to the tsarga. The ratio of the withdrawn product to the phlegm returned to the back is called the phlegm number.

The higher the reflux number, the lower the productivity of the apparatus, the cleaner the product is.
There are three types of selection:
- By the way. the selection unit is located above the Dimroth refrigerator, and catches the erupted vapors. They are cooled in an additional flow-through refrigerator.
- By liquid. The cooled phlegm of the “upper floors”, dripping from the refrigerator, is taken through inclined planes or a sump.
- For a couple. Part of the steam rises up to Dimroth, and part rushes to an additional refrigerator, where it condenses. A stable reflux ratio is provided, which does not change during the entire distillation time.
Additional refrigerator
Has an auxiliary function.

What is he doing:
- cools the resulting product,
- besieges accidentally caught vapors,
- cools the finished product.
You will learn more about what a distillation column is and what the principle of its operation is from this video:
Design choice
The size and design of the apparatus depends on a number of factors:
- Required performance. with greater productivity, the side with stuffing will be higher and wider - the pair passes more. The cooler and extraction unit must also provide sufficient efficiency. The minimum length of the tsarga is 1.5 meters, it is better to make it collapsible from three knees - 1 meter, 0.2 meters, 0.5 meters. this will allow the device to be used for both distillation and rectification.
- Possible sizes. Often home distillation columns are limited in size due to the height of the ceiling. To save space will help shifting the dimroth refrigerator in the upper part of the apparatus, or placing it perpendicular to the side (Thor's hammer).
- Access to metalworking technologies. A stainless steel apparatus will last a long time and will not oxidize alcohol, but argon welding or stainless steel electrodes will be required to connect the parts. Cooking stainless steel is difficult. If possible, laboratory heat-resistant glass can be used, but it is too fragile. A great option for a do-it-yourselfer is copper. She melts easily gas burner, on sale there are a large number
- The volume of fueled raw materials. The larger the applied cube, the higher the performance should be. Evaporation of alcohol occurs at 75 - 80 ° C, lowering the temperature will reduce the speed of the process.
- Budget. With a minimum budget, a simple but effective design with mechanical adjustments should be considered. If the budget is not constrained, the device is complemented by precise needle cranes, additional nodes and automatic control.
For home distillation, the simplest will be a column with a cube of up to 50 liters with built-in heating elements with a power of 3 kW. Column diameter 32 mm, liquid extraction unit based on the design of Alex Bokakoba, Dimroth cooler inserted above the selection unit.
An additional cooler is not needed; instead, a 1.5-meter long plastic tube cooled by air serves perfectly. As a nozzle, you can use the Panchenko nozzle, SPN or metal stainless steel washcloths for dishes. All connections are made on inexpensive plumbing threaded connections.
Optimal Calculations
The calculation of the column begins with the definition of the following parameters:
- Possible height. Practice shows that for home apparatus the optimal height will be 1.5 - 2 meters. If a gas stove is used as a heater, the height of the drawer will be 1.2 - 1.5 meters. The diameter depends on the height, the average ratio is 1/50. For example, the tsarga 1.5 meters should be no more than 32 mm. (round up to standard pipes).
- The power of the heating element or heater. A 1.5 meter drawer will have a capacity of approximately 300 ml / hour, which corresponds to 300 watts of heating element power. The power of the heater must be sufficient to heat the volume of mash up to 70 ° C for 1 hour, and also have the possibility of optimal regulation.
- The volume of the cube. This is an insulated container with a convenient size, transportable. To save room height, the diameter and height should be approximately the same. The amount of heated vapor depends on the volume of the cube. For home use, beer kegs of 25, 30, 50 liters are convenient. It is better not to use aluminum cans or tanks - aluminum corrodes quickly.
- Cooler power. The cooler must fully cope with the condensation of vapors with a minimum flow of water. There is no exact formula for calculating the power of a cooler; the number of turns and length are selected empirically. For our design, 30 centimeters of a tightly wound spiral from a 6 mm tube is quite enough. It is better to make a refrigerator with a power reserve and adjust the feed rate cold water.
How to make from fitting plumbing at home?
Actions are as follows:
- We buy materials- 2 meters of 32 mm copper pipe; tin for soldering; 15 cm copper tube with a diameter of 8 mm, 2 meters of 6 mm tube; needle valve, plastic hose with a diameter of 8 mm. We purchase a ready-made nozzle or a substitute - ceramic gravel, metal washcloth. The simplest connectors are clamps or brass threads.
- We make a king. We divide the pipe into segments of 1 meter, 0.3 meters, 0.5 meters. We solder a segment of 10 centimeters to the cube lid, insert a mesh to delay the nozzle. At each joint, we solder a clamp connection or plumbing thread made of copper or brass.

- Assembling the node selection based on Alex Bocacoba. On a tube 0.3 meters long, closer to the bottom edge, we make two angular cuts at 30 - 40 degrees. We insert copper plates into the cuts, cut and solder. We drill a hole for the liquid sampling tube, the hole should be at the bottom of the "pocket" of the bottom plate. We solder a thread for a needle valve on the sampling tube, which will regulate the sampling. On the side and just above the sampling hole, we insert the “forward flow” tube. It is needed to control the phlegm number. The forward flow conducts the phlegm from the selection “pocket” below, the phlegm drips into the center of the nozzle. The middle part of the forward flow is made of a transparent plastic tube.

- Assembling the cooler, for which we tightly wind a copper tube stuffed with sand onto a pin with a diameter of 12 mm. The pin is removed, the sand is shaken out and blown out. It turns out a spiral, one end of which must be threaded inward. The beginning and end of the tube is threaded into a brass "cup" with a thread and sealed - this is a cork. The resulting refrigerator is inserted above the selection unit, dripping phlegm is collected by inclined planes.

- Before use, pour the nozzle into the drawer. The nozzle should not tightly clog the pipe, steam should pass freely through it.

- If desired, you can make a flow-through aftercooler. It consists of two tubes, with a diameter of 10 and 12 mm. The length of a thin tube is 3 cm shorter than a thick one. The tubes are inserted one into the other and the ends are sealed. The inlet and outlet of cold water are soldered to a thick tube.
The column is assembled and ready to use. Before use, it is better to wash the parts with a weak solution of acetic acid using a brush.
Watch a video that shows how to assemble a distillation column with your own hands:
Operating modes
The modes are as follows:
- Heating the mash up to 72 -75 ° С. The Dimroth cooler operates at minimum power.
- Warming up the column and building "floors" of reflux condensation. Throughout the column there is active bubbling and steam and mass exchange. It is important to prevent oversaturation of the column, otherwise there will be a "choke" - phlegm will clog the entire diameter of the tsarga. We select the power of the heaters so that the temperature near the sampling unit is 71 - 75 ° C.
- Start of selection. When selecting for liquid, the slender pyramid in the side is inevitably violated, so the reflux ratio will need to be adjusted. The vapor density gradually decreases, as does the intensity of selection. The first selected liquid - "heads" - contain volatile ethereal components. The volume of heads reaches 20% of the planned alcohol content.
- Selection of the main commercial alcohol goes until the smell of fusel oils.
- If you want to extract everything possible from the raw materials, we draw out the "tails" - the last part of the alcohol-containing vapors. They contain a large amount of fusel oils, the tails are mixed in "heads" and used for further rectification.
- Completion of rectification- turning off the heater, cooling pipes.
The whole cycle, depending on the desired product quality, can last a relatively long time - from 8 hours to 2 days.

The average productivity of the column assembled by us is 250-300 ml. 96° alcohol per hour.
Do you need to design equipment?
The process of calculating, assembling and testing homemade equipment brings great pleasure. The result after edits and improvements will be guaranteed. However, the first difficulties or failures can cool the ardor of novice rectifiers.
As a result of self-construction, even minor nuances affect the result - the packing density, the angle of inclination, the diameter of the Dimroth tubes ... If you need a quick and guaranteed result, it is better to purchase a ready-made device from the manufacturer. When buying, it is important to know the device, productivity and purpose of the device, so as not to buy a fake or inefficient device.
Selection node under the clamp 1.5 inches - a necessary accessory for rectification, as well as the selection of the head and tail fractions on the distiller. The 1.5-inch glass-type selection unit is designed in such a way that, with a cup inside, the accumulated strongest and purest alcohol vapors passing through the selection unit itself settle and exit through a silicone tube connected to the selection unit, from where the purest and strongest product comes out .
Using this device in the column, you can select “heads” and “tails” by adjusting the selection with a needle valve or a Hoffmann clamp.
The sampling unit is equipped with two tubes, the first one for the thermometer and the second tube for the reflux outlet, on which a needle valve or a Hofmag clamp is installed to adjust the flow. The needle valve must be installed through a silicone hose, since the liquid outlet tube in this device is not equipped with a thread!
There is a caveat: the Hoffmann clamp in some cases may not completely block the selection!
For rectification:
Install the selection unit on the drawer side, securing it with a clamp. After the sampling unit, install an inverted condenser that returns cooled phlegm to the column or a powerful reflux condenser (during distillation). Insert a thermometer into the fitting to control the temperature*. Install a needle cock or a Hoffmann clamp on the reflux outlet tube through the silicone hose and close it completely. Next, start heating the cube (at a tank temperature of 60 - 70 degrees, cool the refrigerator as much as possible by directing the flow of water). After the column has warmed up, it needs to work on itself for at least 40 minutes until the temperature stabilizes. After that, smoothly open the needle valve, not forgetting about the stabilization of the temperature, and adjust the selection of heads drop by drop. After selecting the heads, proceed to the selection of the body, not allowing the temperature to deviate from the stable temperature by more than 0.2 degrees, with such a deviation, it is necessary to close the needle valve until the temperature stabilizes. A constant deviation of temperature, and the impossibility of its stabilization at the primary level, will inform you about the termination of the selection of the body. For complete rectification, it is necessary to complete the device with an aftercooler.
To select heads:
If the reflux condenser on your equipment is at least 200 mm and is equipped with at least 5 tubes, then install the selection unit in front of the reflux condenser on the frame, securing it with a clamp. Insert a thermometer into the fitting to control the temperature*. Install a needle cock or a Hoffmann clamp on the reflux outlet tube through the silicone hose and close it completely. Start heating the cube (cooling the reflux condenser as much as possible, directing the flow of water). After the column has warmed up, let it work for itself for 15-20 minutes, then slowly open the needle valve and adjust the selection of heads drop by drop, about 1 drop per second. After selecting the heads, turn off the tap, proceed to the selection of the body according to the classical scheme.
There is also the most advanced head selection scheme, install the device according to the bottom-up scheme:
– column with packed part
- diopter
- dephlegmator
– selection node
- upside down refrigerator
With such a scheme, only high-boiling fractions will break through through a very thin cooling supply to the reflux condenser. The refrigerator will cool them and send them to the exit using our device. The diopter in this scheme is necessary to visualize the returned phlegm and control the supply of cooling.
Try both options.
For tailings:
Install the selection node between the cube and the lower side. During the operation of the column, set a drop-by-drop selection on yourself - approximately 1-2 drops in 3-5 seconds. Control the selection with a crane or a Hoffmann clamp. Tailings may occur throughout the distillation.
For installation, do not forget to purchase additional clamp and gasket!
The selection unit is made entirely of stainless steel AISI304. Features a 1.5" double-ended clamp connection, outgoing tubing for silicone hose diameter 8 mm.
* – The product is not equipped with a thermometer!
Manufacturer: Russia
I continue to think about the optimal design of the apparatus and invariably come to the conclusion that the steam extraction is not universal.
To begin with, let me remind you: both types of selection involve the presence of a reflux condenser and the return of a part of the condensed phlegm (as the condensate of an alcohol-containing vapor is called) back to the column / cube. Only a part of the phlegm is taken away, forming the final product. About what and why this is done, you can read.
During steam extraction, steam is partially condensed in the reflux condenser and the condensed part is returned to the column/cube, while the uncondensed part passes further to a special refrigerator-condenser, where it turns into a product and cools.
With liquid extraction, all steam is condensed in a reflux condenser, and then in a special dispenser (it is often called the "Selection Unit" or UO) is divided into the part returned to the column / cube and the part taken, which is discharged to the aftercooler (in which the product is simply cooled and there is no condensation - there is no steam).
Judge for yourself - the steam selection option requires more attention when setting up at the stages of selection of the head fraction and transition to the selection of the main body. Regardless of the type of cube heating, accurate and quick setup difficult, and in some variations is simply impossible (discrete heaters, gas, short dephlegmators, etc.). It is often not possible to set the amount of head selection at the required low limit at all. All this affects the quality of the product and its final output.
And with liquid selection, everything is much simpler and more convenient. The reflux condenser converts all steam into phlegm, which, after passing the UO, is divided into two streams - return and selection. And the value of both flows depends on how much of the product we want to select. Dosing of the selection is carried out purely mechanically - by the size of the hole through which the product is taken (well, or by the frequency of opening the valve when using automation). Having once picked up the "jet" for the desired amount of selection, we forever close the topic of adjusting the selection at one level or another. Water adjustment is not needed at all - the dephlegmator always works “at full”. Power adjustment comes down to two or three values: “head”, “body” and “tails”, or, more simply, “head” and “body” (when using automation it is more difficult, well, these adjustments are not for you to do).
Why do I write these platitudes? Recently, people began to buy BCs (classic ones with steam extraction) and get packing drawers to them, justifying these additional devices with the desire to get a better product. Of course, the drawer side can give a good separation and allow you to further strengthen the product in any case (with a corresponding decrease in performance). But you need to correctly adjust the amount of return and power so that the tsarga works in certain modes and without choking. How to do this in the absence of any means, even visual control on the BC? Only by selecting parameters with inevitable losses in time and product. And what about head selection? You can, of course, greatly dilute the SS (raw alcohol or the product of the first distillation without crushing into fractions, it is already irrational to work with mash on packed drawers - the process stretches in time, prolonged boiling of the mash is undesirable) and take the head deeper, but this leads to large losses final product and still does not give "full guarantees" of quality.
BC with steam extraction is also called a distiller with fortification. And you need to treat it with the right expectations - right from the mash you can get strong moonshine with improved drinking characteristics at the exit. But moonshine. Actually, for many and in many cases this is quite enough and you can work at the bookmaker without any special stages.
If you want to take the next step - to get also NDRP (under-rectified, i.e. the product is clean and strong, but with traces of the source) or even more alcohol, you need to immediately choose a construct with liquid selection. It is much easier to immediately purchase a dephlegmator-stick for the same money instead of the classic BC (for 38 pipes from 4 thousand rubles, for 51 - from 6 thousand rubles) for a certain capacity and build an expanded system on its basis.
How to make a distillate extraction unit for a distillation column
If you decide to make your own distillation column, you are doing the right thing. Previously, this mechanism was used only on an industrial scale at distilleries. This is due to the fact that the structure occupied several meters in height and was quite voluminous in area. However, progress does not stand still. Gradually, studying the basic mechanisms and processes of rectification, the specialists managed to recreate a reduced copy of the factory sample. A modern distillation column can easily fit in the kitchen of even the smallest apartment, not to mention a garage or private house. At the same time, the product obtained at the output of such an apparatus will be no worse than the factory one, and perhaps even better. After all, the quality and taste of the drink will depend on you, or rather on the raw materials that you will use to make homemade alcohol.
Today we will look at how to make one of the parts of a distillation column - a distillate selection unit.
It is not uncommon for people who decide to assemble a distillation column do not have the opportunity and skills to turn some parts on a lathe. Therefore, we will describe how to make a distillate selection unit at home, using improvised means. You will need the following components for this job:
* Two arbors with different diameters (you can use bearings of a suitable diameter).
* A ball from a large bearing (in the absence of a suitable bearing, any other cone-shaped object can be used).
* Stainless plate, up to 1 mm thick.
* A hammer.
* Drill with 7 mm drill.
 We take a stainless steel plate. It needs to be screwed up. Using a compass, we outline the diameter of our future washer. Draw some circles. We do this in order to be guided by them when fitting the product. Next, we drill a hole in the middle, with a diameter of 7 mm. We put the workpiece on the bearing hole so that their center points coincide. On top of this design we put a large ball, the diameter of which is 15-16 mm. We hit it with a hammer several times. As a result of this, the workpiece will bend, the edges will rise, and the hole will expand. We need to make the edges at an angle that will tend to 90°. To do this, we take another bearing (its diameter should be smaller than that of the first one) or a mandrel, put it on top and beat with a hammer. The mandrel must be taken such that at the end it rests against the ball and the edge of the workpiece at the same time. Thus, it beads the edge of the sleeve and you get an almost right angle. Absolutely right angle there is no point in trying.
Next, we cut off the excess metal and grind it with a file. We grind according to the markup with  larger to smaller diameter. In the course of grinding, try on the washer to the pipe. In its final form, it must go into the pipe with an interference fit. The washer should not hang out and, moreover, fall out. Next, we take the pipe, which is intended for the column, cut off the sleeve 2 cm with a hacksaw. We cut it off evenly. In case of irregularities - we level with a file. We also remove the facets. Next, we grind the workpiece with sandpaper. We clamp the sleeve in a vice and saw the wall from one side. We cut so that the sleeve, when compressed, has outside diameter, which would match inner diameter pipes. The bushing must forcefully enter the pipe. Try to make sure that there is no gap at the cutting site or
  was minimal. We take the mandrel and, resting against the edges, we put the sleeve into the pipe to the depth we need. Usually it is 25-30 centimeters from the edge of the pipe. Check how tight the sleeve is. If it's tight, leave it as is. If there is a gap - it is necessary to solder. To do this, we drill 3-4 holes in the pipe in the place where the sleeve is located. Hole diameter 5-6 mm. After that, we take a drill twice as large in diameter and countersink the edges of the holes. Be careful not to drill through the bushing. We solder with a heated soldering iron in the places obtained, after which we check the reliability of the connection. It must be strong and the parts must not loosen. Next, you need to put on 2 profile bushings (they do not need to be fixed). They will hold due to springy properties and tensile strength. The only condition that needs to be met in this situation is the fact that the sleeve must receive the correct circle during processing. After we have assembled and soldered the structure, we drive the support washer on the other side of the pipe. It should be inserted without tension, freely. Next, completely fill the tube with a nozzle.
For those with access to lathe and skills of working on it, we offer another version of the distillate selection unit of the distillation column. Everything is much simpler here, and does not require special comments. It is necessary to machine the profile sleeve so that it, as in the embodiment described above,

entered the pipe with tension. We fix it with spot soldering. The product received after you wash it warm water, will be ready to use. Here's what the finished design looks like:
- Nozzle
- Pipe
- Distillate sampling tube
- Place of soldering
- distillate outlet
- profile sleeve
- support washer
In order to understand the essence of the processes occurring inside the distillation column, we recommend that you refer to alcohol columns. It discloses the theory of obtaining ethanol, the quality of which is close to the maximum.
Today we will talk about the design of a home rectifier and how this device can be made by hand.
Before you start creating a distillation (packed) column (RC), you need to purchase suitable material. It should be noted right away that all kinds of non-ferrous metals should be deliberately excluded from the design of the device: no copper alloys, no food-grade aluminum and similar materials. Only stainless steel is a chemically inert alloy that is not subject to corrosion and does not emit toxic impurities during the rectification process.
On the pages of FORUMHOUSE you can find a lot of advice regarding the use of copper in the construction of rectifiers and distillers. But if you read, then even more you can find people who disagree with such opinions. The explanation is quite simple: hot alcohol is a very strong solvent. Therefore, the contact of hot alcohol-containing liquids with any non-ferrous metals is highly undesirable and even dangerous to health.
beutiflet FORUMHOUSE User
Only glass, silicone and stainless steel.
Working scheme of the Republic of Kazakhstan
The figure shows a diagram of a standard RK, having dealt with which, you can independently assemble a home rectifier.

Consider the main elements of the design in more detail.
alembic
Any metal container made of stainless steel and having a suitable volume can be used as a distillation cube.

As for the volume: someone uses a regular pressure cooker (with built-in heating), while someone has slightly higher requirements. In general, everyone is guided by their needs.

viktor50 FORUMHOUSE User
The pressure cooker is too small, you need a capacity of at least 15-20 liters. The rectification process takes quite a long time and getting a liter in half a day is not kosher.
As for column heating: the easiest (but not very practical) option is to install the still on an electric or gas stove. The fact is that the column has a relatively great height, so it would be better if alembic will stand on the floor (not on the stove).
Installing the cube directly on the floor allows electric heating, which makes the design of the RC less cumbersome, and the entire installation - the most convenient in operation.

Timothy1
It is necessary to move from gas to electricity - it is easier to regulate, and the height is added! I cut the heating elements into a flask, connected the voltage regulator from the TV and went ahead.
Be that as it may, when heating the feedstock, a smooth adjustment of the power of the heating element should be ensured. Otherwise, the whole idea will be doomed to failure.
Many users, in an attempt to improve the design of the RC, equip the device with automatic control systems, as well as complex regulators. But if you are used to controlling the process on your own (and in the case of a home-made distillation column, at first you will not succeed in a different way), then the installation automatic system control is not essential. Until you have sufficient experience in the field of home rectification, a simple power regulator included in the circuit of one of the available electric heaters will be quite enough.

Timothy1
I have three heating elements from a Soviet teapot - 1.25 sq. LATR, shown in the photo, perfectly regulates one heating element.

The rectification process in this case is carried out using one (adjustable) heating element. The remaining 2 are needed exclusively for heating.
If you have already had enough time to enjoy the visual perception of the process, and the lack of time does not allow you to constantly be near the operating RC, then the automation system embedded in the design of the device will allow you to control the process, requiring minimal human participation. Automation allows you to select the contents of the distillation cube, preventing the ingress of tail fractions into the "body" of the product. There are already ready-made technical solutions that can be bought in specialized stores. Such systems, reacting to temperature changes, close the distillate extraction unit at the right time or, conversely, open access to cold water to the reflux condenser.

rectification tsarga
The rectification tsarga includes several components at once:
- Pipe with insulation and nozzle.
- Reflux condenser with distillate extraction unit, water jacket and thermometer.
- Union for connection with the atmosphere.
Given that alcohol vapor is very flammable, a hole for communication with the atmosphere (which is necessarily created at the top of the distillation column) must be equipped with a fitting and a rubber tube. The end of the tube should be lowered into a container of water. This will help prevent the spread of vapors indoors and their ignition.
Consider the design of the listed nodes.
Pipe (packed column)
The process of heat and mass transfer takes place in the lower pipe of the distillation column. A special filler is placed in its internal space, which increases the area of contact between the hot steam and the cooling phlegm. At self-manufacturing columns as a filler (nozzle), it is easiest to use scourers for washing dishes made of stainless steel. Sometimes a special twisted wire (also made of stainless steel) is used.
If you use metal washcloths as a filler, then the quality of their manufacture should first be checked. To do this, cut off a piece of washcloth and boil it in a solution of table salt. If instead of stainless steel, another alloy is included in the washcloths, then the products will not be able to withstand such a test and will quickly rust. It is necessary to cut the washcloth. After all, if it has a protective coating, then only in this way can its internal structure be exposed.
The packing density should correspond to the indicator - 250-280 g of packing per liter of the internal volume of the packed column.

The quality of separation of boiling fractions directly depends on the size of the packed tube. Having considered the practical experience of FORUMHOUSE users, we can conclude that minimum diameter pipes should be equal to 32 mm. In general, the higher the pipe, the better the fraction separation will be. Optimal Height pipes must correspond to 40-60 of its diameters (minimum 20). Outside, the pipe should be insulated with a layer of protective material.


belor44 FORUMHOUSE User
A metal mesh is installed in the inner cavity of the pipe (top and bottom) to hold the filler.


belor44
In my column for NDRF, the filler is washcloths. At the same time, there are nets from a tea strainer. The pressure is stable. A meter column with a diameter of 35 mm produces an under-rectified product with a strength of 96% at a rate of 950 ml per hour. There are no snags.
The bottom and top of the distillation pipe, as a rule, are equipped with a thread that allows you to connect the unit to the distillation cube and to the dephlegmator.

Dephlegmator
The main purpose of the reflux condenser is the condensation and separation of light fractions that have a lower (relative to reflux) boiling point. In practice, the reflux condenser may have different design. The simplest to manufacture is recognized as a direct-flow (shirt) type dephlegmator or, as it is also called, a refrigerator-condenser. It consists of two pipes of different diameters, between which there is a cooling jacket with running water.

In fact, a straight-through reflux condenser is a stainless steel pipe that is welded into another pipe of the same material (only of a larger diameter). Externally, the device looks like in the image.

The photo shows that the dephlegmator has two fittings (for inlet and outlet of coolant) and a tube for communication with the atmosphere (above). At the same time, at the bottom of the reflux condenser there is a fitting for distillate selection.
In order to avoid the appearance of impurities and odors in the final product, it is recommended to use only silicone tubes for distillate sampling.
The body of the dephlegmator can be made from stainless pipes or from an ordinary food thermos and an additional inner pipe. The diameter of the inner tube is usually equal to the diameter of the packed column. If you do not have access to argon welding, then you can fasten structural elements using an ordinary soldering iron.

The distillate extraction unit, located at the very bottom of the reflux condenser, is a figured washer welded into the inner tube of the device.

In the sampling unit, it is necessary to make holes in advance for the thermometer (if it is planned to be used) and for the sampling tube.

The need to introduce thermometers into the design of the RK is a controversial issue. People "experienced" often do without thermometers at all. At the same time, there are such distillers who, on the contrary, measure the temperature where it needs to be done, and where it is not at all necessary. For example, installing a thermometer in the body of the distillation cube only allows you to control the heating process. That is, by watching it, you can roughly navigate - how much time is left before the column boils.
But there are two constructive nodes in the Republic of Kazakhstan, where temperature control brings tangible practical benefits. These are the dephlegmator outlet pipe and the dephlegmator extraction unit (instead of the extraction unit, the space between the packed column and the dephlegmator can be used to install the thermometer).

If, at the outlet of the reflux condenser, the temperature of running water is allowed to drop below 45 ° C, then the separation of the fractions will not occur very efficiently (due to supercooling of the phlegm). If the temperature is above 55°C, then in the process of sampling the “body”, “tails” will break through the sampling tube.

Controlling the temperature in the extraction unit makes it possible to determine the steam temperature at the outlet of the packed column, and at the same time gives an understanding of which fraction is being separated at the current time. For example, if the temperature of the steam in the extraction unit is within the range of - 77.5-81.5 ° C (depending on atmospheric pressure), then only the “body” of the product will enter the distillate extraction tube.

Siberiafish FORUMHOUSE User
The temperature during the transfer was kept in the range of 78.8-81.3. Before the end, she began to jump.

The inner end of the thermometer tube soldered into the column must be plugged.
In order for the reflux condenser to be evenly cooled from all sides, a screw spiral can be soldered into the cooling jacket, which will set the correct direction of the cooling flow.

But what design of the reflux condenser is offered by one of the users of our portal.

Timothy1 FORUMHOUSE User
I wound two meters of corrugation into the def - it removes 3 liters per hour!
The design of this device is as follows.

In most cases, the corrugation, which passes running water through itself, is wrapped around the inner tube of the dephlegmator (it is not shown in the figure). However, this approach does not always allow efficient heat transfer to be achieved. The feasibility of introducing such a design can only be determined in a practical way.
In practice, you can find dephlegmators of the most diverse designs (including horizontal devices). We have described only the most common.
Dephlegmator dimensions
The main quantity that determines the dimensions of the device is the area of contact of the steam with the cooled surface. This value is often determined empirically. It depends on the power supplied to the column and on the temperature of the coolant.

Timothy1
The distillation column I made two weeks ago produces 1200 ml of alcohol per hour. You can do more, but there is not enough cooling! The input power during acceleration is 3.5 kW, during the stage - 1.25 kW.
The product yield is always proportional to the input power. For example, if the power supplied to the cube (in the process of rectification) is 700 W, then the maximum productivity of the column will be 700 ml/hour (in practice, at this power we have 300-500 ml/hour). The area of the reflux condenser with such a performance should be equal to - 200-300 cm². This area has inner pipe dephlegmator, having a length of 300 mm and a thickness of 32 mm.

Doobik FORUMHOUSE User
The rate of distillation primarily depends on the strength of the heating. If the stove can boil 1 liter per hour out of the mash, then no matter what the apparatus, you will not get 2 liters per hour. The purer and stronger the product, the slower the distillation. The apparatus itself can slow down the process in only one case - the low power of the reflux condenser, that is, when it is necessary to reduce the heating for the normal operation of the apparatus. The larger the diameter, the larger the heat transfer area, and the better the heat removal.
From the foregoing, we can conclude that it is better to have a reflux condenser with dimensions exceeding the calculated ones. After all, an excess cooling area will never lead to a cessation of condensate formation, and, consequently, to a cessation of rectification.
By the way, on the Internet you can find a calculator for calculating the reflux condenser, which will help you navigate the dimensions of the manufactured device.
Fridge
As a cooler for the sampled distillate, you can use a laboratory cooler, which is usually purchased at a laboratory glassware store.

In this case, the device can be made independently - according to the principle of a shirt-type dephlegmator (only the refrigerator will be much smaller in size). For this, again, stainless steel tubes of small diameter should be used. The length of the refrigerator should approximately equal the length of the reflux condenser.

In order to regulate the rate of distillate withdrawal or to stop (start) extraction in a timely manner, the distillate withdrawal tube should be equipped with a stopcock or a clamp (for example, from a dropper). The location of the clamp is indicated on general scheme RK.
The cooling cavities of the refrigerator and dephlegmator are interconnected in the following sequence: bottom of the refrigerator - refrigerator - top of the refrigerator - top of the dephlegmator - dephlegmator - bottom of the dephlegmator - sewerage. Simply put, a series connection of pipes is used, while water is supplied to the dephlegmator already slightly heated.
The temperature of the cooling water in the dephlegmator, as we already know, must correspond to certain values (approximately - 45-55 ° C). And additional taps for adjusting the water flow will help us achieve the required indicators. The valve from the gas welding torch regulates the flow most finely.
Distillate distillation sequence
Consider the sequence of work with our distillation column. First of all, we dilute raw alcohol (obtained after preliminary distillation of the mash) with tap water to a strength of 30% ... 40% (there is no consensus on this indicator, but the lower it is, the less likely it is to accidentally ignite). Then we pour it into the distillation cube, assemble the distillation column and fit it to the distillation tank.
The column, under no circumstances, should not deviate from the vertical level. Otherwise, the quality of the final product will noticeably suffer.
After the RC is installed, you can start heating the contents of the cube. The distillate tap must be closed. At the moment when the steam temperature in the reflux condenser begins to rise sharply, it is necessary to reduce the power supplied to the column to a minimum (the temperature at this moment can quickly reach 70-78 ° C, which is associated with a sharp rise in vapor through the packed part of the column). In this position, the device should be left for 30 minutes. This is necessary in order for the RC to warm up, and the process of heat and mass transfer to begin inside it. The temperature in the upper part of the RC may then fall.
After the specified time, we turn on the water supply to the refrigerator (and to the reflux condenser) and begin the selection of “heads”. We repeat once again that you can’t drink “heads”!
The end of the selection of "heads" can be determined by several signs: temperature stabilization - around 78 ° C and a change in the organoleptic characteristics of the selected distillate (the distillate begins to smell of alcohol).
After the selection of the "heads", you can begin the selection of the "body": increase the power of the column and adjust the water temperature in the dephlegmator (45°C - 55°C).
We enjoy the process until the “tails” are cut off. The beginning of the tail fractions condensation can be judged by the increase in temperature in the reflux condenser (up to about 85°C) and the appearance of the smell of fuselage in the sampled distillate. On this, the process of rectification will be considered completed. Tailing fractions can be selected for use in the process of subsequent hauls, or simply disposed of. It's up to you.
If you are familiar with in practice, then we invite you to take part in the discussion of issues related to this fascinating topic. If you are accustomed to eating no less sophisticated snacks along with exquisite drinks, then this article will teach you to endlessly surprise guests with the unusual taste of cooked dishes.


Sun skirt: types and how to wear it Black sun skirt with a T-shirt how to wear
Ground bird cherry Ground bird cherry cook
Own business: production of chips
How to care for your skin in spring Face masks in spring
Seizures in the corners of the mouth: causes and treatment in adults and children