Laptop owners usually use a wireless connection to access the Internet, since there is a Wi-Fi adapter on all laptop models without exception. However, in order to use it, sometimes you have to figure out how to turn on wifi on a laptop.
Hotkeys or hardware switch
The first step is to physically turn on the Wi-Fi adapter. On the different models laptops, this procedure is slightly different, but its meaning is the same: you need to find a hardware switch or use function keys. Let's look at a few examples:
Continue options turning on Wi-Fi You can take a long time, giving ways for MSI, Acer, Samsung and other brands. Even different series of the same manufacturer have different ways to activate the wireless module, therefore:
- Inspect the laptop case for a hardware switch or Wi-Fi enable button.
- Examine the keyboard - one of the keys in the F1-F12 row should be marked with the icon wireless connection. If you press it together with the Fn button, the adapter will turn on or off.

If you have a Sony Vaio series laptop, then there may not be a hardware key or Fn button on its keyboard. For Wi-Fi to work in this case, a special VAIO Smart Network utility is required, which can be found on the official website of the manufacturer.
Fn button not working
What to do if the Fn button does not work? How to turn on the adapter in this case? First you need to figure out why the key does not work. Fn runs under BIOS control and has its own utility, without which the key does not function. Therefore, if the button does not work, you first need to find a utility for enabling hot keys on the manufacturer’s website for a specific laptop model (the name should contain the word “HotKey”). 
If the installation of the utility did not help or the key is physically damaged, you will have to use alternative method turning on the adapter. On Windows 8 and Windows 10, to turn on the adapter, just click on the Wi-Fi icon in the notification bar and move the Wireless Network slider to the active position. If the adapter drivers are installed correctly, then the icon must be there. 
There is no such function in Windows 7, but you can try to enable the wireless connection through the window for changing adapter settings (this is described below). If this method did not help, then you will have to look for an external keyboard with a working Fn key and then no longer turn off the Wi-Fi module.
Setting up Wi-Fi on different versions of Windows
With the physical inclusion of the module, you will figure it out quickly enough. Sometimes the Wi-Fi setup ends here: the system performs the rest of the necessary actions on its own, displaying a list of available wireless points. But sometimes you have to establish a connection manually.
Regardless of the version of Windows, you first need to check that the Wi-Fi module drivers installed without errors:

To be sure, it is better to go to the official website of the laptop manufacturer and find latest version wireless network module driver for your model. In addition, right-click on the adapter and select "Enable" (if it is stopped).
Windows XP
In theory, Windows XP should have been discontinued long ago, but on some older Dell models and other laptops, the legendary system still continues to perform its functions. Wi-Fi in a Windows XP environment is configured as follows:

There should be a "Wireless Network Connection" icon in the File Explorer window. Its presence demonstrates that the Wi-Fi module is working correctly. Right-click the icon and select Enable. Further:

If the list of available points does not contain the network that your router distributes, click "Update list". Then select desired point name and click Connect. If the network is password-protected, you will be prompted to enter an access code, after which the connection will be established.
Windows 7
On Windows 7, the procedure for connecting to a wireless network has changed slightly, becoming a little easier. Now all available networks are displayed after clicking on the Wi-Fi icon in the system tray. But if there is no icon, then:
- Go to the Network Sharing Center.
- Click "Change adapter settings".
- Find your wireless connection and make sure it's turned on.

After enabling the wireless connection, the Wi-Fi icon will appear in the tray. Click on it to see a list of available hotspots, select a network and click Connect.
Windows 8
On Windows 8, the procedure for connecting to Wi-Fi remains the same, but Airplane mode has been added, which you need to be able to work with. If the adapter driver is installed and the wireless connection is working correctly, then you will see the Wi-Fi icon on the notification panel, when you click on it, a list of available networks appears.

If there is no icon, follow the same steps as on Windows 7 - open the "Change adapter settings" window and turn on the wireless connection. If there is no wireless connection itself, check the drivers and the status of the module - everything should be enabled and installed. 
If the adapter is turned on, the drivers are installed, but there are no available networks, check that the Airplane mode icon is not hanging in the notification panel. If it is, you need to disable this mode. To do this, click on the icon and move the slider to the "Disabled" state.
Windows 10
On Windows 10, everything remains the same with a few changes, so you will quickly figure out how to connect a laptop to Wi-Fi:
- Click on the wireless connection icon in the tray.
- Select the desired network.
- Click "Connect" and enter your password.
If the access point is not displayed, try configuring the network settings. Click on the link of the same name - the "Network and Internet" section will open Windows settings 10.
Here you are interested in two tabs:
- Wi-Fi - Make sure your wireless network is turned on.
- Airplane mode - make sure the mode is disabled.
You can go to the adapter settings section and turn on the wireless connection. Simply put, on Windows 10, you have several equivalent options - you just need to choose the more convenient method for yourself.
Often, users who have purchased a laptop or netbook encounter difficulties when turning on and configuring wifi. The procedure itself is quite simple, but in some cases there are various snags and unforeseen difficulties, and sometimes you need to configure the router before you start connecting Wi-Fi to your laptop. In this article, we will consider both a standard connection and options for solving such problems.
How to turn on WiFi on a laptop
Usually, to turn on wifi, it is enough to perform 2-3 simple operations. Which one depends on the model and manufacturer of the laptop. Here are the options for enabling a wifi network on the beeches of the most popular manufacturers:
- On an ASUS laptop, you need to press the combination of the FN and F2 buttons.
- On Acer and Packard bell, hold the FN button and press F3 in parallel.
- On HP laptops, wi-fi is turned on with a touch button with a symbolic image of the antenna, and on some models, with the FN and F12 key combination. There are also models on which a regular button with an antenna pattern is provided for this purpose.
- To enable wi-fi on Lenovo, hold FN and press F5. There are models where there is a special connection switch for wireless networks.
- On laptops from Samsung, to turn on wi-fi, you need to hold down the FN button and press either F9 or F12, depending on the model.
To connect wi-fi on laptops various models and different manufacturers can use their own original key combination. Detailed description for a specific model, you can see the article how to enable WiFi on a laptop hardware, or look in the user manual that came with the laptop. The FN button is available on almost all models of modern laptops. With its help connection of various functions and connection of a beech with other devices is carried out. If the laptop does not have an FN button, then a special button or switch is used to turn on the wireless network. As a rule, it is indicated by one of these drawings.
If not found on the keyboard, examine the ends of the laptop, perhaps the switch is on the side. Also take a close look at the bottom of your laptop. There are models in which the switch is located on the bottom cover. Moreover, manufacturers make this button barely noticeable. It almost merges with the body, and you can not see it at first glance. It may be signed by Wireles or Wlan. Turned on wifi with the right button or combination, but it doesn’t work? Wi-Fi needs to be set up on the laptop.
Hidden WiFi switch example
.
Attention: It is worth saying that such switches can be located in the most unexpected places, even on the back cover of the laptop. So if your WiFi does not work, carefully inspect the laptop for which switch.
How to set up WiFi on Windows 10
And so let's figure out how to set up WiFi in the operating room Windows system 10. By following simple steps, you can easily do this, you just need to repeat the instructions below exactly. If they don't help you can always ask for advice in the comments.
Connecting to WiFi on a laptop
Let's immediately consider how we can connect to a wifi network if everything is in order with the laptop settings. We do simple actions, the first thing we will need to do is in the lower right corner of the screen on taskbar find the icon in the form of network divisions (Wi-Fi antennas). Do not forget that this icon can be hidden behind the up arrow. Click on it and the fields with available to WiFi connection networks. And click on the connect button.

After that, if the network has protection, you will need to enter a password.

If the password is entered correctly, then you will see a window asking you if you want your computer to be displayed on the network. I won't go into details, but if you are connecting on your home wifi network, then click on the button YES.

After these simple steps, you will successfully connect to the WiFi network.

Check if your WiFi adapter is enabled on the laptop
Now let's look at one of the most common connection problems. So you moved your gaze to the lower right corner to find an icon in the form of network divisions (Wi-Fi antennas). But it was not there; instead, there is an icon in the form of a monitor, on which there is a red cross. This means that your WiFi adapter is disabled and you need to reconnect it. To do this, click on the icon in the form of a monitor with the right mouse button, and in the pop-up menu, select the item Network and Sharing Center. In the window that opens, click on the item in the left menu Change adapter settings.

Then a window will open Network connections. In it, if you enter the icon Wireless network, and under this inscription is written Disabled. Then you just need to enable it, for this we right-click on it and select the item Turn on. And make a connection.

If, when opening the window Network connections, nothing type icons Wireless network not found, this may mean that your Wi-Fi adapter is disabled by hardware. You need to look for the WiFi power button on the laptop case, as I described above.
Check if the WiFi driver is enabled and if it works properly
Now let's consider the option that we checked our laptop and are 100% sure that the laptop's hardware WiFi adapter is connected. And the icons Wireless network no, or everything is there, but where available wifi networks should appear, there is nothing or you see that something strange is happening with the wifi adapter. Most likely there was a problem with the laptop's wifi adapter drivers. You will need to go to Device Manager and check what is happening with your wifi drivers.
Click anywhere (empty) on the lower taskbar with the right mouse button, and select Options from the drop-down menu.


On the page that opens, at the very bottom, select Device Manager.

Now expand the tab in the window that opens Network adapters, the driver for the WiFi adapter should be displayed there, usually there is an inscription “Wireless” in its name.

And so what could be wrong with your wifi adapter drivers? First of all, pay attention to the icon next to the name of your adapter, if it has any extraneous icons like "Exclamation mark" or "Circle with a dot". This means that the driver is installed but does not work correctly, to fix the problem, you need to update or reinstall the driver. Also if in the tabs Network adapters, there is no driver in which the word "Wireless" is present, which means that the driver for your adapter is not installed. If so, then in the general list Device Manager there will be an inscription " unknown device". It will look something like this:

The solution to this problem will also be installing new drivers. If not, the inscription " unknown device" and there is no driver in which the words " Wireless". This may mean that your wifi adapter is disabled, out of order, or simply missing.
How to set up WiFi on a Windows 7 laptop
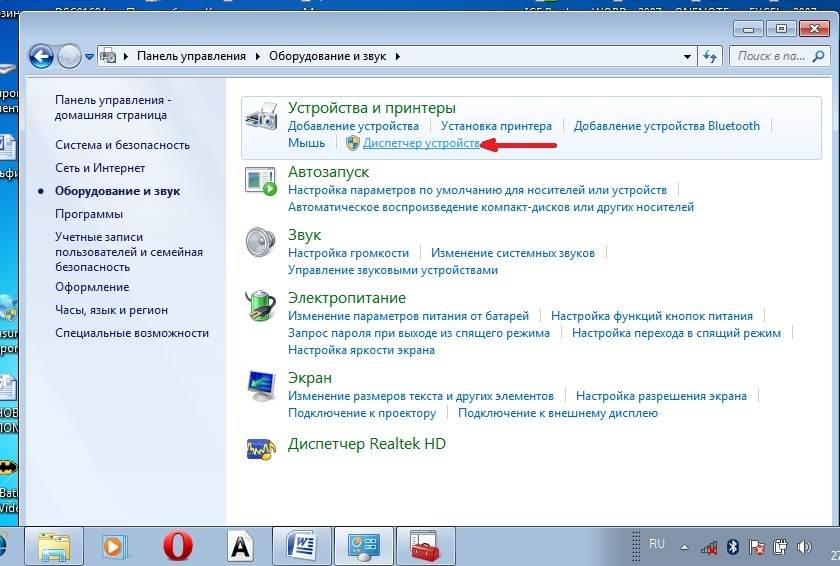
Before setting up, you need to check the availability and connection of drivers. Checking Drivers Checking the driver is to find out if they are on your device at all and whether it is currently in use. So in Control panels select item Device Manager, which can be hidden inside the item Equipment and sound.
A window opens in which we find Network adapters. Two items must be present: Ethernet and Wi-Fi. One of them should have the word "Wireless" in its name. This is your adapter.

If there is no entry for the wi-fi adapter, or there is an icon with an exclamation mark on a yellow background next to it, this means that you have a problem with the drivers. If there is no entry, then the drivers are not installed and you have to install them from the disk that came with the laptop. Or find it on the manufacturer's website. Without them, wi-fi will not work. If there is an entry, but there is a yellow exclamation mark opposite it, right-click on this item. In the window that appears, select "Enable". The reason for the connection difficulties may lie in the fact that the adapter is set to save power. To disable it, right-click on it, then Properties - Power Management, now you need to uncheck the box "Allow the computer to turn off this device to save power."

Now everything is fine with the driver. Turning on the adapterwi— fi . For this, through Control Panel→ Network and Internet go to Network connections. Here we find Wireless network connection. This is the wifi adapter. Right-click to open the dialog box and select Enable. Connecting to an access point. It remains to connect the laptop to the access point. Make sure the access point is active. Find the wi-fi icon in the lower right corner of the screen on the taskbar. When clicked, the network management window will open, select the desired network, click "Connection".

If the network is protected by a password, the system will ask you to enter it (if you forgot the password from your network, you can find it out). Only after entering the required password you will be able to use the Internet. If the network is open, the connection will happen automatically. That's all. Turning on and configuring Wifi on a laptop completed. If you once set up wi-fi, then you don’t need to do this anymore, as they will automatically be saved in the laptop’s memory. You will only need to turn it on with the appropriate button or keyboard shortcut. Keep in mind that a wireless connection consumes a lot of power from your device, so the battery will be used quite intensively. Pleasant and simple connections without adventure!
.
We figure out how to enable wifi on a laptop
Hello, friends. In this article, we will analyze the question of how to enable wifi on a laptop. A fairly common situation when everything seems to be working for friends and acquaintances, but not for you.
We highly recommend that you pay attention to the article about cleaning laptops in Minsk. It is from the timely cleaning of the beech from dust that it depends on how long it will work without breakdowns.
Introduction
To begin with, it is worth saying that to enable wifi, you need to install a driver on it. Perhaps you have it installed (may be present in advance in operating system) and possibly not. If it is missing, then in most cases you will not be able to turn on wifi on a laptop.
Check if the driver is missing
In order to make sure the driver is installed, let's go through this path in Windows 7: right-click on the "My Computer" icon, select properties there. The following window appears:

In it on the left we find the line "Device Manager". It contains information about the main devices of a laptop or computer, including whether drivers are installed or not. We are interested in network adapters. There should be a network card and a wi-fi adapter, part of which is usually written as wireless.

There should be no exclamation marks in this network devices tab, they mean that the driver is not installed. If you checked and so far no deviations have been found, then double-click on Wireless, that is, a wi-fi adapter.
There you can see whether the device is enabled or not. If it is written, it is on, then everything is fine, we figured out the technical part. Then it remains to turn it on on the beech itself.
Keyboard shortcuts to enable wi-fi
- And so, Asus, in order to enable wifi on a laptop, you need to hold down the fn and F2 keys.
- On MSI models, this is done with the fn + F10 buttons.
- On copies of Acer and Packard Bell, you need to hold down the fn + F3 keys.
- On HP models, we use the touch button with the image of the antenna, and the combination of fn + F12 buttons is also possible.
- On Lenovo beeches, it is connected by pressing the fn + F5 keys. There may also be a situation, as in the IdeaPad z570 model, where you need to switch a special switch from the right side.
- On Samsung beeches, press fn+F9 or fn+F12.
Also, in rare cases, the fn button may be absent, which means that wifi is turned on on the laptop with one button. She needs to be found. Usually it looks something like this, although some manufacturers may place it in other places on the case:

If you haven't found anything similar to these icons, then you should look at the entire body of the beech and you may find a switch labeled Wireless or Wlan. Plus, if you successfully find it, after pressing it, if you look closely, the indicator light should light up, such as, for example, which shows the charging of the beech.
But it is not certain that such an indicator will exist. After the adapter is turned on, then in the taskbar at the bottom right near the clock where the network connections are located, the icon should change.

You just have to select it, you will see a list of available wifi networks. Select the one you want and connect to it. If you have problems with this, then we advise you to refer to the article on how to connect wi-fi on a laptop.
That's all, we sorted out the situation with you, how to turn on wifi on a laptop. You may not be able to do this, due to the fact that the beeches are different and universal way no. But you will be well informed how the process is going on, in any case it will bring you closer to the goal. Finally, if not difficult, then please leave a comment on the article, thank you.
Modern technologies make everyday life much easier and more convenient. Wireless Wi-Fi is a prime example of this. The fact is that in our time there is no need to connect an Internet cable to a computer and work while sitting in one place. WiFi allows you to move freely around the apartment or house without losing connection. Moreover, this technology allows you to create private groups by connecting several computers into one network for data transfer. Everyone knows this technology and successfully uses it, but not everyone knows how to turn on Wi-Fi on a Windows 7 laptop. This is what this article will be about.
What is a Wi-Fi adapter
Before going directly to the system settings on a laptop, you should determine what a Wi-Fi adapter is (or, as it is also called, a wireless communication module). To do this, you need to know what WiFi is. As you already know, this wireless technology has a high data transfer rate, which is not inferior to a cable connection.
Radio waves are used to transmit information. It is in order to receive and send signals via radio waves in a laptop that a Wi-Fi module is needed. It performs the function of a transmitter and receiver in one "face". As you may have guessed, this module consumes electricity, which is why, to save battery power in a laptop, manufacturers have provided the ability to turn the adapter on and off. So we got to the heart of the topic. Next, we will look at how to enable the WiFi module on a Windows 7 computer.
How to set up a Wi-Fi adapter easily and simply: Video
How to turn on the wireless module
First of all, it is worth noting that for this, a special button is provided on the laptop, which shows the corresponding icon. To use it, you need to hold down the "FN" button and, without releasing it, press the button to turn on the wireless adapter.
Everything is elementary simple. However, in some cases there may not be such a button. In addition, for the additional keys to work, you need to install drivers - a special software. Drivers must also be installed on the Wi-Fi module itself. How to do it? Everything is simple.
As a rule, a laptop comes with a disk with all the necessary programs for Windows 7, including drivers. If there is no such disk, do not rush to get upset, because everything you need can be easily and quickly downloaded on the official website of the device manufacturer. The main thing is to know the computer model and the name of the adapter.
The model is usually indicated on the laptop itself - on the lid, at the bottom of the screen or under the keyboard. The name of the adapter can be found as follows. In the "Start" menu, find "My Computer" and right-click on it. In the window that appears, select "Properties".
WiFi connection in Windows 7: Video
After that, you need to go to the "Device Manager" item. In the window that appears, you need to find the "Network adapters" item, in which you will see the Wireless Network Adapter. This is your Wi-Fi module. Here you can turn it on or off as needed.
It is worth noting that there are several ways to enable the Wi-Fi module on a Windows 7 laptop:
- With the help of a special button - you already know how to do it;
- Through the task manager, as described above;
- By setting up a network environment on a computer in Windows 7.
You already know the first two ways. Therefore, let's look at how to enable Wi-Fi communication on a computer with Windows 7 using the network environment settings.
How to enable the wireless module in the network environment settings
To do this, go to the "Start" menu and launch the "Control Panel". Next, in the menu that appears, select "Network and Internet", and then go to the network and sharing center.
Here on the left in the column you need to find the item "Change adapter settings". In the window that appears, you will see various labels, we are interested in "Wireless Network Connection".
If this label is gray, then the module is disabled. To enable it, you need to right-click on the shortcut and click "Enable" in the menu that appears. If after that the computer still does not start searching for available connections, then you should resort to the first method of enabling wireless communication. If everything is done correctly, the laptop will start searching for available wireless networks and offer a list of connections, from which you select the desired network and click "Connect".
In this article, we will take a closer look at the process of connecting a laptop or Windows 7 computer to the Internet via Wi-Fi. I think the article will be useful to many, since when you first connect to Wi-Fi, there are always a lot of questions. As a rule, they are associated with installing the necessary drivers, enabling a wireless adapter on a laptop, etc. More on that later.
The laptop is a great thing. I do not really understand people who are now buying stationary computers. Except for serious games. Well, you must admit, with a laptop it is much more convenient. If you want a big screen, you can connect it to a monitor or TV. It does not make noise, and if necessary, you can take it with you. And yet, all modern (and not so) laptops have a built-in Wi-Fi module. A receiver that allows you to connect your laptop to the internet wirelessly WiFi networks. In the case of a desktop computer, you will need to buy .
All you need is to buy and install (if you don't already have it), it will distribute Wi-Fi to which you connect your laptop. You can connect your computer to a free Wi-Fi network in cafes, shops, etc. Or, to your neighbor's unsecured network 🙂 This is much more convenient than laying a network cable. If for a regular desktop computer this is still normal, then for a laptop this is no longer the case. And it’s not convenient to move around the house all the time with this wire.
Connecting a laptop to the Internet is not difficult, but provided that the driver for Wi-Fi is installed. Many people have a lot of problems because of the driver. If you simply did not install the driver on your Wi-Fi receiver, or you installed Windows yourself and did not install it, then you will not be able to connect to Wi-Fi. But, perhaps, you already have everything installed and configured, therefore, first we will consider the process of a normal connection to a wireless network. If you can’t learn from it, there won’t be a wireless connection, etc., then read the article to the end, we will consider possible problems.
Connect laptop to Wi-Fi
Let's first consider the connection process without any settings and checks there. Why complicate things, maybe you already have everything set up. If everything is fine, your laptop sees the wireless network and is ready to connect, then the Internet connection icon on the notification bar will look like this:
Connection status that looks like network level with an asterisk (as in the picture above) indicates that the laptop sees available networks and is ready to connect to them. Click on this icon, then select the Wi-Fi network to which we need to connect and click the button Connection. In Windows 10, the Wi-Fi connection process is slightly different. If it's necessary, detailed instructions.

If the network is password protected, a window will appear in which you need to specify the password and confirm the connection by clicking the button Ok.

That's it, your laptop should connect to the Wi-Fi network. The connection status will be like this:
![]()
You can use the internet.
If you see connection status, it looks like this:
![]() This means that most likely everything is configured on your laptop, but the laptop simply does not see networks available for connection. Perhaps there is simply no coverage in this place. If you are connecting to your network, then check if the router is turned on. If enabled, then .
This means that most likely everything is configured on your laptop, but the laptop simply does not see networks available for connection. Perhaps there is simply no coverage in this place. If you are connecting to your network, then check if the router is turned on. If enabled, then .
This is how the connection will go when you have the driver installed on the Wi-Fi adapter and the adapter itself is turned on. But very often the adapter on the laptop is turned off, or no one installed the driver on it at all. In such cases, many questions arise. Now we will analyze in detail both cases, due to which you may have problems connecting your laptop to a wireless network.
Enable "Wireless Network Connection" on the laptop
If your wireless connection is disabled, or the driver for Wi-Fi is not installed, then the connection status will look like this:
![]()
This means that there is no way to connect to the Internet via Wi-Fi, and there is no connection via a network cable. As I wrote above, this happens due to the adapter being turned off, or due to the lack of a driver. Let's first check if you have "Wireless Network Connection" disabled. This, of course, is unlikely, unless you turned it off yourself, but you need to check.
Click on the internet connection icon, and select Network and Sharing Center.

Then choose Change adapter settings.

Look at the adapter "Wireless Network Connection", if it is disabled, then right-click on it and select Turn on.

After that, the connection status "There are available connections" should appear. (if there is a Wi-Fi network in the radius).
We turn on wireless connections with the buttons on the laptop
It seems to me that now manufacturers do not install separate buttons to turn on the Wi-Fi adapter. But, if you have problems connecting to Wi-Fi, then charmingly check if there is a special button to disable / enable wireless connections on your laptop. I know for sure that Toshiba liked to make such switches.
Now, on laptops, a keyboard shortcut is used to disable / enable the wireless network. As a rule, different manufacturers have different keys. But usually this Fn+F2. So on Asus laptops. You can see for yourself, there should be a network icon on the key that is pressed in tandem with Fn. Approximately like this:

True, my combination of these buttons is responsible for turning off Bluetooth. Wi-Fi does not seem to respond at all. But, yours may be different. It's definitely worth checking out.
If there is no "Wireless Network Connection" adapter at all in the adapter management window, but there is Wi-Fi on your computer / laptop for sure, then this means that Wi-Fi adapter driver not installed.
Now we will check everything and try to solve this problem.
Check and install the driver on Wi-Fi
I have not yet seen a case that after installing Windows 7, the system itself installed the driver on the Wi-Fi adapter. In Windows 8, this is much better. Windows 10 often installs the necessary drivers itself. So, after installing Windows, in order to use Wi-Fi, you need to install the driver specifically for your laptop or adapter (very often, adapters from different manufacturers are installed in one laptop model. It is because of this that you can see several Wi-Fi drivers on the manufacturer's website).
We go to the device manager.

Open the tab in Device Manager Network adapters, and looking for a driver for Wi-Fi. I have it called Atheros AR9485WB-EG Wireless Network Adapter, it is installed. You must also have something like Wireless Network Adapter.

If you do not have a wireless connection, then most likely you will not find an adapter either. You need to install the driver, then Wi-Fi will work. And yet, if the driver on the Wireless Network Adapter is not installed, then in the device manager there will be at least one unknown device with yellow exclamation mark. It looks something like this:

This is most likely the same Wireless adapter that the laptop does not know how to work with.
Driver installation
All you have to do is download the right driver and install it. It is best to download the driver from the official website of your laptop / adapter manufacturer, and for your laptop (or adapter) model. Best of all, use Google to find the official website of your laptop, for example Asus, then use the site search on the site, indicating the model of your laptop. Most likely, your computer page will be found, open it and find utility and driver downloads there. Find the driver for Wireless and download it for the operating system you need.
Most likely, the driver will be in the archive. To install, run the .exe file from the archive. For example, the archive with the driver for my laptop:

After installing the driver, restart the laptop and try connecting to the wireless network, following the instructions. I wrote in more detail about installing the driver in an article about.
If some points from the article remained incomprehensible to you, or you still couldn’t connect your computer to Wi-Fi, then write about it in the comments, we will try to solve your problem.


Chocolate biscuit: the secrets of cooking in a slow cooker and oven
Chemical composition and nutritional value
Apple chips at home
Braised cabbage with white beans, recipe
How to reduce the ass, hips and stomach at home?