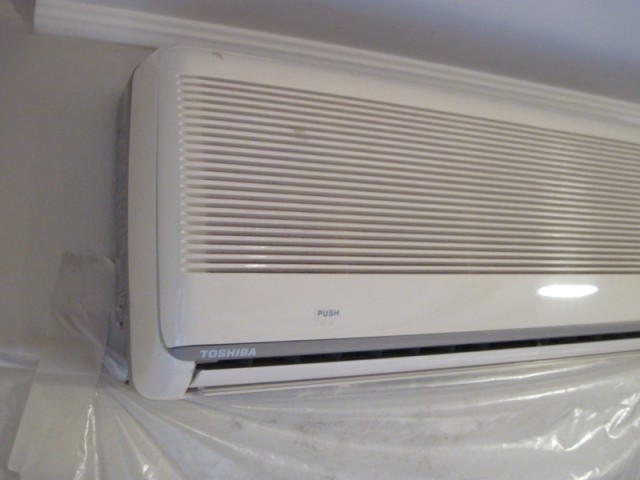
If you notice that cold air coming out of the split system has an unpleasant sweet smell of rot - this means that the unit urgently needs preventive cleaning
except bad smell, clogging of the internal components of the air conditioner leads to faster wear of the power system of the device, increased power consumption and, most unpleasantly, can cause a number of allergic respiratory diseases.
Of course, you can entrust this procedure to a service worker, especially if the air conditioner is still under warranty. But if you have been using a split system for a long time and do not intend to pay big money for something that you can handle on your own, then you should know the procedure for disassembling the air conditioner for its preventive cleaning.
In fact, there are quite a lot of companies producing split systems today, but they all involve a more or less unified system for building indoor units. Therefore, even if you encounter some design differences, the basic disassembly technique will remain the same.
How to disassemble for maintenance the indoor unit of a split system
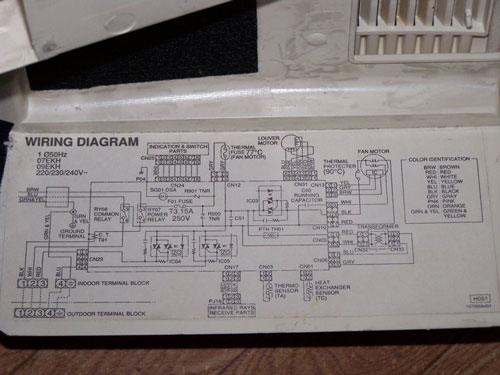
First of all, you should prepare a set of screwdrivers of various sizes and workspace configurations. Also, do not forget to put boxes for collecting fasteners next to you, as well as a functional and electrical diagram of the air conditioner (in some models circuit diagram applied to inside block top cover). To clean the internal elements of the split system, you need a vacuum cleaner, detergents and clean rags.
- Turn off the power to the air conditioner . This is the first thing to do in order to comply with electrical safety rules. Do not turn off the air conditioner with the remote control button, but simply remove the plug from the socket.
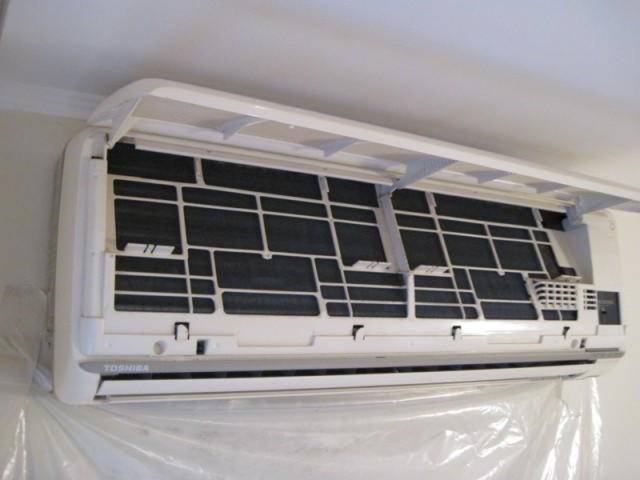
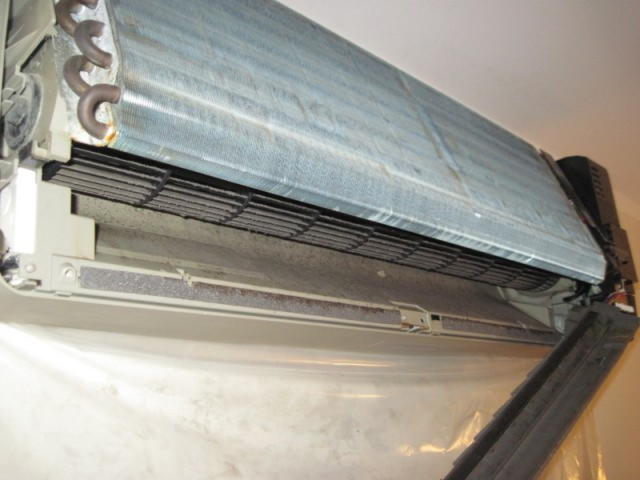
- Remove the top cover of the block . Unscrew a few screws (two or three) covered with decorative caps and remove the top cover indoor unit conditioner. The cover, covered with a layer of dirt and mold from the inside, should be washed in the bathroom using a brush and detergent.
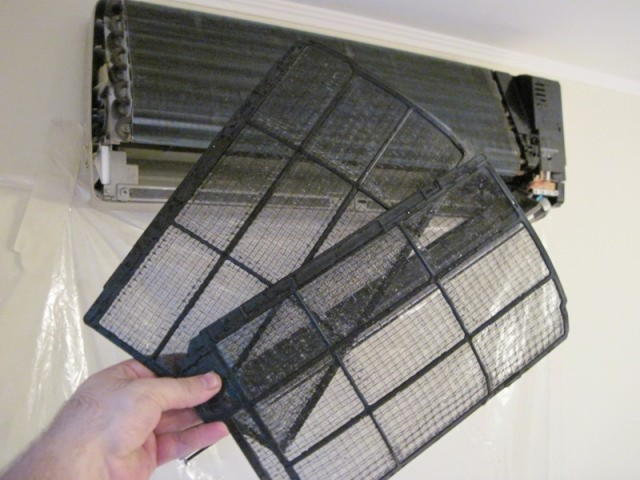
- Remove air filters . Remove the plastic air filters. They can be mounted both on the block cover and inside it. We also wash the filters under a strong stream of water, helping ourselves with a brush.
- Remove the airflow guides . Slightly bending, remove from the grooves special blinds that direct the flow of cold air into the room. They, too, most likely need enhanced washing.
- Disconnect the bottom cover of the indoor unit, the drain pipe and the power wire of the split system. . Gently wring out the three latches, and then disconnect the drain bath together with the outlet hose from the indoor unit of the split system.
- Disconnect the wiring terminal blocks, remove the electronic control unit and transformer . To remove the control unit from the split system, you should carefully wring out the side fasteners, and then pull the device towards you. Do not forget to unscrew the ground wires before doing this.
- Remove the fan motor. We unscrew the bolts securing the electric motor to the chassis, lift the evaporator and remove the engine together with the rotary fan.
- Separate the motor from the fan . First, you will have to gently heat the bolt head with a soldering iron to unlock the thermal lock on the motor pulley. After the fan blades are removed from the pulley, they can be thoroughly washed in the tub.
The assembly of the indoor unit of the split system should be done in the reverse order.
how to open the air conditioner to get to the fan, the bottom 2 screws found what needs to be done to open
Vadim Unscrew two or three screws under the horizontal blinds.
Then gently move the bottom of the body. Try to let the blinds pass through the slot. There are three hooks on the top, they will unhook themselves. After removing the housing, carefully remove the thermal resistor from the slot.
Then, on the left side, unscrew one screw holding the drain pan, carefully slide it off the hooks and let it hang on the drain hose.
Access to the fan will be free.
Be careful when assembling. Don't break the hooks.
Nikita with all the dope with a swing on the floor
Victoria Download the instructions for it - there is a disassembly in pictures. At least on my HITACHI so.
Yuri He is taken out of the case. very tight.
Tags: How to remove the cover of the indoor unit of the Samsung air conditioner
Dismantling, cleaning the indoor unit of the Panasonic P.S. split system Don't forget to grease the impeller bearing in...
24 Nov 2013 - 29 min. - Added by the user Split-infoDisassembly of the indoor unit of the split system. ... Dismantling the indoor and outdoor unit of the air conditioner. - Duration: 8:39. Cool Van 89.139...

Service of the internal block of the conditioner...
Hi all! At the request of my friends and accomplices in general, I want to write a post about the maintenance of air conditioners, because this is already relevant at the moment (I hope the moderators will be understanding)! The fact is that consumers are often misled by offering them air conditioning service ANNUALLY!!! This is not necessary, because everything depends on the degree of contamination of the room where the air conditioner is located!How to understand that cleaning is already inevitable? Let's look at the process of cleaning the indoor unit, perhaps you yourself are able to perform this operation:
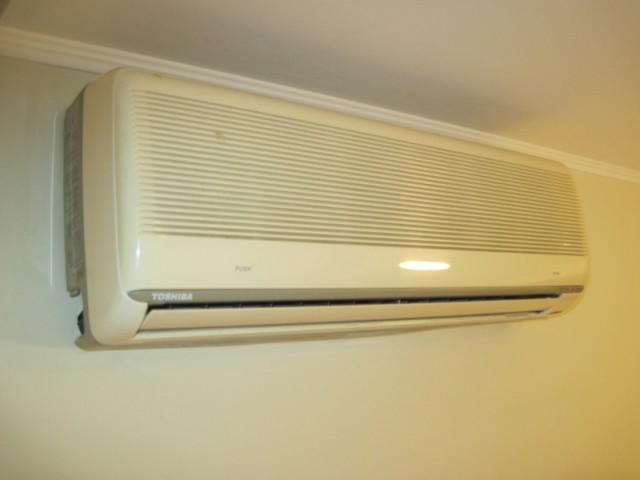
So we have a regular internal block:

Below, in order not to mess up the repair, we glue the film onto ordinary masking tape:
Open the lid, remove the mesh filters and rinse them under running water (you can do this at any frequency, but at least once every 2 months!)
Now we remove the entire upper part of the case, along with the cover ...

We unfasten the bath (through it the condensate enters the street) ...

and then enjoy the terrible spectacle! Here we can already understand what we breathe including a clogged air conditioner ...
So we got to the main point that I wanted to tell you about! WITHOUT DISASSEMBLY OF THE AIR CONDITIONER, you can see the degree of its contamination and independently draw a conclusion ... but is it necessary to clean it?
Pay attention ... The fan impeller, which we need to clean!!!

We remove the impeller (if possible), wash it with a jet of water and a brush, and clean the radiator with a steam generator ... Voilà:

Then proceed to the assembly of the indoor unit, in reverse order! But those same mesh filters ...
We fasten the lid, put the nets ...

Close the lid of the indoor unit...
We turn on 22-25 degrees on the remote control (do not turn on the minimum ... never in the heat, not a single condo will give you 16-17 degrees !!! You will stupidly kill it!) and enjoy the coolness!

... I will talk about the outdoor unit later! I inform you that I have been engaged in air conditioning and ventilation since 2000 and I am ready to help with advice, and indeed in this area!!! So ask! I will answer later, in the evening I will answer everyone, because now there is a lot of work .. I am running away) Have a good day everyone!
How to remove the air conditioner from the wall with your own hands
disassembled indoor unit. With how to remove the air conditioning compressor and himself outdoor unit with their own hands ... Remove the protective cover from the case; ...
How to disassemble the air conditioner with your own hands to eliminate bad smell from a split system? To take apart wall air conditioner with your own hands, you must first familiarize yourself with some of the features of household air conditioners.
How to disassemble the air conditioner
One day any user of the wall, domestic air conditioner faces the following unpleasant problem: when the split system is turned on, a jet of cool air escapes from its outlet, filled with a slightly sweet smell of already stagnant mold. This means it's time for you to Maintenance of your air conditioner, that is, wash it thoroughly, and inside the system. There are two ways to solve this problem: the first is to call the wizard (however this method expensive), the second is an independent analysis of the split system and its subsequent cleaning on its own.
We suggest that you do everything yourself, because in this way you will be able to save a certain amount of money, moreover, this skill may come in handy in the future. We present to you detailed guide on disassembling the indoor unit of the air conditioner, which will help you in solving the problem of unpleasant odors from the split system. The considered algorithm for disassembling the air conditioner is typical, so it is suitable for many brands of modern air conditioning devices. So, to disassemble the air conditioner yourself, you will need several minus and plus screwdrivers of various diameters, as well as a set of hex stars (not for all models of split systems). If you already have such a simple arsenal, then you can start disassembling the indoor unit. Please note that in the process of cleaning the air conditioner, you do not have to remove the device from the wall, disconnect the copper line and drain the freon.
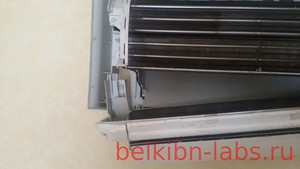
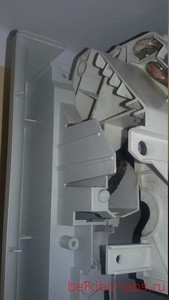
First of all, turn off the power to the air conditioner, then remove the protective filters from the indoor unit of the device. This process is described in detail in the standard service manual for your split system. Next, remove its front panel from the unit, to do this, unscrew the two bolts that are closed with protective plugs, and then pull the frame towards you (it is held on top by two latches). The lid on the inside will be covered with mold and dust, so immediately send it to the sink. Next, remove the blade that directs the air flow, to do this, apply a little physical force and pull it out of the slots. Then remove the lower part of the air conditioner indoor unit from the latches, and then disconnect the split system drain hose and its supply wire.
Next, you need to disconnect all the wiring, while it is better to write down how the wires are located. If you are too lazy to write down, and besides, you can boast of your grandiose knowledge of radio engineering, then when you assemble the air conditioner back, you can use its electrical circuit, which is located on the inside of the front cover of the indoor unit.
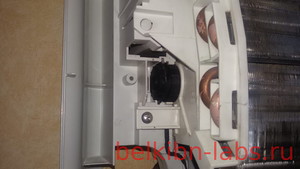
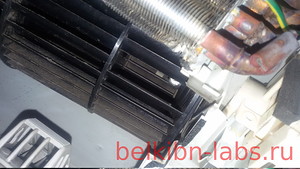
Then wring out the mounting brackets, then remove the housing of the electronic unit and the transformer. Then you need to press the three support latches and carefully dismantle the drain and outlet hose. The hole for blowing air from the indoor unit, as well as the blades of the built-in fan, will be covered with a strong coating, which exudes an unpleasant odor. After that, unscrew the air conditioning motor support bolts, carefully lift the radiator, and remove the motor support. Then remove the blades, as well as the engine from the cell, and you can carefully lay the radiator back so that it does not suddenly fall.
Then remove the heat lock that is on the electric motor pulley mounting bolt. Be aware that this is not easy to do. To prevent the rubber element that transmits energy from accidentally burning out, you need to gently heat the bolt head with a thin soldering iron, while periodically trying to unscrew it. When you manage to separate the blade from the motor, send all contaminated elements of the system to the sink. To wash all the parts, you will need a bottle of detergent, a brush with fairly long bristles, and plenty of water. The assembly of the air conditioner is carried out in the reverse order.
You can see for yourself that the design of the indoor unit of a wall-mounted split system is not very complicated. Therefore, in order not to spend extra money, you can clean the device yourself, besides, you now know how to disassemble the air conditioner with your own hands.
Panasonic Air Conditioner Cleaning
There is a Panasonic split system. Good. Expensive and pretty good quality. After about three years of operation, it turned out that the indoor unit required cleaning, because during operation the system began to emit an unpleasant odor. Previously, when such a smell occurred, I took out the filters and washed them, after which the smell disappeared. This time it didn't help. It turned out that despite the presence of cool filters, electric ions and all that, a significant layer of dust had accumulated on the turbine. When I tried to wipe off this dust with a cotton swab, I failed completely. And the stick turned out to be a bit short, and the distance between the turbine lamellas is very small, and there are a lot of lamellas themselves. In addition, the dust simply did not clean off. There was a feeling that the turbine would have to be soaked in a soap solution so that this horror would come off it.
Having gone on the Internet, I saw with satisfaction that this problem is completely standard and concerns absolutely everyone. However, everyone approaches washing the turbine in different ways. Some even lay cellophane under the wall and wash the turbine from garden hose high pressure water. This method surprised and even somewhat discouraged. Still I chose another and more reliable way- dismantle the indoor unit and remove the turbine. If you can’t do this, then call the masters who will do this operation for a lot of money, and, perhaps, with some specific mockery associated with the fact that they have a crazy line there, I’m not the only one so smart that they broke like that, they all left and went to hell with me... They have Gazprom and Lukoil as clients, and I'm here with my stupid block in the singular ....
In short, I suffered for a very long time, took everything apart, took out the turbine, washed it, put it back in and calmed down. Since then, another three years have passed and I had to repeat this operation. And I regretted that I did not film the whole process and did not write down how and what to do there, because I managed to forget everything.
But just yesterday I did this operation again, and this time I wasn’t such a sucker, but I filmed everything and even dictated comments to myself on the recorder in hot pursuit. But now I thought about writing an article, because, perhaps, it might come in handy for someone else, this info will be safer on the Internet, and it will be more pleasant for me to read later, in the next three years (God forbid we will be alive by that time).
We disassemble the split system
Friends! The split system is designed in such a way as to occasionally remove the turbine, service it, and then insert it into place. So the system turned out to be repairable, but you just need to know exactly where the screws and latches are, where to press so as not to break anything.
Attention!
Imagine, I am standing on a stepladder right in front of the split system and looking at it. On the right I have motors, all electronics and LEDs. I wrote this paragraph in order to make it clear where in this case is right and where is left.
So, the first step is to remove the case. It is held on from below by screws, from above by latches such as hooks. But finding two screws that hold the case turned out to be not easy. I searched for a long time, but found. They were under cover. First, we raise the lid-wing on the motor with our hands (I, unfortunately, do not know the special terminology). We unscrew the two screws and carefully pry the case from the bottom up. It is removed very easily, but perhaps with a click, because at the top it is hooked on three latches - hooks.

We remove the body. This is the right screw.

We remove the body. This is the left screw.
The second thing we need to do is to remove the unit, which includes an external air valve (cover-wing) with a motor and a foam tray for accumulating and draining condensate. It does not rest on screws, but on two specific horns that are in their grooves somewhere quite deep inside the device. We put our hands deeper on both sides of this very bath and press vertically down. The bath, together with the body on which it rests, is released. You can separate the node first on the left, then on the right
Air conditioner cleaning. Disconnect the condensate collection unit
We shift the air outlet unit with an air damper and the condensate tray vertically down. The specific horns on which the knot was held are visible.
Attention!
There are three serious nuances. First, a condensate drain hose is attached to the bath. It can be attached either on the left or on the right. This hose, if it's on the left, might get in the way. Apparently it will have to be removed. I have it on the right and does not interfere. Secondly, this bath hangs on the wires and is not completely removed. The wires are extremely thin. It is better to tie up the whole knot somehow so that these wires do not break. And, thirdly, some water, that is, condensate, can pour out of this entire device. So you also need a fairly large rag to wipe off anything that might spill out.
Next, we look at the left side and see that the head of the screw is exposed. This is the last screw that we have to unscrew. In addition, we see the bearing assembly that holds the turbine. This bearing is rubber and inserted into the grooves, as it were. You don't need to touch it! We unscrew the screw.
Here is the third screw that we need to unscrew. It fixes the heat exchanger
At this point, the turbine is already quite accessible and you can touch it with your hand. Pay attention to the right side of the turbine. This is the part where the main motor is located, which drives this same turbine. We turn the turbine by hand and find on the very right edge the place where the lamella is missed. Looking from below into the resulting space, we see that access to the screw opens, which fixes the turbine on the motor shaft. Carefully insert a screwdriver into the turbine and unscrew the screw. But not completely. It will be hard to put it back in later.
Air conditioner cleaning. We loosen the screw securing the turbine to the engine shaft
Now comes the final crucial moment. It is necessary to lift the left side of the heat exchanger assembly. Care must be taken not to cut yourself on sharp edges. The heat exchanger is held on some unknown and invisible latches. You need to use some force to lift it. It is necessary to lift the left side up.
Air conditioner cleaning. Heat exchanger compartment
After the heat exchanger has snapped off, it is necessary to lift it very carefully by the left edge and we will see that the place where the turbine rubber bearing is located is divided into two parts. A vertical crack is formed, sufficient to pull the turbine down, starting from the left edge. It might even fall out on you. But most likely it will get stuck somewhere halfway.
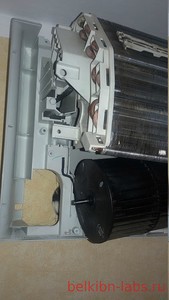
Air conditioner cleaning. We take out the turbine
We remove the rubber bearing from the shaft, take out the turbine itself and carry it to the sink. After washing it, we carefully collect everything. We do it in reverse order. You have to be careful not to damage anything. We do not apply much force and we are not in a hurry. Do not forget to fix the turbine on the right side of the motor shaft. Going by experience outdoor unit much faster than understandable.
As a result, we had to unscrew only 3 screws and loosen one screw. Everything else is on latches.
That's all. Thanks for attention.
Dmitry Belkin.
Article created 02.06.2015
No... well, obviously, except for the turbine, I wiped off the dust and dirt wherever it was and where it was possible to reach it. I don't have a steam generator, unfortunately. I had to vacuum and finish the job. Theoretically, I think, it is possible to spray the heat exchanger with a soapy solution, and then wash off this solution by spraying too. Water will enter the bath and go to the drain. In addition, the heat exchanger is constantly wet from condensate and the condensate drains and does not a large number dust settle on the heat exchanger.
By the way, the heat exchanger especially does not have the opportunity to get dirty, because it does not have a special ventilation mode! At all! There is a certain synthetic ventilation mode, but, as I understand it, it is needed only for one purpose, namely, when people have gathered under the air conditioner and smoke. Then you can turn on the so-called patrol, which will effectively clean the air from smoke without air conditioning. But in this mode, I can't control the air flow. It is always intense. Split system and air purifier are not interchangeable. And this, as I understand it, is correct! If the air conditioner can be used instead of the purifier, then no one will buy purifiers. But here, too, there is a way out. Since the air conditioner is inverter, you can set the cooling temperature to 24 degrees and it will blow in the desired mode, but it will practically not cool. And if it does, then due to the inverter, the air, when cooled, will come out of it not cold, but cool. In short, you can endure.
Hello Gennady!
Opening the air conditioner is really not easy! Here you need to know exactly how it is done. I am not familiar with your system and cannot help you. I can only encourage! Look for plugs in the body color. There may be screws underneath. With latches, everything is always more complicated.
If you notice that the cold air coming out of the split system has an unpleasant sweet smell of rot, this means that the unit urgently needs preventive cleaning.
In addition to an unpleasant smell, clogging of the internal components of the air conditioner leads to faster wear of the power system of the device, increased power consumption and, most unpleasantly, can cause a number of allergic respiratory diseases.
Of course, you can entrust this procedure to a service worker, especially if the air conditioner is still under warranty. But if you have been using a split system for a long time and do not intend to pay big money for something that you can handle on your own, then you should know the procedure for disassembling the air conditioner for its preventive cleaning.
In fact, there are quite a lot of companies producing split systems today, but they all involve a more or less unified system for building indoor units. Therefore, even if you encounter some design differences, the basic disassembly technique will remain the same.
How to disassemble for maintenance the indoor unit of a split system
First of all, you should prepare a set of screwdrivers of various sizes and workspace configurations. Also, do not forget to put the boxes for collecting fasteners next to you, as well as the functional and electrical diagram of the air conditioner (in some models, the electrical diagram is printed on the inside of the top cover of the unit). To clean the internal elements of the split system, you will need a vacuum cleaner, detergents and clean rags.
- Turn off the power to the air conditioner . This is the first thing to do in order to comply with electrical safety rules. Do not turn off the air conditioner with the remote control button, but simply remove the plug from the socket.
- Remove the top cover of the block . Remove a few bolts (two or three) covered with decorative caps and remove the top cover of the indoor unit of the air conditioner. The cover, covered with a layer of dirt and mold from the inside, should be washed in the bathroom using a brush and detergent.
- Remove air filters . Remove the plastic air filters. They can be mounted both on the block cover and inside it. We also wash the filters under a strong stream of water, helping ourselves with a brush.
- Remove the airflow guides . Slightly bending, remove from the grooves special blinds that direct the flow of cold air into the room. They, too, most likely need enhanced washing.
- Disconnect the bottom cover of the indoor unit, the drain pipe and the power wire of the split system. . Gently wring out the three latches, and then disconnect the drain bath together with the outlet hose from the indoor unit of the split system.
- Disconnect the wiring terminal blocks, remove the electronic control unit and transformer . To remove the control unit from the split system, you should carefully wring out the side fasteners, and then pull the device towards you. Do not forget to unscrew the ground wires before doing this.
- Remove the fan motor. We unscrew the bolts securing the electric motor to the chassis, lift the evaporator and remove the engine together with the rotary fan.
- Separate the motor from the fan . First, you will have to gently heat the bolt head with a soldering iron to unlock the thermal lock on the motor pulley. After the fan blades are removed from the pulley, they can be thoroughly washed in the tub.
The assembly of the indoor unit of the split system should be done in the reverse order.


The influence of the Internet on a person
Types of seizures Tonic-clonic seizures in children
Profession Internet project manager
best remedy for prostatitis
Symptoms and treatment of mastopathy of the mammary glands