Furry pet owners know summer is a scary time, especially for hamsters. If the house has a climate control system, it’s already better, and if not, you can put ice cubes on your pet, or install your own air conditioner for the hamster! We will talk about how to assemble such a device from improvised means and a peltier element in this article.

The Peltier element is a simple but very interesting device. It looks like a small ceramic plate with dissimilar semiconductors inside, but if you let current flow through it through two contacts, one side will start to cool and the other to warm up. It also works in reverse side- if you heat one side and cool the other, the EP will generate current.
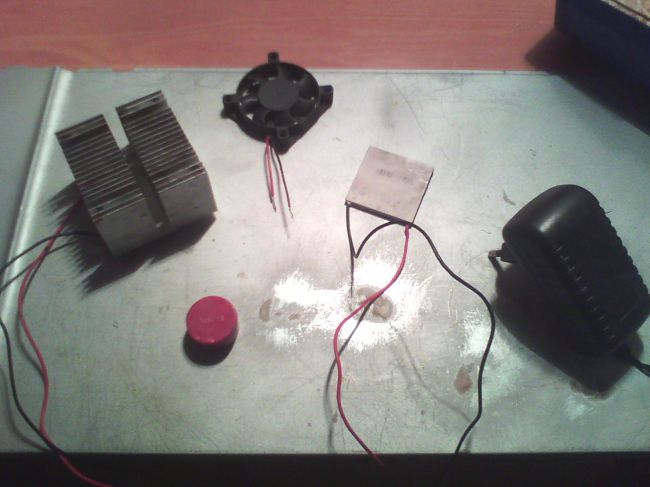
To assemble the device you will need:
1. Peltier element.
2. Radiator for the processor.
3. Cooler.
4. Thermal paste.
5. Power supply (in this article, a 5V 1A power supply is used, but it is better to choose a power supply for the nominal parameters of the Peletier Element - 12V, then the efficiency of the device will increase).
Where to find and how to choose accessories:
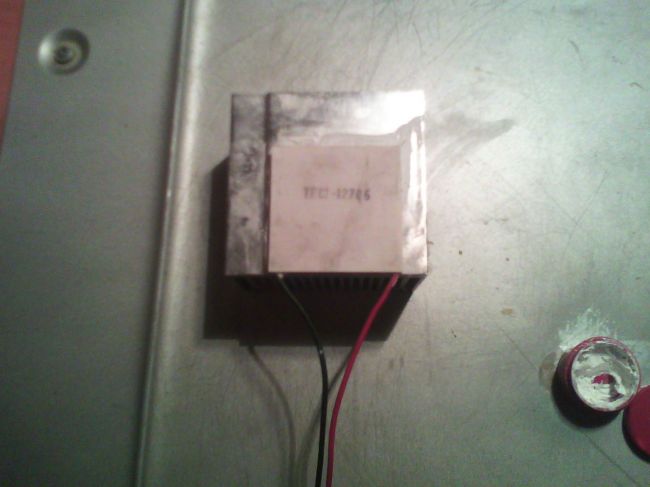
The Peltier element is easy to find, they are sold in many "amateur radio" stores and radio markets. Also, you can order on the Internet - for example, on ebay or Aliexpress by keyword"Peltier". The second way is more profitable, since pelties from factories in China will cost you much less (the elements for this article were ordered from China, a batch of 5 pieces cost about $ 10). In our case, we used TEC1-12706 40x40mm, the optimal current for it is at 12V (although an increase to 15-16V is not critical) from 0 to 6A.
The rest of the components were removed from the old computer and found "in the bins", and if you don't have them, you can buy them inexpensively on the radio market. Last but not least, the cooling efficiency depends on the radiator - the bigger the better. The rule was experimentally deduced - it is optimal if the bottom area of \u200b\u200bthe radiator is twice the area of \u200b\u200bthe EP, and the height is 4-5 cm - such a radiator is not too large, but it dissipates heat well (on the radio market this will cost 50 rubles). A cooler - a small one, taken from a video card, will be enough. The power supply, as already mentioned - better than 12V, but also 5V / 1A (old phone charger) - proved to be excellent.
Assembly process:
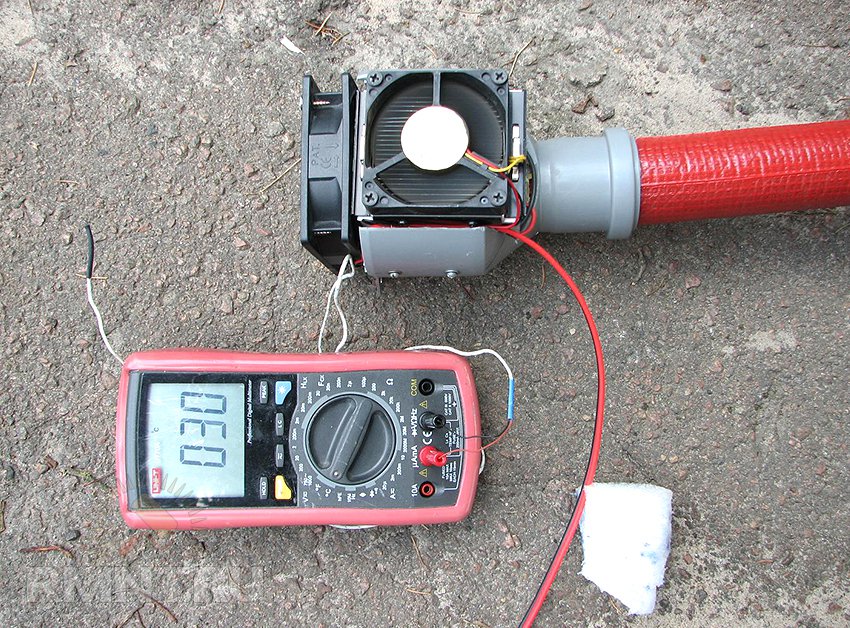
Usually, the name (12706) is applied on the cold side of the EP, and the name is empty on the warm side. You can check the sides by connecting the element to the PSU, observing the polarity.
1. Lubricate the warm side of the Peltier Element with plenty of thermal paste, and install the heatsink on it, pressing it firmly.
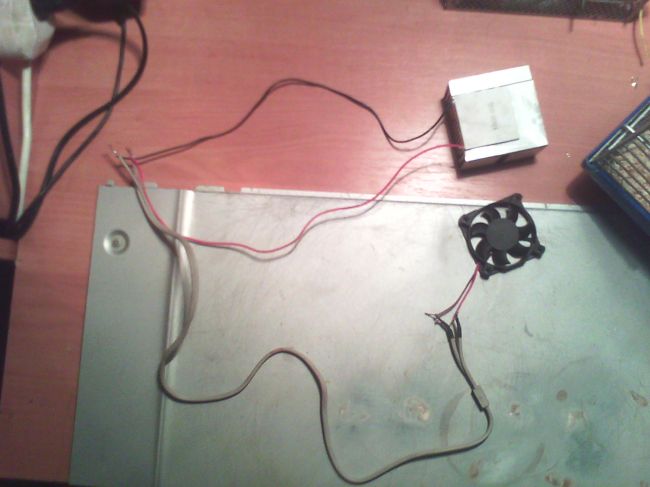
2. Strip the "+" and "-" contacts of the cooler, lengthen them if necessary - just twist them with two larger wires, and insulate (with heat shrink or electrical tape) the junctions. Heat shrink is a tube that shrinks strongly when heated. A very handy item.
3. Install the cooler on top of the radiator using wire, zip ties, or special fasteners (air will flow inside the radiator and dissipate to the sides).
4. Now, connect the contacts of the cooler and the Peltier element together, and do not reverse the polarity - the side not pressed against the radiator should be cooled while the cooler is spinning.
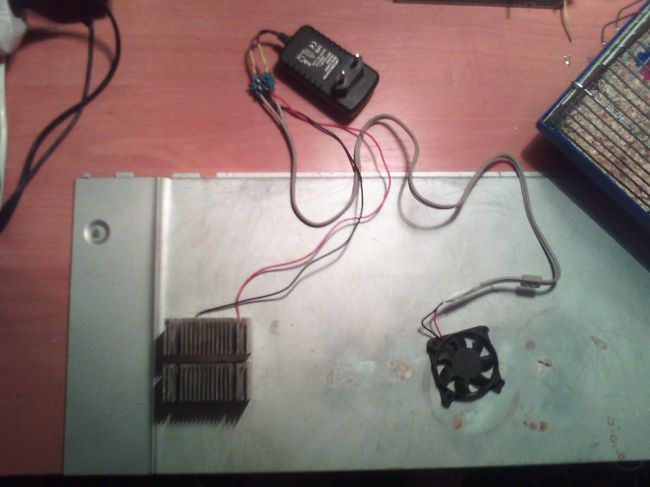
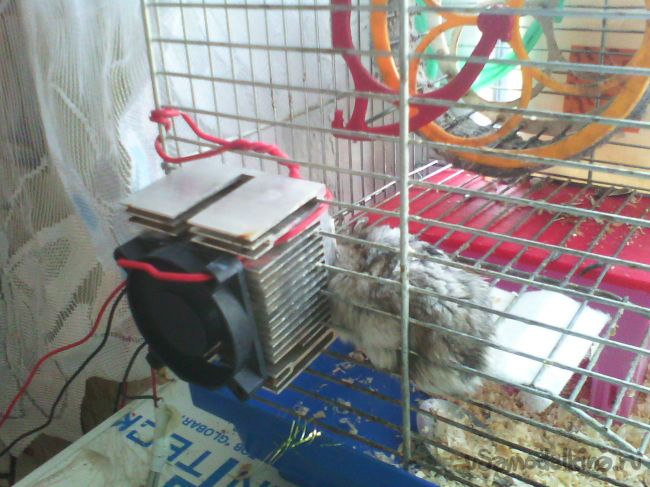
5. Connect the device to the PSU, insulate all the contacts and voila - a homemade air conditioner for a hamster is ready to go, it remains only to install it.
The installation process falls on your shoulders and depends entirely on the parameters of your pet's home. It is important that the radiator is placed outside - otherwise, the heat will be poorly dissipated and remain inside. Installing it on the cage is easier, you can simply thread the radiator through the pins, as in the photo below. If you have a terrarium, you will have to improvise - for example, put an additional cooler "for blowing" and change the power supply scheme - power the coolers from a separate PSU - then the efficiency will increase significantly. The scope for modifications is huge, and the power consumption of the device from this article is about 5-6W.
After connecting, the temperature of the cold side was noticeably low, and after a couple of minutes condensation formed - in the heat of 30+, your fluffy pet is guaranteed to like this new thing :)

As everyone knows, if the car does not have a complete set, then installing it there is very problematic, and often not possible at all for technical reasons. However, every year the heat makes people develop their ingenuity.
There is one way to "air-condition" your car, which, despite all the complexity, attracts more and more experimenters. This refers to a thermoelectric cooler based on Peltier elements. The most important advantage of such cooling with the help of the thermoelectric effect is the minimum number of moving parts and the absence of a complex and expensive compressor.
Such an automobile does not require freon, does not need a lot of tubes and radiators, which must be sealed. To work, it will be enough to apply 12 volts to a very thin plate and remove heat from one side by blowing with a fan, and get cold on the opposite side, even with the formation of frost or ice.
Creation of a thermoelectric air conditioner
For example, consider the operation of a conventional Chinese-made car refrigerator powered by a cigarette lighter. The refrigerator itself consists of two parts - a cover with a thermoelectric cooling system and a heat-insulating box.
In the cover there is a plate of a Peltier element with a power of 65 watts, to which a 12 volt wire is connected from a conventional car cigarette lighter. Fans blow over each of their radiators, causing air flows to mix, forming a cold breeze inside the box.
On the basis of this simple design, you can easily make "air conditioning". The most curious idea to create from a cigarette lighter is to make a panel of Peltier modules and insert it into the glass of the back door of a car.
The glass is lowered, and a model with thermoelectric modules is installed in its place, then it rises to fix the received one. The most important advantage of this simple system is that the separation of the cold and warm sides is very easy.
FROM inside cold streams are removed by additional fans, and from the outside - by air flow from the movement of the car. In traffic jams, of course, the heat dissipation will deteriorate, but at speed it will be clearly noticeable cold air. To do this, you need to connect the module to the 12 volt on-board network, or to the cigarette lighter.
Due to the large number of opinions for / against, I am developing a calculation and construction method for everyone. To check, I will test everything for myself. Only engineering approach, only hardcore!
For those who want to copy - I do not forbid. But please cite the source - this
page.
Thank you for your productive comments.!
Terms:
- hot intermediate low pressure circuit with expansion tank and "wet" pump;
- intermediate circuit coolant: antifreeze (non-removable installation is assumed);
- Peltier elements type TEC1-12706, 4 pcs.;
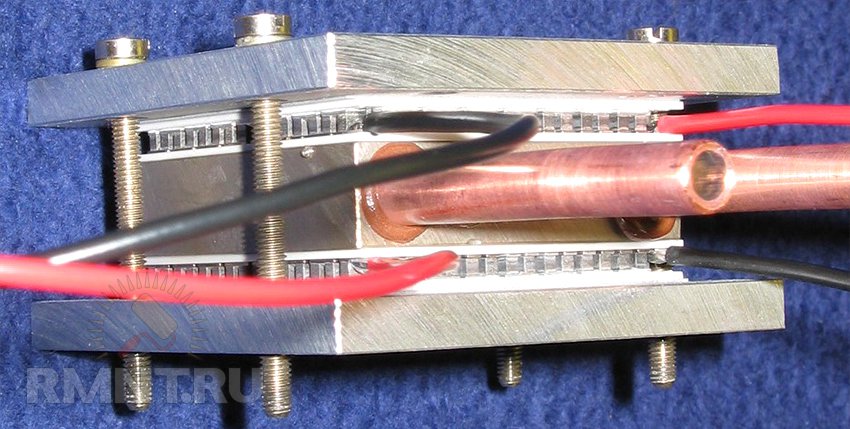
- primary heat exchanger: aluminum water block 80x40x12 mm, fittings d=8mm;
- "cold" radiators - type O221-60, 4 pcs. or O161-80, 2 pcs.;
- fans 120mm, 1000rpm.
1. Calculation of the temperature difference (cooling) of the air between the inlet and outlet of the condo:
Let's be realistic. No one makes you wait for miracles from Chinese elements. Let the power spent on cooling by each element be 30 watts. In this case, the total P=30*4=120 W.
- Heat capacity of air Cm~1.005 kJ/kg*K [kW*s/kg*K]
- The average performance of a 120mm fan from a PC is 70 m3 / h ~ 20 dm3 / s (somewhere they indicate more, but in some places it is less).
Let's find the mass performance of the fan:
- under standard conditions (0С, atmospheric pressure) 29 grams of air = 22.4 dm3;
- under standard conditions (20C, atmospheric pressure) 29 grams of air = 22.4*0.932~24 dm3=0.024 m3;
thus, the mass productivity of the fan is mt=24.2 g/s=0.0242 kg/s.
Thus, the temperature difference is dTv=P/(mt*Cm)~5 degrees.
Similarly, it can be calculated that in the maximum possible mode of operation of the elements, a maximum temperature difference of as much as 9.5 degrees is possible. Great, the interior of a car with a volume of 7.5 m3 in the average mode will cool by 10 degrees in ~ 15 minutes.
2. Calculation of the temperature difference (heating) of the heat carrier on the water block
- Maximum temperature TEC1 elements - no more than 80gr.С (from reference and common sense);
- antifreeze density at 80gr.С ro=1050 kg/m3;
- heat capacity of antifreeze at 80gr.С cm=3.500 kJ/kg*K;
- productivity of the brushless "wet" 12V pump Vfr=250 l/h~0.07 l/s.
Brushless pump. Upit=12 V, productivity 250 l/h
3. Calculation of the temperature difference on the cooling radiator
Slightly higher performance of 120mm fan from PC 70 m3/h~20 dm3/s
When the cross section of the air channel is S~15*15=225cm2=2.25dm2, the airflow velocity will be Vv=20/2.25=8.88m/s. (I'll post a drawing later)
For radiators of the O161-80 type (we will take such as an easily accessible option for the time being), the thermal resistance RQ = 0.36 C / W is indicated for the speed Vv = 6m / s. We accept this value for further calculation.
The maximum heat dissipation power for radiators of this type is dP=80W.
For our 2 pieces, the maximum 160 watts is quite a sufficient value.
The continuation of the theory follows.
Practice
Acquired:
- Pump, water block, 4 pieces of TES1-12706 elements;
- two CPU-radiators: GlacialTech Igloo 7200 for s754/939/AM2 and stock-Intel s478;
- Stars-922 hot melt adhesive (5gr/tube)
We unpick the fans, they will come in handy later.
Wash surfaces with soap.
We glue!
We press the load for 12 hours.
The conditioner is intended for maintenance of the set temperature (operating modes and cooling, and heating) in the closed volume. The air conditioner is made on the basis of thermoelectric cooling modules - Peltier elements. Applications of this thermoelectric air conditioner:
- air conditioner for transport
- air conditioner for kung
- yacht air conditioner
- elevator air conditioner
The principle of operation of a thermoelectric air conditioner is based on the use of thermoelectric effects that occur in semiconductors.
Thermoelectric air conditioners are used where high reliability, maintenance-free, long service life, compactness and the absence of refrigerants for safety reasons are especially important.
The table shows the technical data for the thermoelectric air conditioner model, which can be purchased on our STELCO-A website. This air conditioner is designed for use in electronics cabinets to maintain a predetermined temperature range, and operates in both cooling and heating modes. The air conditioner is based on highly efficient thermoelectric cooling modules - Peltier elements
It is possible to manufacture air conditioners with other power indicators. You can find more detailed information about this thermoelectric air conditioner, as well as buy it, on other pages of our website. For information about prices, terms of delivery, configuration, please contact our e-mail with inquiries.
Some examples of application of thermoelectric cooling systems:
Air conditioners for subway drivers and electric locomotive cabs;
Thermostat for the international space station;
Conditioners for tanks;
Air conditioners for submarines;
Seat conditioners for luxury cars;
Mausoleums (Moscow, Pyongyang);
Refrigerators CCD matrices of satellites;
Air conditioners for telecommunication cabinets;
Thermal stabilization of lasers.
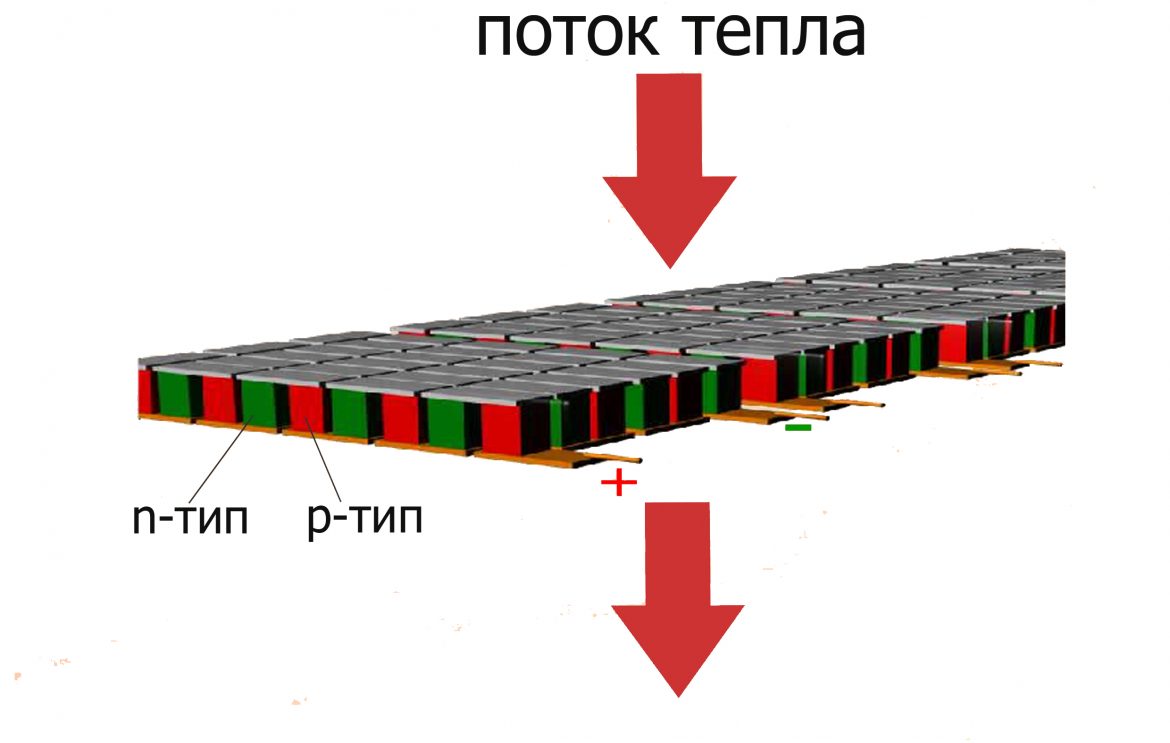
THERMOELECTRIC MODULE OPERATION SCHEME
In order to ensure a comfortable climate inside the transport, a thermoelectric installation can be used. The principle of its operation is based on the Peltier effect. When passing electric current a heat flux is created through series-connected p- and n-type semiconductors.
ADVANTAGES OF THE THERMOELECTRIC CLIMATE SYSTEM
This principle of obtaining heat or cold has a number of advantages over traditional refrigeration machines (air conditioners):
There is no refrigerant (any refrigerant is to some extent an asphyxiant or poisonous substance);
There is no compressor, the working core of the system does not contain moving parts, which means that the reliability of the device increases;
For systems "radiator-radiator" there is no liquid, which means that leaks leading to a malfunction of the device are impossible. This is especially important for transport, where mechanical impacts and extremely high temperatures can disable traditional refrigeration machines;
Easier maintenance and higher maintainability;
In heating mode, the energy consumption efficiency is higher than that of resistance heaters (in addition to resistive heat, the device takes heat to heat the room and from the environment);
The "radiator-radiator" system retains its performance even with severe damage to most of its parts.

TECHNICAL SPECIFICATIONS
Thermoelectric climatic systems (air conditioners based on thermoelectric modules) are block devices that easily allow you to dial the cooling capacity and heating power required by the consumer. You can buy a thermoelectric air conditioner from us by ordering the parameters necessary for your task. The table shows some general data.
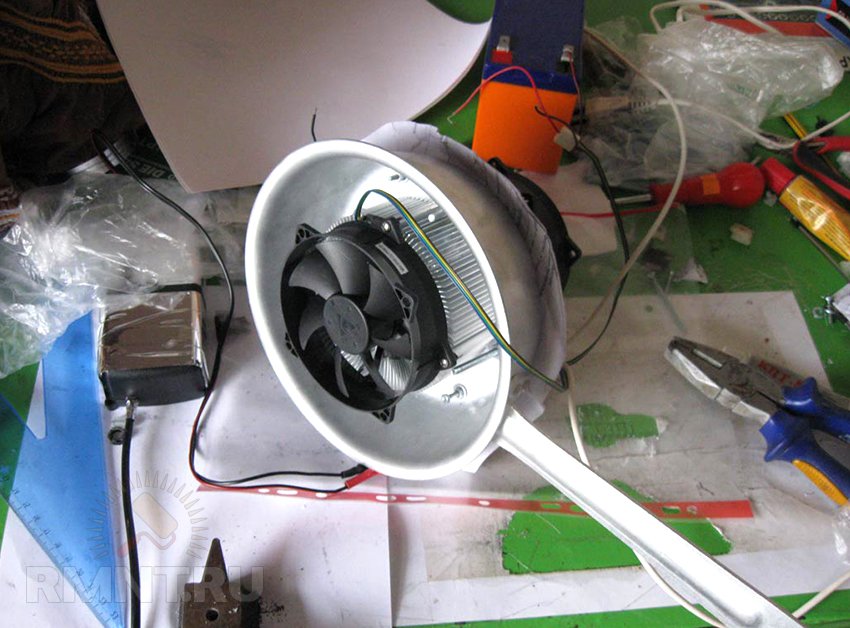
Standard thermoelectric modules have a reciprocal principle of operation. In this article, we will talk about the use of Peltier-Seebeck modules in heat exchangers and give an example of assembling a water cooler and a basic air cooling system with the possibility of a reverse start (heating).
The principle of operation of thermoelectric modules (TEMs) used for cooling is based on the Seebeck effect, the inverse process with respect to the Peltier effect. The main element is the same TEM described in the first part. When a direct current is applied to the field of thermocouples, a temperature difference is observed on the planes of the ceramic plate. This is a fact based on a thermodynamic process, which we will not describe (so as not to bore with scientific calculations), but we will show how to apply it in everyday life.
Note. To build the units, the instructions for which are given below, you will need basic practical skills in assembling electrical circuits. The node models given are exemplary and can be replaced with similar ones (or more / less powerful ones) at the discretion of the master.
How to make your own water cooler
The quick-witted reader has already understood that the “miracle ladle” from the first part can be used to cool the liquid if you run it “in the opposite direction” by connecting direct current.
TEMs are used in every water cooler. It is quite possible to build an analogue of this factory device with your own hands, while it will work no worse. We will describe the principle of operation and the assembly scheme. The layout and options can be selected based on your own needs. For example, make it portable or stationary, integrated into kitchen furniture or training system drinking water. Last option is optimal, since the cooling in the system will be controlled (on the fact of power supply).
For this we need:
- Rectangular flat airtight container made of stainless steel with dimensions 100x100x30 (flask-heat exchanger) with ½ inch threaded outlets on the short sides. This is the only element, the manufacture of which is better to order the master at the factory.
- Drinking water connection with a ½ inch fitting (from a tank or water pipe).
- Power supply for 10-12 volts with adjustable current.
- Thermoelectric modules TEC1-12705 (40x40) — 2 pcs.
- Wires with a cross section of 0.2 mm.
- Hot glue or thermal paste.
- Key for 2 channels (toggle switch, button).
- Faucet, soldering iron, solder.
Using hot glue, we fix the TEM on the flask. We connect the wires according to the corresponding groups (plus and minus). We determine a convenient location for the key, taking into account the possibility of replacement during repair and accessibility during use. We include it in the scheme. We connect the wires to the power supply. We are testing the circuit.
Attention! When testing, limit yourself to observing the very fact of correct operation, but do not try to give the maximum dry load - this can lead to failure of the TEM (it cannot be repaired).
Then we connect the inlet fitting of the heat exchanger flask with the water supply channel, and the outlet fitting with the connection (flexible or rigid) to the tap.
We fill the system with water and set the optimal current strength at the desired jet pressure. The optimal pressure is slightly stronger than gravity. For the intake of cool drinking water, this will be quite enough. The remaining nuances - fasteners, length of wires, location - are purely individual in each individual case.
This basic system can be developed and improved. For example, install a thermostat in a heat exchanger and include it in the circuit instead of a key (tumbler) - suitable where water is constantly needed certain temperature. Flask-heat exchanger can be made of silver for additional ionization of water. By including an EK-1674 DC boost converter in the system, you can reduce power consumption to a minimum.
Calculation of costs for building a cooler:
A ribbed radiator is not involved in this system, since the goal - cooling (but not freezing) a small volume of water (300 ml) - is achieved without it.
How to make a mini-refrigerator, chiller or air conditioner on thermoelectric modules on your own
A more difficult task is cooling the air. If in the case of water the efficiency of the cooler is guaranteed by the difference in the density of the media (water - air), then in the case of a homogeneous medium (air - air), the situation is more complicated. The main difficulty is the removal of temperature from the hot side of the TEM surface. More precisely - synchronous temperature removal from both surfaces. If you simply start the Peltier-Seebeck element, the heated and cooled air will mix, and the temperature will even out.
In confined spaces of small volume (up to 0.7 m 3 ), a cooling system based on a TEM with a two-sided air outlet is quite applicable. This allows you to build a new cooling box or give a second life to an old refrigerator (freezer). To do this, you will have to slightly complicate the system by including a pair of exhaust fans of mutual power, a temperature switch, a finned radiator and using more efficient thermoelectric modules.
We will need (for one base cooling point):
- TEM TES1-12712 (40X40), 106 watts - 1 pc.
- Fan RQA 12025HSL 110VAC (or more powerful) — 2 pcs.
- Radiator HS 036-100 (100x85x25 mm).
- Thermostat TAM-133-1m (temperature switch with sensor).
- DC power supply 12 volts, 6 amps (adjustable).
- Duralumin sheet.
- Wires, thermal paste, fasteners
In the finished box, in the upper part of the cooled zone, we make a rectangular window with dimensions of 100x100 mm. We cut out two plates of duralumin with dimensions of 130x130 mm and 180x180 mm. We fix the fan in the center of the smaller plate in such a way that 1 cm of air remains. We install the temperature switch inside the box. We mount the smaller of the plates from the inside of the box (with a fan inside the box) on screws or rivets through a sealant. We stick the TEMs on the mounted plate and output the wires. We cut and bend a large plate so that it fits into the mounting hole, but at the same time there are sides for fixing to the wall of the box from the outside. We fix the radiator and the second fan on it. We generously lubricate the TEMs with thermal paste and mount the plate to the box wall through the sealant.
Attention! There must be a maximum contact between the area of the TEM and the plate!
We assemble the electrical circuit. We recommend turning the fans on permanently. maximum power, and the current strength for TEM - through the regulator. This will ensure effective temperature pickup and air mixing when operating in different modes (not at full power).
The advantages of this design:
- silent operation compared to compressor refrigerators;
- lack of mechanisms and moving parts, friction forces (nothing to break);
- liquid heat carriers (freon) are not used;
- total power consumption about 200 watts;
- you can upgrade the design, vary the performance;
- availability and maintainability of individual units.
Disadvantages:
- condensation may appear on the duralumin plates;
- outdoor unit management;
- many factors and nuances of work are revealed empirically when using;
- small area of application.
Calculation of costs for the construction of the basic cooling system of the refrigerator and air conditioner:
| Name | Unit rev. | Qty | Price unit / rub. | Art, rub. |
| TEM TES1-12712 (40X40), 106 watts | PCS. | 1 | 600 | 600 |
| Fan RQA 12025HSL 110VAC | PCS. | 2 | 150 | 300 |
| Duralumin 3 mm | PCS. | 1 | 300 | 300 |
| DC power supply | PCS. | 1 | 300 | 300 |
| Thermostat TAM-133-1m | PCS. | 1 | 250 | 250 |
| Radiator HS 036-100 | PCS. | 1 | 220 | 220 |
| Wires, thermal paste, fasteners, solder | - | - | 300 | 300 |
| Total | 2270 |
In principle, this design is a ready-made built-in air conditioner that can be installed in the cab of a car, tractor, in a closed enclosure or a security booth. It is only necessary to consider constructive protection from atmospheric precipitation.
The power reserve of the TES1-12712 module is quite large. The temperature amplitude on the sides of the element can reach 50 degrees. With a room temperature of +27 °C and the use of a liquid cooling system (radiator + fan), you can extract an impressive minus 25 °C at the outlet! This allows you to create compressorless and quiet freezers even at home.
Where else are thermoelectric modules used?
The Peltier-Seebeck effect has been known since the 1840s. It is actively used to this day, thanks to the stability of the laws of physics. The thermoelectric module will always find a place where there is excess energy or where heat exchange needs to be carried out quickly and silently.
The main applications of thermoelectric modules:
- Chip cooling. Fans, as the main heat exchanger, are a thing of the past. They are being replaced by compact, silent and almost eternal TEMs.
- Engineering. Even the most modern internal combustion engine emits exhaust gases from the combustion chamber. Engineers use their heat to generate additional energy using Peltier elements. The collected energy is fed back to the engine systems, but in the form of direct current, which saves fuel.
- Appliances. Everything that is described above plus most household appliances that work on cooling or heating (except for compressor refrigerators).
AND little secret finally. Our module has an almost miraculous property - reversibility. This means that when you reverse the DC polarity on the module wires (using a switch), the hot and cold surfaces are reversed. The cooler turns into a heater, the refrigerator into a thermal chamber (incubator), and the air conditioner into a low-power fan heater. To do this, you do not have to change the scheme of the device. It is enough to simply reverse the polarity.
This principle is used in a device called a recuperator. It is a box consisting of two isolated chambers, which communicate with each other with the help of fans. With the help of Peltier modules, cold air from the street is heated by energy extracted from the heated air that is removed from the room. The device allows you to save on heating your home.
Vitaly Dolbinov, rmnt.ru


Living and dead water: myth or reality, what is the power of living and dead water?
Craniosynostosis, or premature fusion of the bones of the skull Frontal crest in a child
Beautiful hair How to achieve hair density at home: useful tips
Why mosquitoes bite some people, but not others
How to achieve beautiful hair