Without fasteners, a master is like without hands: dealing with a fixed connection of parts various designs has to constantly. Bolts, screws, nuts, screws, washers - the most common fasteners. In work, it is very often important to know the size of the bolt in advance.
You will need
Calipers;
- ruler.
Sponsored by the placement of P&G Articles on the topic "How to determine the size of the bolt" How to determine the size of the gas mask How to determine the size of the arm How to determine the size of the bearing
If you've ever been puzzled when trying to figure out what size nut you need for a bolt, you're not alone. The many different sizes can be overwhelming and confusing. Regardless of these changes, nut size measurement should not be a mystery. The nut has five ways to measure it. Matching a nut to a bolt or a wrench to a nut two way measure solves most mating problems.
Lay the nut on a flat surface so that the hole is frozen. Place the end of the measuring tape on one of the flat sides of the outer perimeter of the nut. Pull the tape measure across the diameter of the nut until the flat side is directly opposite the one you are pulling out. If the nut is metric, count the number of lines on the tape measure to find the measurement. If you count 9 lines, the size is a 9mm nut. Add sixteenths together to find the size. These two measurement methods will help you know which wrench or socket to use on a nut.
Instruction
Bolts and nuts, similar to modern ones, appeared around the middle of the 15th century. They were made exclusively by hand, and therefore each nut-bolt combination was unique. The classic version of the connection of these two parts has been improved over the years.
Among the latest industrial achievements is the development of special electronic devices, capable of automatically controlling the tightening forces of this type of fastener.
Set aside the nut in the same way as in the section. Install the end of the tape on one side internal thread nuts. Pull a tape measure through the other side of the inner thread of the nut. Count the lines to find the diameter threaded hole. Measure across the widest opening of the thread. This measurement will help you match the thread diameter of the nut with the thread diameter of the bolt.
Measuring the continuity or fineness of a thread
Count the number of threads by internal thickness nuts. Use a magnifying glass and a pin to trace the threads. Write the total on a piece of paper. Draw threads per inch of nut thickness. The 16 threads per inch nut has coarse threads, while the twenty threads per inch nut has fine threads. To measure the thickness of a nut, hold the nut between your fingers and measure the perimeter parallel to the bore of the nut.
A modern bolt is a popular fastener. Together with a nut, it is intended for detachable connection of parts and is a cylindrical rod with external thread on one end and a head on the other. The head can be of different shapes: square, oval, cylindrical, conical, six or four faces. Most of the state standards for fasteners, including bolts, provide for the possibility of producing similar products (according to general view, by appointment). The difference will be only in the type of bolts and their execution. The size of the bolt depends on the purpose and is primarily related to the outer diameter of the thread, since the bolt is a threaded fastener. To determine the diameter of a bolt, measure it outside diameter threaded with a caliper. If the thread is not applied along the entire length of the rod, then the diameter of the bolt in its “bald” part is approximately the same as the diameter of the thread when measured at the tops of the turns. What is the length of the bolt? As a rule, when designating a product, the length of its rod is indicated. Thus, the height of the head is not taken into account. Measure the length of the rod - get the length of the bolt. If you order a M14x140 bolt in metric measurement, this means you need a bolt with a thread diameter of 14 mm, a shank length of 140 mm. In this case, the total overall length of the product, taking into account the height of the bolt head, for example, 8 mm will be 148 mm. Another parameter is the thread pitch of the bolt. Measure the distance between two nearby (neighboring) thread vertices and you will get the desired size. For example, an M14x1.5 bolt is a bolt with a diameter of 14 mm and a thread pitch of 1.5 mm. Another dimensional characteristic of some types of bolts is the length of the threaded end. To find out, measure the part of the rod that is intended for screwing the nut. There are many regulations that technical requirements to the fixture. For example, for flange connections (and it is with them that bolts are used), they are set out in GOST 20700-75. Both the design and dimensions of fasteners are regulated by GOSTs 9064-75,9065-75, 9066-75. How simple
If you can't get the nut back or get it on the bolt, try turning it in the opposite direction and it might come off. Check Turning the right side clockwise to tighten and counterclockwise to loosen. the thread is turned counterclockwise to tighten and clockwise to loosen. Check Another way to find the nut size is by trying a bunch of different wrenches on the nut until one fits. You will quickly realize that you no longer know the part numbers and measurements.
All the numbers you might need to know will now be in millimeters instead of inches or fractions of an inch, so if you find yourself using metric bolts you will probably have to measure them from scratch. Here's how you can get metric measurements if you find them on your next project.
Other related news:
Cutting ... If holes are drilled in order to connect the workpieces with bolts, you need to take a drill with a diameter slightly larger than the diameter of the bolt by 0.5-1 mm. Such a gap compensates for possible inaccuracies in the position of the holes in the workpieces. By the way, to reduce these inaccuracies, it is recommended to connect
Linear measurements
First you'll want to measure the metric bolt from one side of the shank to the other. The easiest way to do this is to have a caliper that is measured in metric units. Fasten the caliper around the bolt and adjust it until it fits and it should give you the exact measurement you need in millimeters.
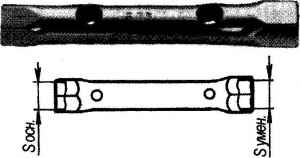
Ordinary key heads
Bolt pitch - how many threads per millimeter on a bolt. To calculate this manually, you can count the threads of the bolt across the entire shank and then divide the total length of the shaft by that number. There are devices that can help you with this a little faster, including the bolt gauge. On the bolt wheel you will find a series of combs with different widths. Some of these are metric bolts and will be marked as such. You can test against these ridges one by one to find one that fits snugly against your bolt threads.
The carving is different: artistic, where the pattern is cut out on the material, or machine-building, which is a spiral screw thread made on a round rod, or in a hole. About one such thread out of many of their varieties used in mechanical engineering and everyday life,
A rare lover of technology at least once did not encounter an unfortunate situation when, instead of a whole bolt, a head with a short stump turned out to be in his hands. The rest of the bolt would get stuck in the hole, and getting it out would be extra hassle and wasted time. How to turn out
Step 3 - Measure the length of the bolt
The number written next to this set of ridges will be the required step. The number you measure for your tone also determines whether the bolt is fine or coarse. As a general rule, bolts with a pitch of 5mm or less are considered fine. Since the length of the bolt is the last number in the metric measurement, you must measure it last. Start to the right of the head, including only the shank, and measure to the end. This rule for bolt length holds true for most types, including cheese, hex, pan, socket, button, and low type heads.
Sometimes it happens that when tightening new bolts, excessive force is applied and the bolt breaks, and also when unscrewing old rusted bolts, you have to deal with bolts with stripped threads or a broken head. In this case, there are several tricks to remove such a bolt.
When problems arise with a car, someone is looking for a good car service, and someone tries to deal with the problem on their own. If this problem is really serious, then it is better not to experiment and immediately turn to professionals. But there are also such malfunctions that you may well
Step 4 - Merge to Measure End Part
Measure the entire length only if you are working with an oval or flat head. These three numbers combined will give you the final measurement you'll need, in the order you found them in these steps. Bolts typically use four types of measurements while nuts only use two. Bolts are measured by shank length, bolt head size, shank width and thread pitch. Nuts are measured by the width of the hex shape and by the height of their threads. Bolts and nuts come in different sizes and cannot be interchanged.
Drawing is one of the most important disciplines in technical and engineering specialties, since it is the correctness and accuracy of the drawings of various parts that determines how correctly they will be made in reality. Among the simplest drawings, drawing nuts and bolts can be distinguished -
Even a person who is far from technology often has to unscrew and tighten screws, bolts, nuts (hardware - this is often abbreviated as these hardware) with a tool designed for this - wrenches. Each key is marked with the size of its working part, simply - the pharynx. But the value corresponding to it - turnkey size - denoted in technical reference books by the letter S (the distance between opposite parallel faces on a nut, bolt or screw head), is not indicated on any fastener. As a rule, these data are not available in the operating and repair instructions attached to any technique, even in the symbols and drawings, although there is plenty of other information about fasteners in them: both the thread size and its pitch are indicated, sometimes the length and even view heat treatment, often the tightening torque. But basically these data are constructive, and they are needed for the manufacture of parts. During adjustment, repair or assembly work, the above thread parameters, except for the latter, turn out to be unclaimed. For a mechanic, it is much more important to know with what size of the throat a wrench is needed for the head of one or another screw or bolt and nut (or, as the professionals say, “wrench for how much”).
Most nut and bolt measurements are either metric gauge or standard gauge. The strength of nuts and bolts is also considered a measurement and is determined by their alloy grade. Place the head of the bolt or nut into the nut and bolt. Nut and bolt gauges are available in most hardware and automotive parts and are available in both metric and standard sizes. One hole in the sensor will fit snugly into the bolt head or nut and will not allow the bolt head or nut to rotate inside the sensor.
The bolt or nut head size will be stamped on the sensor to match the selected hole. Measure the length of the bolt shank from the bottom of the head to the bottom of the bolt using a measuring tape to determine its overall length. Because the difference between metric and standard bolts length is very small, most often this measurement is in inches.
When the nut or bolt head is in plain sight and in an easily accessible place, it will not be difficult to determine “how much” a key is needed - an experienced techie will recognize this at a glance, and an inexperienced one can “calculate” with a caliper or by selecting keys: from two -Three times this is usually done successfully.
If the fastener is in hard to reach place, and even “behind the eyes” (which happens very often), then it is necessary to determine the size of the turnkey hardware head by touch, when even a professional can easily make a mistake. Trouble will not happen if the master tries to work with a smaller key - he simply will not fit on the head. If the key turns out to be large, then “cutting off” the edges of the head with it, as they say, is a couple of trifles. In addition to the fact that the part will be irreparably damaged, then unscrewing the fasteners even with a special tool will be a considerable problem.
Place the bolt shank into the bolt gauge. This measurement represents the diameter of the shank and can be either metric or standard size. Use each to tell the difference. Three eighths of an inch will be a little less than a 10mm measurement, but ½ inch will be a little more than a 12mm measurement. Because millimeter and inches fluctuate, you'll have to try both metric and standard gauges to see which fits tighter on the bolt, which will determine its actual diameter width.
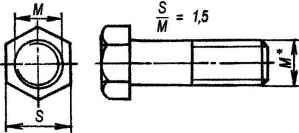
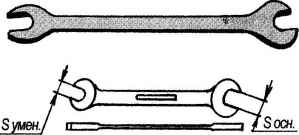
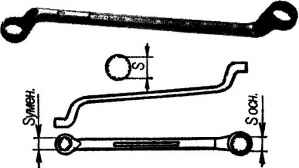
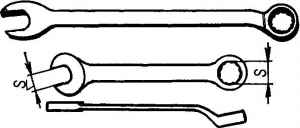
To determine the “turnkey” size “behind the eyes”, it makes sense to refer to the information on the thread of the fastener specified in the instructions. After all, according to GOST, each thread corresponds to two close sizes of the turnkey fastener head: the main and the reduced one, and the difference in their values is small. On average, the turnkey size is approximately 1.5 times the outer diameter of the thread (see Table 1) and you can already focus on it. And although the reduced turnkey size is assigned by designers less often than the main one, it is necessary to try to unscrew the fasteners “behind the eyes” for the above reasons with a smaller key: if it doesn’t fit, then you can safely work with a key corresponding to the main size - it will not break (of course, provided that the fasteners are not rusted). The keys are usually also made according to the same principle: at one end of the pharynx (open - for open-end, closed - for socket and ring keys) corresponds to the main size of the head of the fastener, at the other - reduced. Only combined keys fall out of this row, in which at both ends the pharynx is of the same size, only one is open, and the other is closed (circular), and wrenches are adjustable.
The hole in the gauge will be marked with the width. Unroll and attach a thread gauge to the bolt threads. Again, since millimeter and inch measurements are slightly different, there will only be one calibration key on the thread gauge that fits the threads perfectly. Each key will have a mark on it showing the pitch measurement.
Measurements in the design and manufacture of threaded connections
Slide the nut onto the bolt shank once you have determined the bolt thread pitch. A nut that threads onto a bolt and does not allow vibration movement on the bolt shank is the correct nut for the bolt and the pitch is identical. For bolts, four types of measurements are commonly used, while for nuts, only two. Bolts are measured according to pin length, bolt head size, pin width and thread pitch. Nuts are measured by the width of the hexagonal shape and by their helix. Bolts and nuts come in different sizes and cannot be replaced.
Matching the dimensions of a turnkey fastener to its nominal metric thread diameter
Most nut and bolt sizes come in metric or standard sizes. The strength of nuts and bolts is also considered a measure and is determined by its grade of alloy. Nuts and screw gauges are available from most stores household appliances and auto parts and have both metric and standard sizes. The hole of the meter fits into the screw head or tightened nut and prevents the screw head or nut from moving inside the meter. The size of the screw head or nut will be marked on the appropriate gauge in the selected hole. 2 Measure the length of the stem stem from the bottom of the head to the bottom using a tape measure to determine its overall length. This measurement is the bar diameter and can be in metric or standard form. Since millimeters and inches fluctuate, you will need to use metric and standard gauges to see which is more convenient for the bolt to determine the actual diameter width. The hole in the gauge will be sealed with the width. 4 Unfold and install a thread gauge on the bolt threads. Again, since the measurements in millimeters and inches are slightly different, there will be more than just a measuring key in the thread, which is ideal for the thread. Each key has a stamping dimension on it, exposing the threads to a dimension. 5 Screw the nut onto the pin screw once you have determined the thread pitch. A nut screwed onto a bolt and not allowing the auger to move in the form of an auger is the correct nut for the bolt and the threads are the same. Bolts and nuts never change standard and metric measurements on the same nut or screw. For each individual nut and bolt, only the metric or standard measuring system will be used. Bolts, nuts and other threaded parts must be tightened to their so-called tightening torque.
When working with fasteners for their safety, the tool has essential, therefore, only serviceable keys should be used: their pharynx should not be expanded, and the sponges should not be wrinkled. Keys with such defects must be removed from the working set. In addition, seemingly similar tools differ significantly in the quality of the metal, the profile of the jaws. The last condition directly affects the distribution of forces on the edges and edges of hardware.
It is a pair of forces and is therefore expressed in units of force per spinning distance. This is called, in general, tools with which you can measure this tightening torque. They can be different types, although the most common are those of the ratchet type, that you can adjust the tightness you want and the key "jumps" when it reaches the tightness. Usually this "jump" is a "pop" that sounds and marks in the hand, and this is the moment when the screw is already tight. Usually they are regulated in the handle itself.
Others, also very reliable, carry a scale on their head and as you tighten, note the tightening. When you reach the desired torque, you will stop pressing, without further complication. The normal thing is that they are at least 50 cm long in order to be able to do more leverage and with more precision.
Fasteners are designed for a specific tightening torque when assembling the product. However, often the efforts during disassembly, especially those that are “boiled” or rusted threaded connections exceed it many times. In these cases, it is better to use the appropriate socket or ring (professionals call them ring) wrenches, and not open-end wrenches. Moreover, you cannot use an adjustable wrench, as well as when unscrewing small (less than S10) nuts, bolts and screws.
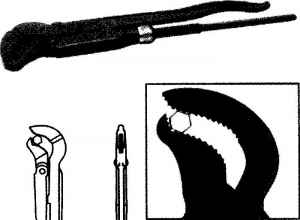
Combined pipe wrench.
If the edges of the fastener are severely damaged by corrosion or for some reason turned out to be “rolled up”, in order to still unscrew it, it is necessary to grind off the turnkey edges by a “number” less. Then, having impregnated the threaded connection with a special liquid (or, in extreme cases, kerosene) to soften the rust and after waiting for time, try to unscrew the part again. Another way (but not the last) to unscrew a bolt or screw with a damaged head is to make a slot between opposite faces for a strong screwdriver and try to unscrew the fastener with this tool. And finally - use a pipe wrench for this. By the way, in the nomenclature of the latter there are now those that do not damage the edges and edges of fasteners even at high unscrewing torques. For small nuts, special pliers can be used.
When you have to deal with the adjustment and repair of the same equipment (for example, a personal car) on a regular basis, it will be useful to compile a table of turnkey sizes for fasteners of the main adjustable units, devoting special time to this or as you turn to adjusting one or another mechanism or unit.
Regular key heads:
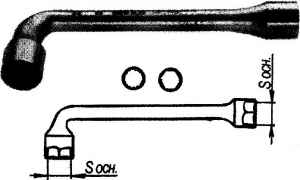
Key heads with dynamic profiles:
a - end; b - cap.
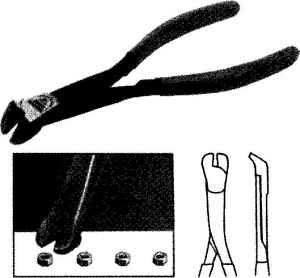
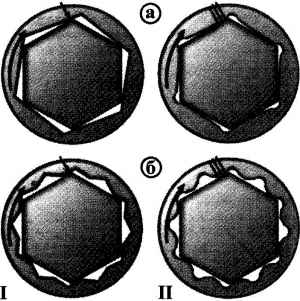
Forces on faces and edges of threaded fasteners from socket (a) and ring (b) wrenches with different internal profiles:
I - concentrated; II - distributed.
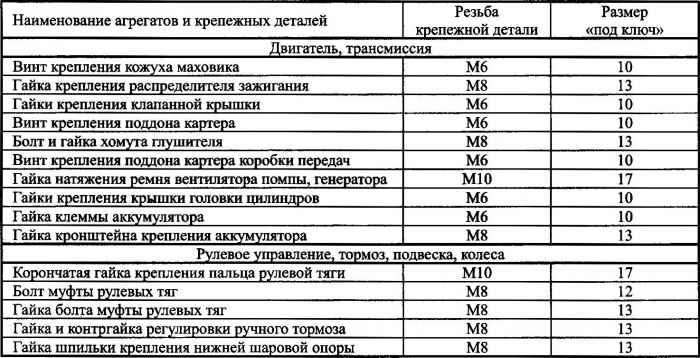
Table 2 shows the turnkey dimensions of the main and adjusting threaded connections for the VAZ-2105 car.
Some fasteners and their turnkey dimensions in VAZ vehicles
Since we are talking about cars, it is worth noting that the so-called “balloon” “for 19” and “candle” “for 21” keys are on a special account in the tool kit of the Zhiguli (and other cars).
The first one is made quite peculiarly and stands out from the whole set of keys. It is recognized even by those who are little familiar with technology: it is cap-shaped, with a curved lever handle, the end of which is made in the form of a screwdriver sting. Once upon a time, with the help of this key, chrome wheel covers were removed, which are no longer installed on modern cars. It would be advisable to sharpen it a little and thus have a strong screwdriver in the kit. In addition to loosening and tightening wheel bolts, this wrench can also be used when working with other relevant fasteners. If necessary, the wheel bolts can also be unscrewed with a conventional (box and even open-end) wrench "19".
The second - a "candle" wrench in appearance is similar to similar tubular socket wrenches with the same diametrical hole for the knob. It even retains a ratio of 1.5 of the diameter of the turn-off thread (14 mm) to the distance between the opposite faces of the key (21 mm). If we turn again to Table 2, it will become clear that the key is non-standard, and there is no special and other key with the same size in the kit. The thread on the candle, although standard (14x1.25), is one of the non-recommended ones.
And about one more key - the usual carob "for 10". This wrench, like a fire extinguisher, is always better to keep "at hand" - as they unscrew the nuts of the battery terminals. After all, if necessary, for example, in case of a short circuit in an electrical circuit or (which has also become relevant now) to turn off an alarm that has worked for no reason (if it does not “obey” the key fob), this must be done very quickly.
It should be noted that in the automotive tool kit there are keys for far from all sizes of fasteners. Therefore, when you need to crawl under a car (in a pit or overpass), it will not be superfluous to check whether everything necessary tools taken with them, otherwise you will have to crawl out from under it with nothing. The same must be done if you are going to disassemble some assembly or assembly for repair or maintenance. In addition, very often some kind of universal and even special devices. Without all this, disassembly may be impossible or even in vain.
One remarkable moment: fasteners with a turnkey size of “13” appeared in our country along with the Zhiguli car, the prototype of which, as you know, was the Italian FIAT-124. With their appearance, hardware with turnkey sizes “by 12” and “by 14” has lost its position.


Mixed Personality Disorder: Causes, Symptoms, Types and Treatments
GTA 4 control settings
FAQ on Smuggling in GTA Online
LSPDFR - welcome to the police
The huge map of Grand Theft Auto San Andreas and its secrets