Hello. Today I'll tell you about how HDPE pipes are welded when building domestic and industrial pipelines. The topic is of considerable interest, as low-density polyethylene pipes are becoming more and more in demand due to affordable cost, high strength and long service life.
Step 2: Pre-Fusion Warnings
This will not normally be used on a small scale such as a home or school or other general building. Because of its significance, it is very important to properly weld the pipe in order to get the most out of the length of the pipe. Before you start merging pipes, be aware that potentially dangerous equipment will be used in this guide. Also remember that just because a piece of equipment is not in use does not mean that all the hazards associated with that equipment have disappeared.
Welding methods
Is it possible to do high-quality welding of HDPE pipes with your own hands? It is possible, but under one condition: special equipment must be used during installation.
Welding works are carried out in two ways:
- Butt-joint - the elements to be joined are heated to the melting temperature at the ends and joined under pressure;
- An electrowelded coupling is used, which is put on the combined ends and melted.
With regard to regions with seismic activity, it is advisable to use electrofusion couplings, which provide high strength connections. Butt welding is less durable, but in this case the price of the finished result is significantly lower.
Some equipment requires relatively long power cords. Keeping a clean work environment includes keeping things out of the way and tethering as much as possible. Loose electrical cords can cause trips and falls, which is no longer safe, especially when working with 350-degree stoves and pipe razors.
Step 3: Weld Preparing Instructions
Before welding, make sure all materials and equipment are laid out and easily visible. General equipment for general weld includes. This is because there is no need to wait when the stove is needed later. Common materials for general weld include.
Let's consider each of these methods in more detail.
Method one: butt welding polyethylene pipes
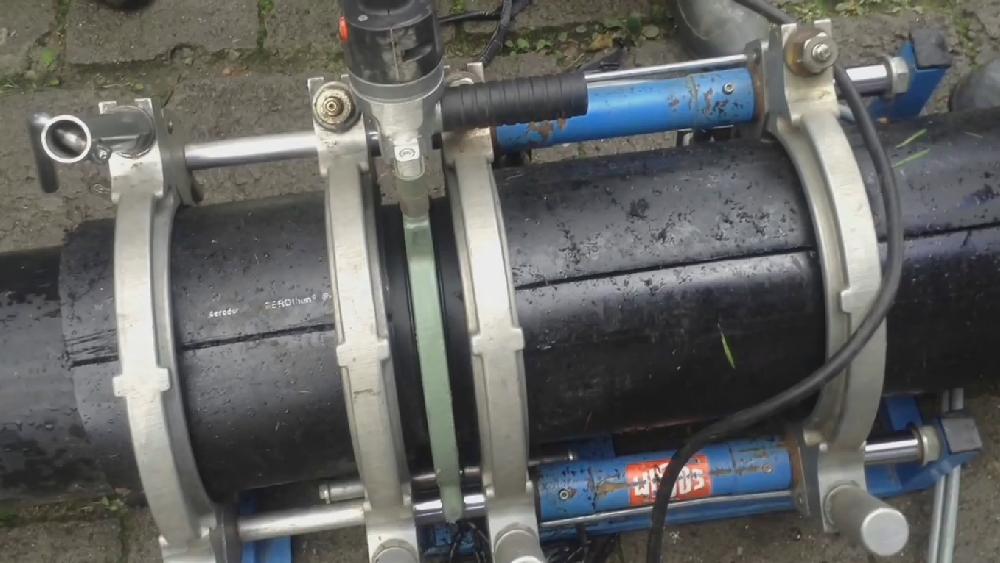
Modern equipment for butt-welding HDPE pipes consists of the following elements:
- the frame (centrator) is used to fix the joined pipes in the required position;
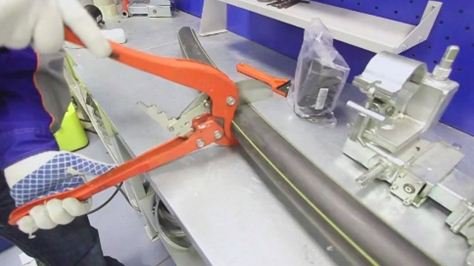
- trimmer (trimmer) is necessary for machining butted ends;
- the heating element is used to heat the ends to the melting point;
- the hydraulic unit drives the pipes to be matched and ensures optimum joint tightness.
![]()
Step 4: General Welding Principles
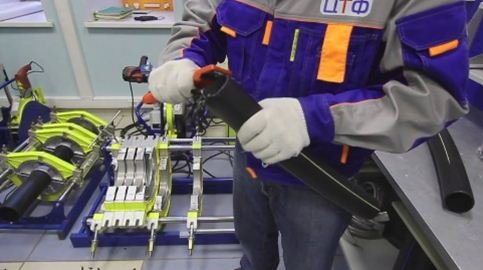
Once all these things are together, the welding process can begin. One turn after clamping the pipe is tight enough. Look at the joint from both sides and from above to make sure one or both pipes need to be adjusted before welding. When the second arm is attached, it will automatically lock into place. With the pipe razor locked in place, place it in the middle of the two pipes without touching either of them. At this point, turn on the razor and slide the pipes into the razor. Small threads of pipe will start to emerge from the razor, but keep shaving until very long strands appear around the circumference of the pipe.
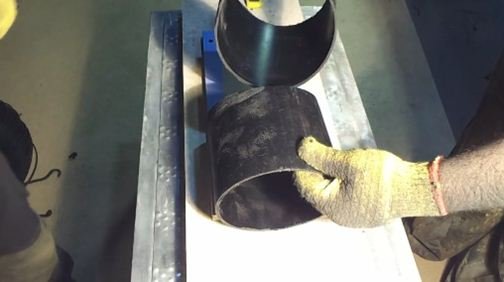
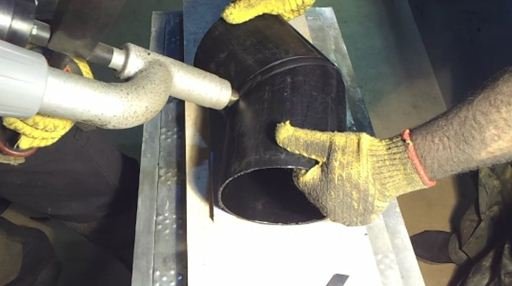
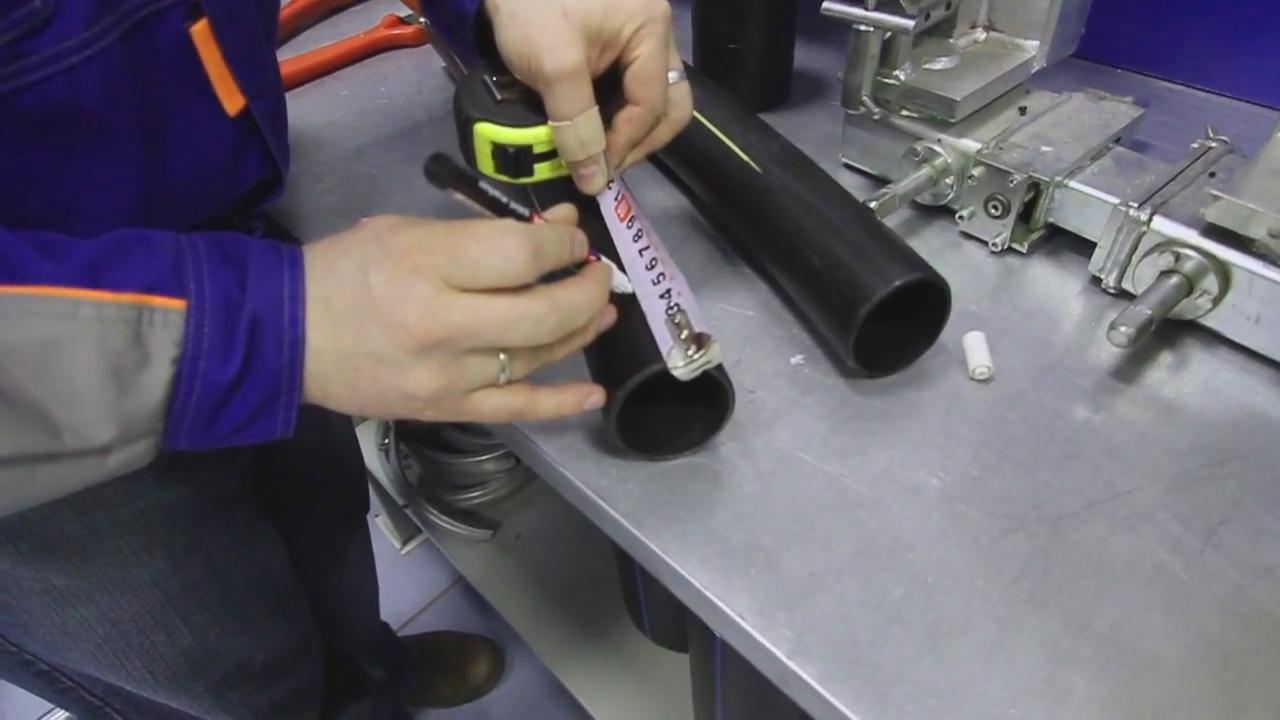
- We disassemble the centralizer, freeing up space for pipes (joining parts), for this we remove the fixing clips;
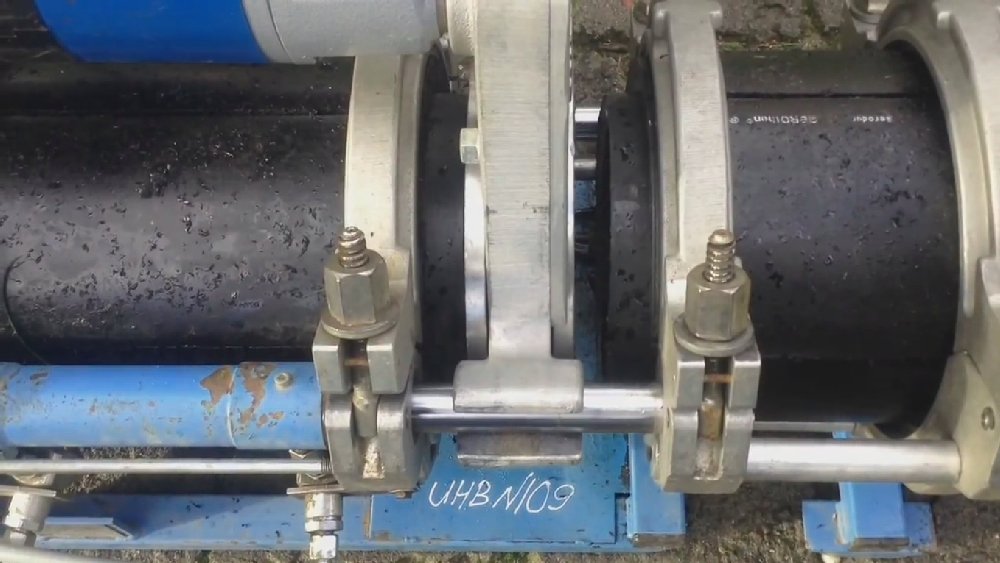
- We install the joined parts in the centralizer and fix them in the upper part with clamps;
We tighten the clamp screws equally on both the left and right sides. On the second clamp from the end we give more force, while on the first clamp from the end we give less force so as not to deform the pipe.
This ensures that each side has been shaved cleanly and evenly. When the razor is no longer in contact with the tube, the razor can be turned off. After the pipes have been shaved, slide them back again to make sure the razor has done its job. If the pipes are really flush, push them apart again.
Step 5: Weld Welds
It is possible that some of the welds need to be done in the field. The same welding procedures will be used, but there will be some improvements. Underfloor welds are between two pipes that are already locked in place or dug into the ground. They usually occur when another branch needs to be added, or when a stub needs to be installed. In a stub script, this is what usually happens.
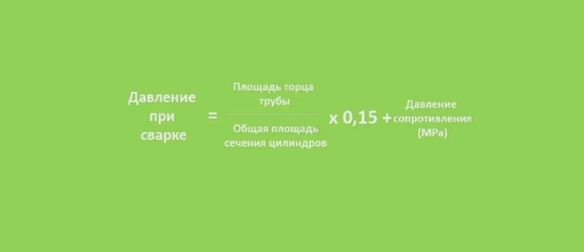
- By means of the control valve, we set the required pressure of the moving part of the centralizer;
Welding pressure is determined in accordance with the table provided with the equipment. Also, the following formula can be used to determine the welding pressure.
After shutting down the system, the pressure from the pipes must be released through the shut-off valve. The most difficult part of the weld is cutting the pipe to the required length. As a general rule, in ground welds, try to remove as little pipe as possible, instead, instead of having too short a pipe, you need to have a little sag instead.
Stage 6: Post-weld equipment and material conservation and protection
As long as the two ends are fused together before the hot plate is added and the ends are stuck together, the weld should be perfectly fine. Faulty welds may occur and slab damage may occur. If pipes are not flushed together before welding, welded pipe can melt at an angle at an angle that is less safe than a conventional straight weld.
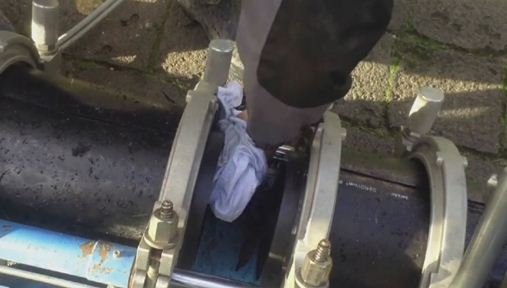
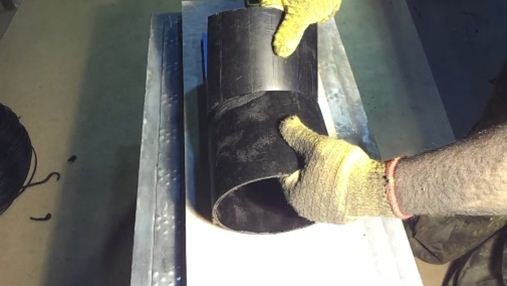
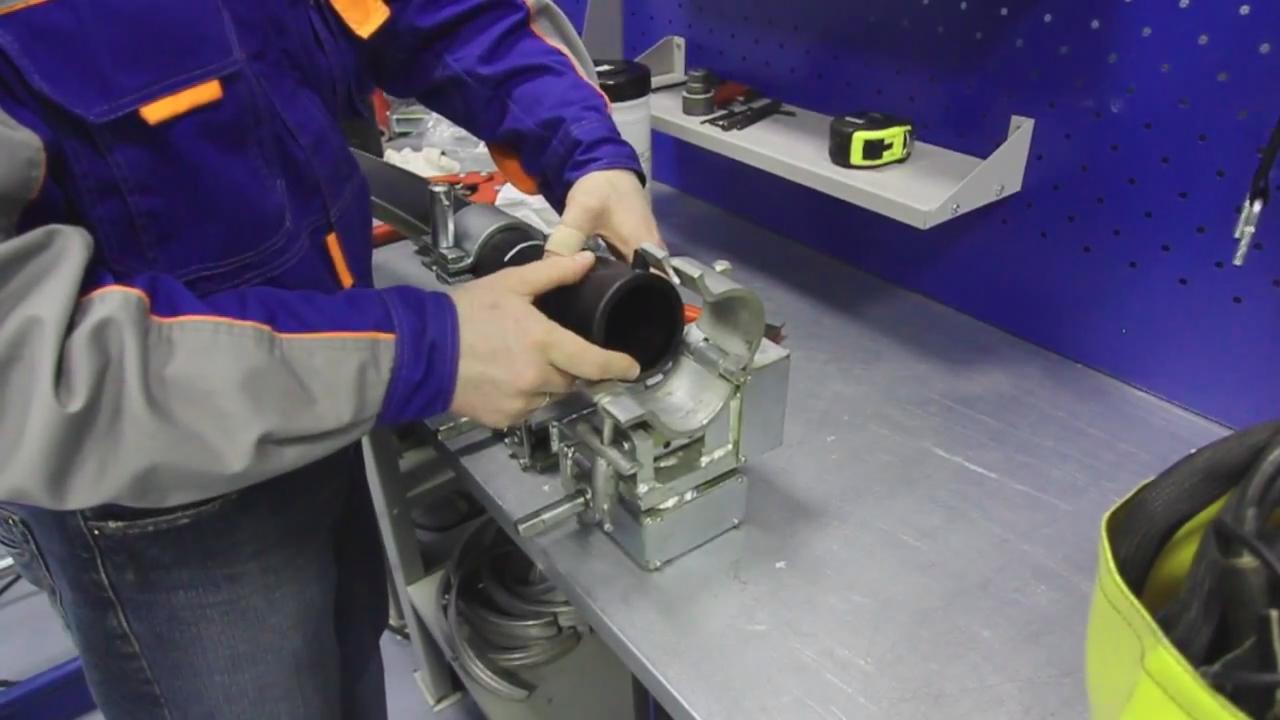
- We clean the surface of the ends from dirt and dust using special wipes or lint-free rags and alcohol as a solvent;
- We install the trimmer between the joined parts on the bed;
- We turn on the hydraulics and shift the joined elements, and then turn on the trimmer;
- We dismantle the centralizer and remove the remnants of plastic chips from the pipes;
When you're done using the hot stove, put it back in your mitt metallic metal from the side to prevent direct contact between the hot plate and the mitt. After using the hot plate and razor, carefully wrap the electrical cords and pull them out of the hangers.
Just turn the knob and it's already warm - that's the question for us. On assembly with 360° energy network installers. Powerful jackhammers tear apart other parts of the street in the background, while men in yellow and red flame retardant suits work on open gas pipelines. Short window for night work.
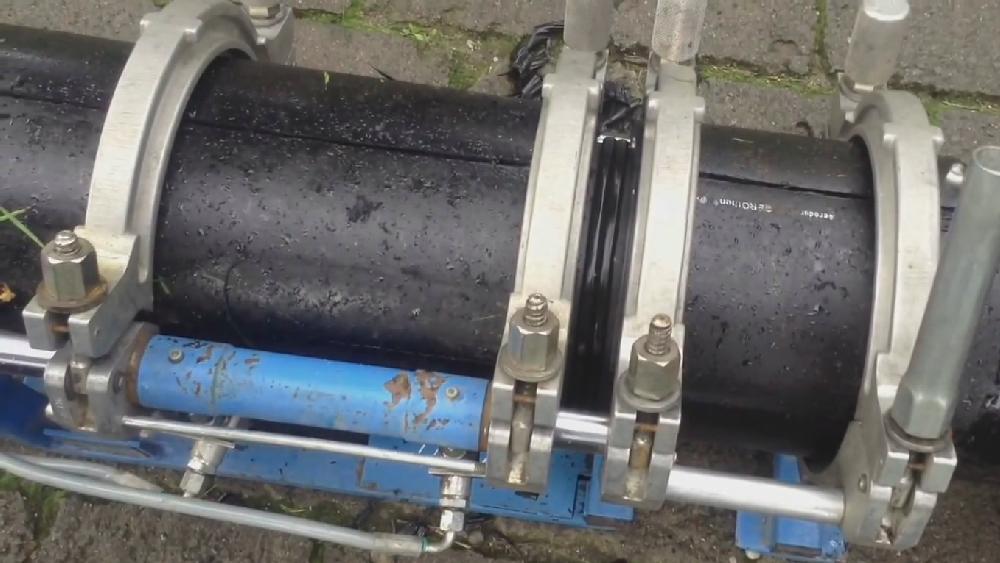
- We check the joined parts for alignment;
- We clean the ends of fat;

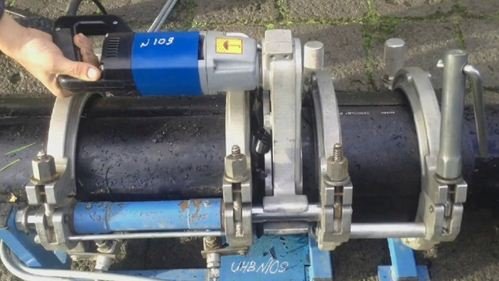
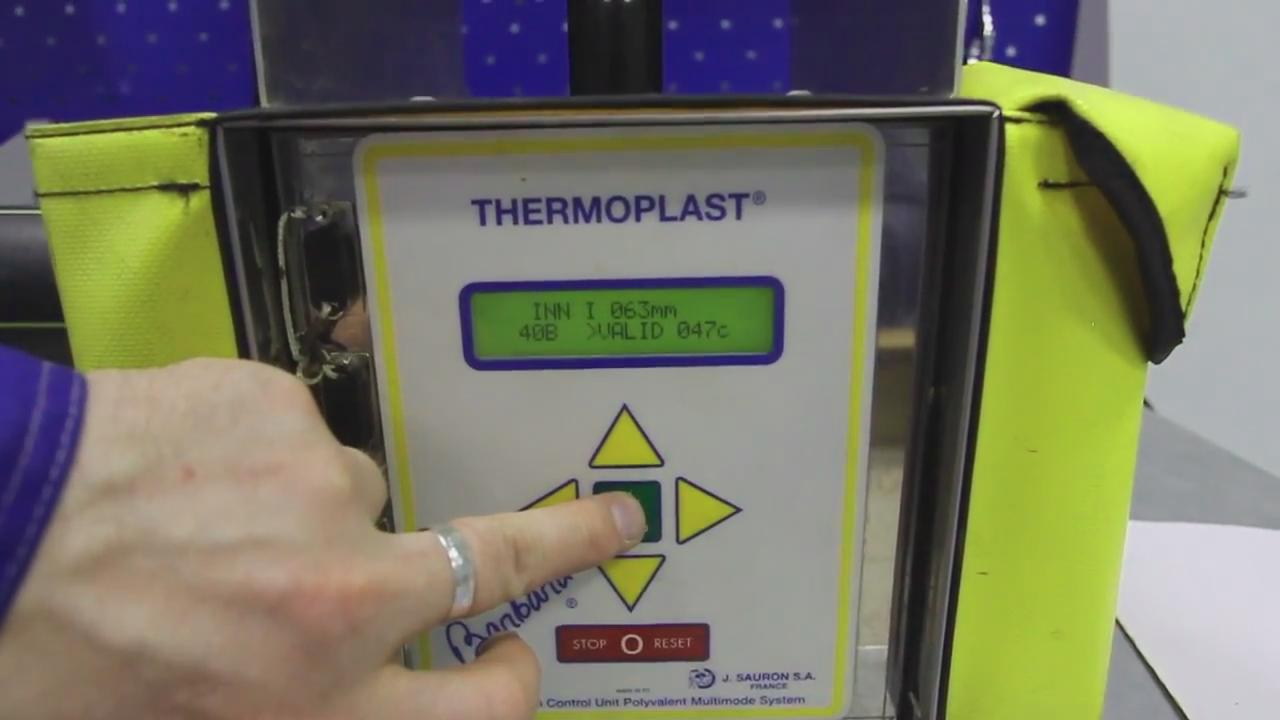
- We install a heating element on the frame;
- We set on the timer the time and temperature necessary for melting the polyethylene walls;
For low pressure polyethylene, the melting point is at least +220°C.
IN daytime this is not possible in such places because traffic and life in the city will be too much affected. That's why we work at night. There is only one short window available: from midnight to five o'clock. The bubble is kind of steady balloon, which is inserted into the tube and inflated until it completely closes the tube so that the gas cannot escape. A specially installed emergency line provides gas supply during the daytime during construction work.
It must be removed at night for work to continue. However, you don't see sparks because the polyethylene pipes are butted together. The men heat the ends of the pipes with a 220-degree hot device called a mirror and join them together. Meanwhile, two other teams are preparing crossings in open trenches. When it comes to energy, safety is written 360° - both for the safety of our customers and our employees. This good feeling. Energy 360° meets the highest safety standards.

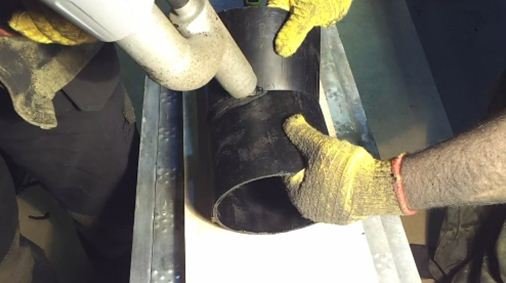
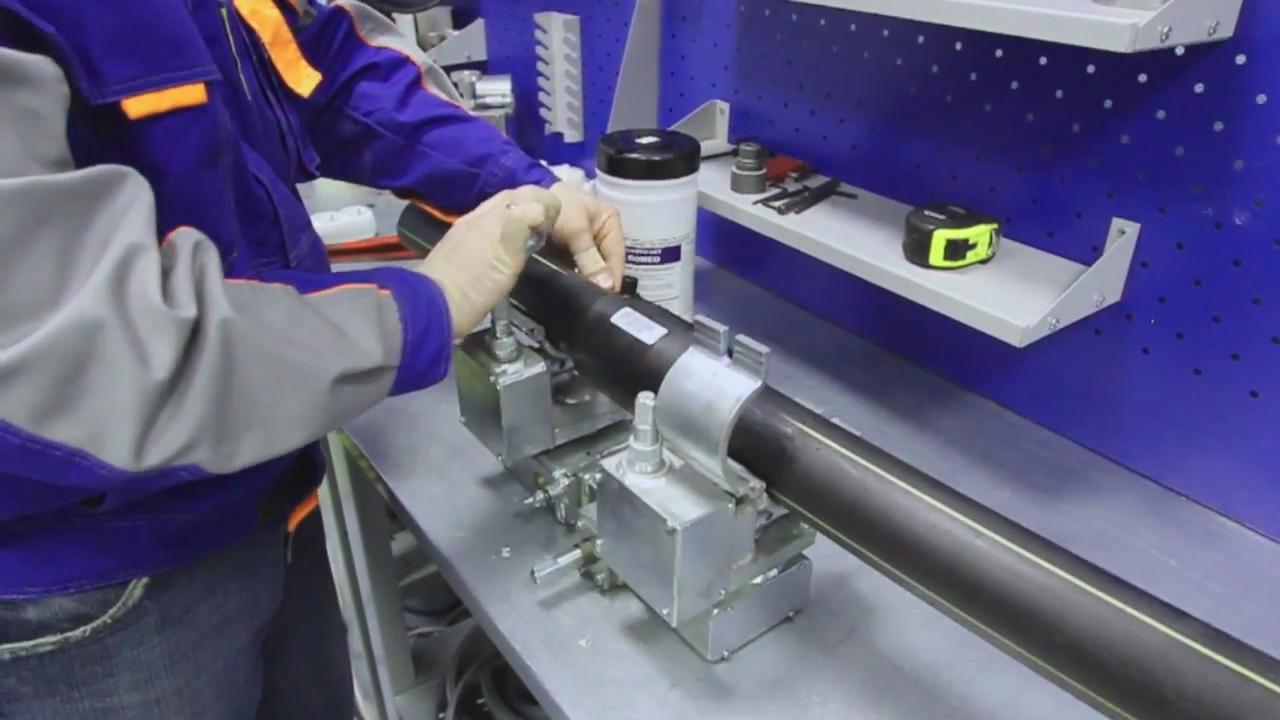
- We turn on the hydraulics and bring the joined elements to the heater under pressure;
- We start heating, which will stop after the timer runs out;
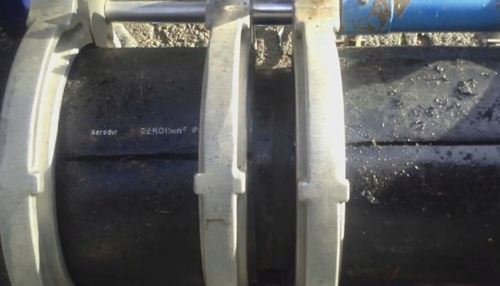
- After the timer has beeped, turn off the pressure and remove the heating element;
- Again we bring the joined ends under pressure to obtain a strong and neat seam;
However, you can't help but lose respect for the use of gas, says Pascal Schulze, who worked as a network fitter for the company for seven years. In the end, everything is ready and the installers can position new pipe in the old pipeline. The excavator picks up a tube 30 meters long, the ends are bent. It hangs like a giant banana on a Zurich night - perfect a starting point to push it through the old pipeline, all the way to the crossroads. With limited space, this is about a millimeter of work.
Video instruction: welding of polyethylene pipes
Again and again, installers have to rebuild the tube. Centimeter by centimeter, it disappears into the ground until, finally, nothing is visible on the surface. But this is not enough. Two more lines are still on the road, everything starts from the beginning. good time very important.
- We start the timer to cool the polyethylene;
The cooling of polyethylene for the quality of the seam is no less important than the welding itself. Therefore, we stand for cooling for at least 7 minutes and at this time we do not disturb either the connection or the centralizer.
- After the sound signal, turn off the pressure, disassemble the equipment and release the welded structure.
Method two: butt welding of curved sections of the pipeline with an extruder
Now we know how to weld polyethylene pipes end-to-end on straight routes. But what to do if you need to weld not a straight section of the route, but, for example, make a bend at an angle of 45 degrees? In this case, special equipment is used for welding HDPE pipes - an extruder.
At four o'clock in the morning the section is ready. Now it means safe, clean, cover. At five o'clock the trenches must be closed to allow morning traffic to pass freely and safely. This is one of the big problems of night construction work. With a limited time window, planning is even more important, says Felix Enert. Timeouts are not possible. "That's why in the morning we have to prepare everything perfectly for the next evening." So the team can use every minute if it can take off the covers for the next evening.
This is one of five five jobs where energy works 360° a year. “Due to heavy traffic, nighttime construction sites in the city are becoming more common,” says Kay Falkland. Transformation is not easy, but it also has its benefits. “At this time, you can go through the city much faster, and it's nice and quiet,” says Netz locksmith Pascal Schulze.
Instructions for conducting welding work next.
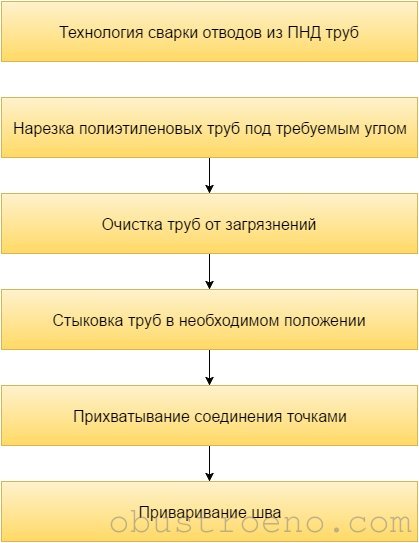
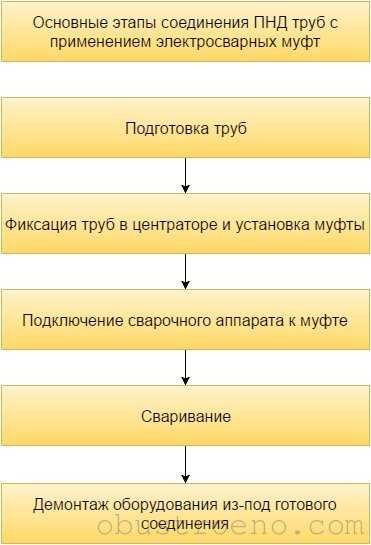
Let's take a closer look at the steps listed in the diagram.
- Through miter saw we cut the ends of the pipes at the required angle;
And so the work is pretty much unflappable—barring the occasional run-in with overly exuberant revelers. Founded in Chemnitz as a tool shop, the company later developed an additional production program: pipe components and fittings for municipal and industrial pipe systems. Uwe Karow, Authorized Officer and Technical Director, Peter Schumacher, Senior Managing Director, 2 Website. The price-performance ratio of the fittings, measured by technical and economic conditions, is constantly checked and also adapted to the pipe systems.
- We remove the chips and cut off the burrs, after which we wipe the surfaces to be joined with a rag soaked in alcohol.
- The parts to be joined are placed on flat surface, join each other at the right angle and are held manually;
Double suspension stainless steel arms, rubber insert, flexible design. The long holes for the nose holder allow for a wide range of variations. Stainless steel pole with rubber insert in rigid or flexible design. Stainless steel arms with double joint suspension, in a flexible design.
Other sizes and threaded connection 2 on request 15. Retaining element fully coated with epoxy powder, approx. 250 µ. The sealing and contact surfaces of the fitting are completely lined with 5 mm thick rubber mats. The plastic bridge is bolted to the pipe with stainless steel screws. Description: The plastic bridge is pivotally bolted to the brass of the angle valve body.
- On the extruder, we set the melting temperature of the granules (+220 ° C);
- Next, with an extruder, we make tacks at the junction of pipes;

- After the potholders are made, we wait 5-7 minutes for the plastic to cool;
The plastic bridge is welded to the pipe. Description: The plastic bridge is bolted to the valve body. Clamp clamp lined with rubber. Type: with welding radius and welding valve. Replacing the entire length of pipes is just as feasible as repairing small corrosion leaks or leaking sockets. 35. As a special component, there is also an integrated passport and extension.
Epoxy resin powder coating. Other coatings on request. Pipe couplings are designed for the ordered outside diameter of the pipe. Order and Order Information: Accurate outside diameter pipes, pipe material, working pressure, medium, temperature and additionally with flanged connections: Nominal diameter and nominal pressure. Also available as a reduction coupling and with flange connection.
- We apply plastic around the entire circumference of the parts to be welded;
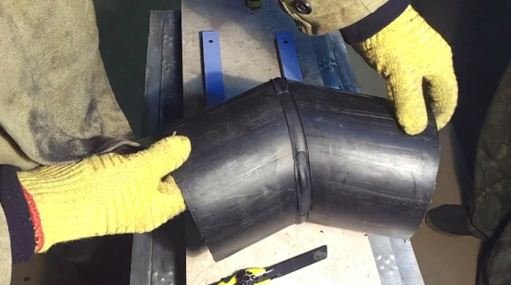
- After the plastic is applied, we leave the structure to cool for 7 minutes, after which the welding is considered completed.
If, when applying plastic from an extruder, the seam is not very neat, it can be trimmed with a knife at the end of welding.
A special pressure chamber sealing system allows you to move the tube without pressing it into its original position. The pipe is no longer stressed and there is no risk of breakage. After installation, the pipe must be resealed to check the tightness! On request, test sockets, threaded sockets or flange sockets can be welded into the steel housing. Sealing bridges, depending on the nominal diameter of the pipe, allow diameter deviations of up to 30 mm. Maximum operating pressure 16 bar Angular deflection max. 4 rec.
Now a few words about the strength of the weld. In terms of the experiment, after the plastic cooled down, the deformation of the assembled branch was performed.
The installer pressed on the seam area with his weight until the cross section of the round pipes became oval. Of course, similar experiments with butt-welded pipes by heating the ends will demonstrate a lower strength of the seam.
Maximum operating pressure 10 bar Angular deflection max. 4 rec. Operating pressure up to 10 bar, depending on the nominal diameter. Tightening torque Nm Ideal coupling for non-positive connection various materials and for installation in all weather conditions. Attention: Not suitable for installation in open structures. Axial mounting only, no bends!
Tightening torque Nm Ideal flange coupling for non-positive connection of large pipes and for installation in all weather conditions. Pricing with galvanized screws. The coupling bridge, depending on the nominal diameter of the pipe, allows diameter deviations of up to 34 mm.
Method three: electrofusion welding
A review of methods for connecting polyethylene pipes would be incomplete without the use of electrofusion couplings. Today, this method is becoming more widespread due to the high strength and durability of the finished result.
The method is applicable both in the construction of pipelines in enclosed spaces, and when working in the field. A significant disadvantage of this method is the high price of couplings. On the other hand, such a cost is justified by the high performance of the connection.
Instructions for making connections using an electric coupling are in the following table.
Let's consider the above points in more detail.
- The butted ends are cut with a special pipe cutter in order to obtain optimal alignment during docking;
- Using a manual scraper, remove the oxide layer from the surface adjacent to the docking area (about 20 cm from the end);
- We remove the formed chips using the same scraper;
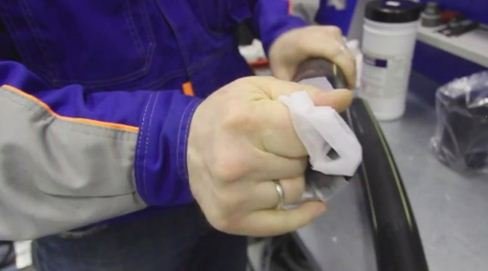
- outer surface of pipes and inner surface couplings are degreased special napkins or a lint-free cloth soaked in alcohol;
- We mark the pipes according to the size of the coupling for easier positioning in the centralizer;
- According to the marks made, we fasten the pipes and the coupling in the centralizer;
The prefabricated structure must be fixed, but not deformed. So that the round section of the pipes does not become oval, do not overtighten the clamps.
Barcode reading
- We turn on the device and read the barcode printed on the clutch body;
Most modern welding machines operate in semi-automatic mode. The heating and cooling time of the coupling is set in the process of reading the data encrypted in the barcode. Without reading the code, the machine will not start welding.
- After the code is read, we start the welding process, after which the device notifies with a sound signal;
- At the end of the welding process, we detect 7 minutes, after which the cooling of the polyethylene can be considered completed;
- We disassemble the clamps on the centralizer and release the equipment from under the soldering point.
This manual can be used as a guide for a superficial acquaintance with HDPE pipe welding processors. For best results, follow the manufacturer's instructions that come with both the machine and the coupler.
Output
So, now you know how to combine polyethylene pipes into a single whole. Any questions left? Ask them in the comments to the text. In addition, I recommend watching the video in this article.
July 31, 2016If you want to express gratitude, add a clarification or objection, ask the author something - add a comment or say thanks!
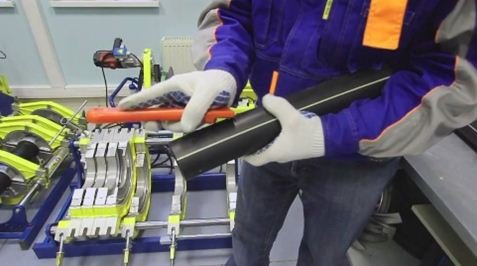
The appearance of polyethylene pipes has turned the laborious work of installing communications into an exciting game. After all, the design is so easy and quick to assemble that it is difficult to call this process work. Difficulties may lie in wait for you except at the stage of connecting elements. Let's talk about this mounting block. So, how is the welding of polyethylene pipes done, and is it possible to do everything yourself?
Polyethylene structures
In order for you to better understand the instructions for welding polyethylene pipes, you should get to know this material better, find out its advantages and disadvantages.
Polyethylene pipes are the "descendants" of ordinary plastic pipes, their latest generation, the most perfect and most versatile. Now such structures are used everywhere - for various needs: heating, water supply, waste disposal, and so on. No wonder, because the latest generation of plastic works flawlessly and "lives" to an advanced age - half a century. This material in its characteristics is much superior to the familiar metal, which was once the most reliable for laying communications. Therefore, homeowners everywhere change iron for plastic - no matter how provocative it may sound, but the latter is more reliable.
The variety of polyethylene products is amazing
Check out the list of its benefits:
- a light weight;
- ease of installation;
- low price;
- versatility of application;
- the ability to install in any weather;
- low volume of waste;
- no effect of corrosion;
- maintaining design flexibility;
- high strength seams;
- lack of lime deposits inside the system;
- perfect smoothness of products;
- resistance to aggressive substances;
- lack of condensate;
- acoustic isolation;
- attractive appearance.
If we talk about the disadvantages of this type of construction, then they appear only if the technical chart for welding polyethylene pipes is violated. So remember carefully how to do everything right.
Do you want to do everything yourself? So get ready to remember
Connection types
In order to turn a set of polyethylene products into a system, you need to get acquainted with the types of connections and choose the most optimal one - suitable for your situation.
So, the methods of fastening pipes are divided into the following:
- Mechanical connection. The easiest, but not universal (suitable for attaching internal fragments of the water pipe) assembly method. For work, fittings and appropriate tools will be required. Such a connection can be disassembled and reassembled at any time, which is very convenient for repairs or inspection of structures.
- Welding. This type of fastening is more laborious, but also more reliable. With the help of this technique, it is possible to mount communications, both by the method of trench laying, and by the trenchless method. Modern technology welding of polyethylene pipes allows you to maintain the flexibility and strength of products. In practice, two types of connection are used:
- electrofusion welding;
- butt welding.
It's important to know! For welding to be of the highest quality, buy products from the same manufacturer, and pipes produced in the same batch. If it does not work out, then sort the elements of different batches and connect them together.

Make sure that the cutting of the elements occurs strictly at right angles.
Welding instruction
If you chose polyethylene pipes, you acted wisely, but now they still need to be installed correctly. Let's learn
Basic Rules
Regardless of which technology you choose - electrofusion or butt welding of polyethylene pipes, you must adhere to such important principles:
- The elements to be joined must be compatible (both in composition and in physical parameters).
- Butt welding of polyethylene pipes can only be carried out if the parts have the same diameter and equal wall thickness.
- Edges should be thoroughly cleaned and degreased.
- The ends of the structures that are not involved in the connection process must be closed with plugs in order to avoid exposure to cold air, which negatively affects the process.
- During work, it is necessary to minimize the impact of the external environment, namely:
- in the heat, do not allow sunlight to reach the connection area;
- in windy weather, create a barrier to gusts of air;
- in cold weather, it is recommended to heat the room for work.
- During welding and cooling of the structure, exclude mechanical impact on the system.
And now let's consider in detail what the technology of welding polyethylene pipes is butt-welding and using the electrofusion method.
Worth paying attention! Before starting work, test the structures for ellipse. Do not use defective products, otherwise you will ruin all the details.
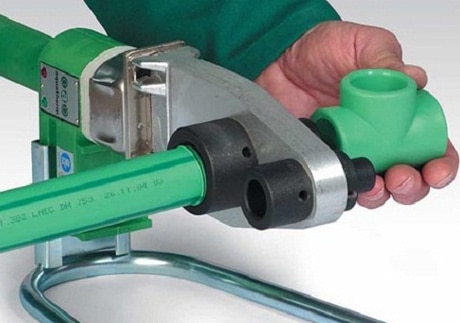
Photofragment of the electrofusion technique: attached heaters
Electrofusion connection
This type of welding, also called thermistor welding, is used to fasten elements of different wall thicknesses and diameters, as well as to install non-pressure pipelines - drainage installations, gravity sewers, etc.
To connect using this technology, you will need special - electrofusion fittings. Now remember the order of work.
- Design the system.
- Calculate the required number of pipes and other parts.
- Make a purchase.
- Cut the structure into pieces of the length suggested by the plan. Make sure that the cut is straight, avoid the flow of molten material into the system.
- Prepare and clean parts, including couplings. It will not be superfluous to degrease the surface of the elements with alcohol, applying it to a piece of rag.
- If the surface of the elements is oxidized, remove the excess with a special scraper.
- Fasten the elements in the positioner, mindful of alignment.
- Wrap the joint with adhesive tape to prevent dust from entering.
- Close the open ends of the structures with plugs.
- Apply voltage to the clutch terminals.
- Wait until the elements, having warmed up, are held together.
Thermistor welding of polyethylene pipes should be carried out only if the connected elements are immovable. In the same position, the structure must remain until the seam has completely cooled.

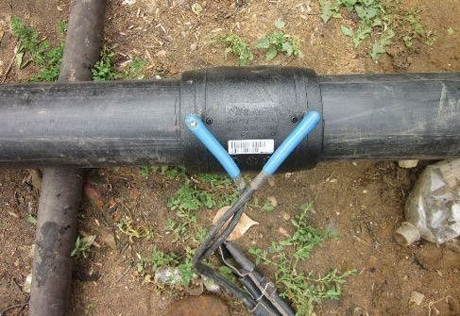
This is what a splice setup looks like
Butt welding
The technology and parameters of butt welding of polyethylene pipes are more interesting, since the elements are connected at the molecular level, forming a stronger seam. This method is used for mounting elements having a diameter of 50 mm and a wall thickness of 5 mm.
At this method the edges of the products are heated with a special heating device, and then melted and in this state are joined, forming a single whole and a flawless seam.
The procedure for this type of welding up to point No. 7 is identical to the previous connection option (except that couplings are not required for work).
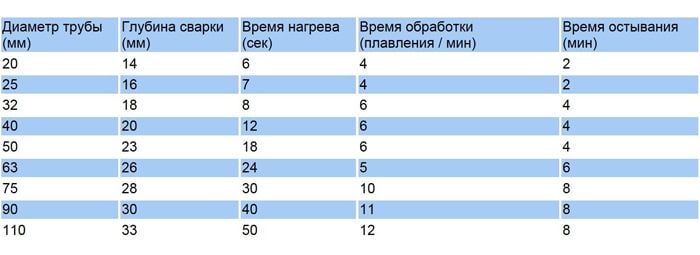
Table for determining the heating and cooling time of the elements to be welded
And then it differs and goes according to this “scenario”:
- insert the ends of the elements into the apparatus so that the heating plate is between them;
- press the edges against the plate and do not change the pressing pressure until the melting process;
- heat the elements, adhering to the norms (the table below for welding polyethylene pipes will help you with this);
- remove the plate and dock the ends, exerting uniform pressure on them;
- holding the knot, wait for the polyethylene to cool.
Worth paying attention! In order for butt fastening to be done efficiently and quickly, use devices with a mechanical or hydraulic drive.
Video instruction: welding of polyethylene pipes
Welding polyethylene pipes is a responsible but exciting process that you are now trained in.


What to do with a girl on a first date?
Grams or grams - which is correct?
How to solve motion problems IV
Winter landscapes of outstanding artists How to draw a light landscape in winter with a pencil for beginners
Solving logarithmic and exponential inequalities by the rationalization method