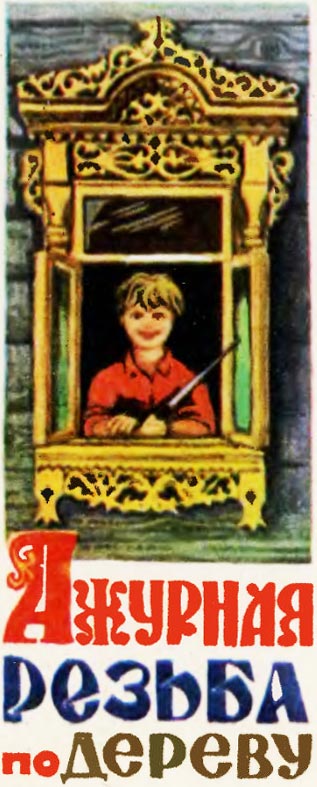
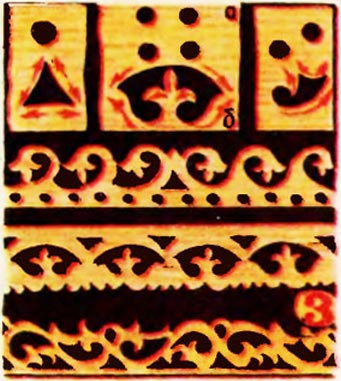
openwork carving on wood was used by Russian carvers in ancient times. The openings in the board, decorated with a relief ornament, complemented the ornament. Openwork or patterned openings were made with a simple carving tool. Sometimes they were just round holes made with a brace.
Acceptable grades are usually listed in the directories, if not, ask! Sources for templates are literally everywhere. Every magazine, newspaper, and book may have something you can use. If you can't find a profile and use it, don't worry about it. The profile is the most important. When you find an image you like, cover it with tracing paper and trace around it. Save the original image if you think you might need it as a reference later.
Almost any photograph can be used to create a drawing, as long as you can see enough detail to trace around it. You can then sketch lines from the original drawing where they go through the squares in the original drawing to the corresponding squares in the second drawing. An easier way is to use a copier to enlarge or reduce the size. We have a print shop near us that charges 5 cents per copy with a minimum of 25 cents. This whole system takes a little time.
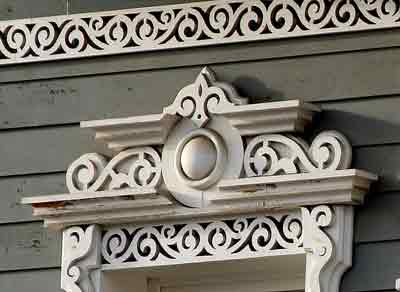
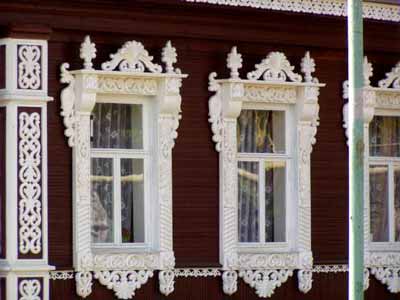
In the middle and in the second half of the 19th century in Russian wooden buildings, both in rural and urban areas, has become widespread openwork saw carving, performed using a thin file - a jigsaw. In many cities and villages of the European part of Russia and Siberia, entire streets of houses are preserved to this day, the pediments of which, window frames, and entrances are richly decorated with openwork sawn carving. Openwork carving is very effective, it looks like wooden lace. Many ornamental and decorative motifs of the Russian deaf relief carving: solar sockets, usually placed in the very center of the gables or in the center of the window casing; images of birds, roosters, ducks, swans; Images different kind fantastic creatures, conditionally called "dragons" - half-birds, half-animals, with flourishing, that is, turned into leaves and shoots, torsos and tails. There are also conditional, generalized, geometrized images of female figures in sawn carving, very similar to similar images in Russian folk embroidery and lace.
Once you have a drawing, you can create your pattern. Some use tracing paper to transfer the design to the wood through carbon paper. Others glue the pattern to the tree and trim it. Still others make a cardboard cutout and watch around it. Once you have your template ready, you are taken to one of the most important steps: template layout. All these appendages, which are somewhat delicate, should be oriented along the line of greatest strength. If you have multiple headers in many directions, you can use multiple pieces glued together to form a grid work of strength directions.
Despite the widespread use of new materials in modern urban and rural construction, sawn openwork carving still attracts builders and carvers in the construction of new buildings both in the countryside and in the city. Many buildings in the Yaroslavl, Penza, Ulyanovsk and Moscow regions are decorated with openwork sawn carving. In the best examples of this modern carving, you can see the same sun disks, the same birds and dragons.
There may be some changes suggested as you cut and you may need space to incorporate these changes. Carving a small sign width will also prevent you from being so inflexible, by your close assumption, that your carvings look somewhat square. Therefore, there will only be 12 days of nuts and bolts. Day 7 covers both 7 and the original.
Day 8 - Short course in anatomy for carvers
The following is a very short anatomy course for carvers, covering both the human form and animals. This is in the general format and all rules must be broken. This chat is for guidance only. In some small way, maybe we can avoid all those flat, square, carved figures of both humans and animals.
A modern master carver, who is fond of sawn carving, should avoid grinding, overloading, far-fetched abstract forms in it and equal to the best samples preserved in nature and recorded in books and albums.
Openwork woodcarving
No animal has a straight spine. The spine will curve down from head to tail. Almost without exception, the bodies of animals will be about twice as long as they are wide, meaning it will fit into a horizontally elongated rectangle. The child of most animals is the largest part of the animal and takes up half or more of the animal's mass, and usually the forelegs are shorter than the hind legs.
Most animals will walk on their "fingers" and "toes" rather than "hands and feet". Most animals cannot retract their claws. To visualize an animal nose, take your own nose and rotate it until the nostrils begin to move forward.
Houses with openwork carvings preserved from the last century can be found in many cities of our country. There are especially many old buildings with carved decoration in the Siberian city of Tomsk.
Folk craftsmen have always had a sense of proportion, so only certain parts of the building were decorated with openwork carvings: window and door frames, chapels, end boards. On sunny days, when the shadow from the slit architraves covers the smooth walls of houses with dark lace, the expressiveness of the openwork carving is enhanced. But even on cloudy days, the details of the carving stand out in a clear pattern against the general background of the wooden structure.
When you carve, express this movement. This will make your carvings more interesting. To visualize appearance animal ear, take a toilet paper tube and cut one end along a sharp diagonal and the other end into a short diagonal. The short side is the head.
Most animal eyes are slanted from the inside, that is, from the nose to the ear, the eye tilts upwards. When carving animals, try to avoid static positions. Let the ears be a little different. Do not climb the legs of animals in the form of stop-legs. Give your legs a little less space from each other. These small adjustments will allow you to carvings come alive.
But not only for the sake of beauty, carpenters sewed all kinds of overhead parts to the house. Each of them has a specific practical purpose. For example, a prichelina is a board that covers the ends of the roofs sticking out from under the roof to their ends. moisture did not penetrate, destroying the tree. The end board, which was nailed to the ends, has the same purpose. log cabin. The window platband closes the joint between the window sash trim and logs. In northern Russian huts, the junction of two chapels was covered with a so-called brush, the lower end of which was decorated with openwork carvings. The so-called towels were also carved - the lower ends of the chapels protruding from under the roof.
We will start with the general proportions of the classic male and female figure. Men and women have 8 heads: from the top of the head to the chin - one head. From the chin to the sternum - the second head. The third head is from the sternum to the navel. The fourth head is from the navel to the crotch, and the fifth is from the crotch to the middle of the upper leg. The sixth head is from the middle of the upper leg to the knee. The seventh head is from the knee to the calf, and the terminal head is from the calf to the toes. From the armpit to the elbow is one head, and from the elbow to the wrist is one head.
The main difference between the male and female figure is that the female's head is usually smaller, the shoulders are narrower, and the hips are wider. Change in body proportions for children - four heads for a 1 year old, six heads for a 7 year old and seven and a half heads for a teenager.
Nowadays openwork house carving continues to be used to decorate rural wooden houses, country houses, gazebos, sheds, towers on playgrounds.
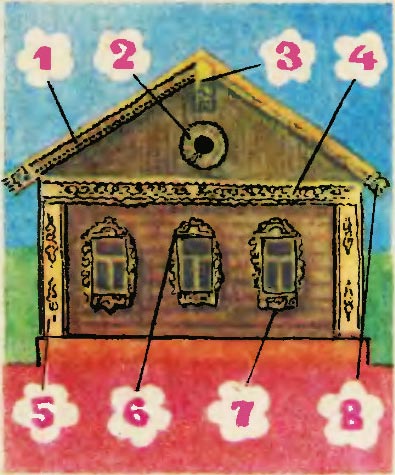
Openwork layout decorative elements on the facade of the house:
1-prichelina;
2-dormer window "sunshine";
3-brush;
4-valance;
5-end board;
6-case of the casing;
7-bottom of the casing;
8-towel.
The "old" method of checking the proportions of the body is that the body will fit perfectly in a circle if you lie on your back and with your navel, with the center spreading the arms up and up and the legs apart. The circle will touch the fingertips of each hand and the soles of each foot. The second method has been theorized that if you stand with your feet together and your arms extended at shoulder height to form a cross, you will fit perfectly into the square.
Now we will be a little more specific and talk about the head for both men and women. The eyes are halfway between the top of the head and the chin. From the bottom of the nose to the chin is the last third. If we again divide the distance from the tip of the nose to the chin by a third: the first third covers the distance from the bottom of the nose to the center of the mouth. The second third spans from the center of the mouth to the center of the chin, and the last third spans from the center of the chin to the bottom of the chin.
It is not so easy to create an original ornament anew, so much of the traditional ornament remained unchanged for many years. Only individual talented craftsmen introduced new elements into it, improving and honing every detail. Ordinary craftsmen usually used ready-made templates, and previously built houses served as samples, so there was no need to draw up a sketch.
The fifth for the second eye and the fifth from the outer corner of the eye to the other side of the head is the last fifth. The corners of the mouth fall right under the center of the eyes. The base of the nose is one width of the eye. The main difference between male and female is that the female head is more rounded and not as square as the male. The upper lip of the male is narrower than the female, and the eyebrow hairs are more prominent in the male than in the female. Hair changes as we get older are much more noticeable in males than in females. The size of the head, between the ears, is usually smaller for the female.
For children, the face area is smaller and the skull widens at the back. In the end, most children develop noses, and the differences between male and female features less defined. Stand on a chair and look at a friend, neighbor, your wife, or one of your children. Draw an imaginary line from the tip of one ear to the tip of the nose. Then another line from the other ear to the tip of the nose. You will see a 90 degree angle. There is no flat spot anywhere.
Modern light wooden buildings, such as gazebos, sheds, playground houses, do not have standard proportions that have been adjusted for centuries. Therefore, for each such building, it is imperative to develop sketches using pre-collected material: photographs, sketches of buildings with expressive carved decoration, individual fragments of architraves, end boards, and piers. All this can be collected on hikes, during excursions around the native land. In cities where the old ones are demolished wooden houses, you can collect a rich collection of carved architectural details. Usually they irretrievably disappear along with construction rubbish. Of course, photographs, drawings, carving samples are not collected in order to one-for-one transfer beautiful patterns to your sketch. The main thing is to try to understand by what means the folk masters achieved expressiveness. wooden ornaments, to feel the originality and beauty of openwork carving, to note the features of the patterns that exist in your area. Only after that you can start working on sketches.
Look at your model and you won't see a single flat plain. If you stand next to your model and look at the profile, you will see that the upper lip starts in the middle of this nose. In other words, behind this upper lip line is the full half of the nostril flare. You will also notice that the tooth mound is rounded all the way around the mouth, and the tooth mound itself will protrude a little further on the female head than on the male head. The upper lip usually sticks out further than the lower lip to allow for a normal "hook".
Now look at the position of the ear. The front of the ear is an extension of the back of the jaw. In other words, the front of the ear starts at the very end of the jaw line. The front of the ear and the jaw are exactly in the center of the head. The ear will tilt back a little.
On a sheet of paper, first of all, draw general form, side view and facade of the building with a conventional image of openwork decoration. The main task solved in such a sketch is to find an expressive form of carved details, to determine the relative proportions in relation to the entire structure. Then, guided by the sketch, complete each decorative detail separately, showing its design and the nature of the proposed ornament. Based on the developed sketches, draw each detail in full size on wallpaper paper. We will tell you how to make templates according to the working sketch, with the help of which the drawing is transferred to the material, after you prepare necessary tools and material.
If you look at the profile of your finished head, you can see the eye, eye, and nostril of the nose, but not the far eye. If you can't see the nostrils, the bottom of the nose is too flat and needs work. If you can see the opposite eye, the eye sockets are not deep enough or the face is too flat. Trim those corners around the face. You should be able to draw a smooth curve from the tip of one ear over the cheekbone and over the tip of the nose and around the other ear. If you're making a caricature, you might not be able to do it, but your head still shouldn't have any square corners unless it's there, and it's going to be big unless it's cut out.
To perform openwork carving, you will need ordinary carpentry and carpentry tools, and when finishing, carving tools.
The main tool used for drilling holes in the board is a brace. They usually drill large holes. It is reliable, proven in work carpentry tool. A ratchet with a ratchet is more convenient, which allows you to lock the cartridge by turning the ring and change the direction of its rotation when clamping or releasing from the drill.
Let me say a few words about hand carving. The hands and fingers are not square. The fingertips, knuckles, and palm of the hand form smooth curves from finger to next. If we start at the tips and draw a line from the tip to the end, we will introduce an arc. From the first knuckle to the first knuckle, we form arcs and so on. The top of the thumb cuts the arc formed by the first joint of the fingers from the palm. "Pink" is the shortest, "pointer" is next, the next ring finger, and middle finger- the longest.
Please don't lift your fingers. All rules must be broken and, in the case of the human figure, this happens every day and in every way. Of course, we are violating the guidelines by design when we make cartoons. When we make cartoons, we represent the human form, but we distort it to get a story or to tell. In other words, have fun. When we make a caricature, we usually set the height of the body to 5 to 6 heads, not 8 in the classical form. We will distort features and shapes, but we will still remain within the "good" shape.
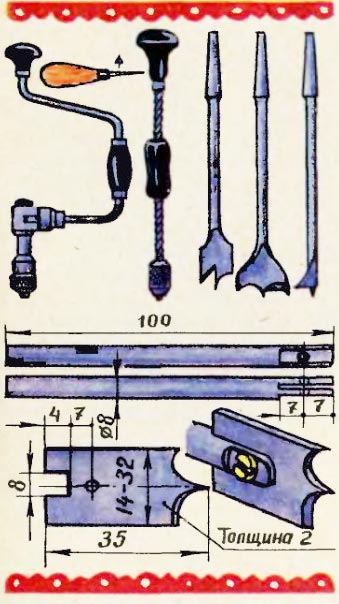
Wood drilling tools:
brace, drill and flat center drills, holder with interchangeable flat drills.
Holes with a diameter of 10 mm or more are drilled using special flat drills - perok. In addition to ordinary perks, there are universal ones with removable cutting plates on sale. The kit includes 7 drills with a width of 14, 16, 18, 20, 22, 25 and 32 mm. If it is not possible to purchase flat drill bits for wood in a store, you can make them yourself. Make plates with cutting edges from an old saw blade 1.5-2 mm thick, which can be processed quite easily with a file. When cutting, the canvas is broken according to the applied deep risks. The risks are applied with a scraper, file or some other tool from solid metal. Make a holder from a bolt or rod with a diameter of 8 mm. Having fixed the rod in a vice, make a cut from the side of the end with a hacksaw for metal. Drill a hole perpendicular to the cut. Punch a hole in the plate at an appropriate distance from the top edge. Connect the plate to the holder with a rivet. If you want to make the holder universal, cut a thread in its hole and select the appropriate lock screw. The universal holder is constantly clamped in the chuck, and when drilling holes of different diameters, only drill-plates are changed. Before drilling, the center of the future hole is marked with an awl.
When you make cartoons, keep general rules to avoid distortions that detract from the figure and upset the senses. If the subject does not send General characteristics classic shape, the observer's eye will reject it out of control. He or she doesn't even know why they don't like it. It's a bit like making fruits or painting a picture and using an even number of pieces in a play of art. Observers will refuse without knowing exactly why. The reason is quite simple: in nature, it is very rare that something grows or exists in even groups.
Small holes are drilled with a drill or drill. If you are unfamiliar with a drill, look at the picture where it is shown.
Often, openwork carving is called sawn carving, since its technique is based on sawing figured openings in the board. Saws for sawing curved blanks along the outer contour are called rotary or circular. The width of the blade of the circular bow saw is from 4 to 15 mm. Narrow blades are used when sawing blanks with steep bending lines, and wider blades are used in large ones with smooth, slightly curved or straight contours. Unlike a conventional joiner's bow saw, the blade must be rotated. This makes it possible to make cuts in different directions, almost without changing the position of the saw machine. The circular bow saw machine can be made by yourself from birch or beech wood. Depending on the size of the workpieces you are sawing and the length of the blades you have, bow saws can have a wide variety of sizes. The circular saw consists of two racks that are inserted into the eyes hollowed out in the thickened ends of the strut. Holes are drilled in the lower parts of the racks, into which they are inserted lathe pegs. The handles should rotate with some effort. On the opposite side, at the end of each handle, longitudinal cuts are made into which the canvas is inserted. The tension of the canvas occurs due to the twisting of the bowstring, which tightens the upper ends of the spacers. The bowstring is made from 10-12 turns of hemp or linen twine. Instead of twine, a rod with a thread cut at both ends is also used to tighten the upper ends of the racks. The rod is passed through the holes in the racks and, having put on metal washers, the wing nuts are screwed on both sides. The stands of a homemade circular saw are usually made elongated - this makes it possible to cut curved lines at a considerable distance from the edge of the board. And the saw blade, along with the spacer, is shortened. Such a saw is much more convenient to work with than a standard saw.
We like the mode of nature, although it may be subconscious. The choice of acrylic or oil is personal. The first step in finishing is sealing the wood. Half pure shellac and half alcohol. My cutting is dry enough to paint for an hour. Make sure you draw every part of the thread. If you miss a small spot, that spot will be much darker than any other, because the antique mixture will soak into this place much more than the surrounding area. Check your carving for complete coverage.
Acrylic paint is dry and ready for antique in a couple of hours. Oil takes a couple of weeks. The reason for antiques is to conquer the colors and make them a little more realistic and less "plastic". The mix is one bottle of baby food plus one quarter inch of butter-colored.
All saws basically have three types of teeth: isosceles, rectangular and oblique. If the saw is intended for sawing wood across the fibers, then its teeth should be isosceles triangles, if along, then inclined. The circular saw, moving along curved lines, crosses the wood fibers at various angles. What kind of tooth shape should a circular saw have? The most versatile was a saw with a rectangular tooth shape, when one of its edges is located at a right angle to the blade. To increase the maneuverability and ease of movement of the circular saw, the set of teeth must be made quite large.
Curvilinear blanks from boards with a thickness of not more than 10 mm are cut with a small round saw or jigsaw.
In production, curved blanks are sawn out on band saws. The blade of such a machine is a flexible steel tape with welded ends. Maybe you want to make such a machine - its diagram is shown in the figure.
Remember that when working on a band saw machine, you must strictly follow the safety rules. The saw blade must move in the guard. Accidental start of the machine must be excluded, for which the button is covered with a hinged lid. And most importantly - when working, keep your hands away from the saw blade!
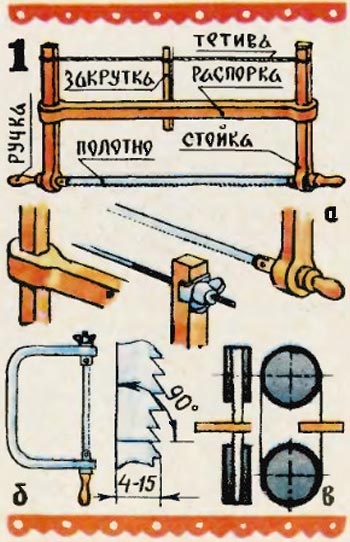
1 - cutting tools:
a) wooden circular saw and its knots;
b) metal circular saw;
c) scheme of the band saw machine.

2 - saw blades; cutting teeth and drawing scratches on the canvas.
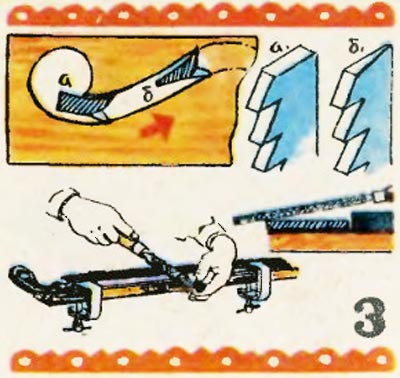
3 - planing of the saw blade.
The main tool for sawing out internal openings in the workpiece is hacksaws with narrow wedge-shaped blades, the so-called triggers. Triggers can also cut blanks along the outer contour. In addition to the usual triggers of different sizes, universal ones with removable canvases are used. The thickness of the blades of the triggers is 1.5 mm, the length is 325-530 mm, the width at the handle is 20-40 mm, the shape of the teeth is rectangular. The saw is bred through one tooth: even teeth to the right, and odd teeth to the left. They sharpen at random, that is, first through one tooth on one side, and then, turning the canvas, on the other side.
If the hammer could not be bought, it is made by hand from an ordinary hacksaw or an old saw blade 1.5 mm thick. The hacksaw blade is cut so that an elongated sharp wedge is obtained. If the teeth of the hacksaw you are using have rectangular shape, then the excess metal is cut off from the side of the butt, but if they are of a different shape, then you need to cut off that part of the web on which the teeth are located in order to cut out new teeth on this edge later. You can cut the canvas as follows. Clamp the blade in a vise between two planks so that only the part that needs to be cut protrudes. Run the tip of the scraper several times along the edges of the boards on the canvas until a sufficiently deep risk is formed. Apply the same risk on the other side of the canvas. Then, with hammer blows, bend the protruding part of the canvas. Usually the canvas breaks easily exactly at the risk. Align the resulting rough fracture with a file. The trigger blade will move more freely during the sawing process if it is planed, that is, the metal is filed from the butt side with a file. Strengthen the canvas with clamps on the workbench. In order not to inadvertently touch the teeth with a file, nail a metal plate 3-4 mm thick along them on a workbench. First, with several passes of the file, remove the metal from one side of the blade, and then from the other. Usually, before planing, the cross-section of the saw has the shape of a rectangle, and after it, it has the shape of an acute triangle or a highly elongated trapezoid. When sawing, the butt of such a blade is not clamped by wood fibers and the saw moves easily in the cut. The wider the cut formed by the saw, the easier it is to change the direction of the blade. This is especially necessary when cutting sharp bends. To get a wide cut, the saw blade is well bred.
The sequence of openwork carving:
1 - a template and drawing a picture with it on the board.
2 - sawing out along the outer contour and applying guide grooves with an awl.
3 - drilling holes.
4 - sawing out internal openings.
5 - cutting the finished openwork board.
For openwork carving, boards 15-25 mm thick from aspen, pine, birch and alder are used. Because on outdoors birch wood is affected by fungi, carved from it openwork patterns must be covered with a protective layer oil paint. When choosing a material, it is necessary to harvest well-dried boards without cracks, warping and with a minimum number of knots. The smooth surface of the boards is obtained by planing.
Usually, any saw pattern consists of several repeating elements. For each of them, you need to cut a full-size template from thick thick cardboard, textolite, plywood. Soak a cardboard template several times with drying oil and dry for a day. Our drawing shows a pattern of a 5-shaped curl - the most characteristic element of house carving. Suppose you want to cut out a pattern in which the curl is repeated four times. Place the template on smooth surface board and circle with a pencil. Then move it and circle it again. Do this twice more. So you can get an ornament of any length.
With a bow saw or a trigger saw, cut the workpiece along the outer contour, fixing it on a workbench so that the part of the board with the outer contour applied to it is on weight.
To cut the internal openings of the openwork with a hammer saw, you must first drill holes with a rotator. The larger the diameter drilled hole, the easier it is to cut a figured opening. You should try to drill a hole where its edges will more coincide with the contours of the opening.
Poke the centers of future holes with an awl. Immediately before drilling, fix the board on a workbench. To prevent the edges of the holes from chipping at the bottom of the board, place a thick plywood or board underneath. At the beginning of drilling and before its completion, the handle of the brace must be pressed without much effort. This will reduce the likelihood of chipping wood on the front and back surfaces of the board. It is necessary to constantly ensure that the drill is in a vertical position.
When you have finished drilling, remove the clamps and start cutting out the curved internal contours with a hammer saw.
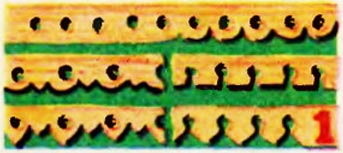
1 - the simplest patterns made with a brace and circular saw;

2 - patterns made with a brace and a trigger;
3 - more complex patterns made with a brace, circular saw and hammer.
When sawing lines with different steepness, different sections of the canvas alternately participate in the work. Very steep lines with a small radius of curvature are cut with the tip of the hammer, that is, its narrowest part. As the steepness of the line decreases, the middle part of the saw enters the work, and if the line being cut is almost straight, the wide part of the saw located closer to the handle is included in the work. After cutting out the openings on the carved board, eliminate all sorts of flaws and inaccuracies with a narrow-bladed knife and chisels.
On this, in fact, the work can be completed. But if there is time, desire and skills in handling carving tools, openwork carving can be given a sculptural form, revealing more figuratively individual details of a floral ornament.
© "Encyclopedia of Technologies and Methods" Patlakh V.V. 1993-2007


Why dream of stealing a car and is it worth being afraid of a repetition of this in reality?
What is transmitted genetically to the child from the mother and what is the father From whom the genes are transmitted to the child
How to get rid of snails in the garden forever with folk remedies?
Lavender tea drinking: benefits and recipes of lavender tea
Economic strategies review and description House building games