All photos from the article
Artistic wood carving for beginners can seem like a rather complicated process. In principle, at first it is so, but having mastered the basic techniques and methods of processing the workpiece, we will be able to gradually improve our skills, each time creating much more complex jewelry.
Naturally, this requires various devices, and among them you should definitely include templates, stencils and patterns for woodcarving. It will be much easier for a master who masters the technique to navigate the finished drawing than to try to improvise.
General information about sketches and stencils
Image creation
Before proceeding to, we need to decide what exactly we will cut. An ornament for woodcarving can be very different, and if we are talking about creating a plot composition (flat or three-dimensional), then the list of available options will be endless in principle.

Note!
You can find a variety of sketches on the net, but stencils for woodcarving for beginners, i.e. not distinguished by complexity, among them are quite rare.
Much more often, authors lay out schemes for mid-level crafts, but they should be used only after mastering the basic techniques.
When making a sketch, it is best to follow this algorithm:
- First, we select the workpiece and decide what exactly we will cut out of it.. Beginners should give preference to carving on a plane or making a simple figurine.
- Then we create a sketch of the future sketch, highlighting the main parts and marking the places where the ornament will be applied..

- At the next stage, using a compass and a ruler, transfer the sketch to graph paper. If the part is large enough, then graph paper can be abandoned in favor of tracing paper, on which we apply a scale grid for convenience.
- If there are several repeating elements in the ornament, then for them you can make separate stencils from thick cardboard by cutting the part along the contour.
Separately, it is worth mentioning the technology of mechanized carving using milling machines. In principle, milling cutters quite allow you to select by marking, but most often metal or polymer stencils for wood carving with a milling cutter are used to decorate flat parts. They limit the movement of the cutting edge, and therefore practically exclude the influence of the human factor.
Note!
Such products are quite difficult to manufacture, because their price is appropriate.
So it's worth buying them only if you need to perform a large number of similar images.
Transfer to workpiece
So, we already have a template or sketch, now we need to understand how to transfer the image to the blank.
The instruction involves the use of several methods:
- Templates for wood carving with a router are the easiest to use - just fix the plate on the surface of the product so that the grooves are exactly opposite the location of the ornament.
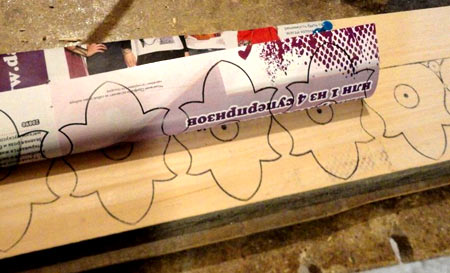
- Cardboard templates are also not difficult to use: we apply them according to the markup and carefully trace with a pencil along the contour.

- When transferring simple geometric shapes, you can use the puncturing technique. To do this, we fix the sketch on the part and mark all the key points with a needle / awl. Then we connect the marks on the wood with straight lines.
- Finally, you can use carbon paper: put it under the sketch and circle the lines in the drawing, transferring the image to the tree.

Threading technology according to the finished contour
When the drawing is transferred to the workpiece, the most difficult part of the work begins, namely, the woodworking process.

- If our task is a through thread, then first you need to make a starting hole in each element. This is done using a drill with a drill, the diameter of which corresponds to the width of the canvas used.
- After that, a saw is inserted into the hole, and part of the wood is sawn out. The edges of the hole are then leveled either with a knife or using files and abrasives.
Flat and volumetric threads are performed differently:

- First, the contours of future recesses are cut with a sharp knife.
Note!
It is advisable to draw a cutting line along the inside of the contour, since usually the area of the treated area increases slightly during operation.
- Then, with the edge of the jamb or cutter, we perform the central slot of the deepest part. After that, we begin to form the recesses, choosing the wood between the contour and the central recess.
- Small details and textures are formed using a chisel. Ideally, it should be sharp enough to cut through the material without the use of a mallet, but sometimes (especially if you have to cut oak, beech or maple) you cannot do without additional effort.

- It is convenient to choose deep grooves with chisels with a curved blade - the so-called cranberries. In this case, care must be taken that the cutting edge does not sink below the selected level.
- After completing the carving, it is worth once again walking along the contours with a knife, restoring even edges. When this stage is completed, you can proceed to grinding the surfaces.
Conclusion
Do-it-yourself wood carving will be much easier to master if you early stages work you will use suitable sketches and stencils. To understand the intricacies of using these devices, we recommend that you carefully study the video in this article.
Wood carving is a real art, complex and exciting, requiring a steady hand, patience and some artistic skills. With great inspiration and desire, it is quite possible to master the basic simple techniques, and then take on more complex ones. To work, you will need special tools with which the carving process will be more comfortable.
A selection of woodcarving sketches
The main tools for woodcarving also include sketches, templates and. It will be much easier and more understandable for a beginner to navigate the finished scheme than to try to create sketches on their own.
Before creating a wood craft, you need to decide on a pattern or pattern. On the Internet you can find many ready-made stencils for wood carving from simple patterns to real paintings. You should not choose, and options of medium complexity at first can be simplified by removing too complex elements.
When creating a sketch, you need to do the following:

Stencils can be made using text editor, in which it is possible to develop your own sketches, as well as add or remove details in the finished drawing. It remains only to enlarge the thumbnails to the desired scale and print on the printer.
Further, paper patterns are fixed on a wooden base and copied in any convenient way, for example, using carbon paper. If the template is to be used repeatedly, the finished paper stencil can be transferred to a denser cardboard or other surface. 
Stencils for slotted threads are usually used more than once, so it is advisable to make them from dense material: cardboard, plywood, hardboard, plastic panels.
If you have to make a lot of sawn carved parts, for example, when decorating a house or building a fence from a carved picket fence, you can use a milling machine.
For it, special ready-made stencils made of metal or polymers are used. Such a rigid template is installed on the workpiece and limits the movement of the machine strictly according to the pattern. Such templates are quite expensive, so it is not advisable to purchase them for single products.
Transfer image to tree
There are several ways to transfer a picture from a template:
How to choose a template for woodcarving
It must be remembered that for large wooden products, for example, for or you need to select the appropriate stencils. Small elements will simply be invisible. And for crafts such as boxes, frames, you can choose more complex patterns with fine details.
Also, for different carving techniques, you need to choose the appropriate patterns and patterns:
Sketches and stencils for woodcarving have a special place, and a rare master does without such an assistant. The beauty of wood crafts will largely depend on the accuracy of the stencil and no matter how complex the pattern will be.
Contour woodcarving, being a variety geometric carving, requires some experience. Without habit, it is difficult to cut absolutely straight lines without nicks and chips. Not very complex technique is combined with maximum detail, resulting in beautiful carvings.
An example of contour woodcarving
Wood carving is cutting and trimming wooden material. As a result, finished contour drawings come out from under the cutter's knife. The outlines of objects, landscape compositions, flower collages are embodied mainly in wooden panels.
How is the process of working with wood carried out? How do you get beautiful pictures? All work on a piece of wood, which later becomes a work of art, can be divided into stages:
- First choose an image.
- The drawing is translated into .
- They make it from a stencil.
- Wood carving is being done.
- The finished panel is sanded, sanded, varnished.
Wood carving requires special skill, the sketches of which involve the implementation of a complex pattern.
 A selection of sketches for contour woodcarving
 Each line drawn should be straight and clear. For drawings in a particular case, the master himself decides how deep the lines should be cut. The expressiveness of the image on the tree depends on this.
Caskets, crosses and other products are made using the contour wood carving technique, where it is necessary to reproduce the outlines of flowers, animals, people. Work is carried out both on natural wood, and on tinted, as well as on plywood.
Work technique
Wood carving techniques are divided into cutting lines and curls. The lines are first cut, then cut. In this case, a special sharp knife is used - a jamb. The blade of the knife should be located at a slight inclination from a vertical position. In this way, incision is made.
 Example of contour carving technique
 Then the slope is done in the opposite direction. The cut part of the tree is cut. When cutting contour grooves, the jamb is clamped in a fist, the movement of the blade is directed with the other hand. In the process of pruning, it is important that even strips of wood come out from under the knife. If sawdust, uneven stripes are obtained, there will be no beautiful lines.
Read also
Wooden carved patterns
Woodcarving for the purpose of cutting curls and rounded lines involves the use of various chisels. But experienced craftsmen able to cut sinuous contour patterns with just one jamb.
The technique of cutting curls, small circles is as follows.
 Slotted wood carving technique
 The chisel is held in a fist, making a slight inclination towards the center of the circle. The blade is deepened into the wood by several centimeters, after which the plank is turned in a circle along the axis. Then do the cutting. It also rotates along the axis with cutting off a cut piece of wood. Further, the radius is increased if necessary.
For woodcarving, flat and rounded chisels are used. An experienced craftsman, knowing the purpose of each, can cut out the most intricate pattern. The pinnacle of craftsmanship is contour carving with a pillow. The resulting pattern in the center looks like it is raised above the rest of it. In reality, only the depth of the grooves differs. In the center, it can be made larger, along the edges - smaller.
Wooden patterns on plywood
Plywood carving is somewhat different from wood carving. Working with the material involves the implementation of several techniques. These include:
- performing contour cutting;
- carving;
- openwork carving;
- combined thread.
According to the sawing method, contour images of animals, figures of people, flowers are cut out. The result is a convex image on a flat background. Contour carving involves cutting out a complex pattern by cutting and trimming. The result is a embossed exquisite pattern.
Openwork carving involves cutting through the details of the pattern. The pattern performed in this technique is the most laborious and beautiful. The product resembles an airy lace. Combined contour carving combines 2 or more techniques at once.
 The process of making slotted threads
 Most often used simultaneously for its manufacture openwork carving and contour sawing techniques, contour carving and sawing. Plywood carving, although a more laborious task, is easier to perform. It's all about the material. Hardwood is more difficult to process than plywood samples.
Plywood carving technique
Before starting work, a workpiece is made, it is polished, crumbled, if necessary, in dark tone nitro paint. Allow the workpiece to dry and paint over again. A drawing or sketch is applied to the finished sample using ink, gouache. Sometimes stencils are used instead. All curves of the picture are drawn according to the prepared form.
Geometric wood carving consists of different elements that have a geometric shape, and is performed with one cutter. maybe: lines, squares, trihedral and tetrahedral recesses, etc. This technique will even allow you to make carved works of such shapes - leaves, flowers, berries, ears of corn. If you develop the skill, then it will go into the form of contour carving.
Original jewelry box made with geometric carvings
You can search the internet or come up with your own. Geometric cutting is quite simple to perform, this will require: a cutter, a pair of semicircular chisels. Geometric carving lessons will show you how to play with chiaroscuro and unusual patterns. It is especially beautiful in different triangles, nail-like cutting and trihedral-notched shape. Such cutting allows a polished and matte finish.
For triangular-notched carving, you only need a joint knife, it has a beveled blade. In addition, the following tools are needed:
- chisel flat, 2 cm wide;
- the chisel is semicircular;
- hacksaw;
- files: round, square, semicircular;
- ruler;
- simple pencil;
- compass;
- eraser.
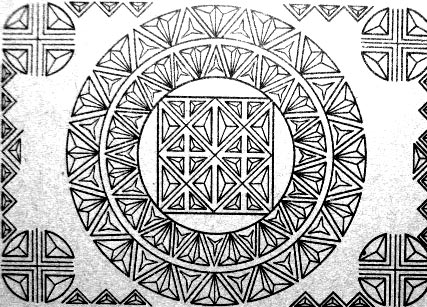
 Elements and patterns for geometric woodcarving
 Cutting technology is simple, but each component plays a role in the work.
Wood
wood happens the following types: hard, very hard and soft. For beginners, it is better to use soft wood, it is easier to work with (linden, pine or aspen).
Linden is more difficult to get than other types, as it is often used by professionals. Pine has a drawback - it pricks when cutting.
Aspen a good option for work. There are many visual photos of what kind of tree should be, and what the longitudinal fibers look like, along which you need to work.
Preparation for work
For the first lesson, you need a board measuring 170 by 110 mm and 2 cm thick. Sketches for this work will be given below. The surface of the board must be sanded with sandpaper. Now, using a ruler and a simple pencil, draw the entire surface of the tree in 5 cm cells.
 Patterns for woodcarving
 Then we draw all the figures, as shown in the figure below. In total, 7 figures turned out: pegs, rhombuses, a viteika, a pyramid, stars, squares and a rosette. From these figures, you can then add new patterns. A photograph showing which compositions can be made up of the same elements, how the composition looks after processing and painting wood.
Pegs - the first figure
In a triangular notched thread, the whole process consists of two operations - tattooing and trimming. These are simple movements that are easy to do in practice. We take the knife in our hand, the thumb rests on the beveled part of the handle.
Press down on the cutter in a vertical position so that it goes a few mm deeper, then lower the blade at an angle to cross the line of the side knife according to the markup. In the same way, a prick is made on the left side of the triangle. 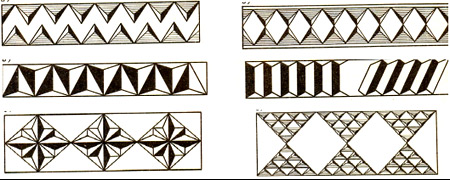
Cutting requires:
- attach the cutting part of the knife to the left side of the triangle, so it will connect to the top with its bevel;
- we take the handle of the knife back, observing the parallel between right side pattern and cutting blade (this movement is done with the hand, as if we were pulling a bow);
- we press on the knife, returning to the first position of the brush; so the nose of the knife is at the top, and the cutting part is on the right side of the triangle.
Read also
Sculptural woodcarving
The trimmed triangle will break off in the end, hence the name - "peg". This movement is called "shot". When doing it, try to keep the angle at 45 degrees. Drawing comes out simple with this shape, but it's the foundation of geometry.
Security measures
All movements should go from the wrist, this simplifies the work and relieves the burden on the shoulder. 
The working arm (which contains the cutter) is pressed tightly against the work table to free the movements of the brush. When holding the workpiece with your free hand, it is necessary to monitor the location of the fingers so that they are not on the working part when the cutting process is in progress.
Rhombic - the second figure
Ornaments for geometric carving are made up of simple details, such as pegs and rhombuses. A rhombus consists of two triangles connected by their bases.
The technology is the same, but first you need to cut top row, and then rotate the board and make the bottom one.
Viteika - the third figure
It consists in mastering the basic techniques of carving and basic shapes. Viteika is the same kind of peg. They are simply offset to the side in relation to each other.
 Figures for geometric carving
 The result is a winding path. To do this, you need to cut and chop the lower triangles, and turning the board - the upper ones. So we will see that the "snake" remains in the middle.
Pyramid - the fourth figurine
The first patterns were the simplest. And you can easily deal with them. The next ones will be harder to perform, as they consist of several triangles and are arranged in a certain order in relation to each other.
So the pyramid consists of three triangles, it has a point of contact in the center of all corners. Therefore, when cutting this figure, each element, when pricked, comes into contact with the same point several times. Most importantly, pruning is performed in the direction of the wood layer. 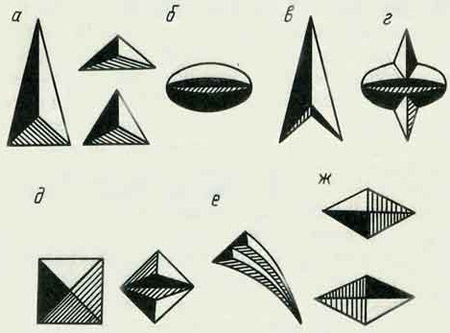
If you cut across, you get unwanted chips that will spoil the patterns.
Asterisk - the fifth figure
Ornaments of geometric cutting can be varied, but mostly consist of the same elements that are put together. Also with the figure of an asterisk. It consists of four pyramids, and this figure will not be difficult to make. You just need to sequentially cut four pyramids one after the other.
Squares - the sixth figure
This element is clearly different from all the others. There are no triangles in it, and it is cut out in a completely different way than all the figures. This cutting method is called straw. Many sketches include precisely squares. They can be both the border of the work, the frame, and part of the main elements of the picture.
This figure is cut in this way:
- we retreat from the markup by 1 mm to the right, holding the knife at an angle of 45 degrees, deepen it by 2 or 3 mm and cut along the line to the end;
- on the left side of the strip we do everything the same;
- we make a puncture at the end and beginning of the strip, while the knife is directed vertically.
One of the most luxurious, which are valued for originality and manual work, by right are considered products made in the form of wood carvings. From ancient times, with the help of this type of art, unsurpassedly decorated towers and huts were created.
Some of them are now considered architectural monuments. This art is beginning to revive in modern world. Excellent helpers in this matter are stencils for woodcarving.
In contact with
What is a stencil for?
To begin with, let's try to figure out what stencils for woodwork are. These are special ones, with the help of which elements of patterns are applied to the surface of wood.
They are much make it easier to repeat the same characters and allow you to work faster. For example, the most popular stencil for platbands are samples.
With their help, quite complex work for interior and facade design.
Stencils are divided according to their purpose for creating interior elements:
- ribbon carved ornament;
- carved platbands;
- pilasters;
- towels;
- carved balusters and more.
All varieties are considered professional templates. By them it is possible create several ornaments for woodcarving voluminous character and significantly facilitate the task that is set for the master. There is no need to create them yourself. On the Internet, you can find and download the version you like.
How to choose a stencil
Drawings for wood carving are so diverse that they can be used by both beginners and high professionals. With their help, both unpretentious ornaments and high-level works of art are created.

The main thing is to make the right choice. To do this, you must adhere to certain rules:
- if the incisors began to be used quite recently, then do not choose intricate ornaments, since it is quite difficult to work on them, and you can ruin the workpiece;
- for each type of woodcarving, choose your own stencil;
- before starting work, it is necessary to apply a stencil drawing to the workpiece, the lines must be neat and clear.
 Finding stencils today is easy. This can be done using electronic libraries.
Each decorator will appreciate the convenience and rich selection of this source. Here you can pick up drawings from a past era, as well as modern masterpieces.
When making a choice, be sure measure the dimensions of the workpiece and directly the image.
It is also necessary to choose a sample that will look appropriate on an interior element. We pay attention to the nuances:
- for a large product, you do not need to choose a stencil with small elements or openwork patterns;
- for small items, stencils with large patterns are inappropriate;
- proportions must always be observed.
All these tips apply to any drawings.
Types of woodcarving
Woodcarving does not have a narrow direction, on the contrary, it has several varieties:
- slotted;
- flat-relief;
- embossed.
Slotted plywood
 The key to success when making slotted threads - right choice ornament. Thanks to him, plywood carving sets the overall concept and adds aesthetics to the product.
Drawings and ornaments on floral or animalistic themes - standard representatives classical style and are suitable for any direction in the interior.
Very often used slotted inscriptions. In this case, ready-made stencils are difficult to find, as they are created individually for each case. This is due to the fact that it is necessary to maintain the size, font style, and the set of words is always different.
Important! The situation is completely different with patterns of plant, animal and fantasy style. Many variants of this topic can be found on the Internet. Some options are shown in the photo below.
House woodcarving
Brownie - the main focus of the design of huts, which is very common in the Nizhny Novgorod region. It is she who can boast of various lace patterns. For self-execution, you should select the appropriate sketches.
The main condition for house carving is to avoid small details. They will be lost on the facade of the house, and they will not last long.
Options for house carving can be selected on sites dedicated to woodcarving. But there are masters who can make a template to order. In this case, you can realize exactly your idea and get an original pattern.
Attention! Patterns for house carving are applied using tape stencils.
Through wood carving
A distinctive feature of a through thread is complete removal of wood from the inside of the picture.

Through-carving comes in different styles:
- simple, in which elements are cut out along the contour of the picture;
- openwork, when the pattern is created with a three-dimensional effect due to multi-level cutting.
With the help of a through thread, frames, various linings, door leafs, elements for decoration are made.
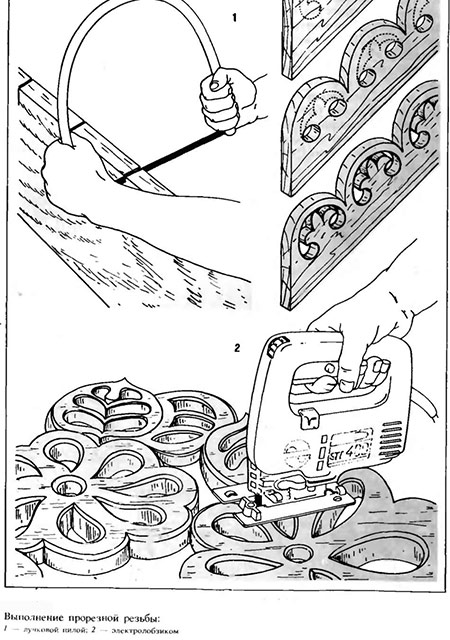
Through carving in oriental style is performed using a jigsaw.
Sawing with a jigsaw
Sawing with a jigsaw is mainly carried out on plywood. To perform quality work, you must have at least the slightest experience with the tool. Also an important factor is the presence of an original stencil with the image of animals.

Commonly used stencils:
- a pair of swans;
- head of a deer, wolf;
- cocks on the needle;
- a horse standing on its hind legs;
- butterflies.
It all depends on the style of the interior that needs to be complemented. decorative elements. You can easily find template examples on the Internet.
 Most suitable material for cutting - birch plywood 3–10 mm thick. In addition, for work it is necessary to prepare:
- carbon paper for overlaying the pattern;
- special paper for grinding parts;
- carpentry glue for joining parts;
- clear lacquer to give a decent look.
Before starting work, the workpiece is carefully polished with glass paper, only then they begin to transfer the pattern.
Floral ornament
Often, floral or leafy patterns are made in the form of stripes or borders, consisting of repeating ornaments. Can be made in an individual composition that contains an image trees, fruit-bearing plants, various floral elements And so on.

Work is done in a variety of ways:
- display in a naturalistic way;
- simplified plant elements.
The floral ornament for carving a tree in its popularity is in second place after the geometric pattern. Favorite thematic elements at all times are lilies, grape leaves and berries, oak, hops, ivy and more.
Sketches for patterns
In terms of their subject matter, stencils for woodcarving are quite diverse. Some of their options are used in a narrow direction, and some can be found on any interior elements.

Here are some options for sketches that can be used for a specific purpose:
- Wooden uzorochye serves to decorate the facade of houses. It looks perfect both on doors and on walls.
- cutting artistic style used to decorate dishes and furniture.
- Products made using intricate openwork cutting are especially held in high esteem. Most often it is used for household items.
Important! A well-chosen sketch will help you to carve wood quickly and accurately.
Useful video: wood carving templates
Each type of cutting has its own processing technology, detailed elements are maintained. In some cases, several techniques are used simultaneously, which are subsequently converted into a three-dimensional canvas with the presence of the smallest fragments. This is what characterizes a true master.


Can't understand the meaning of life
Mate Brewing Methods
Trollface quest games Black humor games
Dark spots in photos?
Rules of the game Bald in VK. Scrabble nerd. The purpose of the game Balda