Today the topic: how to preserve calibrachoa at home in winter is incredibly relevant. Considering that the plant is classified as a perennial, and besides, it is expensive to buy cuttings on the market every year, we must try to organize a comfortable period of rest for the mother plant and an easy spring awakening.
Experience shows that calibrachoa in most cases survives wintering safely. With the onset of spring, the plant actively “rejuvenates” and blooms profusely.
There are different methods for preserving the mother liquor and rooted cuttings of calibrachoa:
- on the windowsill;
- in a refrigerator;
- in the basement.
Let’s figure out which of the proposed options should be considered the most reliable and effective.
Methods for wintering calibrachoa
In room
It happens that the first frost has already occurred outside, but the calibrachoa bush continues to bloom. Of course, by September or October, a few bells remain on the stems, however, this is not a reason to say goodbye to the plant.
You should bring the pot indoors, place it on the windowsill and continue with your usual care. First of all, we are talking about moderate watering and organizing additional lighting.
When the last bud fades, you need to provide the plant with:
- stable temperature within 12-18 degrees;
- moderate watering once every 7-10 days.
In this case, heating devices should be kept away from the hanging stems of Calibrachoa. Hot air from the battery can cause blackening of the vegetative mass.
On a note! Reduced air temperature in the room helps to stop the growth of perennials. Thanks to this measure, when there is a lack of lighting, the stems do not stretch and do not lose their decorative effect!
Overwatering, as well as drying out the soil clod, is a common cause of plant death. Important! Excess water causes the vegetative mass to wilt. A beginner may interpret this signal incorrectly and, on the contrary, continue to flood the roots. The difficulty in caring for perennials in winter is maintaining moderate soil moisture and... air.
Is it worth replanting calibrachoa with the onset of cold weather if the roots become crowded in its original pot? No. This procedure should be postponed until spring.
Once every 1-1.5 months, the mother liquor should be fed with mineral fertilizers with chelates or phosphorus-potassium fertilizers. Experience shows that in this case, overwintered plants look much better and healthier.
On a note! Calibrachoa cuttings rooted in August-September tolerate the “dormant period” much easier than 1-2 year old plants and bloom earlier.
In the basement
As already noted, in the conditions of central Russia, as well as in its remote corners, calibrachoas are classified as annuals. Gardeners have come to terms with the fact that for each season they have to order young cuttings or sow seeds for seedlings in advance (in February).
With the arrival of autumn, hanging baskets are freed up for new calibrachoa. Mature bushes are thrown into the trash. And in vain.
Plants really are not able to withstand sub-zero temperatures and severe frosts, but if you bring the container with calibrachoa into the basement for the winter, then in the spring you can restart the growth of the vegetative mass and achieve abundant flowering of your favorite variety.
Preparing for winter:
- long branches of calibrachoa are cut off, leaving ±8-10 cm from the root;
- The soil is watered in moderation (without stagnation of water).
The basement should be quite humid and cool (up to +10⁰С). Additional lighting is not provided. The plant is stored until about mid-February.
Do not be alarmed by the poor appearance of calibrachoa (in particular, the drying out of the greenery) after wintering in the basement. In the absence of light and heat, it simply cannot be otherwise, convinces Elena Gavrilova: http://www.razmnojenie.ru/kolonka/zametki/calibrachoa.html.
Soon (around March), when the pot is placed on the windowsill in the room, the plant will quickly recover - it will produce young shoots, grow branches, leaves, and buds.
On a note! Overwintered calibrachoas often suffer from chlorosis. It is better to use iron-containing preparations before the bush blooms, otherwise the opened buds will instantly lose their decorative effect. To help - a weak solution of citric acid.
In a refrigerator
What should gardeners do who are not cellar owners, but grow so many flowers that placing pots on the windowsill is simply unrealistic? There is an exit. You can overwinter calibrachoa (at least 1-2 cuttings) in the refrigerator.
The advantages of this storage method:
- stable low air temperature (+1-+3⁰С);
- optimal soil moisture without additional watering.
- the need for regular ventilation of the plant;
- shortened (about 2 months) rest period;
- the deplorable condition of the flower due to the death of stems and leaves.
After the container with calibrachoa returns to the windowsill, the mother plant will definitely throw out new shoots and begin to actively increase the vegetative mass.
During this period, it is important to feed the plant with phosphorus-potassium, nitrogen or mineral compounds.
Reminder! To prevent chlorosis, you can add citric acid to water.
Fertilizers in winter
Should Calibrachoa be fertilized during dormancy? This is the most controversial issue among gardeners. Some believe that in order to better preserve calibrachoa until spring, you just need to water the soil in a timely manner, others insist on adding mineral or phosphorus-potassium preparations.
Practice shows that fertilizing really has a positive effect on the condition of plants and increases their immunity. The main thing is not to abuse the concentration and dilute the solutions by half as weak as indicated in the annotation for the period of active growth.
Fertilizers for feeding in winter:
- Uniflor;
- Gumi;
- Fertikalux;
- other mineral, organic compounds.
Is it possible to preserve calibrachoa in winter without additional measures?
Practice shows that individual plants survive well on the windowsill without lighting, fertilizing or low temperatures. Against all odds, Calibrachoa waits for spring, and with increasing daylight hours, without additional stimuli, it begins to grow.
Gardeners do not undertake to explain such an “exception to the rule,” but they claim that they have repeatedly encountered such situations. This means that wintering calibrachoa in a city apartment with heating devices, dry air and drafts is not a myth, but a reality.
Conclusion
Calibrachoa is a garden perennial that does not overwinter outside. Caring for the plant during the dormant period is not difficult, every gardener can do it.
Failures are a matter of everyday life. Any gardener will confirm that there are situations when a flower does not want to grow with the most first-class care and, on the contrary, surprises with its beauty with minimal attention. So it is with calibrachoa. Through trial and error, you can find your own way of storing perennials.
“Garden, vegetable garden, do it yourself” shares his personal experience:
Calibrachoa are micropetunias that bloom luxuriously and do not require abundant watering. Previously, such flowers were grown only from cuttings. Now you can breed the calibrachoa plant in a different way. Growing from seeds greatly simplifies the spread of this species. The calibrachoa mixture has been selected so that you can grow them in container plantings, in the garden plot, on your balcony in bright pots and cache-pots.
The Million Bells series includes about 18 varieties with a great variety of colors: dark yellow, pink, cherry, lemon yellow, red and crimson. Initially, in nature, Calibrachoa flowers were purple in color - this is their natural color. Later, in our days, the plant became interested in flower growers, and breeding varieties appeared with brown, yellow, blue, white, red and
Calibrachoa has the main distinguishing feature, which is that the flowers of this plant have a “throat”. It has a different color from the corolla and can be brown or yellow.
Typically, calibrachoa garden flowers are regular in shape and resemble the bell of a petunia. Today, breeders have developed terry varieties, which are somewhat inferior in beauty and splendor to simple specimens.
How is calibrachoa different from petunia?
Many flora lovers acquire a wide variety of and sometimes even rare plants at home, ranging from simple cacti to giant canas. Each plant has its own subspecies, which has a completely different structure. For example, you can take common petunia. This beautiful flower has a kind of relative, but significantly different in genetic data. The name of this flower is calibrachoa, growing from the seeds of this plant is very popular today.

Calibrachoa has recently appeared in the homes of many flora lovers. The external differences between this plant and petunia were small, so many saw it in it. And even scientific biologists attributed this species to the genus Petunia.
But in 1990, scientists were able to prove that calibrachoa flowers differ significantly from petunia in DNA structure. So, if we look at petunia, we can come to the conclusion that it has only 14 chromosomes, in contrast to calibrachoa, which has 18. So, by scientific standards, we can consider that these plants are completely different, although they have related ties.
Differences between petunia and calibrachoa plants
How are these plants different?
The calibrachoa flower is only about 3 centimeters in diameter.
It has much more flowers than petunia.
This amazing plant has its own well-known varietal series, for example, a name such as “a million bells”. This species can produce shoots even with minimal comfort and without soil - up to one meter.

No matter how amazing the calibrachoa plant is, little is known about it to ordinary buyers. Therefore, this flower may be sold under other names such as surfinia and
Difference between Surfinia and Calibrachoa
Flower size. It is usually small in size, but in minitunia it can also be up to 3 centimeters.
The neck (pharynx) at the base of the corolla is bright yellow.
Calibrachoa leaves are elongated, approximately 1 centimeter wide and 4 centimeters long, covered with small hairs. This is the main difference, since the stem is also covered with fine fluff.
The stem of calibrachoa is more like the trunk of a shrub and is prone to woodiness, unlike petunia, which has a herbaceous stem.
Growing and care
Like all other plants, it loves sunny color and calibrachoa. Growing from seeds greatly facilitates the spread of this species. Below we will consider in detail the main points of caring for this extraordinary plant.

Bloom
Garden calibrachoa flowers are very similar to only they are slightly smaller, their diameter is approximately 3 centimeters, with a smooth edge of the petal. Natural color, but now many varieties have been created with different colors: red, white, yellow and brownish. In many varieties, a dark vein in the center is clearly visible, and the base of the petal itself is more brightly colored.
If you want calibrachoa to delight you with flowering all the time, then as soon as you notice that the flowers begin to fade, you need to pick them, otherwise it will set seeds. Flowering usually becomes weaker towards the end of summer, during which time it is recommended to prune the stems. Thanks to these manipulations, the branching and development of new buds is stimulated.

Foliage
The leaves are much smaller than those of petunia (length is approximately 3-4 centimeters and width 1 centimeter), lanceolate. All green parts of the crop are covered with a hard, but not thick, layer of hairs.
The soil
Calibrachoa thrives in loamy and sandy loam soil, but can grow in any fertile soil. It tolerates well the addition of compost or humus to the soil, but not manure. For acidic soils, it is necessary to add lime (250 g per m). Calibrachoa is usually placed in pots or containers with nutritious soil, which consists of humus, peat, sand, leaf or turf soil. The soil should absorb moisture well and be loose. Be sure to add mineral fertilizers that dissolve slowly and hydrogel. There should be drainage at the bottom. About 60 plants grow at 1 meter.

Lighting and temperature
For successful growth and flowering, the plant needs sufficient heat and light. Calibrachoa grows well on sunny terraces or balconies facing southeast or south. But this flower is afraid of the drying heat. If placed in direct sunlight during the day, calibrachoa can burn. It is recommended to provide diffused light during these hours.
Place in the house
Calibrachoa has very fragile stems and flowers; strong winds can damage or tear them off. Therefore, an unglazed balcony on the upper floors is not suitable for keeping this plant. The most favorable place for growing calibrachoa is considered to be a place protected from any wind.
Calibrachoa seedlings. When to sow?
To plant calibrachoa, you can use containers such as hanging baskets, balcony boxes or flowerpots. To make the plant feel comfortable in a new place, it is recommended to use a light substrate with a large amount of baking powder. At least three liters of soil should be placed per container.
In order to achieve the maximum flowering period of plants, the best way is to grow calibrachoa from seeds. Planting period is mid-January or February. It is imperative to grow in well-lit rooms, as this plant loves sunlight. Planting calibrachoa of large varieties of flowers is favorable in February - March. Depending on the sowing of plants, flowers can be obtained as early as April, mid-May or June.

Humidity
The need for moist soil in calibrachoa is much less than, for example, in petunia. On the contrary, moisture is unacceptable for this species. If you overdo it with watering the plant, its tender roots will immediately begin to rot, and the calibrachoa will die. But she loves frequent spraying. On particularly hot summer days, it is recommended to spray the plant at least three times a day.
Fertilizer
If calibrachoa is in the growing season, it must be fertilized regularly. It is enough to feed only once a week. When the plant already has buds or flowers, it is better to choose fertilizers that contain a large amount of potassium and phosphorus.
Reproduction
The plant reproduces in two ways:
seeds;
cuttings.
When propagating calibrachoa by seeds, no one can give you a guarantee that they will grow into the same lush, beautiful and healthy plant as the main one. Seed-grown specimens may not bloom well, and the flowers themselves may not be the same color or size as the main plant.
A more productive option is propagation of calibrachoa by cuttings. The process is quite simple. At the beginning of autumn, apical cuttings measuring approximately 4 centimeters in length are cut from the main plant. The lower leaves of these cuttings are removed and planted in a moist substrate. To speed up root growth, you should equip a greenhouse or simply cover the cuttings with a plastic cup, ventilating the plants for several minutes every day.
In a greenhouse, Calibrachoa cuttings take root quickly. After which they need care, like ordinary adult Calibrachoa. They calmly survive the winter, and in the spring the tops of the formed bushes are again cut off and rooted. Calibrachoa is grown from these fresh tops.
Purpose
This plant looks great in flowerpots, hanging containers, and bright flowerpots. Goes well with
Propagation of calibrachoa by cuttings is the most convenient and effective way to grow this ornamental crop. Sowing seeds and caring for seedlings is a more labor-intensive process that can present an unpleasant surprise at any moment. Let's consider both options for propagating herbaceous perennials, pay attention to possible mistakes and ways to solve typical situations.
How to get seedlings
Calibrachoa and petunia bushes differ in the number of chromosomes. Externally, the difference manifests itself in certain morphological characteristics:
- in lignification of the stem;
- in crushing flowers;
- ability of seeds to ripen.
Gardeners have long noticed that after the bells have faded there is no need to pick the dried buds, that is, to purposefully maintain the decorative effect of the perennial. Calibrachoa does not form seed pods. This property helps the plant direct energy exclusively to setting new buds. Hence the enchantingly abundant flowering.
Sometimes gardeners discover the consequences of self-seeding in pots with “overwintered” mother plants - tiny bushes. After transplanting into separate pots and complex fertilizing, young calibrachoas bloom, causing bewilderment to the gardener - the children do not at all look like the parent bush.
There is only one conclusion. If you want to experiment in this direction, personally germinate several pills with seeds, it is better to turn to products from trusted manufacturers. High-quality seed material will allow you to grow seedlings of a specific variety or a certain color at home - what is indicated on the package. Collecting seed pods yourself can end in disappointment. Calibrachoa has sterile flowers.
And finally, when planning to grow a perennial from seeds, you should be prepared for the following:
- the fragile seedlings of the plant are much more capricious than those of petunia;
- young shoots grow very, very slowly;
- The slightest mistake in watering and lighting can destroy the seedlings.
If these characteristics do not frighten the gardener, you can begin organizing a greenhouse.
Time
The optimal time for sowing calibrachoa seedlings is the end of January or the first ten days of February. Unlike petunia, this plant develops extremely slowly. Seeds begin to hatch 1-3 weeks after all the necessary conditions for germination have been created. In early spring (if necessary), seedlings are planted in separate containers.
The soil
For calibrachoa, light, breathable soil is important. You can use a purchased substrate diluted with vermiculite, hydrogel or coconut fibers (50x50), or you can stock up on peat tablets.
Both options meet the plant's soil requirements:
- ease;
- humidity;
- breathability.
Planting and organizing a greenhouse
How to grow a perennial from seeds? The step-by-step algorithm of actions is as follows. The peat tablet is soaked for 20 minutes in clean water, then lightly squeezed. Some gardeners use boiling water for this purpose. The goal is to destroy potential soil pests.
Dragees with calibrachoa seeds are not deepened, but simply placed on the surface of the soaked tablet (or on top of the ground). Using a spray bottle, re-moisten the substrate.
A greenhouse for seedlings can be a plastic cup with holes pierced in the bottom, as well as glass, plastic film, plastic containers from store-bought pastries and cakes.
In the first days, it is important to organize for calibrachoa seeds:
- additional lighting (up to 16 hours a day);
- moderate soil and air humidity;
- stable temperature within 21-25 ⁰С.
On a note! It is important to prevent condensation drops from accumulating above the film, glass or plastic. Regular ventilation of the greenhouse or the organization of additional openings will help to avoid this.
Thin calibrachoa seedlings gradually begin to adapt to room air. The greenhouse is removed within 2-3 days. If necessary, seedlings with 2 leaves are planted in separate containers.
The video from “Garden, vegetable garden, with your own hands” will clearly, step by step, demonstrate the process of sowing pellets with seeds, explain the importance of using river sand and organizing comfortable conditions for the germination of calibrachoa:
Cuttings
Many gardeners who are mastering Calibrachoa agricultural technology for the first time are interested in how to propagate rare varieties by cuttings. Are there certain rules when rooting them?
Top length. Root growth stimulants
Despite the existence of numerous step-by-step instructions explaining the process of cutting calibrachoa, there is nothing complicated about this action. Surely, the gardener has already shaped other types of indoor plants: athenia, lemons, etc.
Regular pruning of trunks and stems causes flowers to branch, bush, and throw out side shoots. In general, it gives perennials decorativeness and splendor.
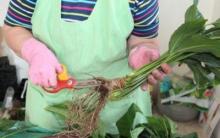
How to take calibrachoa cuttings? To obtain planting material, you need to cut or pinch off the top of the mother plant with 4-5 internodes. Of these, the lower 2-3 rows of leaves are torn off, leaving the upper rosette intact. The length of the cutting is not a fundamentally important criterion and does not affect the effectiveness of rooting.
If desired, the seedlings are kept for 15 minutes in a solution of Epin (a growth stimulant drug). However, as practice shows, calibrachoa cuttings do not particularly need this procedure. Even without additional measures, they have a fairly high survival rate. Epin's solution is successfully replaced with Kornevin's powder, which is used to treat sections before planting in the substrate.
In general, all root formation stimulants (in this particular case) are more correctly called a means of self-soothing for the grower than an effective preparation for the propagation of calibrachoa.
On a note! Plants should be planted immediately after cutting. Any delay has a negative impact on the survival rate of the cuttings. After 1 hour, they lose 70% of their ability to root.
Landing. Soil requirements
The soil for rooting calibrachoa cuttings is standard: light, loose, with a pH value of 6.5-7.
The purchased substrate is diluted with perlite, vermiculite, coconut flakes, and hydrogel.
For convenience, use toothpicks and matches to make indentations in the soil, insert the cutting and carefully press the stem with soil. After this, the plant must be watered well so that water comes out of the drainage holes.
The container with the cuttings is placed in a greenhouse. Now it is important to ensure that the room with young calibrachoa is kept humid, light and warm.
On a note! The peculiarity of the perennial is that it does not take root in water and rots.
Common mistakes
Calibrachoa is a rather capricious plant, at least in comparison with petunia. When rooting cuttings, it is important to avoid:
- accumulation of condensate on the walls of the greenhouse;
- soil drying out;
- changes in air temperature;
- lack of light.
In the first case, the plant is often affected by rot. If young leaves touch wet soil or the ceiling of the greenhouse, the risk of losing calibrachoa doubles.
Direct rays of the sun combined with high humidity cause rotting of the cuttings. Immature plants cannot cope with hot air, lose their elasticity, and die. It is important to take care of diffused light here.
Drying out the soil, as well as its hypothermia due to temperature changes, damages the calibrachoa root system so much that it is often impossible to revive the sprout.
Lack of light weakens the plant's immunity. The cuttings stretch out, turn pale, and lose their decorative appearance.
But! Despite the above precautions, providing calibrachoa with comfortable growing conditions is not at all difficult. The perennial takes root well, forming a healthy mother plant by summer for subsequent cuttings.
On a note! If the grower managed to maintain the turgor of Calibrachoa leaves for a week, the operation of rooting the cuttings can be considered successful - the root formation process has begun.
Caring for young bushes
The normal rooting period for perennials is from 7 to 21 days (taking into account the use of drugs such as Epin, Kornevin). The appearance of new leaves, stretching of the stems, entwining of the peat tablet with roots indicates that it is time to transplant the calibrachoa into a new pot.
The container is drained, filled with soil, in which the plant is placed along with a peat tablet (old substrate).
If a young plant throws out a bud, it is better to pinch it. Then the perennial will continue to grow its root system and will not waste energy on flowering.
Standard care for rooted calibrachoa cuttings:
- protection from drafts and returning spring frosts;
- moderate watering;
- gradual adaptation to sunlight (otherwise the plant will burn);
- maintaining air temperature within 25 degrees.
Practice shows that calibrachoa cuttings are prone to diseases of adult plants. So, chlorosis is a common occurrence for them. In this case, young bushes are treated with any preparations containing iron (for example, ferovit, cytovit). The solution should be weak and not exceed the dosage indicated in the annotation.
Feeding rooted cuttings is acceptable. Phosphorus-potassium and complex fertilizers are used in minimal concentrations.
Wintering
A pot with a mother plant can survive the winter and begin to grow in the spring. The optimal air temperature during the Calibrachoa dormant period should not exceed 10 degrees Celsius. Rare watering and absence of drafts are sufficient conditions for preserving the plant.
In February, the mother plant is cut to produce young and lush bushes. The procedure can be repeated in mid-summer (using the side stems as a basis), in order to obtain healthy and strong “mother plants” in winter. In this way, the florist will fully provide himself with different varieties of calibrachoa and eliminate the possibility of losing his favorite bushes.
How to properly cut a mother plant, says “Garden, vegetable garden, with your own hands”:
Cuttings are one of the most commonly practiced methods of vegetative propagation of plants.
Many types of garden and house plants can be successfully propagated by cuttings.
Young plants obtained by rooting cuttings develop relatively quickly and soon bloom. For example: it takes about 2.5-3 months to start blooming. And a petunia cutting, rooted from a flowering plant in the warm season, forms buds within two weeks.
Rooting of cuttings is resorted to in cases where:
- I want to propagate my favorite plant;
- the plant dies, but you can still cut a healthy cutting from it and keep this species or variety;
- it’s a pity to throw away cut branches after forming bushes - they can be rooted and, for example, given to a beloved friend.
I’ll tell you about my experience of cutting garden flowers using calibrachoa and petunia as an example.
Preparing calibrachoa and petunia cuttings for rooting
With a variety of colors of numerous flowers, simple or double, they are very popular among flower growers and do not need any special introduction.
Calibrachoa is a continuously flowering hanging plant, intended for growing in balconies and high areas.
In their shape, calibrachoa flowers are very similar to petunia, but they are much smaller - only 2-3 cm in diameter. This is by no means a drawback of the plant, because a huge number of them bloom on each calibrachoa vine! It is not for nothing that the most famous calibrachoa variety series is called “Million Bells”. Compared to petunias, calibrachoas are more cold-resistant and practically not susceptible to disease.
Calibrachoas bloom most profusely in full sun, but these plants also look good in partial shade.
It is better to plant Calibrachoa in loose, nutritious soil and provide the plant with regular watering and fertilizing, avoiding stagnation of moisture.

In the photo: calibrachoa blooming in a hanging basket; rooted calibrachoa cuttings
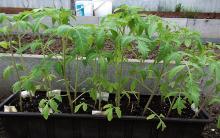
These “three heroes” are rooted and planted cuttings of Calibrachoa. They have taken root well in their pots, but require pinching to form a branched bush. I'll cut them off above the fifth pair of leaves. New branches will soon form under the cut site, and the cut off crown can be rooted and a new plant can be obtained.
To obtain a cutting, we cut or pinch off the lower leaves of a calibrachoa branch to expose the trunk. We leave a few leaves on the top for photosynthesis. Large leaves of the cuttings can be cut in half to avoid excessive loss of moisture.

In the photo: obtaining a calibrachoa cutting from a cut branch
In winter and early spring, plant cuttings take less root than in summer. Therefore, to protect against failure and speed up the process of rooting cuttings, I will resort to help (this procedure is not necessary).
I dissolve 4 drops of Epin in a glass of water (200 ml) and send the cuttings to swim in the solution for 20 minutes.
We perform the same manipulations with petunia cuttings. We cut the cuttings so that at least two or three internodes remain on them. We expose the trunk, leaving the crown, and send the cuttings to swim in a solution with Epin.
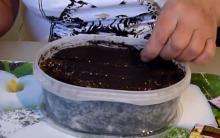
Rooting flower cuttings in peat tablets
If you have the opportunity to root cuttings in peat tablets, root in them. Almost one hundred percent survival rate is guaranteed. And - sheer pleasure. It is easy to maintain the desired humidity and easy to replant plants. Peat tablets are a wonderful invention of mankind!
Before planting the cutting, soak the peat tablet for 20 minutes in clean water, then lightly squeeze out the excess moisture and make a hole in it. You can use a toothpick for this.
Carefully insert the stem into the recess and lightly squeeze the tablet.

In the photo: use a toothpick to make a hole in the peat tablet; cuttings planted in a peat tablet
All that remains is to place the tablet with the cutting in a homemade greenhouse made of two transparent cups. Cuttings need high humidity and light to root.
If there are several cuttings to be rooted, peat tablets with them can be placed in a common bowl and covered with a transparent lid or film (but so that the tops of the cuttings do not touch them).
I always make a hole in the lid of a makeshift greenhouse to allow condensation to evaporate. This allows you to get rid of the work of repeatedly airing the cuttings. It looks something like this.

In the photo: a calibrachoa cutting takes root in a mini-greenhouse with a hole; petunia cuttings planted in light soil
If there are no peat tablets, you can root the cuttings in light soil. I mix ready-made flower soil with coconut fiber in a 50:50 ratio. Such additives make the soil loose, but retain moisture and allow air to pass through.
Rooting flower cuttings in light soil
For an example of rooting in the ground, take a prepared petunia cutting and carefully place it in the soil mixture. The soil should be moist, but not squishy, and the leaves should not touch the ground. This way we will avoid possible troubles in the form of rot.
Before planting the cuttings, it is a good idea to treat the soil against fungi and bacteria with suitable preparations ("", "Previkur", "Maxim", etc.).
We also cover the planted petunia cuttings with a greenhouse glass with a hole and place it in a bright place.
Now our task for the next week is to think about our pets 2-3 times a day and lightly spray the leaves of the cuttings. It is important! Until roots have formed, the plant drinks only through the leaves. No water - no life.
If on the fifth or sixth day the planted cuttings look vigorous, and its leaves have not lost turgor (elasticity), then you are doing everything correctly, and the root formation process has started.
After another week, the rooted cuttings begin to grow new fresh leaves; their roots are visible through the walls of a glass or peat tablet.
The photo below shows that the calibrachoa stalk already has roots. And after two weeks, the petunia cutting not only formed roots, but also produced buds.
However, if the roots are not yet visible, and the stalk is about to bloom, then it is better to pinch off the buds - let the plant spend its energy on root formation.
Cuttings of calibrachoa as a way of winter preservation of plants Category: Useful information Author: Tatyana Molodtsova To make you happy with the blooming clouds of calibrachoa grown by yourself every summer, you need to cut the plants twice a season. In July, cut and root cuttings from the mother plants, from which by the fall mother plants will grow, which will remain overwinter in a cool, bright room. In February-early March, from these mother plants you have grown, you need to cut and root cuttings, which by summer will become a decoration for your hanging flowerpots. And then again - cuttings from these plants for winter storage, and in winter - cuttings again to grow new plants. You can sow seeds, but is it necessary... Recently, you can find calibrachoa seeds on sale. Of course, if you have an irresistible desire, you can try to grow these flowers from seeds. But does it make sense... The fact is that thin calibrachoa shoots are even more capricious than petunias. To get flowering specimens by summer, you need to sow the seeds in the first half of February. The seedlings grow for a long time, reluctantly, and slowly gain strength. Therefore, it is much easier to propagate the plant by cuttings. This is also more profitable in material terms - from one summer calibrachoa mother plant you can root quite a lot of cuttings. And in February-March, cut about the same number of cuttings from them. That is, the number of plants you produce grows exponentially. Vegetatively propagated calibrachoa varieties bloom more luxuriantly than those grown from seeds. The fact is that they have a “set” at the genetic level - not to set seeds. This means that the plant does not waste energy on this, devoting all of it to flowering. When faded flowers dry out, they simply fall off without leaving behind a seed pod, which means they do not spoil the appearance of the bush; it always looks neat. Cutting technology For both summer and winter cuttings, the same scheme should be followed. Using a sharp tool (so as not to pinch the plant’s vessels), you need to cut off the tops of the shoots so that there are 4-5 internodes on the cutting. In general, I also use the middle parts of the shoot as cuttings, the main thing is that the shoot is not woody. Such cuttings, although worse, still take root and give rise to plants. Preparing for calibrachoa cuttings Cutting calibrachoa cuttings Next, cut off the leaves. The bottom pair is a must; this internode will be immersed in the soil. We leave 1-2 upper pairs of leaves, the rest, which are located lower at the base of the cutting, either cut off completely, or cut the leaf blade in half. If you leave a lot of green mass, the cutting will be forced to evaporate moisture from the surface of all the leaves, spending a large amount of energy not on the formation of the root system, but on evaporation. But you can’t remove almost all the leaves - after all, the cuttings still feed on them. Find the “golden mean”. Apical calibrachoa cuttings Ready-made calibrachoa cuttings If the internodes are very short, then sometimes you have to “expose” 2-3 internodes from below in order to fix the cutting in the soil. Do not expect that every cutting you cut will take root, but the yield will still be large. You can plant the cuttings in pre-soaked peat tablets and place the container with the plantings in a special greenhouse for plants or, for example, in a transparent cake box. But I do it my way. Before cuttings, I prepare the planting containers - I cut the bottoms in small, 100-gram plastic cups in 2-3 places. I pour light, permeable, slightly moistened soil into it (if the soil is stored in a bag with small holes, then it does not dry out unnecessarily, maintaining its natural moisture. I dip the lower parts of the cuttings in Kornevin powder and carefully immerse the bare internode into the soil. I press the soil in the cup to the base cuttings. If you “squeeze” the cuttings with soil not well enough, rooting will go worse. I water the cuttings a little. But I don’t flood them! It is important to plant the cuttings first and then water them, because with the reverse sequence, a crust forms on the surface of the washed-in damp soil, making it difficult for small roots to breathe. Planting calibrachoa cuttings After planting the cuttings, the soil needs to be slightly moistened. I put the cups in a lattice plastic box and cover it with film so that small holes remain. If you “seal” the box tightly, the cuttings will simply rot. And if you open it too much, they will dry out. That is, I tuck Not all the edges of the film are under the bottom. The film should fog up, but condensation should not accumulate in drops. After planting the cuttings, you need to set up a greenhouse for them. You don’t need to cover the rooted cuttings tightly with film. I choose the place for the boxes meticulously - the cuttings should not be exposed to direct sun (“cooks” instantly). This point is especially relevant during summer cuttings, when “the sun is still high.” Therefore, you have to cover the boxes with clean white bags. There is no need to place the cuttings on the floor of the greenhouse in the hope of protecting them from sunlight - they will quickly rot. Now, for 1.5-2 weeks, you will have to spray the cuttings daily from a spray bottle with a fine spray and ventilate the mini-cuttings. In hot weather you have to spray twice. Ideally, in the area of the leaf area of the cutting, the moisture should constantly remain in a state of fog, but the soil should not be waterlogged. You can add Zircon to the spraying water a couple of times. It not only encourages the plants, but also helps speed up the rooting process. The cuttings need to be shaded from the scorching rays of the sun. The roots of the cuttings are clearly visible through the walls of the glass. You can easily determine whether your cuttings have taken root - the roots will be visible through the transparent walls of the glass. Then you should switch to moderate soil watering and gradually free the boxes from the film - for several days, let the film just lie on the edges of the box, do not tuck it, and then remove it altogether. Look at the lighting according to the situation - gradually accustom young plants to it. The crowns of shoots that have begun to grow should be pinched. You can then repeat this technique a couple more times to induce more tillering. When cutting cuttings in spring, more attention should be paid to this procedure in order to form a neat ball by summer. As the roots entwine the provided space, future queen cells should be transplanted into flowerpots with a diameter of 11-13 cm. You can hang them on the greenhouse guides. I plant in 0.5-liter glasses with holes in the bottom. It is preferable to use opaque pots so that light does not penetrate through the walls and does not contribute to the development of algae on the inner walls of the cup. Queen plants obtained from July cuttings should be kept in winter in a very bright room at a temperature of approximately +12 ... + 15 ° C, for example, in a heated greenhouse or veranda. If necessary, do additional lighting. And under no circumstances should you overfill it! Rooted calibrachoa cuttings Closer to spring, in February-March, everything will repeat itself all over again. During rooting, cuttings need a temperature of about +20°C, but after transplantation - no more than +15°C. And good lighting so that the shoots do not stretch, the plants are squat, and the leaves do not turn yellow. In April, if everything goes well, rooted and bushy plants can move to an unheated greenhouse. Calibrachoa Calita Supercal Terra Cotta A very important point when growing calibrachoa is to prevent the appearance of powdery mildew, which likes to appear at the most unexpected moment and develops very quickly. As a preventive measure against most fungal diseases (and bacterial ones too), I regularly spray and water calibrachoa queen cells with a solution of “harmless” biological preparations Alirin-B or Gamair. If you discover powdery mildew too late, it is better to treat the plants with Topaz (according to the instructions). Very often, especially when kept in a greenhouse, queen cells are colonized by aphids, whiteflies, and spider mites. Against aphids, I first use the biological preparation Biotlin. Usually it helps. Fitoverm uses “biological weapons” against the last two pests. And only when pests are not affected (usually in the summer, in the heat), I use Aktara or Alatar.


Kishmish best large-fruited varieties
Covering a cake with chocolate velor at home How to make a velor coating
Classification of artificial superhard materials
We use decorative inscriptions in the interior of the apartment Letters and inscriptions in the interior
How to choose seals for a gate valve or check valve