It’s a rare person who is passionate about creating sweets and doesn’t know what it is. But if you are a complete beginner, then here it is: chocolate velor is a type of top covering for a cake that looks very much like a noble fabric - actually, velor or velvet. The coating composition is chocolate (dark or white) and cocoa butter, and food coloring, if necessary. In order to cover a cake with velor (“veil”), you need to either buy a ready-made composition in a spray can, or purchase a spray gun specifically for this purpose, the necessary ingredients and prepare the mixture yourself. It would also be nice to have a cooking thermometer (with time and experience you will learn to do without it, but at first it will be very useful). That's it in short. And now - as we like, with details, relish and photos of steps and examples :)
Initially, modern mousse cakes were covered with chocolate velor. The technology for preparing them involves freezing them into natural ice! The surface of such cakes is even and smooth. And that’s all velor needs. It lays very nicely on a frozen mousse cake, with a distinct lint, and sets quickly. Here, look at this.
However, to the great joy of home confectioners who do not practice mousse desserts (not everyone is interested in this), you can velor ordinary cakes, which many do successfully. There are two options on how to do this.
1. “Pack” a classic sponge cake in a dense mousse, freeze so that only the mousse itself sets and the cake does not have time to freeze, remove from the freezer and spray with velor.
2. It’s good to line the cake with cream (almost any cream, the main thing is stable! For example, chocolate ganache, butter meringue (and any butter cream!), butter cream cheese will do), put it in the freezer for half an hour, and then take it out without Cover long conversations with velor. Here, for example, is my experience of covering a “simple” cake with velor. The alignment suffers a little here, of course, but the point is clear. The cream under the velor is chocolate ganache.
If you really want, you can even veil the backing! Many people do this. Not everyone likes golden factory substrates; they do not always suit the idea of a cake; besides, this is a very interesting effect when the cake seems to smoothly flow into the substrate, forming a single whole with it. Quite often, mastic cakes are decorated this way, especially children’s cakes with a theme. So, confectioners today offer their clients velor as an alternative to mastic. I also recently added velor backing in accordance with my idea.
I’ll say right away that I didn’t use cans of ready-made velor.
First of all, because of their prohibitive cost. Maybe, of course, one can will be enough for several cakes, maybe it’s very convenient, you don’t need to prepare anything, everything is guaranteed to work out, but, of course, there is only one color in the can, and even that, according to the stories of experienced people, is not always predictable , and if you want another one, you’ll have to buy another can. However, if you are not going to velor cakes often and, in principle, bake them several times a year, then it is easier, of course, to buy a spray can for the occasion, and that’s all. I understood that I would be doing a lot of velor, so I immediately decided that I would make the composition myself. Well, and to buy a spray gun. More about him a little later.
It’s also convenient to use cans if you want to mix velor of different colors on one cake. That's very beautiful. It will be inconvenient with a spray gun: pour out one mixture, prepare a new one - a different color, rinse the spray gun, fill it, cover it... Long and tricky. For this, it’s good to have at least one color in the can. And give the main one from a spray gun, for example.
Prepare the mixture for velor:
If we want to get dark-colored velor, we should take dark chocolate. The second essential component of velor, as I already said, is cocoa butter. It is sold in specialized confectionery stores, it is quite expensive, but its consumption is low. Proportions 1:1. Please note: this is variable! Some people prefer others, but 1:1 with dark chocolate, as far as I know, is the most common option, and I like it. To cover a small cake with a diameter of 18 cm and a height of 7 cm, you need approximately 30 g of chocolate and cocoa butter.
Here we weighed out the required amount of ingredients. Look, I have the most ordinary chocolate bar from the supermarket. What I mean is that it is not necessary to use professional chocolate in discs, although it would be very good, but everything will work out with ordinary chocolate. It’s just that, as confectioners say, what’s on store shelves isn’t even chocolate at all. Google for fun about what the composition of real chocolate should be, and you will see that, in essence, they are right. But okay, we are not proud, we work with what we have.
Melt both in the microwave or in a water bath.
This must be done one at a time.
The melting point of chocolate and cocoa butter is different. Put it together - the chocolate will burn, and the cocoa butter will barely melt during this time. Chocolate, we remember everything, we melt it in pulse mode, if in the microwave, that is, literally 15 seconds at a time. We take it out, turn it over, melt it again. It may not go all the way: it will come from its own heat and the warmth of the bowl. If in a water bath, make sure that neither water nor steam gets into the chocolate, it doesn’t like that.
Mix. You can directly in the spray gun tank. In a good way, this mixture now needs to be tempered (a terrible word for many confectioners! :)), but I never do this and, honestly, I think that this is not necessary. The pastry chefs I know, who work a lot to order, also do not temper, and the coating behaves perfectly.
There is such a thing as operating temperature.
One in which the cake will not melt, the velor will lie beautifully, and the spray gun will not clog. For dark velor it is 38 degrees C. We measure it using a culinary thermometer. How it feels: you can do a test on your lower lip, the mixture will be barely warm, even closer to cold, but the consistency should be fluid! It is very important. If the mixture is thick, it will clog the spray gun and nothing will work (tested by me)! You'll have to disassemble it, wash it, reheat the velor, etc. Honestly, I don't always stick to the specified temperature. I heard from girls I know that even at 45 degrees C they wear velor and everything is fine. And I myself have covered cakes with quite warm velor more than once. But I gave you the right guidelines, and at first you should still adhere to them. And then you yourself will feel what’s what.
Once the working temperature is reached, spray the velor onto the cake - just taken out of the freezer just a minute before! - from a distance of about 20 cm.
The space around needs to be prepared, otherwise - yes, yes! - everything will be covered in chocolate in the most literal sense!
There's a lot of people here. You can build some kind of box, you can hang it with film or fabric, but I usually put two large cardboards in the corner. It is convenient to place the cake itself for veiling on a rotating stand, if you have one. You spray and turn it, and the cake evenly acquires the coveted fluffiness.
If you need black velor or, say, dark red or some other dark color, you need to add the appropriate dye to the finished mixture.
It is believed that you need a special fat-soluble dye, like the kind for chocolate. But I also used the usual water-soluble gel “Top Decor” and Americolor, everything works, you just need to run the mixture with a blender to rid it of paint crystals, otherwise they spread out into ugly specks on the finished cake as it defrosts.
Well, I’ll also note: it takes a lot of dye to achieve a rich color. This is why I recommend, if you need a dark, rich color, to dye velor on dark chocolate rather than white! The dye consumption will definitely be less, but be prepared for the fact that you will still need quite a lot of it. This is a downright minus for ardent opponents of all chemicals. Dyes, of course, are not useful. The solution then is natural chocolate color, pastel colors, and if you really want to be spectacular, you don’t have to eat velor, like mastic: it covers the cake with a thin layer and is easily removed from it with a fork.
Need colored chocolate velor? Bright or subtle, but not too dark?
Then we make velor on white chocolate. P
I have different proportions here. I take 60/40 - chocolate and cocoa butter.
But I repeat, on the Internet you can find completely different data, say, 70 to 30 or, as in the case of dark chocolate, 50 to 50. And the technology for preparing the mixture for velor is exactly the same as for dark chocolate: melt separately , mix, stir until smooth, add coloring, punch with a blender. The operating temperature for white chocolate velor is 35 degrees C.
We must break through, otherwise we end up with such a nuisance (photo https://vk.com/photo-57802780_456243687). I specially took a quick photo of this shame, as I knew it would come in handy! Looks terrible, don't do it!
Spray gun:
I’m not an expert in all these technical characteristics, honestly. I won't tell you what the nozzle size, power or anything else should be. But I will say something else, also important. We need a regular, construction spray gun, of course, a new one, which you will use only for food purposes! Nowadays, due to the fashion for velor cakes, “special” confectionery spray guns are sold, but, as far as I know, they differ from construction spray guns only in the name - “confectionery” - and the price, which is much higher. However, whether to buy them or not is entirely up to you. However, I know for sure that many famous confectioners and confectionery shops work with construction spray guns and everything works out great for them.
I have a Bosch PFS 55, which is quite common in our sweet environment. The Wagner W550 is also highly praised. If these models are no longer on sale, google their characteristics and look for a spray gun with similar ones that will suit you at a price.
After work, pour the remaining mixture (if any) into a clean container, close and store until next use. We remove everything that can be removed from the spray gun, wash it in very warm, almost hot water (otherwise the chocolate will not wash off) using detergents, then rinse it very well, pour warm water into the tank, blow it through several times until the water is gone come out crystal clear, give it a little drive and just some air to dry everything inside. At home, it is convenient to do this in the bathroom. We put away the spray gun until next use. 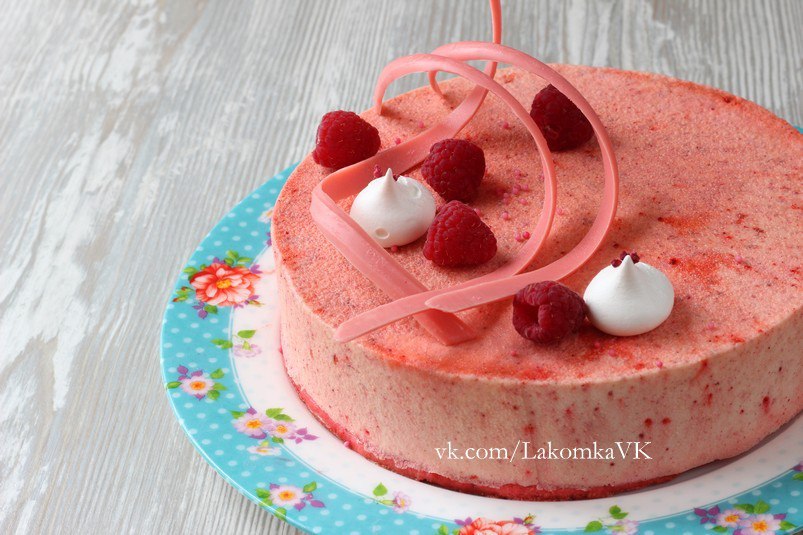
I like velor! Very! Working with it, as for me, is much easier than with glaze (glaze). It's quick to make, fewer ingredients, cools faster, no need to prepare in advance, no those stupid bubbles and fear that the coating will slide off the cake! Cleaner, which is important! I really don’t like collecting the remnants of drained mirror glaze and then figuring out where to use it. And, in my opinion, velor looks more impressive. And I like the taste better: it goes on very thin, you can hardly feel it and has a pleasant crunch when you break it. And it can also be mixed with the same glaze. But I, of course, am not against glaze.
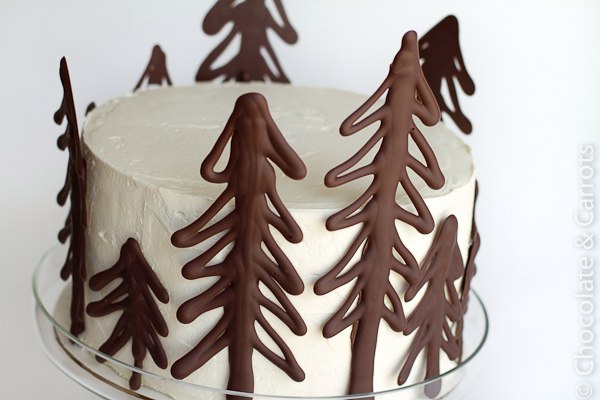
New Year's cake decorated with chocolate Christmas trees


Chocolate flake cones


Ingredients:
- 3 cups chocolate flakes
– 6 breadsticks (straws)
- 1/2 cup peanut butter
- 1/4 cup Nutella
- 3 tablespoons butter, softened
- 1 cup powdered sugar Combine peanut butter, Nutella, butter and powdered sugar in a bowl. Take a straw and spread peanut butter around it, making a light cone shape. Hold the straw and begin inserting the cereal pieces into the peanut butter in a symmetrical circle. Add cereal until you reach the top.
Break some flakes into triangles and add them to the top (where the pinecone gets narrower). If your pinecone gets too tall, cut off the top of the straw and add a spoonful of peanut butter to cover it. Insert a few more triangles at the top of the pine cone. To get a “snowy” effect, sprinkle the cone with powdered sugar.
Chocolate leaves

Chocolate feathers for decorating desserts
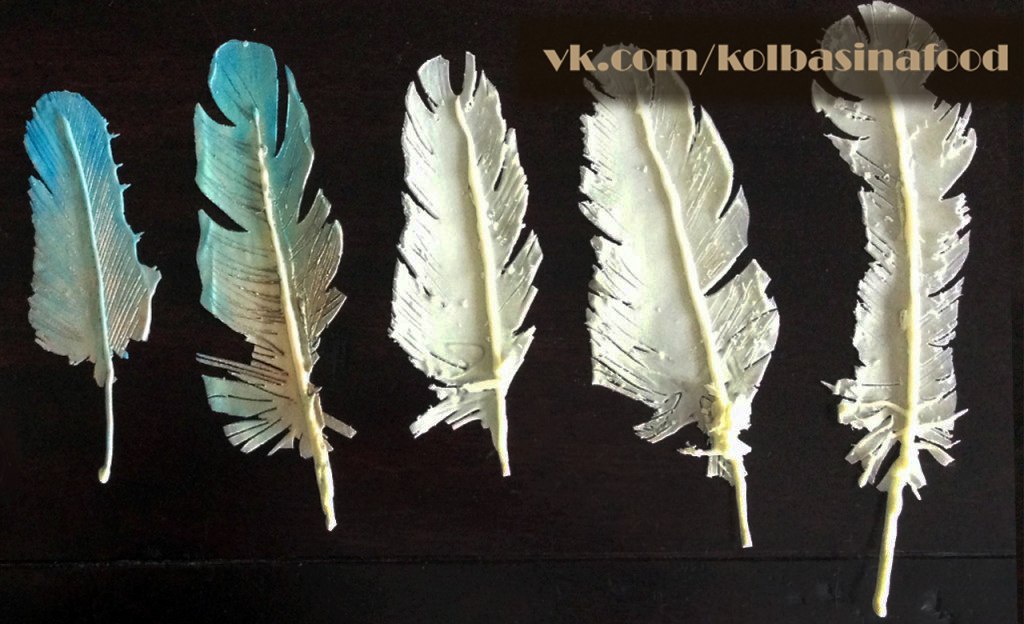
Good day everyone. Today I again want to please you with my unique and very easy-to-make discovery in the world of culinary decor. Today we will learn how to make beautiful feathers from tempered chocolate using a very simple technology. You will find a huge number of options for their use, because... an elegant sweet feather in a dessert will become the highlight of the entire dish, and maybe even the entire restaurant.
Ingredients and tools:
Tempered chocolate (you can buy it ready-made at a confectionery store, or you can make it yourself, guided by this article http://www.chocolatier.ru/shokologija/chto-nuzhno-zna... I advise you to take white)
Powder dyes (powder dyes, liquid “our feathers” will not color beautifully)
A plastic bag or pastry bag with an uncut end (pardon the pun)
Silicone mat
Baking paper
A toothpick, or a knife, or a wooden stick with a pointed end (oh, those ends)
Preparation:
A video with a detailed illustration of the technology is attached to the recipe. You can watch and read the text translated and adapted by me.
First of all, make sure that your work surface is at room temperature; in this case, working on a cold surface with chocolate will be more problematic. Place a silicone mat on your work surface and a sheet of parchment paper on top of it. Cut another sheet of parchment paper similar in size to the first and set it aside for now. Place the melted chocolate in a regular plastic bag and gather it towards one of the corners, or use a plastic piping bag. Cut off the very edge of the corner of the bag of chocolate and squeeze the chocolate onto parchment paper about 1-2 cm thick, and the length corresponding to the expected length of the feathers. Just don’t make rectangles, draw a shape close to the shape of a feather, but not very carefully.
Next, place a second sheet of parchment paper on top of the feather blanks and press it tightly. With the help of your talented hands, align the resulting cakes into a more beautiful shape, already clearly similar to the shape of feathers. Carefully peel off the top layer of parchment paper and use a knife blade to trim the edges of your “feathers.” The base should be very thin, so don’t worry that you removed some of the chocolate along with the paper, that’s how it should be. In the video, another batch of feathers is also made from the resulting prints on the second sheet.
Now, without wasting time, arm yourself with a toothpick or a wooden stick with a pointed end and, of course, a photograph or picture of a natural feather - it will be very helpful in your work. Here, although not complicated, is the work of an artist. You need to use the sharp end of a stick to scrape out gaps in the chocolate that replicate the natural appearance of the feather, this is done quickly in one movement, in some places I advise you to make these “gaps,” as I called them, more obvious for realism. You need to go over the entire edge of each feather so that there are no smooth flowing lines anywhere. Next, we need to add texture to our feather using the same toothpick, but this time we don’t press it so hard, but scratch it along the main layer of chocolate, creating only a pattern on the surface of the chocolate. To better understand my words, watch the video attached to the post.
Now we need to make a shaft for each feather. To do this, take a bag of chocolate in which we have already cut a hole and, pressing on it, draw a rod in the middle of each feather, drawing a line beyond the outline of the fan (that’s the name of the fluffy part of the feather, I just looked it up). You can also add volumetric lines starting from the pen shaft for greater volume.
Place the resulting feathers directly on parchment paper in the refrigerator until hardened. Then easily peel them off the parchment.
Actually, that's all. But you can also tint the feathers. For this, as I wrote above, dry powder dyes are suitable. Soak your brush in water, dip it in paint powder and paint! You can also enter other colors. Remember that the water on the brush is used to blur and give a gradient to the base color.
Summarizing all of the above, I want to say that this decor is both tasty and beautiful, and besides, it lasts for a very long time!
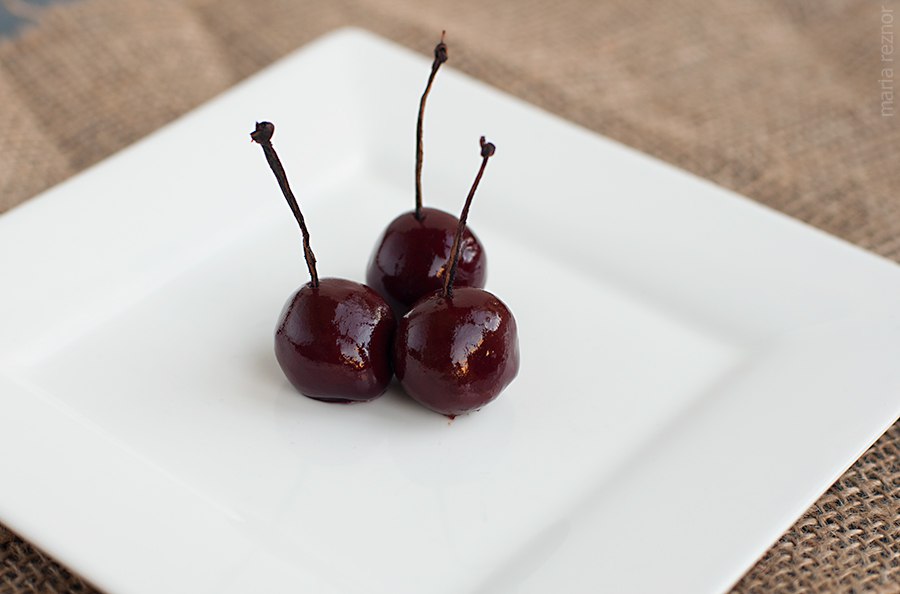
CHOCOLATE CHERRIES

Ingredients:
- heavy cream - 120 ml;
- light molasses - 2 tbsp. l.;
— dark chocolate — 340 g.
Combine heavy cream, light molasses and butter in a saucepan and cook, stirring, over medium heat. When it boils, reduce the heat. Add chocolate, stir until mixture becomes smooth. Pour into a 23x33 cm bowl, cover with film and refrigerate for about an hour. Beat the mixture with a mixer, set aside for five minutes, form balls, place on parchment and cool.
The following ingredients will be required for the coating:
Chocolate cherries

Want to wow your sweet-toothed guests? Let them taste some gorgeous cherry-like chocolates! In this decorative element, the ChefSteps team forms balls of classic chocolate ganache, dips them in a shimmering glaze and complements them with a vanilla bean that imitates the stem. These fancy pseudo cherries are a great addition to all modern desserts, but you can also simply place them on top of a regular ice cream sundae or serve them on their own with tea or coffee. But for all its splendor, this element is not as simple as it seems, the chefsteps team warns that it is better to prepare it in advance, because... Not everyone gets it right the first time.
Ingredients:
For the ganache:
Dark chocolate – 200g.
Butter – 80g.
Cream 33% - 240g.
Sugar – 20g.
Or the second option for ganache:
- heavy cream - 120 ml;
- light molasses - 2 tbsp. l.; (or liquid glucose or honey)
- butter - 1 tbsp. l.;
— dark chocolate — 340 g.
For the cover and stem:
Gellan – 1.5 g. (can be purchased here http://moleculares.ru/tekstury/119-gellanovaya-kamed…)
Cherry juice – 175g.
Red wine vinegar – 45g.
Sugar – 22g.
Water – 22g.
Leaf gelatin – 14g.
Cherry puree – 200g.
Cherry syrup – 150g.
Xanthan – 0.6g. ( http://moleculares.ru/tekstury/13-ksantanovaya-kamed…)
Vanilla pod – 1
Preparation:
First, I will tell you about the classic recipe from the ChefSteps website, and then about the method from Maria Reznor.
First we'll make the ganache. To do this, chop the chocolate into small 3mm pieces and place in a separate bowl. Cut the butter into 1cm cubes and set aside for now. Mix the cream with sugar and bring to a boil, stirring occasionally. Pour the resulting mixture onto the chocolate chips and let stand for 10 minutes. Using a silicone spatula, starting from the middle, slowly stir the chocolate until it is completely dissolved. This stirring helps to completely melt the chocolate and gives a smoother texture. Now add chopped butter to our chocolate mixture and mix again until the butter is completely dissolved. Cool the mixture at room temperature. No more stirring or shaking. The ganache is ready to use when the mixture does not flow when you tilt the bowl. If the ganache does not harden for a long time, use the refrigerator.
You can make balls from the resulting ganache by hand, but it is best to use a silicone mold with 3cm hemispheres for a more ideal result. Then there is no need to cool the ganache; pour it directly into a silicone mold with hemispheres placed on a baking sheet, align the mass with the edges of the hemispheres, wrap in plastic wrap and freeze. Be sure to fill in an even number of hemispheres so you don't have any extra halves.
Now let's prepare the cherry glaze:
At 150 pour 1.5 g of cherry juice. gellan and quickly bring to a boil, stirring constantly with a whisk. As soon as the mixture boils and the gellan is completely dissolved, pour it into a flat container set on ice and cool until completely solidified. You can also simply place the container instead of ice in the refrigerator. Break the resulting jelly randomly into pieces and blend in a blender until smooth.
Soak leaf gelatin in cold water. Meanwhile, in a saucepan, mix red wine vinegar, cherry juice (remaining 25g), water and sugar. Add the soaked gelatin there and heat until the gelatin is completely dissolved, without bringing to a boil.
Next, in a separate container, mix cherry puree, cherry syrup, xanthan, cherry gel and cherry mixture with gelatin (We made the last two ingredients above). Blend the mixture with an immersion blender until smooth and remove the air by vacuum sealing the mixture or rubbing it through a fine sieve. Other methods for removing air are shown in the attached video.
Store the resulting gel in the refrigerator until you make ganache balls.
Now let's return to our ganache:
Remove the silicone mold with hemispheres from the refrigerator. We heat it a little with a burner to make it easier to remove the hemispheres. Carefully heat the flat surface of each hemisphere (with the same blowtorch, or by placing the flat side on a heated baking sheet, or over a switched-on induction cooker). We connect the halves together to form a sphere. Return the resulting spheres to the freezer to harden, then smooth the seam with a small knife and place it in the freezer again for one hour.
Tip from the ChefSteps team: wear gloves to avoid leaving fingerprints on the cherries (OK, and for the hygiene of your products).
My note: First, fun fact - chefs all over the world, judging by what is written, do not like to wear gloves. The original says: “CHEF’S TIP: Wear gloves to avoid getting fingerprints on your cherries. (OK, and for food safety.).”
Secondly: to be honest, it seemed to me that there was a lot of red tape with these hemispheres. Where have you seen perfectly round cherries??? I haven’t seen it, so I’ll make these spheres myself from ganache by hand. It’s more aesthetically pleasing and much simpler.
So, here is the answer to my question about the perfection of the sphere: We take the chocolate spheres out of the freezer one at a time and cut off 3 mm from the top of each. Return to the freezer. (Yes, it’s definitely easier to roll the balls yourself. Take it out and put it in, take it out and put it in. The poor freezer will defrost from this)
Meanwhile, we again take the spheres out of the freezer and use a knife to cut out indentations on the side where we made a 3mm cut, imitating the shape of a real cherry. And what do you think next? We put the spheres back in the freezer.
We torture the freezer further: remove the spheres from the freezer and place them in the refrigerator for 2 hours. After that, insert a toothpick into the lower part of the sphere (on the reverse side of the cut one) and place it in the freezer along with the inserted toothpicks for an hour.
The saga with the spheres is over and before we start glazing, I would like to tell you in a simplified form my version of making spheres from ganache. As soon as the ganache has set, I would begin to roll it into balls of different sizes with my fingers, making a depression at the location of the stalk with my finger, then I would cool them in the refrigerator, insert a toothpick into their, excuse me, butt, and then freeze them for an hour before glazing. There is, of course, a possibility that for a perfect coating of glaze you also need a perfect surface of the ganache spheres, since we weren’t even allowed to leave the fingerprints of the master from ChefSteps, but I saw the recipe and the result from Maria Reznor, who already fell in love with us - she sculpted with her hands, and her cherries I really liked it.
The last stage of preparation is glazing:
Remove the glaze from the refrigerator and heat to 40C. This is a very important point, because... the working temperature of this glaze is 40C +-2 degrees, only in this case the coating will be ideal. If you overheat, the coating will be too thin and, moreover, it will begin to melt the ganache; if you underheat, the layered coating will be too thick.
Before heating the icing, prepare the foam - we will insert toothpicks with cherries into it and freeze them in it. When the glaze reaches the desired temperature, remove the spheres with toothpicks from the freezer and immerse them one at a time in the glaze, then insert them into the foam. We are sure to work quickly. As soon as all the cherries are ready, put the foam with them in the freezer until the glaze completely hardens.
While our cherries are freezing, let's make stalks for them. To do this, cut the vanilla pod into 5cm segments, cut each segment lengthwise 1mm wide, and tie a simple loop knot at the end of each thin strip. To insert our vanilla “stems” into cherries, heat a needle on the stove and insert a hot needle into the upper part of each cherry, where the indentation is, and insert a “stem” into the resulting hole. We store the resulting cherries in the refrigerator.
That’s all, actually, the delicious cherries are ready. ChefSteps are so happy about this fact that they offer to dance around the resulting cherries with your family and neighbors (Is it really that hard???). For those who want to have fun, I have attached the original text from the end of the recipe:
“These are not easy to make. If something went wrong, don’t give up-practice makes perfect. When you do succeed, buy a wrestling belt from eBay, have it rush-shipped to your house, and waltz around telling your spouse/children/roommates how amazing you are. (This usually goes really well for us.)”
Oh, and they use the resulting cherries in this recipe: https://www.chefsteps.com/activities/course-13-black-..
Now to Maria Reznor’s technique (it’s much shorter than this treatise above):
Combine heavy cream, light molasses and butter in a saucepan and cook, stirring, over medium heat. When it boils, reduce the heat. Add chocolate, stir until mixture becomes smooth. Pour into a 23x33 cm bowl, cover with film and refrigerate for about an hour. Beat the mixture with a mixer, set aside for five minutes, form balls, place on parchment and cool.
First you need to mix the juice, vinegar and sugar, be guided by the quantities according to your taste, this is not so important, then you need to evaporate the mixture until a suitable concentration is formed, be guided, again, by your taste. The taste should be rich, sweet and sour, the vinegar should not be felt in all its character. The most important thing is to weigh the resulting concentrate and measure out the correct amount of carrageenan. Return the carrageenan mixture to the heat, stirring until it dissolves. This jelly hardens at approximately 40 degrees and melts at 70. That is, roughly speaking, you need to catch the stage when the mixture is still liquid, but is about to gel. Carrageenan jelly is heat reversible, so if the mixture gets too cold, simply reheat it to continue working.
So, the mixture is ready, the chilled candies are taken out of the refrigerator, now, placing the candies on double-edged toothpicks, dip them into the mixture. And this is where the strength of materials would come in handy if I ever studied it, because a layer of jelly that is too thick breaks under its own weight, so you can apply 2-3 layers. Twist the toothpicks with the cherries in your hands a little so that the mixture is evenly distributed, stick the toothpicks into something soft for further cooling (I used a piece of polystyrene).
For the stalks you only need vanilla pods. They need to be cut lengthwise into thin strips, and knots should be tied at the ends.
When the candies have completely cooled down, you need to take a needle, heat it and make a hole in the “cherry”, carefully insert the “stem” into the hole. You need to carefully remove the candies from the toothpicks, since carrageenan jelly is fragile.
Decor “Autumn Leaves”

I’ll give you my remark right away: to make such “leaves” you will need silicone molds. For example, like these.
Velor desserts delight and fascinate. They look stylish, modern and royally elegant. Cakes with velor decoration are usually made with mousse filling with the addition of fruit or berry confit and crispy praline. Thanks to such a complex structure, they turn out equally beautiful both inside and outside. We’ll tell you how to make a velor cake with your own hands in our article. Here we will reveal all the secrets of preparing these delicious and beautiful desserts.
Cake with velor “Strawberries and cream”: culinary master class
Such a delicate and exquisite dessert can easily become a decoration for any holiday table. It belongs to the average category of complexity, preparing it is interesting and exciting, and the result will definitely meet all your expectations. Meanwhile, during the cooking process, it is important to adhere to the technology specified in the recipe, do not forget to weigh the products, strictly observe the baking temperature and the order of processing the products.
The culinary master class begins with drawing up a diagram of the future dessert. When drawing up a drawing, it is important to take into account both the size of the mold in which the dessert will be prepared and the order of the layers. The Strawberries and Cream mousse dessert will have 4 layers: a sand base, strawberry confit, cream cheese cheesecake and mousse filling. The top of the cake will be covered with velor. To prepare this you will need 2 culinary rings with a diameter of 16 and 18 cm. Let's consider the technology for preparing a velor cake step by step.
Step 1. Sand base
Preparing the cake begins with baking the base or the sequence of actions in this case will be as follows:
- Soft butter (60 g) is whipped with sugar (60 g) until white. The mass should be homogeneous, fluffy and light.
- Sifted wheat and almond flour are added to the prepared creamy mass in equal proportions (60 g each). The dough is kneaded.
- The prepared dough is wrapped in film and placed in the refrigerator for half an hour.
- The chilled dough is rolled out on parchment paper with a diameter slightly larger than 16 cm. After this, the excess edges of the layer are trimmed using a culinary ring of the required size.
- The cake goes into the oven, preheated to 175 degrees for 15 minutes.

After removing from the oven, the cake should cool thoroughly. We can assume that the first layer of velor cake is ready.
Step 2. Strawberry confit
Bright and aromatic strawberry confit has a consistency similar to berry jelly. Yes, and it is also prepared on the basis of gelatin. The sequence for preparing strawberry confit is as follows:
- Powdered gelatin (10 g) is soaked in 50 ml of cold water.
- Strawberry puree (200 g), sugar (60 g) and corn starch (10 g) are mixed in a saucepan and brought to a boil over low heat with constant stirring.
- After 2 minutes, gelatin is added to the strawberry mass.
- The mass is mixed again and removed from the heat. To cool, cover the top of the container with film.
- The mass, cooled to room temperature, is poured into a silicone mold with a diameter of 16 cm or directly onto a shortbread cake in a ring and sent to the freezer until completely frozen.
Step 3. Cheesecake
The next layer in the velor-coated dessert will be cheesecake with strawberries. Its preparation occurs in the following sequence:
- Cold Philadelphia cream cheese (250 g) is thoroughly mixed with half an egg, sugar, heavy cream and strawberry puree (50 g of all ingredients).
- A double layer of foil is spread on a baking sheet, a ring with a diameter of 16 cm is placed on it. After this, the sides of the mold are formed from the foil, into which the prepared mass is then poured.
- The cheesecake is baked for half an hour at a temperature of 160 degrees.
- After the prepared layer has cooled, the ring is removed from the mold. And the cheesecake itself goes into the freezer until completely frozen.

You can prepare the cheesecake in a silicone or springform pan lined with parchment. The main thing is that its diameter corresponds to the size of 16 cm.
Step 4. Cake mousse
Delicate and refined mousse determines the taste of the future cake. That is why flavored milk is used to prepare it. You can learn how to make it in our master class. The sequence for preparing the mousse layer for a velor cake is as follows:
- Gelatin (10 g) is poured into 50 ml of cold water for half an hour until it swells.
- At this time, flavored milk is prepared. To do this, ordinary pasteurized milk (250 ml) is poured into a saucepan and whole seeds are added to it. The milk is brought to a boil and infused for half an hour. This is how vanilla milk is prepared. Likewise, instead of vanilla, you can add lemon zest or tea. Before combining with other ingredients, the milk must be strained through a sieve.
- Sugar (100 g) is combined with starch (10 g) and yolks (3 pcs.). Then milk is added to the resulting mass. The mixture is thoroughly mixed and brought to a boil.
- After 1 minute, the milk mass should be removed from the heat and the gelatin should be thoroughly stirred into it. After cooling, add butter (50 g) to the resulting cream.
- Separately, whip heavy cream (250 g) and combine it with the cooled cream.

Step 5. Assembling the cake
To assemble the cake, it is recommended to use a silicone mold with a diameter of 18 cm. Or you can make the mold yourself. To achieve this, cover the required diameter with cling film on one side. This will be the bottom of the pan, which will then need to be placed on a hard surface, such as a baking tray or large cutting board. The velor cake is assembled in the reverse order, that is, the upper layers are formed first, and then the lower ones.
First you need to pour a little liquid mousse onto the bottom of the mold and place the baking sheet in the freezer until the layer hardens completely. The frozen cheesecake is laid out next, then the confit and shortbread base. After this, the velor cake is filled with the remaining mousse from the sides. Now it needs to be frozen well for 10 hours, and only after that you can start decorating the dessert with velor.
Step 6. Velor using spray velor
In fact, covering a cake with velor at home is not at all difficult. And preparing such a coating is much easier than mirror glaze. But, before you start preparing it, it should be noted that you can cover the cake with this decor in two ways:
- using spray velor - a ready-made sprayer in a cylinder;
- using an electric spray gun.
Aerosol cans provide instant coverage of the cake with velor without the need to prepare any additional preparations. One such 400 ml container is usually enough to cover 6-8 cakes, which is more than enough for home use.
But this velor coating for a cake also has a number of disadvantages. Firstly, the color range of sprays is limited to 8 basic shades, the brightness of which cannot be changed. Secondly, they are quite expensive. It will be much more economical to buy ingredients for making velor yourself.
Making velor for a cake at home
To make velor at home, you only need two ingredients: cocoa butter and white chocolate. The optimal proportion is 1:1. This means that for 50 g of cocoa butter you will need to take 50 g of white chocolate. However, you can take more chocolate and less butter. It all depends on personal taste preferences. This amount of ingredients (100 g) will be enough to cover a large standard-sized cake with velor.

First you need to melt the cocoa butter and chocolate in a water bath (or in the microwave). Then combine both ingredients in one bowl. Next you need to add helium or any other food coloring and mix thoroughly. The mass should have a liquid consistency and uniform color. Afterwards, the cake is poured into a spray gun flask and sprayed onto the frozen product. More details about this are provided below.
How to cover a cake with velor using a spray gun
First, you need to have an electric spray gun in your home. If such a tool is not available, then it can be purchased at any hardware store. Secondly, you need to calculate in advance the feasibility of such a purchase. Even despite the high cost of sprays, the price of purchasing a cylinder will be much cheaper than a new spray gun.

Before applying velor to the cake, you need to prepare your work area. For this purpose, a large box is suitable, which is installed on the table with the open part to the side. This is done so that only the specified product is covered with velor, and not the walls, table and ceiling. A cup or plate is also placed in the box, on which the cake is placed. Now the container with liquid velor is fixed on the spray gun, the equipment itself is taken in the right hand, and the plate with the cake placed on it is turned with the left hand. If the entire sequence of actions is followed, the velor surface of the cake turns out to be uniform. Now you can think about the decor.
Decorating velor cakes
Velor itself can be called a cake decoration. However, even such an ideal surface requires exquisite decoration.

The latest fashion is decorating cakes with fresh berries and fruits. Ideal for this occasion are raspberries, strawberries, red currants, figs, etc. Most often they are laid out on one half of the cake or in a circle in the shape of a wreath. Berries crushed with powdered sugar look especially interesting.
Secrets of making velor cakes
When preparing a velor cake, it is important to remember the following points:
- It is important to follow the cooking technology. Do not forget to weigh the products, measure their temperature, observe the thermal regime and the sequence of processing of the products.
- The surface that is covered with velor must be frozen and perfectly smooth without flaws or irregularities.
- Before applying velor using a spray gun, you must make sure that the temperature of the liquid is no more and no less than 34-35 degrees.
Making a velor cake is easy and fun. At the same time, even true gourmets will appreciate the taste of the prepared dessert.
...and put it in the freezer for 15-20 minutes. You can hold it longer. Many people freeze sponge cakes without any problems. I prefer not to do this: perhaps this is suspiciousness, but it seems to me that a fresh cake is still always better than a defrosted one. You see for yourself, decide according to the situation.
In any case, to cover it with velor, the cake must be very well cooled, even frozen!
My cake is on a rough mat.
Let's prepare the mixture for chocolate velor
While the cake is in the freezer, prepare the velor mixture. I wrote about this in detail in a post about. I’ll tell you about the tops here too. Take 60 g of white chocolate (I use regular chocolate bars) and 40 g of cocoa butter (this is for a cake 18 cm in diameter and 14 cm in height). Melt separately in the microwave. Let's connect. Add food coloring. Any. Punch with a blender. Cool to operating temperature. It's about 35 degrees, maybe a little more. The mixture should become barely warm, but remain fluid: too dense will clog the spray gun. I will have two colors, so I prepared two containers with the mixture for the velor, although I made smaller mixtures of the additional color.

Pour the velor of the main color (mine is white) into the spray gun tank.

Covering the cake with velor!
We take out the cake, put it on a turntable, if you have one (this is very convenient!) and velor it from a distance of about 20 cm. Rotate the stand with the cake and evenly apply the chocolate coating to the sides and top of the cake. If suddenly you see that the result is not a beautiful velor crumb that looks like real pile, but some floating lumps, stop and put the cake in the freezer for some more time: it is very likely that it has not cooled enough. Also check the temperature of the mixture. Perhaps it's too high.
But if you did everything right from the beginning, it will turn out nice.

Now the most routine thing in this situation, if you do not have an additional tank for the spray gun. You need to drain the remaining mixture (it can be used for other cakes). Rinse the tank, pour water into it, and run it through the spray gun. Then expel the air. Then wipe the tank dry and add additional mixture.

Now apply the stencil, being careful not to press too hard onto the sides of the cake. Carefully attach with pins.

And spray a mixture of a different color, adjusting the intensity as desired.

Chocolate splashes
Just melt white chocolate and add coloring. I sprinkled in a few pinches of silver kandurin. It turned out gray - with barely noticeable shiny particles.

And now a moment that was impossible to film :) Take a little chocolate on a spoon and randomly “splash” it onto the cake from a short distance. Very simple! The chocolate will fall chaotically, but that’s exactly what you need!

Now carefully transfer the cake to a clean surface and decorate it with a pre-made chocolate flower and leaves. I gave a similar MK with a photo. It is quite difficult to move a cake covered with velor without damaging the appearance underneath if you do not have practice. Therefore, you can velor the cake already on the finishing substrate. Only in this case it will also be veiled. But many people like it even better, and they do it on purpose. The main thing in this case is that there are no fingerprints left on the velor on the backing: after all, we handle the backing to move the cake from place to place. Be careful.

It’s a rare person who is passionate about creating sweets and doesn’t know what it is. But if you are a complete beginner, then here it is: chocolate velor is a type of top covering for a cake that looks very much like a noble fabric - actually, velor or velvet. Looks absolutely amazing! The coating composition is chocolate (dark or white) and cocoa butter, and food coloring, if necessary. In order to cover a cake with velor (“veil”), you need to either buy a ready-made composition in a spray can, or purchase a spray gun specifically for this purpose, the necessary ingredients and prepare the mixture yourself. It would also be nice to have a cooking thermometer (with time and experience you will learn to do without it, but at first it will be very useful).
Initially, modern mousse cakes were covered with chocolate velor. The technology for preparing them involves freezing them into natural ice! The surface of such cakes is even and smooth. And that’s all velor needs. It lays very nicely on a frozen mousse cake, with a distinct lint, and sets quickly.
However, to the great joy of home confectioners who do not practice mousse desserts, ordinary cakes can be velored, which many do successfully. There are two options on how to do this. 1. “Pack” a classic sponge cake in a dense mousse, freeze so that only the mousse itself sets and the cake does not have time to freeze, remove from the freezer and spray with velor.
2. It’s good to line the cake with cream (almost any cream, the main thing is stable! For example, chocolate ganache, butter meringue (and any butter cream!), butter cream cheese will do), put it in the freezer for half an hour, and then take it out and cover velor. Here is an example of covering a “simple” cake with velor. The cream under the velor is chocolate ganache.
If you really want, you can even veil the backing! Many people do this. Not everyone likes golden factory substrates; they do not always suit the idea of a cake; besides, this is a very interesting effect when the cake seems to smoothly flow into the substrate, forming a single whole with it. Quite often, mastic cakes are decorated this way, especially children’s cakes with a theme. So, confectioners today offer their clients velor as an alternative to mastic.
Preparing the mixture for velor!
Ready-made velor in a can is very expensive. Maybe, of course, one can will be enough for several cakes, maybe it’s very convenient, you don’t need to prepare anything, everything is guaranteed to work out, but, of course, there is only one color in the can, and even that, according to the stories of experienced people, is not always predictable , and if you want another one, you’ll have to buy another can. However, if you are not going to velor cakes often and, in principle, bake them several times a year, then it is easier, of course, to buy a spray can for the occasion, and that’s all. For those who will be doing a lot of velor, it is better to prepare your own velor composition and buy a spray gun. More about him a little later.
It’s also convenient to use cans if you want to mix velor of different colors on one cake. That's very beautiful. It will be inconvenient with a spray gun: pour out one mixture, prepare a new one - a different color, rinse the spray gun, fill it, cover it... Long and tricky. For this, it’s good to have at least one color in the can. And give the main one from a spray gun, for example.
About the mixture.
If we want to get dark-colored velor, we should take dark chocolate. The second essential component of velor is cocoa butter. It is sold in specialized confectionery stores, it is quite expensive, but its consumption is low. Proportions 1:1. Please note: this is variable! Some people prefer others, but 1:1 with dark chocolate is the most common option. To cover a small cake with a diameter of 18 cm and a height of 7 cm, you need approximately 30 g of chocolate and cocoa butter.
Here we weighed out the required amount of ingredients. We take the most ordinary chocolate bar from the supermarket, if there is no professional confectionery shop.
Melt both in the microwave or in a water bath. This must be done one at a time. The melting point of chocolate and cocoa butter is different. Put it together - the chocolate will burn, and the cocoa butter will barely melt during this time. Melt the chocolate in pulse mode, if in the microwave, that is, literally 15 seconds at a time. We take it out, turn it over, melt it again. It may not go all the way: it will come from its own heat and the warmth of the bowl. If in a water bath, make sure that neither water nor steam gets into the chocolate, it doesn’t like that.
Mix. You can directly in the spray gun tank. In a good way, this mixture now needs to be tempered, but this is not necessary.
There is such a thing as operating temperature. One in which the cake will not melt, the velor will lie beautifully, and the spray gun will not clog. For dark velor it is 38 degrees. We measure using a culinary thermometer. How it feels: you can do a test on your lower lip, the mixture will be barely warm, even closer to cold, but the consistency should be fluid! It is very important. If the mixture is thick, it will clog the spray gun and nothing will work! You will have to disassemble it, wash it, reheat the velor, etc. It is better to velor with a composition a couple of degrees higher than lower (up to 42-45 degrees is the limit)
Once the working temperature is reached, spray the velor onto the cake - just taken out of the freezer just a minute before! - from a distance of about 20 cm. The space around needs to be prepared, otherwise - yes, yes! - everything will be covered in chocolate in the most literal sense! :))) Who cares about anything here. You can build some kind of box, you can hang it with film or fabric, put two large cardboards in a corner. It is convenient to place the cake itself for veiling on a rotating stand, if you have one. You spray and turn it, and the cake evenly acquires the coveted fluffiness.
If you need black velor or, say, dark red or some other dark color, you need to add the appropriate dye to the finished mixture. It is believed that you need a special fat-soluble dye, like the kind for chocolate. But you can also use regular water-soluble gel “Top Decor” and Americolor, everything works, you just need to run the mixture through a blender to rid it of paint crystals, otherwise they will spread into ugly spots on the finished cake as it defrosts. It takes a lot of dye to achieve a rich color. That is why it is recommended, if you need a dark, rich color, to paint velor on dark chocolate, and not on white! The dye consumption will definitely be less, but be prepared for the fact that you will still need quite a lot of it.
Colored chocolate velor
Need colored chocolate velor? Bright or subtle, but not too dark? Then we make velor on white chocolate. Proportions 60 to 40 - chocolate and cocoa butter. The technology for preparing the mixture for velor is exactly the same as for dark chocolate: melt separately, mix, stir until smooth, add coloring, blend with a blender. The operating temperature for white chocolate velor is 35 degrees.
Spray gun!
Well, now, about the most important unit - the spray gun! You need a regular spray gun, a construction spray gun, of course, a new one, which you will use only for food purposes! Nowadays, due to the fashion for velor cakes, “special” confectionery spray guns are sold, but the difference from construction ones is only in the name - “confectionery” - and the price, which is much higher. However, whether to buy them or not is entirely up to you. However, many famous confectioners and confectionery shops work with construction spray guns and everything works out great for them. In this case, we used Bosch PFS 55, which is quite common in our sweet environment. The Wagner W550 is also highly praised. Others with similar characteristics will also fit.
After work, pour the remaining mixture (if any) into a clean container, close and store until next use. We remove everything that can be removed from the spray gun, wash it in very warm, almost hot water (otherwise the chocolate will not wash off) using detergents, then rinse it very well, pour warm water into the tank, blow it through several times until the water is gone come out crystal clear, give it a little drive and just some air to dry everything inside. At home, it is convenient to do this in the bathroom. We put away the spray gun until next use.
Beautiful culinary experiments to you!
chocolate velor
Chocolate velor is the outer covering of the cake, which is
small chocolate droplets that, when frozen, become
the look of expensive velvet.
To cover with chocolate velor you need to buy an air spray gun.
If you do not plan to sell cakes and a spray gun to you
you will need it for 1-2 times - just try it - then you can find a cheap one
spray gun model. For example, I have Soyuz KPS-96450 - a simple Chinese
spray gun. Although now I am more inclined to the Stavr KE-800 model -
it has a maximum viscosity of 130 din, so you can save on cocoa butter,
adding more chocolate to the velor mixture.
![]()
Scientists have proven that chocolate significantly increases the level of...
endorphin in the blood. Especially if you eat it while sitting on your own yacht.
spray gun,
chocolate (dark, white, milk),
cocoa butter,
gel dyes
Now in big cities and even in small towns the number of
people making custom cakes.
Homemade cakes are not only different
excellent quality of ingredients, but also exclusive design.
If butter/margarine roses still predominate in store-bought cakes
or decorations made from protein cream, then home craftsmen try to decorate
cake so that its appearance delights customers.
Very popular for covering cakes
mastic,
mirror glaze
and chocolate velor.
If mastic can be made at home from marshmallows and powdered sugar, mirror
glaze made from chocolate, cream and gelatin, then for making chocolate
velor, you will have to buy a special tool that sprays chocolate -
spray gun or spray gun.
Special spray guns designed for working with food products,
does not exist. Confectioners use spray guns designed
for applying varnishes and paints, purchased at hardware stores.
There are a large number of different models of spray guns. But choose
A chocolate sprayer is needed based on two parameters - the diameter of the nozzle
and permissible paint viscosity.
1.
To obtain the best texture of chocolate velor, the spray nozzle
should be 2.5~3mm in diameter.
The larger the nozzle, the thicker the chocolate mass can be. Those. in relation to
chocolate and cocoa butter, the proportion of chocolate may increase.
The smaller the nozzle, the more cocoa butter you need to add to the chocolate mixture.
There are confectioners who use airbrushes with
nozzle diameter 0.2~0.5mm. But chocolate through such a small hole
does not work and confectioners make velor from cocoa butter alone with the addition
dyes.
If there are no spray guns with the optimal nozzle size on sale, it is permissible
use a nozzle with a diameter of 1~1.5mm. But for such a hole you need to make
liquid mixture - the ratio of chocolate and cocoa butter should be no less than
than 1:2, But you may have to add oil if the spray gun is not
pull the mixture.
2.
Any fluid substance has such a parameter as viscosity. Simplified
speaking, this is the amount of time it takes for the liquid to flow out of the cup
a certain size through a hole of a certain size.
In the instructions for the spray gun, viscosity is measured in din.
The viscosity of the chocolate mass depends on the ratio of chocolate and cocoa butter
and on temperature.
The basic rule of chocolate viscosity is that the more cocoa butter, the thinner it is.
(less viscous) a mass is obtained.
The spray gun for chocolate velor must pass liquid with a viscosity
not less than 40 din.
The best viscosity parameter is 60 din or more.
Confectioners who often use spray guns for work prefer
two models - Wagner W550 or Bosch PFS55.
If the spray gun will be used rarely, you can choose
cheaper models.
2,6
60
2,6
100
The chocolate spray gun must be disassembled, i.e. he owes
have a removable head that can be washed after use.

Other characteristics, such as the upper or lower location of the tank for
paints, joint or separate arrangement of the compressor - do not have
crucial for quality chocolate application.
The second most important part of the spray gun is the spray regulator.
This is a part in the nose of the spray gun, when turned, the outlet holes
increase or decrease. The larger the outlet holes, the larger
drops of chocolate and the more textured the velor coating becomes.

The temperature of the chocolate mass for velor should be within
from 30 to 45°C.
Typically, for high-power spray guns, the chocolate temperature is 30~35°C,
for weak spray guns, the optimal temperature is 40~45°C.
To measure the temperature, it is best to use a special culinary
thermometer. But if there is no thermometer, then you can make do with your own body -
You need to drop the chocolate mixture onto the crook of your arm. If the drop is not felt,
This means the temperature of the mass is close to body temperature - 36~37°C.
This temperature is suitable for working with velor.
You can melt chocolate and cocoa butter in the microwave or
in a water bath.

As mentioned above, the ratio of chocolate to cocoa butter depends on
the diameter of the spray gun nozzle and the declared viscosity.
The most commonly used ratio is 50% chocolate to 50% cocoa butter.
The lower the nozzle and viscosity, the more cocoa butter is added to the mixture.
You can use any chocolate for velor - bitter, milk, white.
The color and taste of the velor will depend on this.
Cocoa butter is a rather expensive product. It is 2-6 times more expensive than chocolate.
It differs greatly in price from different manufacturers, so for velor
It is advisable to take cheap oil, as it is no worse than expensive one.
The easiest way to make velor is from dark or milk chocolate. Velor turns out
noble in appearance and it is immediately clear that it is made of chocolate.
But often you need to make a colored coating for a cake, for example, a cake in the form
It is advisable to cover the hearts with red velor.
To obtain colored velor, a mixture of white chocolate and cocoa is used
oils with added dye.

It is very important to choose the right dyes - they should be gel or
fat-soluble. Water-based or alcohol-based dyes are not
will dissolve in the oil and remain in small droplets. Chocolate velor will be
untidy in appearance, with inexpressive color.
But even when painting the mass with the right paints, there is a possibility
poor mixing.


Therefore, to mix chocolate mass and dyes, it is necessary to use
blender, preferably an immersion blender.


When applying chocolate velor, part of the chocolate mass is sprayed.
The surface behind the cake gets especially dirty.
Therefore, it is necessary to prepare the place where the work will take place.
There are two best options for preparing your work area.
1. Place a cut large cardboard box on the kitchen table.
The box will be a screen on which flying
drops. The box should cover the space on the sides and back of the cake.
For reusable use, cardboard can be wrapped in film before use.
After work, remove the film and throw it away, and fold the cardboard and put it away
Until next time.
If you make a screen from plastic or thick aluminum, then the
the chocolate can be scraped off and reused. This is important if
the production of velor cakes has been put into production and the cake is flying away
a large amount of chocolate mass.
2. Shower or bath. They are good because the chocolate is on the surface
shower or bath can simply be rinsed off with hot water. Or you can hang it
the cabin with paper/newspapers, secured with tape. After work, remove the paper
and throw it away.

To obtain a beautiful coating, it is necessary to carry out preparatory work
working with the cake.
To cover with velor, you can use two types of cakes - mousse and
covered with butter cream.
after cooking and removal from mold
frozen for 5~7 hours.
It is very important to get the alignment right. For this
The cake is first assembled - the cake layers are sandwiched with any cream or jam. Then
The outside of the cake is coated with butter cream. It could be
Charlotte custard
butter cream with cream cheese,
lemon butter cream,
custard protein cream,
whipped with butter.
You can also use chocolate ganache.
The buttercream on the surface of the cake needs to be well leveled, but not to
absolute smoothness.
Place the cake in the refrigerator overnight. During this time, moisture from the cream
will be redistributed into the cake layers, the cake will settle, and the cream will thicken.
Remove the settled cake from the refrigerator and level it very carefully with a knife.
or with a spatula - dip the spatula in hot water and use short strokes
level the surface of the cake. After each touch of the cake, use a spatula
must be washed with hot water. Do not wipe off the water from the spatula,
It's better to just shake off the excess.
At this stage it is very important to level the cream to smoothness, since when applying
velor, any pits and tubercles will be very visible.
Place the leveled cake in the freezer for 4~5 hours. During this time
the cream will harden completely, but the middle of the cake will remain soft and, accordingly,
It will take less time to defrost.

Place the frozen cake on a wire rack. You can use an oven or microwave rack.
Place the grill on a special rotating table.
Place the entire structure in the work area.
Before you start painting the cake, you need to adjust the size of the drops.
To do this, first direct a stream of chocolate onto the paper.
Turn the “lamb” on the nozzle so that the drops are the desired size.
The larger the drops, the more textured the velor coating.
When applying chocolate to the cake, the spray gun must be kept at a distance
at least 25~30cm from the surface of the cake.
With one hand you need to smoothly and evenly turn the cake in a circle, and with the other
make oscillatory movements with the spray gun with your hand.


In no case should you point the spray gun at one place for a long time, achieving
correct color depth. It’s better to go around the circle 3-4 times than to paint the cake
in one go. If you direct the jet for a long time to one place on the cake, then instead
beautiful grains, chocolate streaks will form, which is
marriage.
1. If the spray gun is rarely used.
After completing the work, remove the spray gun head and disassemble it into parts.
Rinse with hot water and leave to dry.
Wait for the remaining chocolate in the container to harden and remove it with a spoon.
Scrape off frozen chocolate from the turntable with a spatula.
Place the chocolate in a bag and put it in the freezer until next time.
2. If the spray gun is used several times a day.
After each use, you need to “shoot” refined vegetable
oil and wipe the outside with napkins.
1. Since the cake continues to shrink after covering with velor, and the chocolate
velor is a hard “shell”, the coating may crack.
In order to give the velor a little more plasticity, you need to add
add a little refined sunflower oil to the chocolate mass at the rate of
0.5 teaspoon per 1 cake.
2. Since cocoa butter has a not very pleasant chemical smell,
then you need to take chocolate, which will give the velor its aroma.
But it’s even better to add 2~3 drops of vanilla flavoring to the chocolate mass.
At the moment, the best flavoring is from Dr. Otker.

If you don’t have a spray gun and can’t buy one, you can use
ready-made chocolate velor in cans. It comes in different colors.
One can is enough to cover eight to ten cakes.
You need to look for cans with velor in special stores for confectioners.
But you need to keep in mind that the cans are very expensive.


Conspiracy on the boss: reading rules and examples
Strong prayer to the Mother of God, helper in childbirth
Beginning of a political career
Mysteries of history. Hitler's entourage. Georgy Litvin, "Hitler's Jewish entourage" Hitler's entourage
Atlantic Ocean: interesting facts Interesting facts about the Atlantic Ocean