All elements of geometric carving are the simplest geometric shapes formed by straight and curved lines or a combination of tetrahedral or semicircular notches. The main elements of geometric carving are dihedral, triangular wedge-cut recesses of various widths, depths, configurations, tetrahedral recesses of various shapes and curvilinear recesses in the form of brackets. All compositions of patterns are made by repeating these elements, creating some kind of geometric figure. The most common in geometric carving are triangular notches - triangles that differ in shape and size, therefore such a thread is often called triangular-notched. This type of carving is characterized by an ornament consisting of various combinations of triangles, rhombuses, wavy zigzag disks, spirals, squares, sectors, segments, etc.
The markup begins with drawing with a hard pencil lines that limit the ornament, parallel and perpendicular to the longitudinal edges of the workpiece, as well as at various angles. After drawing the bounding lines, the inner space is divided into elements of a geometric pattern: first, as a rule, into squares or rectangles, and then into triangles. The lines are divided into parts using a ruler or divider compass. The breakdown into small elements is performed by eye.
Geometric thread from beginning to end is performed with a jamb knife or a cutter knife. The knife can be wide or narrow, depending on the size of the elements of the pattern.
With a triangular-notched thread, the knife is held in the same way as with a contour.
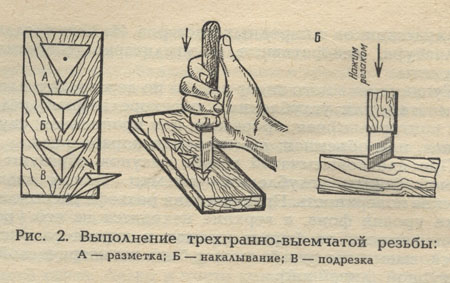
A trihedral-notched triangle is formed from three triangles connected by vertices (Fig. 21, a). After marking, the bases of the triangles are trimmed by holding the cutter at an angle of 45 °; cutter pull over. The triangles are carved at the vertices. Insert the tip of the blade vertically into the intersection of the triangle heights (fig. 21, b), point the heel towards one of the outer vertices. In the center, the knife deepens by 3-4 mm, and only fits to the base of the triangle. This technique is called a tattoo. Make a prick to the other two vertices of the triangle, and turn not the knife, but the board.
Rice. 21. Implementation of elements and patterns of geometric carving: a- marking of triangles; b- the position of the knife when pricking; v- cutting out triangles; G- execution of chips; d- "rhombus" pattern; e- chain pattern; f- "viteika" pattern; s- "snake" pattern
The next technique is notching. Depending on how deep the thread will be, hold the knife at an angle of 30–45 ° to the surface of the board. Place the nose of the knife at the top and guide it along the side of the triangle, gradually deepening 2-3 mm towards the middle, as you approach the other vertex, reduce the pressure on the board. At the top, the cutter is raised slightly and the notch is completed. In the same way, the final trimming of the triangles is performed, but more deeply. Isosceles triangles are formed with a depression at the junction point of the vertices (Fig. 21, v). In this case, you must watch the movement of the cutter so as not to touch the cutting of the other triangle.
Another element that needs to be mastered is called a chisel (Fig. 21, G). It is based on an equilateral or isosceles triangle. The spall is characterized by indentations towards the top. Clamped in a fist, dip the knife vertically 3-4 mm into the apex of the triangle and lower the heel of the knife along its sides until it touches the base - make punctures. Then from the base of the triangle, slightly tilting the knife towards its apex, make an undercut by cleaving the triangle.
We have considered two simple elements, on various combinations of which almost all geometric threads are built. When marking, first, two parallel lines are drawn, limiting the width of the ornament ribbon. Then a midline is usually required. Based on these lines, they mark out the details of the pattern.
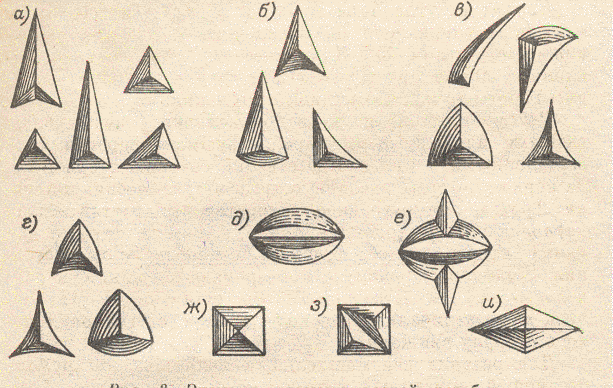
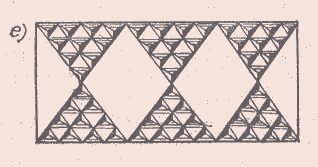
The "rhombus" pattern is a pair of triangles lined up in two rows apex to apex (Fig. 21 , d).
The "chain" pattern is two rows of triangles facing each other with their bases (Fig. 21, e).
The "viteika" pattern is two rows of triangles located one opposite the other, but shifted by half a step (Fig. 21, f).
The "snake" pattern - two rows of triangles, arranged as in a "white", but the side edges of the upper row do not touch the side edges of the lower one, which leaves an untreated plane of the workpiece in the form of a snake between them (Fig. 21, s). To avoid unnecessary chipping, cut alternately straight and inverted triangles.
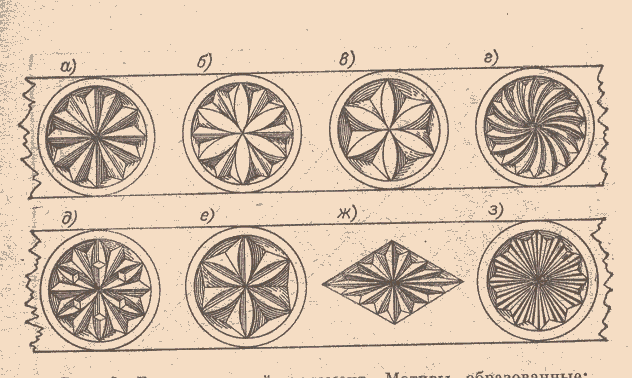
The "rosette" pattern consists of two rows of "whites" adjoining one another (Fig. 22, a).
Herringbone pattern - first in top row cut out large triangles, and then in the bottom - small (Fig. 22, b). The uncut plane of the workpiece looks like small Christmas trees.
Pattern "honeycomb" - the plane of the workpiece is drawn into squares, on the sides of which two rows of pegs are selected, top to top (Fig. 22, v). Using this markup, you can get different kinds of this ornament. One of them is a four-sided notch, that is, a pyramid with its apex directed deep into the workpiece. Consider two options: when the notch is located along the fibers and diagonally to them. It can be seen from the figure that in the first case it is necessary to resort to threading across the fibers. The carving technique is similar to that of the four-point pinched pegs. In geometric carving, there are varieties of a four-sided notch - rectangular, diamond-shaped and irregular outlines. It makes sense to immediately shade one of the groups of beads (vertical or horizontal) separately, so as not to make mistakes when carving. All horizontal flakes are sequentially cut out, and then all vertical ones.

Rice. 22. Making patterns in geometric thread: a- rosette pattern; b- herringbone pattern; v- honeycomb pattern; G- star pattern; d- the "ladder" pattern is straight; e- the "ladder" pattern is inclined; f- "squares" pattern; s- four-guard pyramids inscribed in rhombuses; and- triangles inscribed in the chips; To- asterisks inscribed in the honeycomb.
The "star" pattern is a row of squares, which are divided diagonally into four triangles, adjoining apex to apex and consisting of the same triangles and pegs (Fig. 22, G).
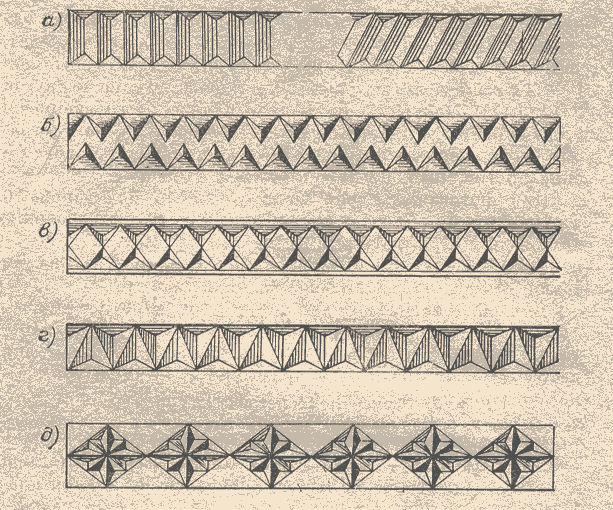
The straight ladder pattern is made in the form of a tape with undercuts on one side and the other (Fig. 22, d).
The oblique ladder pattern is also made in the form of a ribbon with various approaches and ends (Fig. 22, e).
The "squares" pattern is made by carving dihedral grooves on the sides of the square at the level of the workpiece plane or in the form of a tape, where the sides of the square are limited by a dihedral groove (Fig. 22, f). Possible different options slope of the sides of the dihedral groove on the sides of the square. If the squares, rhombuses, honeycombs are large enough, the space inside them can be filled with one of the thread elements (Fig. 22, h - to).
Having mastered the previous exercises, you have come close to carving the "shine" pattern - the most beautiful and complex one in the trihedral-notch carving. Shines of various configurations are usually central elements in geometric carving patterns. These can be squares, rectangles, rhombuses, circles, ovals and derivatives of the above figures, in which the patterns are inscribed.
The rays of the "shine" are elongated triangular notches. In fig. 23 shows the schemes of marking and cutting "lights" inscribed in various simple shapes. When making them, the same techniques are used as when making three-sided grooves with a recess in the center. The thread is made depending on the direction of the wood grain. When carving along and across wood layers, it is necessary to choose the direction of the cut. The thread, made in the direction of the grain, turns out to be shiny and juicy, and across it is matte, difficult to finish. In this regard, it is necessary to mark the future product in such a way that the main thread occurs along the layer.
So, in order to make a "shine" inscribed in a rhombus, first draw a rhombus (Fig. 23, a). Parties AB, BC, CD and DA divided by any number equal parts(in this example there are five of them) and connect the division points to the center. First, cut the vertical and horizontal lines and deepen them, making three cuts from the center of the triangle with a bevel to each corner of the cut. Having completed the notch, bring the cutter to one of the sides of the corner and, tilting it, trim the edges. Each triangle has three cut edges. "Shining", inscribed in a rectangle (square), is performed in a similar way (Fig. 23, b).
The most popular is "shine" inscribed in a circle. This rosette usually represents the center of the entire carved composition.
When marking the outlets, the workpiece is first divided into squares (Fig. 23, v). Diagonals are drawn from the corners of the squares (Fig. 23, G). From the center of the square, using a compass, draw two concentric circles (Fig. 23, d). The radius of the outer circle should be 3–5 mm larger than the radius of the inner circle (depending on the size of the rosette). The outer circle is divided into 16 sectors, and the inner - into 32. The ends of the radii of the inner and outer circles are connected by straight lines (Fig. 23, e).
With a vertically placed knife, punctures are made to a depth of 2–3 mm, and they begin to cut and cut the edges extending from the center of the beams. In the last turn, the splinters are cut out (Fig. 23, f).
When cutting the "shine", the angle of the tip of the cutter should be sharper than for other patterns.
The direction of movement of the knife when making the "shine" pattern on a plank with a horizontal arrangement of fibers is shown in Fig. 23, h - l.
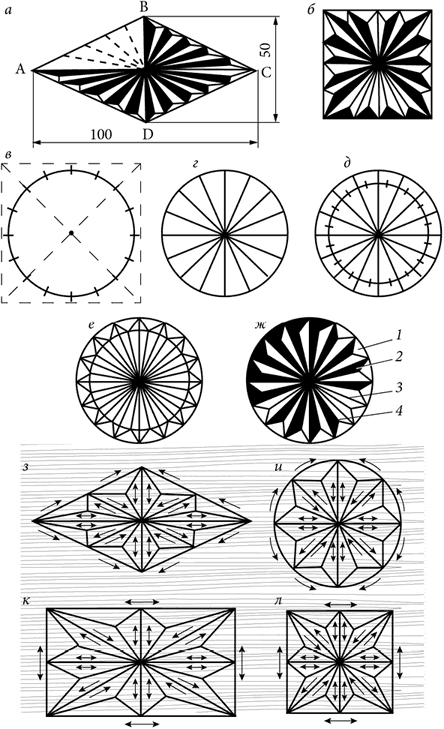
Rice. 23. Making the "shine" pattern: a- "shine" inscribed in a rhombus; b- "shine" inscribed in a square; c, d, e, f- marking of the "radiance" pattern inscribed in a circle: f- ready-made rosette with a "shine" pattern ( 1 - chipped; 2 - triangular beam; 3 - uncut strip of the product surface; 4 - wedge-shaped notch); s, i, k, l- the direction of movement of the knife when cutting the "shine" pattern inscribed in various geometric shapes (the background indicates the direction of the wood grain)
To perform elements of geometric, triangular-notched and other types of thread, you need to remember a few rules:
- be sure to mark and prick the pattern;
- make a tattoo only at the point of convergence of the rays;
- when carving with a flat cutter of curved lines, use a cutter with a sharper sharpening angle of the tip, and raise its heel the higher, the steeper the rounding;
- if there are dents or burrs during the threading of the triangular elements, you need to sharpen the knife well on the donkey and carefully repeat all the operations.
| <<< Назад
|
Forward >>> |
There is apparently no need to talk in detail about the technique and methods of geometric (or, as it is also called, trihedral-notched, and in Europe - carbshnite) carving. In almost every previously published book about artwork on wood this one is described well enough folk way household decoration. Of particular interest is the book by L.P. Levin "Woodcarving" (1957).
Geometric carving, giving household items artistic view, at the same time teaches perseverance and accuracy, trains the accuracy of the eye and hand, which will be very useful in the future. This type of thread is technically simple to execute, does not require special abilities, the main thing is desire and diligence. It does not require a complex instrument either. I want to note that women are quite successful in this technique. Their hands do a good job with repetitive elements. For carving, you should choose soft non-textured rocks: linden, aspen, alder. Poplar is too soft, wrinkles even under a sharp knife. Having gained experience, cope completely with a birch, a mahogany. The pine tree exfoliates, pricks, but allows you to cut large details of the ornament. The oak will require considerable physical effort, but the ornament is beautiful, with a dense, shiny cut.
Rice. 4.10. Compositions for geometric carving
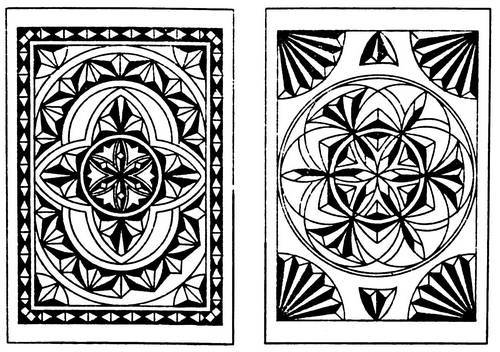
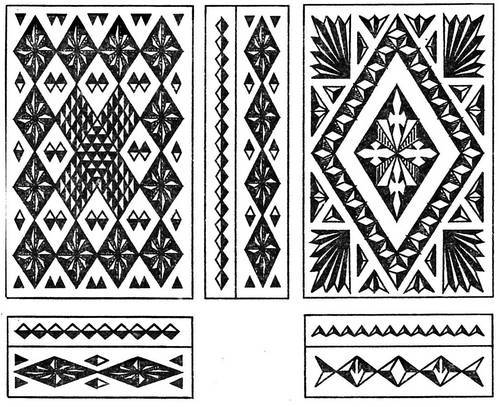
Rice. 4.11, 4.12. Compositions of geometric ornaments
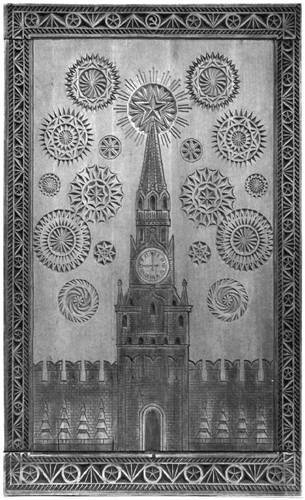
Photo 33. Stele "Olympics 1980", birch 100 x 25 cm
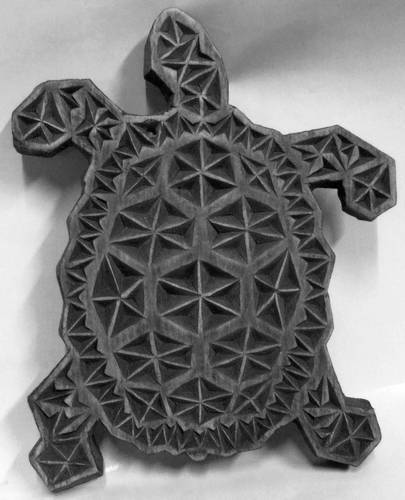
Photo 35. Relief on the image for working with children. Linden 20 x 15 cm
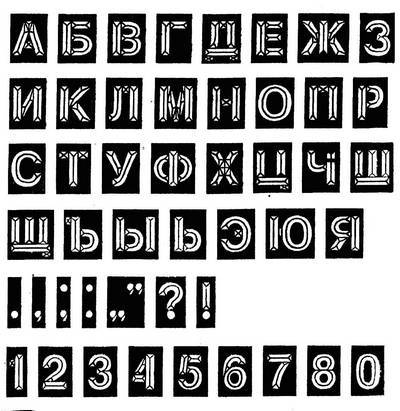
Rice. 4.13. Font for contour and geometric carving
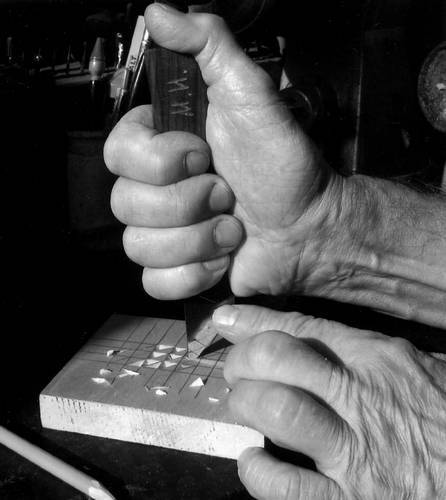
Photo 36. Method of holding a jamb in a geometric ornament
I will dwell on the technique of cutting out the simplest triangle, on the basis of which most of the elements and compositions are built. You already have the skill of contouring straight and rounded lines, now take the first steps to new discoveries, but first, remember a few rules:
The cut can be done immediately with one movement, except in cases where the elements of the pattern are very large or the material has high hardness;

Rice. 4.14. Geometric thread elements: a- triangles; b- beads; v- chain; G- rhombuses; d- herringbone; e- cones; f- viteika; s- eyes; and- bushes; To- honeycomb; l- splinters; m- cubes; n- shine (1st teeth, 2nd - simple); O- border; P- power socket; R- spinner
Compliance with one angle of inclination in the work on the entire composition is mandatory if options are not provided;
If possible, do not cut against the layer, there may be chips;
For carving, use a strong but thin jamb to keep the layers apart as little as possible.
The variety of geometric carving elements (lines and triangles, squares and rhombuses, eyes and scales, see Fig. 4.14) provides a wide scope for imagination when drawing up ornamental compositions.
Research and practical work.
Geometric thread.
Introduction.
Main part.
1. History of wood carving.
2. Geometric thread.
3. Search and research work.
4. Practical activity.
Conclusion.
Bibliography.
Appendix.
Introduction
In the 5th grade, we started labor lessons. If in primary school at the lessons of fine art and art work, we made applications, sculpted, designed from paper, but now we are getting acquainted with a real male occupation - woodcarving. I was very interested in this and I decided to learn more about carving.
Wood carving history
The need to decorate household items appeared in people for a long time.
It so happened that Russia is a country of forests. And such a fertile material as wood was always at hand.
With the help of an ax, a knife and some other auxiliary tools, a person provided himself with everything necessary for life: he erected dwellings and outbuildings, bridges and windmills, fortress walls and towers, churches, made machines and tools, ships and boats, sledges and carts, furniture, dishes, toys and much more.
The master tried to add a particle of beauty to each product. Above all, great attention was paid to form and proportions.
Geometric carving is the oldest way to decorate wood products. Wooden ships, huts, furniture, dishes, weaving machines and spinning wheels were decorated with carvings.
These are all kinds of combinations of triangles, rhombuses, twisted lines, dots, curls, etc.
Each geometric figure in folk art has its own meaning, its own symbolism:
a rosette with rays or just a circle - sun symbol, life
spiral - whirlwind, anxiety, storm;
drop - water, grain, a symbol of life;
cell - a field, any space;
rhombus - power, strength, luck;
cross - a person, a soul;
the point is the fundamental principle of everything;
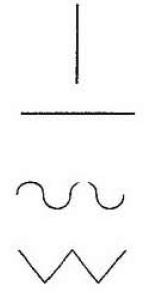
vertical line - hill;
horizontal line - peace, tranquility;
wavy line - movement;
broken line - confrontation.
It is pertinent to say that in our folk culture these symbols go back to the pre-Christian period, when in Russia they still revered pagan gods,
With the help of geometric carving, magic spells were composed that protected our ancestors from various misfortunes.
For example, it was believed that the image of a bird on any household utensils brings happiness.
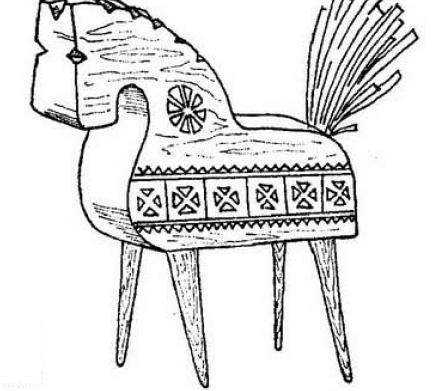
If they cut out a horse, then they also waited in the house of God's grace. Such a horse with magic signs was called a talisman. ”Such objects protected a person, a dwelling from all kinds of troubles.
The pagan belief (belief in the existence of a variety of gods and spirits) was reflected in the construction of the dwelling. So, the gable roof of the Slavic house symbolized the daily movement of the sun across the sky. With the help of geometric carving, they depicted a heavenly body passing its way from sunrise to sunset. The middle position of the sun - noon - was presented larger and more versatile. A horizontal board with overhanging drops meant heavenly abyss.
Later, home decorations lose their mythological background. The carved details of the house are beginning to be only decorative.
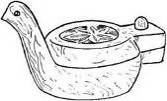
Decorating the house from the outside, folk craftsmen did not forget about the household items that they used every day: a table, a bench, a shelf, a cutting board, a spoon, a salt shaker. Here, too, geometric carving had an advantage over other types of carving.
Spoons were distinguished by a large variety of decorative finishes, and this is no wonder. After all, a spoon is the main "tool" on the table. And he needs it every day.
Initially, each peasant, in addition to his main work - work in the field, - was engaged in building a house, home improvement, production of household items. But the division of labor gradually took place. And those craftsmen who, better than others, could build a house, cut a spoon, make wooden dishes, left work in the field and began to earn their living carpentry and joinery. And from this environment carvers emerged and began to unite in artels.
Geometric thread.
One of the most ancient and common types of wood carving is geometric carving - due to its simplicity and the possibility of performing it with a single tool - a cutter with a beveled cutting edge, the so-called jamb knife. This thread is made in the form of various recesses, forming geometric shapes on the plane by a combination of straight and curved lines.
a) a triangle with straight sides
b) a triangle with two straight sides and one curve
c) a triangle with two curved sides and one straight line
d) a triangle with three curved sides
e) peephole
f) flashlight
g) tetrahedron
The geometric chamfering carving is based on a triangle with straight, concave or curved sides, the edges of which form a pyramid, upside down, hence the name - trihedral-notched. It is from triangles that more complex carving elements are formed: ladders, whites, beads, snakes, eyes, lanterns, tetrahedrons, rhombuses, rosettes, etc., the various combinations of which create geometric carving motifs with each other, and the combinations of motifs form a geometric ornament.
Elements of a geometric ornament are different kinds shapes formed by a combination of straight and curved lines.
Combinations of straight lines form a square, rhombus, triangle, polygon and other similar shapes; combinations of curves - circle, ellipse, almond-shaped figures, etc.; lines and curves - segments, semicircles, etc.
a) a ladder b) a whitewash c) beads d) a snake e) a shining e) pegs
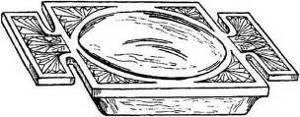
Geometric carving is used mainly for finishing small household items - caskets, small tables, but often carving on books and dish shelves and even on tables. When performing geometric carving, you need to take into account the purpose of the object, its size, species and texture of the wood. The larger the object, the larger the carving should be; one should not make a continuous carving on wood of large-vascular deciduous species and conifers, but alternate it with smooth margins, which, in turn, with a skillful arrangement of patterns, themselves create a kind of pattern. But on small objects made of scattered pore wood (linden, aspen, etc.), sometimes solid carving is preferable - it depends on the composition of the pattern and the quality of the carving.
The number of different forms of triangles is not so great, however, when combined with various kinds of almond-shaped depressions, this allows you to get all the shapes of silhouette patterns of geometric ornament made by geometric carving.
Search and research work.
On the topic that interested me, I read several books, looked through them illustrations and photographs of household items decorated with carvings.
But I wanted to see these things with my own eyes, and so my parents and I visited several museums. I saw antiques decorated with carvings in the Historical Museum and in the museum of the Russian School of Industrial Art. And in the museum Applied arts Several halls are occupied by the "Peasant Life" exposition. Here I saw large berths and platbands that adorned the facade of the hut, old carved sleighs and small children's sleighs, chests decorated with carvings and paintings and bound with iron. I liked very much the ancient wooden dishes - large ladles of brackets in the shape of a horse and a bird. And in the showcase of the Bogorodskaya toy, all stages of work on the carved toy were shown - from a linden block to a finished figurine.
What I saw in museums inspired me to new works.
Practical activities.
In labor lessons, we got acquainted with the simplest geometric carving patterns. We started with the most important thing - with a drawing. At first we drew in a notebook, and then the teacher handed out blanks - the first study boards. On the workpiece, we often change the size of the drawing. In very small drawings, we draw all the main lines with a compass, right triangle, and rulers, and small ones are possible by eye, but not desirable. After a clear drawing, we proceed to carving. The tool must be sharpened on special machine to maximum pungency. On the workpiece, we make pegs about 3 mm in depth according to the drawing. After that, we cut off the tip of the chipped triangle, and then the rest of it. And so we continue to cut out the entire pattern.
We started with the simplest pattern - stars. Then gradually they began to draw and cut out other patterns, such as a snake, a ladder, rhombuses, a twist and a rosette. We carry out all types of carving according to the same principle - drawing, carving.
The very first craft that I decorated with geometric carvings was a cutting board small size... I gave it to my sister for New Year... She liked it, and she bought me various blanks in a specialized store - caskets, a glass, boards, which I later decorated with carvings.
We had a wooden bracelet at home, and I decided to decorate it with contour carvings. I cut out a fish on an oval board, glued it to a bracelet and treated it with stain. I gave the bracelet to my sister for her birthday.
I am currently sketching a pattern for a large box. Soon my mother and I will go to Vernissage and buy new blanks for carving, and I will improve my skills.
Conclusion.
Currently, the art of wood carving has become widespread not only in rural areas, but also in cities. For example, in Moscow and St. Petersburg there are groups of children and adults of decorative and applied art, nurturing new generations of carving masters. This fact suggests that truly folk art will never die. Everyone can contribute to the development of this art form by mastering the lessons of geometric carving. Maybe this hobby will become my profession, but if not, then I can always make wonderful gifts to my family and friends. After all, hand-made things are very expensive, bring joy and warmth.
Bibliography.
ON THE. Goryaeva, O. V. Ostrovskaya, "Arts and crafts in human life"
Moscow "Education" 2003
MM. Gromyko, "The World of the Russian Village"
Moscow "Young Guard" 1991
T.A. Matveeva, "Mosaic and woodcarving"
Moscow "Higher School" 1993
Series "1000 tips from the newspaper Komsomolskaya Pravda", "Woodcarving"
Moscow "AST-PRESS"
Research and practical work.
Geometric thread.
Introduction.
Main part.
The history of wood carving.
Geometric thread.
Practical activities.
Conclusion.
Bibliography.
Appendix.
Introduction
In the 5th grade, we started labor lessons. If in elementary school, in the lessons of fine arts and art, we made applications, sculpted, constructed from paper, now we are getting acquainted with a real male occupation - woodcarving. I was very interested in this and I decided to learn more about carving.
Wood carving history
The need to decorate household items appeared in people for a long time.
It so happened that Russia is a country of forests. And such a fertile material as wood was always at hand.
With the help of an ax, a knife and some other auxiliary tools, a person provided himself with everything necessary for life: he erected dwellings and outbuildings, bridges and windmills, fortress walls and towers, churches, made machines and tools, ships and boats, sledges and carts, furniture, dishes, toys and much more.
The master tried to add a particle of beauty to each product. Above all, great attention was paid to form and proportions.
Geometric carving is the oldest way to decorate wood products. Wooden ships, huts, furniture, dishes, weaving machines and spinning wheels were decorated with carvings.
These are all kinds of combinations of triangles, rhombuses, twisted lines, dots, curls, etc.
Each geometric figure in folk art has its own meaning, its own symbolism:
a rosette with rays or just a circle - a symbol of the sun, life
spiral - whirlwind, anxiety, storm;
drop - water, grain, a symbol of life;
cell - a field, any space;
rhombus - power, strength, luck;
cross - a person, a soul;
the point is the fundamental principle of everything;
vertical line - hill;
horizontal line - peace, tranquility;
wavy line - movement;
broken line - confrontation.
It is appropriate to say that in our folk culture, these symbols go back to the pre-Christian period, when pagan gods were still revered in Russia,
With the help of geometric carving, magic spells were composed that protected our ancestors from various misfortunes.
For example, it was believed that the image of a bird on any household utensils brings happiness.
If they cut out a horse, then they also waited in the house of God's grace. Such a horse with magic signs was called a talisman. ”Such objects protected a person, a dwelling from all kinds of troubles.
The pagan belief (belief in the existence of a variety of gods and spirits) was reflected in the construction of the dwelling. So, the gable roof of the Slavic house symbolized the daily movement of the sun across the sky. With the help of geometric carving, they depicted a heavenly body passing its way from sunrise to sunset. The middle position of the sun - noon - was presented larger and more versatile. A horizontal board with overhanging drops meant heavenly abyss.
Later, home decorations lose their mythological background. The carved details of the house are beginning to be only decorative.
Decorating the house from the outside, folk craftsmen did not forget about the household items that they used every day: a table, a bench, a shelf, a cutting board, a spoon, a salt shaker. Here, too, geometric carving had an advantage over other types of carving.
Spoons were distinguished by a large variety of decorative finishes, and this is no wonder. After all, a spoon is the main "tool" on the table. And he needs it every day.
Initially, each peasant, in addition to his main work - working in the field - was engaged in the construction of a house, home improvement, and the manufacture of household items. But the division of labor gradually took place. And those craftsmen who could build a house better than others, carve a spoon, make wooden dishes, left their work in the field and began to earn their living by carpentry and carpentry. And from this environment carvers emerged and began to unite in artels.
Geometric thread.
One of the most ancient and widespread types of wood carving is geometric carving - due to its simplicity and the possibility of performing it with a single tool - a cutter with a beveled cutting edge, the so-called jamb knife. This thread is made in the form of various recesses, forming geometric shapes on the plane by a combination of straight and curved lines.
a) a triangle with straight sides
b) a triangle with two straight sides and one curve
c) a triangle with two curved sides and one straight line
d) a triangle with three curved sides
e) peephole
f) flashlight
g) tetrahedron
The geometric chamfering carving is based on a triangle with straight, concave or curved sides, the edges of which form a pyramid, upside down, hence the name - trihedral-notched. It is from triangles that more complex carving elements are formed: ladders, whites, beads, snakes, eyes, lanterns, tetrahedrons, rhombuses, rosettes, etc., the various combinations of which create geometric carving motifs with each other, and the combinations of motifs form a geometric ornament.
Elements of geometric ornament are various kinds of figures, formed by a combination of straight and curved lines.
Combinations of straight lines form a square, rhombus, triangle, polygon and other similar shapes; combinations of curves - circle, ellipse, almond-shaped figures, etc.; lines and curves - segments, semicircles, etc.
a) a ladder b) a whitewash c) beads d) a snake e) a shining e) pegs
Geometric carving is used mainly for finishing small household items - caskets, small tables, but often carving on books and dish shelves and even on tables. When performing geometric carving, you need to take into account the purpose of the object, its size, species and texture of the wood. The larger the object, the larger the thread should be; one should not make a continuous thread on wood of large-vascular deciduous species and conifers, but alternate it with smooth margins, which, in turn, with a skillful arrangement of patterns, themselves create a kind of pattern. But on small objects made of scattered pore wood (linden, aspen, etc.), sometimes solid carving is preferable - it depends on the composition of the pattern and the quality of the carving.
The number of different forms of triangles is not so great, however, when combined with various kinds of almond-shaped depressions, this allows you to get all the shapes of silhouette patterns of geometric ornament made by geometric carving.
Search and research work.
On the topic that interested me, I read several books, looked through them illustrations and photographs of household items decorated with carvings.
But I wanted to see these things with my own eyes, and so my parents and I visited several museums. I saw antiques decorated with carvings in the Historical Museum and in the museum of the Russian School of Industrial Art. And in the Museum of Applied Arts, several rooms are occupied by the "Peasant Life" exposition. Here I saw large berths and platbands that adorned the facade of the hut, old carved sleighs and small children's sleighs, chests decorated with carvings and paintings and bound with iron. I liked very much the ancient wooden dishes - large ladles of brackets in the shape of a horse and a bird. And in the showcase of the Bogorodskaya toy, all stages of work on the carved toy were shown - from a linden block to a finished figurine.
What I saw in museums inspired me to new works.
Practical activities.
In labor lessons, we got acquainted with the simplest geometric carving patterns. We started with the most important thing - with a drawing. At first we drew in a notebook, and then the teacher handed out blanks - the first study boards. On the workpiece, we often change the size of the drawing. In very small drawings, we draw all the main lines using a compass, a right-angled triangle, and a ruler, and small ones are possible by eye, but not desirable. After a clear drawing, we proceed to carving. The tool must be sharpened on a special machine to maximum sharpness. On the workpiece, we make pegs about 3 mm in depth according to the drawing. After that, we cut off the tip of the chipped triangle, and then the rest of it. And so we continue to cut out the entire pattern.
We started with the simplest pattern - stars. Then gradually they began to draw and cut out other patterns, such as a snake, a ladder, rhombuses, a twist and a rosette. We carry out all types of carving according to the same principle - drawing, carving.
The very first craft that I decorated with geometric carvings was a small cutting board. I gave it to my sister for the New Year. She liked it, and she bought me various blanks in a specialized store - caskets, a glass, boards, which I later decorated with carvings.
We had a wooden bracelet at home, and I decided to decorate it with contour carvings. I cut out a fish on an oval board, glued it to a bracelet and treated it with stain. I gave the bracelet to my sister for her birthday.
I am currently sketching a pattern for a large box. Soon my mother and I will go to Vernissage and buy new blanks for carving, and I will improve my skills.
Conclusion.
Currently, the art of wood carving has become widespread not only in rural areas, but also in cities. For example, in Moscow and St. Petersburg there are groups of children and adults of decorative and applied art, nurturing new generations of carving masters. This fact suggests that truly folk art will never die. Everyone can contribute to the development of this art form by mastering the lessons of geometric carving. Maybe this hobby will become my profession, but if not, then I can always make wonderful gifts to my family and friends. After all, hand-made things are very expensive, bring joy and give warmth. Abstract >> Culture and art
5) In medieval semantic geometry, properties geometric figures correlated with the virtues of heraldry and ... to the Pacific Ocean (spiral thread Maori in New Zeandia, ... tattoos of the islanders of Polynesia). Thread Maori is based on location ...
Deviations geometric parameters of parts
Coursework >> Industry, ManufacturingCos (φ + φl) expresses the misalignment of the center of rotation O "with geometric the center of the section O (eccentricity e), i.e., the deviation of the location ... and a brief description of fastening cylindrical carvings Cylindrical parameters carvings: middle d2 (D2), outside ...
Development of the creative abilities of adolescents in extracurricular activities using technology
Thesis >> Pedagogy...: give information about species carvings, teach the techniques of execution geometric carvings on wood; Educational: educate ... pencil; - we consistently carry out all the elements geometric carvings; - we process with a file and sandpaper items ...
Folk craft
Report >> Construction... carvings). Earlier deaf species carvings boil down mainly to geometric... pyramids, rhombuses). Plots geometric carvings of an earlier period practically ... they move from "blank" boards to geometric constructions, and then smoothly shimmer ...
The need to decorate household items appeared in people for a long time.
It so happened that Russia is a country of forests. And such a fertile material as wood was always at hand.
With the help of an ax, a knife and some other auxiliary tools, a person provided himself with everything necessary for: life: he erected dwellings and outbuildings, bridges and windmills, fortress walls and towers, churches, made machines and tools, ships and boats, sledges and carts , furniture, dishes, toys and much more. On holidays and hours of leisure, he amused the soul with dashing tunes on wooden musical instruments: balalaikas "flute, violin, beeps.
Even clever and reliable door locks were made of wood. One of these locks is kept in the State history museum in Moscow. It was made by a master wood-maker back in the 18th century, lovingly decorating it with a triangular-notched carving! (This is one of the names for geometric carving).
The master tried to add a particle of beauty to each product. Above all, great attention was paid to shape and proportions. For each product, wood was selected taking into account its physical and mechanical properties. If the beautiful texture (drawing) of the tree could in itself decorate the products, then they tried to reveal and emphasize it.
Wood products with a mild texture were most often painted or decorated with carvings.
Geometric carving is the oldest way to decorate wood products. Wooden ships, huts, furniture, dishes, weaving machines and spinning wheels were decorated with carvings.
It is made in the form of recesses: two-, three- and four-sided, the combination of which gives a fancy pattern on the surface of the wood.
Archaeologists find an ornament (artistic decoration, a pattern consisting of a number of rhythmically ordered elements) depicting geometric bodies on pottery dating back to the Minoan era (3-2 thousand BC). These are all kinds of combinations of triangles, rhombuses, twisted lines, dots, curls, etc.
Each geometric figure in folk art has its own meaning, its own symbolism:
A rosette with rays or just a circle - a symbol of the sun, life;
Spiral - whirlwind, anxiety, storm;
Drop - water, grain, a symbol of life;
A cell is a field, any space;
Rhombus - power, strength, luck;
Cross - man, soul;
The point is the fundamental principle of everything;
The vertical line is a hill;
The horizontal line is peace, tranquility;
Wavy line - movement;
Broken line - confrontation.
It is appropriate to say that in our folk culture, these symbols go back to the pre-Christian period, when pagan gods were still revered in Russia.
With the help of geometric carving, magic spells were composed that protected our ancestors from various misfortunes.
For example, it was believed that the image of a bird on any household utensils brings happiness.
If they cut out a horse, then they also waited in the house of God's grace. Such a horse with magic signs was called a talisman. ”Such objects protected a person, a dwelling from all kinds of troubles.
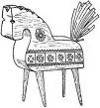
In the old days, it was thought that every living creature has a spirit that controls it, this creature. There were house spirits, forest spirits, horse spirits.
To appease such a spirit and to protect the horse for a year, it was necessary to make an idol (horse figurine). But it was necessary to do it only in 365 touches of the knife to the tree (how many days a year), while pronouncing spells. If you make an idol in 360 touches, then the master's horse will remain defenseless for five days a year. If you touch the idol with a knife even once, then the spells generally lose their power. It was considered a great sin to reveal the secret of a conspiracy, magic words, or to initiate a minor into the sacraments.
And such an idol depicted in the picture guarded the village. It was performed with fifty-two touches of the instrument (according to the number of weeks in a year) and placed on a high pillar (4-5 meters) at the entrance to the village in order to protect its inhabitants from natural Disasters, diseases, robbers.
The pagan belief (belief in the existence of a variety of gods and spirits) was reflected in the construction of the dwelling. So, the gable roof of the Slavic house symbolized the daily movement of the sun across the sky. With the help of geometric carving, they depicted a heavenly body passing its way from sunrise to sunset. The middle position of the sun - noon - was presented larger and more versatile. A horizontal board with overhanging drops meant heavenly abyss.
Later, home decorations lose their mythological background. The carved details of the house are beginning to be only decorative.
Decorating the house from the outside, folk craftsmen did not forget about the household items that they used every day: a table, a bench, a shelf, a cutting board, a spoon, a salt shaker. Here, too, geometric carving had an advantage over other types of carving.
Spoons were distinguished by a large variety of decorative finishes, and this is no wonder. After all, a spoon is the main "tool" on the table. And he needs it every day.
Even when the spoons were made of metal, the wooden spoon was not consigned to oblivion, as it had considerable advantages over its metal "sister". And above all, she did not burn her owner's mouth. Each family member only owned their own spoon, so it had its own distinctive pattern. And this was done for reasons of hygiene - "so that the seizures did not fall" (seizures were called sores in the corners of the mouth, which appeared as a result of the indiscriminate use of one spoon by many family members),
In this regard, you will probably be interested to know that when Peter I went on a trip to Europe, he always took his personal utensils with him (a spoon, a fork, a knife). This offended the hosts who received the guest of honor, but the tsar put his health first and did not want to risk it in vain.
Initially, each peasant, in addition to his main work - work in zero, - was engaged in building a house, landscaping a home, making household items. But the division of labor gradually took place. And those craftsmen who could build a house better than others, carve a spoon, make wooden dishes, left their work in the field and began to earn their living by carpentry and carpentry.
It is known that even in the 10th century in Kiev there were carving workshops, which were engaged in decorative trim dwellings and household items.
And at the beginning of the 16th century, special palace workshops were organized in the Kremlin, which laid the foundation for the creation of the armory,
In the 18th century a large number of master carvers took part in the construction of St. Petersburg, work on the decoration of palace ensembles.
It should be noted that the development of the art of Rezchitsa was not always supported by the state. In the 19th century, when Russia embarked on the path of capitalist development, rich people, patrons of the arts, allocated significant sums to support the people's talents. It is appropriate to name the name of the manager of the Yaroslavl railway, a brilliant businessman, millionaire Savva Ivanovich Mamontov. Savva Ivanovich was a comprehensively gifted person; sang beautifully, played the piano, was a sculptor and playwright, was engaged in directing. And to all this he had a magnificent gift to recognize talents. Dozens of names can be named that represent the pride of our 19th century culture, whom Mamontov helped financially during the formation of their skills and who were under his tutelage. Polenov, Repin, Vasnetsov, Serov, Vrubel, Chaliapin, Levitan, Rachmaninov - many more famous names could be recalled, but these are quite enough to be filled with the deepest gratitude to Savva Ivanovich Mamontov.
At his expense, the “Mamontovsky circle” was also created, whose members built a carpentry workshop and decided to introduce the children of the villages nearby from the Mamontov's estate to folk crafts. The guys studied in the workshop for free and after three years, having received a workbench and a set of tools as a gift, they began to work independently. Among them were brothers Vasya and Misha Vornoskovs.
Subsequently, Vasily Petrovich Vornoskov became the most famous carver. During the Soviet period, he arranged several personal exhibitions in our country and abroad, created the Rezchitsa artel "Renaissance", which is now transformed into the Abramtsevo Art and Industry School "where masters of folk arts and crafts are trained. In addition, the name of Vornoskov is associated with the creation of the so-called Kudrinskaya carving, which is a kind of relief carving.
Currently, the art of wood carving has become widespread not only in rural areas, but also in cities. For example, in Moscow and St. Petersburg there are groups of children and adults of decorative and applied art, nurturing new generations of carving masters. This fact suggests that truly folk art will never die. Well, you, dear reader, can make your contribution to the development of this art form by mastering the lessons of geometric carving.


 Future marriage of Prince Harry year NTV")


Energy drinks: give vigor, but take away health What will happen if you drink 4 energy drinks
Mustard for weight loss: how to use the seasoning with maximum benefit Is it possible for children to have mustard
The benefits and harms of mustard for the human body Table mustard benefits and harms
How to treat the ear after piercing: types of antiseptics, their composition, rules and features of the treatment of a pierced ear
Sistine Chapel in the Vatican: description, history, architectural features