A drill stand (drilling stand) is used in production or workshop conditions, when it is necessary to make a number of holes in workpieces with maximum accuracy. It makes it possible to securely fix the tool and quickly center the drill in material of any hardness.
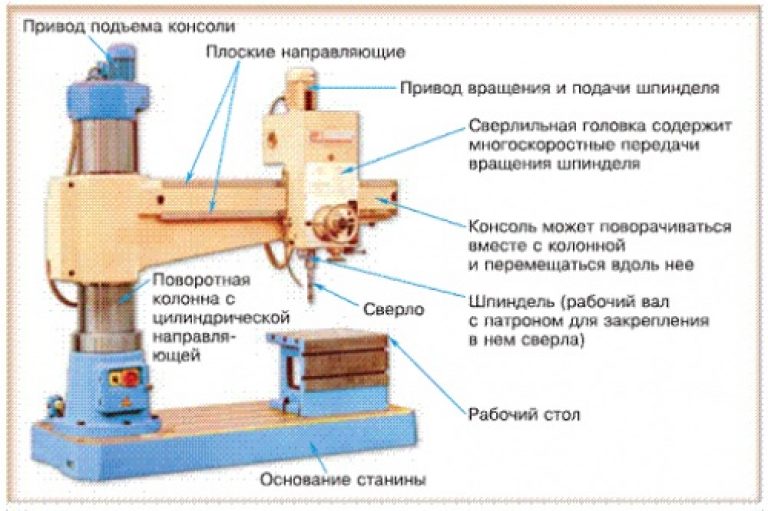
The drilling stand consists of the following parts.
- The support base is fixed on the table There are screw holes for this.
- Cylindrical upright installed perpendicular to the base, the drill goes up / down on it.
- Movable arm mounted on a stand, has a clamping flange for fixing the drill.
- Drive lever needed to raise/lower the tool arm.
Additionally, a drilling depth limiter and a vise for fixing the workpiece on the desktop can be installed in the rack design. Most models do not require an outlet, but magnetic drill machines are powered by the mains.
The holding force of the magnet can reach 25 kN, which ensures a secure fixation of the tool and eliminates the appearance of backlash when it moves along the rack.
Features of the use of a drilling stand
With its help, you can easily turn an ordinary drill into drilling machine and achieve the quality of material processing, close to the factory. Using a stand-machine, it is possible to ensure the smooth running of the drill in a strictly straight line. Due to the reliable fixation of the tool, its displacement relative to the axis of movement is excluded - the holes made in the material will be accurate and accurate.
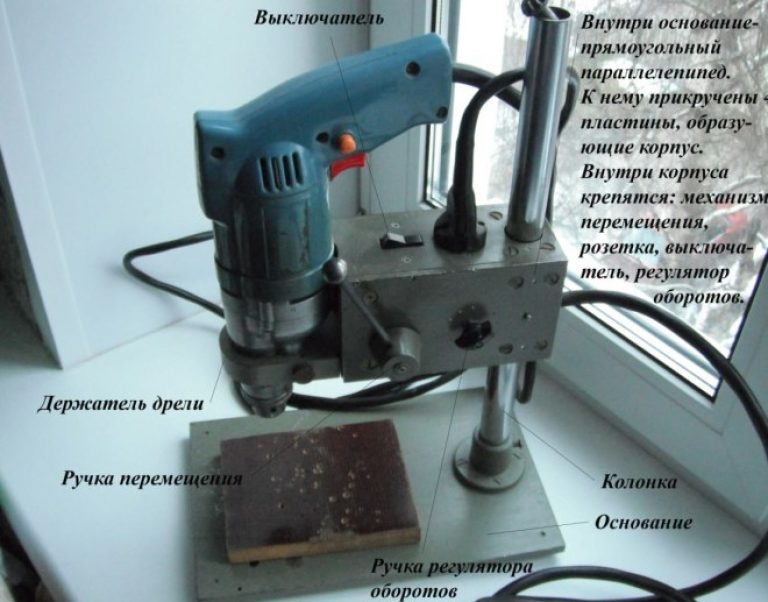
The drill is located on the bracket so that the drill is directed downward strictly perpendicular. The tool is connected to the mains, the workpiece is installed on the desktop - there should be a place for the future hole under the drill. Having fixed the start key on the drill, you can start drilling. To do this, use the lever to move it down, after making a hole - up.
Working on a drill machine differs from manual drilling in that the workpiece moves relative to the tool, and not vice versa. Thus, the operator is less tired, achieves high drilling accuracy and significantly saves time when performing work.
What are the options to choose from?
Clamping flange diameter. This parameter affects the size of the drill that can be fixed on the stand. At different models its value can be, for example, 43 or 65 mm, etc. As a rule, each machine is designed to work with a tool of a certain modification of a particular manufacturer.
Working length. Its value depends on the height of the rack and determines the stroke of the tool. The higher this indicator, the higher the drill can be raised, therefore, the larger workpieces can be placed on the desktop. This parameter is usually 200 - 300 mm. But there are models with a working length of up to 500 mm. Such a stand for a drill has a higher price than models with a standard value.
If you need a high-quality, reliable rack, you can buy it in our online store. We offer models from leading tool manufacturers: Bosch, Prorab, STAYER, Enkor. Choose the right model and place an order. You can make a purchase through the "Buy in 1 click" service or by calling 8-800-333-83-28.
We offer stand drilling machines throughout Russia: Moscow, St. Petersburg, Yekaterinburg, Chelyabinsk, Nizhny Novgorod and many other cities with delivery and warranty, call us! You can find out detailed information about the conditions and cost of delivery from our managers.
In modern production, the use of a variety of machine tools has become so popular that now not a single decent workshop can do without this equipment.
Indeed, a mini CNC drilling machine allows a person to engage in such work that he can independently complete, if he can, then with the use of a huge amount of time.
This applies to the processing of metals, wood and other dense materials, which are quite difficult to use without specialized equipment. Another big plus of the machines is that making a drilling machine with your own hands is not difficult at all.
If desired, a person with basic mechanic skills can assemble a homemade drilling machine in a couple of days. It is about the assembly of home-made drilling machines that will now be discussed in this article.
1 Features and purpose
Drilling machines are widely used in industry. In fact, it was their invention that became a real revolution in the world of industrialists who wanted to quickly increase the pace of production.
Indeed, the presence of machine tools in production is a real blessing. A high-quality drilling and grooving unit is able to perform work with amazing accuracy, while reducing the requirements for the original skills of a person that uses it in work.
This phenomenon is explained very easily. Let's imagine that you need to create a metal plate with ten holes on it.
Holes should be of different diameters. From the smallest to the largest. The plate at the same time has a thickness of 3-5 mm. That is, for working on metal, you will have to use a fairly powerful drill.
Note that large drills are used by large tools, such drills are usually quite heavy. It will be difficult for an unprepared person to even hold them in their hands. Not to mention the performance of more or less lengthy work.
In addition, it should be understood that filigree precision will be required of you, because this detail is just a part of a larger mechanism.
One small slip, and the whole structure can become completely unusable. This is especially true for drilling machines. printed circuit boards. When processing boards, the accuracy of their markup is determined by tenths of a millimeter.
If you give a man everything necessary equipment, then even with experience, he will fiddle with the plate for no less than a couple of hours. When drilling boards, this time cost can double.
And this is the case if you have experience and relevant skills. If it is not there, then it can literally take a whole day to prepare only one plate. If you use a mini machine in your work, then the work time is reduced several times. It already has all the essential tool. The drill is stable and clearly directed.
All that is required of you is to correctly install the plate on the XY table, start the engine and drill a hole. Then change the position of the part and continue working on the same technology. As you can see, the productivity of production is reaching a qualitatively new level.
1.1 Parts of the machine
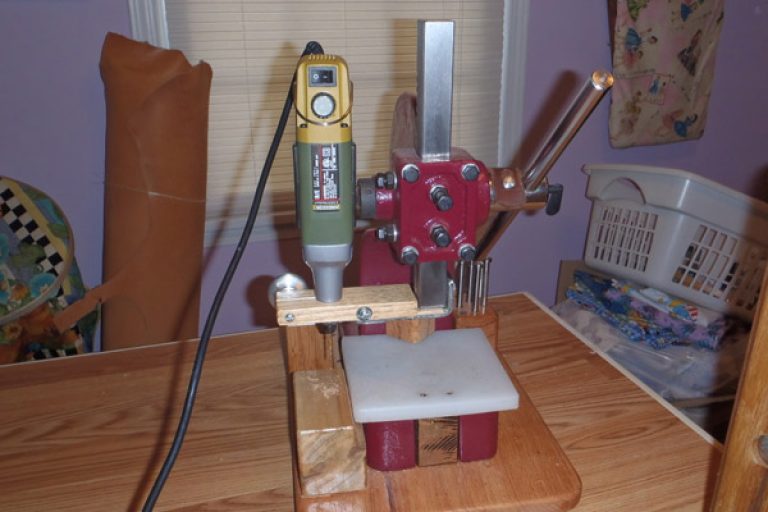
Now let's turn directly to the components of the machine. After all, if you are interested in the question of how drilling machines are made or how to make a drilling machine with your own hands, then first of all you need to figure out the details that will be used when assembling it.
Fortunately, a DIY mini bench drill consists of a few basic parts. The device of the drilling machine determines the quality of the device itself, but here it all depends on many factors.
So, drilling machines consist of:
- beds or bases;
- fixing rail or frame;
- device position control mechanism;
- attachments for the working mechanism;
- engine or mechanism that directly performs drilling;
- adapters, collets and other similar materials;
- all kinds of handles, stabilizing legs and other additional parts that are used to improve the design of the device.
It's worth noting that it doesn't really matter if you're looking at a benchtop mini PCB drill or a standard benchtop.
You, of course, you can use miscellaneous details for assembly homemade drilling machine, however general scheme and the device of the drilling machine will remain the same. The difference will be only in specific details and their dimensions.
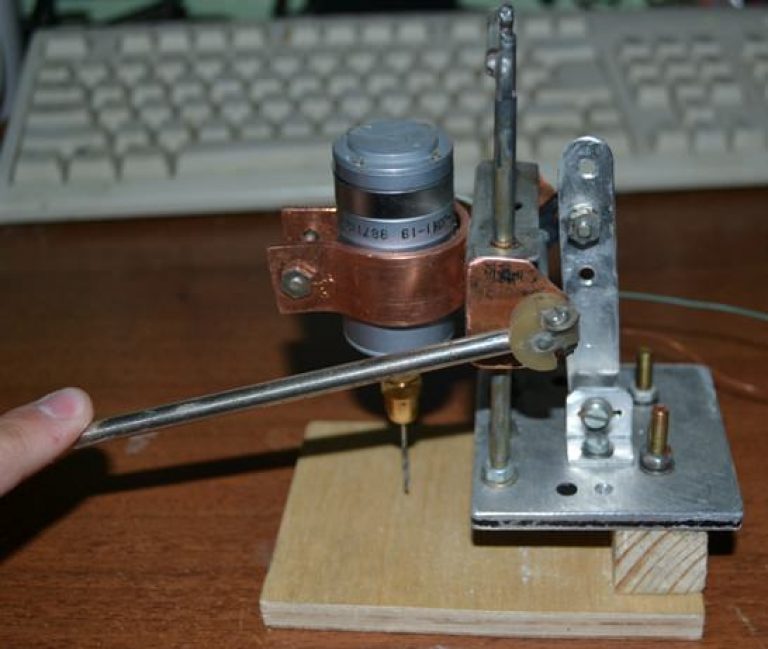
For example, a home-made desktop unit for drilling mini-boards for electronics will be mounted on a shallow frame. In most cases, you won't even need a cabinet. It will be enough to take a large heavy rail, which by its weight will be at least half the design of the device for drilling boards.
Also when developing mini boards you will need a much simpler and smaller engine, as drilling mini boards requires more fine work where power is not a priority.
1.2 Selection of parts for assembly
First of all, always pay attention to the frame or base. The base for an impressive machine must be very strong and stable. It is necessary for such purposes to use a table with good supports, special stands, you can mount from a photo enlarger, etc. Even a cabinet of the right size and dimensions will do, but it's up to you to decide.
If we are considering a desktop sample, then the coordinate table here will act as the first base on which the desktop drilling machine itself is already installed. In this case, the bed can be made from a metal plate or something similar.
Interestingly, some craftsmen manage to assemble a table or a frame for a machine tool even from the ancient parts of a photographic enlarger. That is, a wide variety of parts can be used for manufacturing.
The main thing is that the table or bed on which the device is attached is extremely stable and does not give vibrations during operation.
You can make a frame for fastening with your own hands. The same is done with the mount for the working mechanism. Here you can use metal corner With drilled holes or something similar.
The corner is fixed to the table with screws or welded to the frame. Installed there lifting mechanism. It is made from an old jack, shock-absorbing pipe, sliding rails and other similar mechanisms.
The engine will need to be powerful enough to work, so you will have to go through several options. Moreover, the table and the base of the machine must withstand its weight without any problems and dampen vibrations during operation.
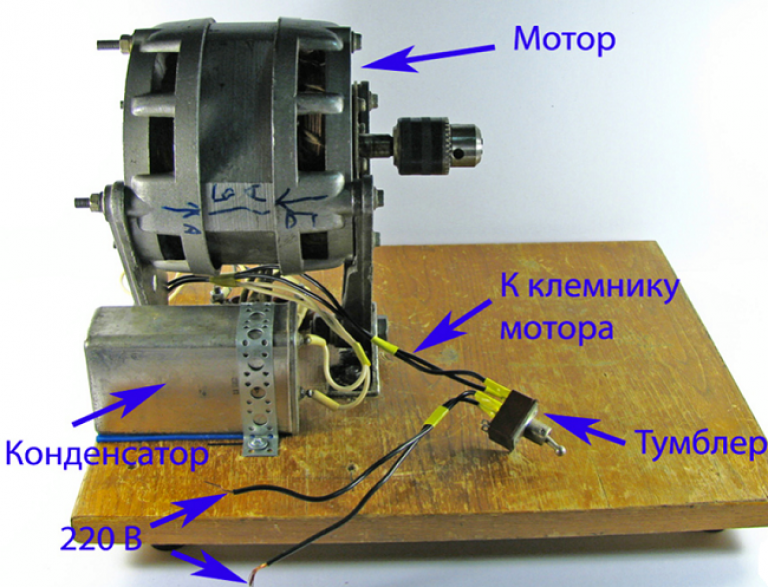
A good asynchronous engine from a washing machine or something like that is suitable for manufacturing. You can use the engine from the drill or the drill itself.
2 Scheme of creating a machine
If we consider only the simplest models of equipment, which you can quickly assemble with your own hands. Then the standard scheme for assembling drilling equipment is best suited for these purposes.
However, we note right away that there are two main technologies for its assembly. The first is simpler, it consists in using a ready-made drill, which is simply screwed to the mounts.
The second is a rather complicated option, and it consists in assembling the machine from a separate engine, collets, guides, etc.
Stages of work:
- We collect the table and the base for the mini machine, we are engaged in fixing the bed.
- We mount the main stabilizing frame.
- We connect the mount for the engine.
- We are in the process of building a lift.
- If necessary, install springs and shock absorbers.
- We mount the working element of the machine.
- We connect all the contacts, install the drill.
When assembling the machine from a finished drill, it will be easier for you to work. All that is required of you is to create a strong frame with the ability to raise and lower the drilling mechanism, to which the drill will then be connected.
There is no need to mess around with power supplies and engine assembly. You just need to properly fix the tool and connect it to electricity.
The assembly of the engine already provides for the installation of a power supply, a converter and, if the engine has an indirect transmission of forces, mechanisms that are involved in their transmission.
Therefore, in order to prepare the second option more time, effort and energy will have to be spent. Yes, and certain engineering skills will not be superfluous either.
2.1 Homemade drilling machine from a conventional drill (video)
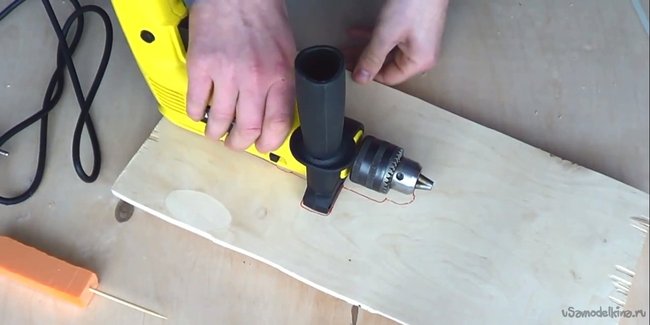
Many people need a lathe. It allows you to process different materials, and to shape cuts and blanks. There are various sizes of lathes on the market, from small to bulky. but the best quality machine can only be guaranteed if you make it yourself, so now we will look at how you can make lathe small size using a hand-held electric drill.
We make a mini lathe from a drill in the video:
So, first we need a piece of plywood, to which we need to glue two wooden blocks in advance to get something similar to a table, then a drill, which should have a handle, or another home-made mount, a blank for testing the operation of the machine (in our case, foam) , two types of sandpaper - fine and large, as well as two wooden blocks.

First of all, we have to make a mount for the drill. Therefore, it is necessary to put the drill on a table, that is, on a piece of plywood, circle it with a marker, make a hole for the bolt on the top of the handle. You should pay attention to the fact that the drill should stand upside down, and this is necessary so that the tool does not overheat, because the drill has cooling fins on the sides and bottom. In order to secure the drill, you just need to remove the handle bolt, pass it through the hole in the plywood and fasten the handle back.
Next, we have to manufacture the rear beam of our machine. To do this, we need a wooden block and a small diameter drill (slightly larger than a barbecue skewer). We drill a hole on the bar, fasten the skewer instead of the drill to the drill, draw the bar through it and fix it on the plywood with hot glue.

It remains to take care of the next part of the machine, which will allow us to shape our workpieces. To do this, we need a second bar and sandpaper. Just glue the paper on both parts of the bar.
The workpiece that we want to process is put on a barbecue skewer. After that, it remains only to give free rein to fantasy and with the help of sandpaper to give shapes to our blanks in different sizes.

In this way, you can create a mini lathe with your own hands, which will be ideal for processing foam and wooden blocks. small size. The same technology can be used to create more powerful machines that will allow you to process more serious materials.


 in women Total viral")


Chantilly Castle - the second in France after Versailles Chantilly Castle how to get from Paris
Amusement park "The Land of Legends Theme Park" in Turkey
Holy places in Greece. Greece Orthodox. Pilgrimage to the feast of St. Nicholas
Picodi: All discounts in one place!
How to get to Dolmabahce Palace