Building a tree house on your own site is not only a great way to diversify the landscape of your local area and add originality to it. This is certainly a great opportunity to please your child by arranging for him an unusual place for active and educational games.
In addition, you can improve your mood by spending time relaxing in complete solitude in a picturesque corner of nature. The entire process of building a tree house does not seem difficult, and what is equally important, does not require significant financial investments. All the nuances of bringing such an idea to life are presented below in a very accessible form. Please read them carefully before starting your project.
How to build a tree house?
To properly organize the construction process, follow the following sequence:
- Choosing a tree.
- Creating a project.
- Selecting suitable materials and tools.
- House assembly.

What kind of wood is suitable for building a house?

When choosing a tree, adhere to the following criteria:
- Sufficient trunk thickness.
- The diameter of the branches is not less than 2.5 cm.
- An adult plant, but not very young or old.
- Give preference to the following breeds:
- maple;
- fir;
- ash.

Important! Under no circumstances should you build a treehouse with your own hands on willows, linden, poplar or chestnut trees. The root system of these breeds is not so strong, and the peculiarities of flowering will bring a lot of unpleasant sensations and the inability to fully enjoy your vacation.

How to make a competent project?
Before you create your own unique project, carefully review the finished tree houses, videos and photos of which are presented in various versions on the Internet.

Important! Choose the ideas that you think are most interesting, but be sure to consider the level of your professional construction skills. If they are not enough, do not try to immediately complete a very complex project; initially test your strength by creating a simple design, which you will later improve at your own discretion. Watch the proposed video, which contains original ideas for building a tree house.
When drawing up your design diagram, be sure to consider the following recommendations:
- Take into account the subsequent development of the tree and its possible modifications.
- Before designing a tree house design, take a photo of the selected plant from different angles so that during the architectural planning process you take into account the structural features of the trunk and its natural bends.
- Correctly correlate the size of the tree with the area of the future home, also taking into account the weight of the building materials.

Important! Compliance with this rule will help to correctly calculate the load on the plant in order to prevent its destruction under the weight of the structure and people. In this regard, be sure to consider how many children can be inside the house at the same time.


What materials will be needed for construction?
The modern construction market provides many different options for materials. To build a tree house, buy any one you like or use the remains of various materials after building a residential house on your own site.

Important! The last option is more practical and at the same time allows you to create the most original project with the least amount of money.

Among all types of materials, the following are most often used to decorate a house in the thick of a tree crown:

What tools should you prepare?
To complete all the work you will definitely need the following tools:

How to assemble a tree house with your own hands?
The amount of time required to fully complete the entire scope of work depends entirely on your skill level and the size of the project. Therefore, before you start assembling a tree house, try to properly organize the sequence of your actions so that the whole process does not drag on.

We build a tree house as follows:
Cut down all diseased and dry branches in advance in the area where the house is to be installed.
- Create a support according to the selected type.
- If you prefer piles, dig two trunks so that there is an indentation on each side of the house platform of approximately 1/3 of the entire length of the floor.
Important! For this work, select logs with a cross-section of at least 10*10 cm.

- Concrete the piles in the ground to a depth of 0.5-0.7 m.
- Wait until the artificial stone is completely cured.
- When installing spacers, install them in such a way as to maintain a 45-degree direction from the trunk along an oblique line to the platform.
Important! Be sure to attach firmly to the barrel and platform using brackets and bolts.

- Assemble the base frame on the ground.
- Secure it to supports.
Important! Carefully check the strength of all fastening points, especially in joints along oblique lines.

- Lay several boards on the frame, creating joists.
- Secure the selected type of flooring on top - a sheet of plywood or a piece of plank knocked down from individual fragments.
Important! When using any lumber, be sure to pre-treat it with an antiseptic solution to prevent rapid rotting, drying out or destruction of the wood due to pest attacks. This approach will significantly increase the strength of the entire structure, and, accordingly, the safety of spending time in the tree house.

- Assemble the individual parts of the structure - walls, roof, not on the tree, but under it.
Important! This principle of performing all work will ensure the reliability of the floors and make it easy to make a strong connection between individual elements.

- Sequentially lift parts of the wall and roof onto the tree, securing them to the platform.
- Equip a lifting mechanism.
Important! If you prefer the rope method, be sure to check the permissible load on it and the integrity of the ropes.

- Seal all gaps and crevices with a resin-based sealant to prevent rain from getting into the structure and to ensure that the room is airtight.
Important! By performing such a simple procedure, you will not only increase the comfort of staying in the treehouse in any weather, but also the strength of the entire structure, and accordingly, extend its service life.
Video
Watch a video tutorial that shows the complete process of building a plank tree house.
Conclusion
The whole process of building a tree house is, in principle, not complicated and is quite possible to assemble the structure yourself. Another important nuance is the final decoration and arrangement of the interior space.

Be sure to show your imagination here:
- For processing external surfaces, give preference to those options that will not introduce additional load:
- paint it in bright colors;
- cover with vinyl siding.
- When furnishing the room, try to make the interior as practical and original as possible, but without using heavy items.
Reading time ≈ 4 minutes
The time for summer holidays is approaching and a completely natural question arises - what to do with your children. Knowing the craving of most of them for various games outside, it would be a good idea to learn how to build a tree house. The project of the most suitable option can be found on our website, watch the video, or proceed with the step-by-step construction described below.
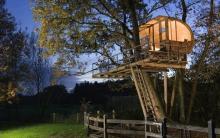
In order to build a treehouse with your own hands, you will need two or three small trees (or separate but large branches) - this way the house will be stable. It cannot be said that the structure will reliably protect from any bad weather, but even in the event of rain, the structure will remain dry.
Tree selection
The construction of a tree house for children must be carried out taking into account all safety standards. The ideal option is when the tree has a strong trunk at the bottom and triple branching at the top (as shown in the photo).

You should start by determining the height at which the house will be located. The optimal height is about 2 m from the ground.
Scheme


It’s not that difficult to build a children’s tree house yourself; the main thing is to take everything into account from the beginning so that you don’t have to redo it again.
Preparation of materials and tools

Next, you should begin preparing the necessary materials, depending on the volume of the future structure. These can be old and new boards, galvanized screws and washers, nails, screws, camouflage tarpaulin, etc.

Tools you will need: hammer, saw, level, tape measure, adjustable wrench, drill, jigsaw. You will also need to find a stepladder or a regular ladder.

Installation of main supports

Take one of the boards and attach it to the tree 30 cm lower than the expected floor of the house (it is advisable that it be at least 20-30 cm above head level).

Level the board exactly horizontally using a level and attach the other end to another tree. The same should be done with the second board, which needs to be attached to the back side of the trees.


Installation of cross beams and diagonal supports

Select appropriately sized cross beams and attach them to the main supports.

This should be done evenly, at the same distance from each other, while the tree trunks should be located between the beams.

In order to give the house greater stability and safety, the base can be strengthened with additional diagonal supports.


Make a rope mechanism

This can be useful both for children’s play (using a roller and a rope, you can lift a basket of food into the house and lower it down, etc.), and for delivering the necessary tools upstairs during construction. At the bottom of the rope you can attach a regular mountaineering carabiner.


Install the floor

When working with floor installation, the hardest part is making the holes for the trunks correctly.

Before making a tree house, consider the factor of further tree growth and branch movement.

Installation of railings and walls

Once the floor is ready, move on to installing the railings and filling the walls.

Everything must be made strong enough so that children cannot slip into any openings.
If there is a child in the family, there should be a separate place for children's games. It is very easy to set up a safe and comfortable children's playground in a dacha or suburban area. An interesting and very welcome addition to the site could be a small house or hut located right on a tree. Making a treehouse with your own hands is not that difficult if you choose a simple project and easy-to-use materials.


Drawing up a drawing and choosing a tree
First you need to think through all the details and draw up a drawing. The main parameters are the height and area of the house, as well as methods of its fastening. Typically, the base of the house is a rectangular shield with holes for branches, supported at the corners by strong pillars. The walls and roof of the structure can be of any shape and made from any available materials.

To get into the house you need. It should be as reliable as possible, have a strong fastening and at the same time not spoil the appearance of the structure. It is impossible to nail a ladder to a trunk - this is detrimental to the tree, and due to its growth, the structure will become increasingly deformed. A rope ladder is the cheapest option, but it can be used at low heights and only if the child knows how to handle it. All this must be taken into account when drawing up the project and calculating the material.


It is very important to choose the right tree, because the strength and reliability of the house, as well as the safety of the child, depend on it. You should not choose old trees with large hollows and voids inside, with a lot of dry branches, or with exposed roots. Trees that are too young and immature are also not suitable for such purposes.


Preparatory work
Having chosen a tree, you need to prepare it correctly. Small, dense growth on the lower branches and trunk can be safely removed with pruning shears, but medium-sized branches should be pruned wisely. Ill-proper pruning can have a detrimental effect on the tree and it will dry out. To prevent this from happening, you can leave all the large branches and mount the base for the house around them.
For construction you will need tools:
- hacksaw or circular saw;
- hammer;
- plane;
- drill;
- screwdriver;
- roulette;
- building level;
- sandpaper.
Materials you will also need:
- edged board with a section of 5x25 and 2.5x15 cm;
- timber 150x150 cm;
- support beams with a diameter of 20 cm;
- galvanized screws;
- nails;
- metal mounting plates;
- antiseptic impregnation for wood;
- solid oil or oil waste.
Before starting work, boards and timber must be treated and dried in the sun. This will prolong the operation of the house and protect wooden surfaces from dampness and rotting. The length of the support beams should be 1-1.5 m greater than the distance from the ground to the base of the house. Beams must be dug into the ground, so after treating with an antiseptic, the lower part of each beam is covered with a dense layer of grease, bitumen mastic, or impregnated with oil waste.
Prices for various types of construction boards
Construction boards
House construction technology


 House construction plan (top view)
Stage one - installation of supports
Carefully measure the distance between the main branches and determine the location of the platform for the house. Project the corners of the base down and mark these points with beacons. Using a drill, holes are prepared for the supporting beams; The depth of the holes is at least 1.2 m, the diameter is 25-30 cm. Sand is poured into the bottom in a layer of 10 cm, then the same layer of crushed stone. The beams are lowered into the pits, leveled and temporarily reinforced with cinder blocks or timber spacers.


All beams must be the same height and stand strictly vertical. In this case, the tree trunk can be located between the support pillars or act as one of the load-bearing supports. Mix the cement mortar, pour it between the walls of the pit and the pillar, and leave to dry. When the base is sufficiently hardened, the spacers are removed.
Stage two - platform installation

For the platform frame, take a timber and cut it to the required length. If the platform rests on pillars at all corners, surrounding the tree trunk, the supporting beams of the frame are fastened along the perimeter of the base. To do this, each beam is raised to floor level, leveled horizontally and both ends are screwed to the inner surface of the pillars. The resulting harness is reinforced at the corners with metal plates.

Next, additional beams are stuffed inside the frame, placing them parallel to each other at a distance of 20-30 cm. Where the tree trunk passes, a hole of the appropriate size is left. From below, the frame is lined with two transverse boards, placing them on both sides of the trunk. All connections inside the frame are reinforced with metal plates and bolts.


If one of the supports is a tree, the platform is mounted differently. The beam is raised to the level of the base of the house and screwed at both ends to the pillars, and in the middle it is nailed to the tree trunk. Then the timber is fastened in the same way on the other side. Both beams must be positioned strictly horizontally. After this, other beams are placed on top, perpendicular to the bottom ones, in increments of 0.5 m. Of course, all elements of the platform are bolted together using steel plates.

The third installation option is mounting without load-bearing supports. If the platform is attached exclusively to a tree, 2 beams are nailed to the trunk 30 cm below floor level on both sides. Then the remaining beams are laid perpendicularly on top in increments of 50-70 cm and connected at the ends with thick boards. The result should be a rectangular structure lying in a horizontal plane. Now additional spacers are installed: they take beams of the same section and fasten them at an angle to the platform, resting one end against the outer beams of the frame, and connecting the lower ends to the tree trunk.
Stage three - laying the floor

For the floor, use high quality edged polished boards. The wood is carefully checked for the absence of roughness and knots, and additional sanding is carried out if necessary. The boards are cut to the size of the floor and laid out on the ground for marking. This is necessary in order to accurately cut holes for the branches and trunk of the tree, because it will not be possible to make neat cuts at the top.

So, the boards are laid out in a rectangle, leaving gaps of 1-2 cm, the circumference of the trunk is measured and the boundaries of the cutout are marked on the future floor of the house. Using a jigsaw, cut holes of the required diameter and fit them onto the wood. The floor should not be closely adjacent to the bark, otherwise as the tree grows, the structure of the house will be deformed. If the blanks correspond to the drawing, you can attach the floor to the platform.

The boards are laid on the frame in the same way as on the ground, at intervals of a couple of centimeters. These gaps are designed to drain rainwater. Secure the floor using self-tapping screws or nails. The finished product should lie strictly in a horizontal plane, not creak or wobble under load.
Stage four - installation of the walls of the house


First, you need to install a strong timber frame around the perimeter of the platform. Here you can take lumber of a smaller section, for example, 50x50 mm. The timber is cut to the height of the walls and installed at each corner of the base, screwed to the protruding support beams with anchor bolts. Intermediate posts are mounted at a distance of 40-50 cm from the corner posts and fixed to the outside of the frame base. You cannot attach the racks directly to the floor; such a connection will not be reliable.


Corner and intermediate posts are reinforced with spacers and then sheathed with boards. The walls can be solid or lattice, it all depends on the preferences of the master. The number and shape of windows, as well as their location, can also be selected at will. The main thing is that the openings are reliably protected and the child cannot fall out of the house.


Stage five - roof installation


The roof is best done in the form of a canopy. At a height of 1.5-2 m above the walls you need to find two strong branches located on both sides of the house. Metal hooks are screwed to the branches and a thick cord or reliable rope is pulled between them. A piece of tarpaulin is thrown over the rope and its ends are secured at the corners of the house.

If branches interfere with making a canopy, you can mount the roof differently. A timber frame is attached along the upper edge of the corner posts. Next, 2 trusses are assembled and installed above the opposite walls. The trusses are connected to each other by two wide boards, which are stuffed along the upper edge of the rafters. Additional fastenings are not required for such a small roof, and the structure needs to be covered with some lightweight material - polycarbonate sheets, or ondulin.


Holes are cut in the roof, as well as in the floor, for large branches, if the structure cannot be installed otherwise. Again, you cannot attach the roofing close to the tree; you should definitely leave a small space around the cutout.
Stage six - installation of the stairs
The staircase to the house can be rope, straight wooden, light lattice, long or short, flat or steep. There are a lot of options, and choosing the right one is not at all difficult. One of these options is a ladder in the form of a shield with slots. To begin with, take a 50x50 mm beam with a length of 2.5 m and place it against the base of the house at an angle of 75-80 degrees, that is, almost vertically. Mark the cutting lines with a pencil and saw off the excess. The second beam is cut in the same way.
Having laid the beams on a flat surface, boards with a thickness of 2 cm or more are stuffed on top. The width of the boards is 15 cm, length 50-70 cm. An oval hole is cut into each piece the width of the foot and the cuts are processed with sandpaper. The cutout should be located on one side, at a distance of 5 cm from the end of the board. When sheathing the board, the blanks are nailed so that the cutouts alternate: the first board with a cutout on the right, the second with a cutout on the left, and so on until the end.

The boards are attached to the beams as a continuous sheet, without gaps. The finished ladder is placed against the house and secured on the outside of the platform using plates and bolts. Be sure to check the reliability of the fastening, because falling from the stairs can result in serious injury. The firmly fixed structure is treated with a primer with antiseptic properties, and then painted or coated with wood varnish.

The final stage is finishing
The house is ready, now all that remains is to decorate it and make it cozy. To protect wood from weathering, all external surfaces are recommended. It is advisable to choose the same colors for the walls and stairs, so the house will look more harmonious. There is no need to paint the inside of the boards, the main thing is that they are as smooth as possible. For convenience, you can attach light shelves inside, put a basket for toys or a children's table. The floor is covered with a soft rug and comfortable children's pillows are laid. Everything else depends only on the little owners of the house, so further arrangement should be entrusted to them.


Video - DIY tree house
 (1
ratings, average: 3,50
out of 5)
(1
ratings, average: 3,50
out of 5)  Every child needs a space that will serve as a place for games and entertainment. In the summer, on a country plot you can build children's tree house. It will be a great place to spend time.
A treehouse will allow children to spend more time outdoors and look away from your computer or phone.
Preparation and design
 In order to start building a treehouse, you should carefully plan all the details of the future structure.
A tree house for children should be:
- safe, with a strong foundation;
- small and light;
- visually pleasing to the child;
- convenient for games.
 The height at which the house will be located should not exceed two meters. The plant that will serve as the foundation must meet certain requirements:
- In order for the structure to be safe, the thickness of the branches should be about 20 cm.
- The tree should not be old or damaged.
- Before starting construction, it is necessary to remove old branches.
- The soil must be non-sandy in order for the roots to firmly support the tree trunk.
- You should choose trees with a well-developed root system (oak, maple, ash).
Gallery: tree house for a child (25 photos)
You can come up with a tree house plan yourself. You can involve your child in this activity and use a child’s drawing as a basis. You can also use ready-made drawings or use photographs from the Internet.
Materials and tools
In order to build a house, you should prepare all the necessary materials And tools:

All wood that will be used for the construction of a children's house must be pre-treated with antifungal impregnation. It will protect the house from the formation of fungus and various pests. The construction of a children's treehouse consists of several stages.
Work process
Installation of supports
 It is necessary to determine the exact location of the platform for the future home. The corners of the base should be marked with beacons. Using a drill, it is necessary to prepare holes more than one meter deep for the supporting beams. A ten-centimeter layer of sand and crushed stone is poured into the bottom of each hole. Then beams of the same height are lowered into the prepared holes, leveled and reinforced with timber for a while.
Fill the holes with cement mortar and leave to dry. After the solution has hardened and the base has become stronger, the timber that was temporarily installed is removed.
Platform construction
 For the base, take a beam of the required length. If the tree trunk is located in the middle and pillars will serve as support for the platform, the beams are attached to the inner surface of the pillars along the perimeter of the base.
The strapping is secured at the corners using plates. Inside the frame, beams are packed parallel to each other.
It is worth knowing that you should definitely leave a hole of the required size for the tree trunk. From below it is necessary to line the frame with two transverse boards.
Installation without supports is also possible. Several beams are nailed to the tree trunk, thirty centimeters below the floor level on both sides. They are laid out perpendicularly on top, and connected at the ends with boards. Next, additional spacers are made, the beams are attached at an angle to the finished platform.
Floor installation
 To make a floor in a children's playhouse, you should purchase a high-quality sanded board. They check it and, if there are any unevenness or knots on the board, sand it again.
The boards are laid out on the ground in the shape of a rectangle and an opening is made for the tree trunk using a jigsaw. The floor should not come into contact with the trunk, as the house may become deformed in the future.
Next, the floor is attached to the platform. The boards are laid on the frame and secured with self-tapping screws. Gaps of a few centimeters are left between the boards to allow rainwater to drain. While building the floor, be sure to check whether it is wobbly.
Wall installation
 A durable timber frame is installed along the perimeter of the platform. The timber is installed at the corners of the base and screwed with anchor bolts to the support beams. The intermediate posts are mounted at a distance of half a meter from the corner posts and secured to the outside of the base. If the posts are attached to the floor, this will be considered a rather unreliable connection. All racks are reinforced with spacers and sheathed with boards.
Don’t forget about windows; their number depends on your wishes or the wishes of your child.
Roof laying
 At a height of about two meters from the walls, you need to find a pair of strong tree branches that will be located on both sides of the house.
Metal hooks are screwed to these branches and a thick, strong rope is pulled between them.
Installation of stairs
The staircase can be built in any way you like; there are many options and drawings. It can be wooden or rope, steep or flat. It is advisable to make a railing for the stairs to protect your children from falling.
Finishing and decor
 In conclusion it is necessary decorate the resulting house and make it comfortable. There are many options for decorating a children's playhouse. It is necessary to build on the wishes and tastes of your child.
Playground can be placed in a house, or you can build it underneath it on the ground. And also, if there is a desire and opportunity, the house can be made with a veranda. You can also add a small slide to the building. It can be either inflatable or plastic.
The floor in the children's house can be covered with carpet. The boards from which the house is made are required paint.
The walls inside the house can be painted, or you can decorate them with children's drawings and all kinds of crafts. The house can be filled with shelves on which toys can be stored. It would also be appropriate to place a small table and chairs. You can put soft pillows on the floor instead of chairs.
Every child dreams of his own small And cozy house or treehouse. We can conclude that building it is not so difficult. Having your own space, decorated to suit your child’s tastes, will bring him joy and pleasure.
A tree house is an unusual and functional thing that will appeal to both children of all ages and adults. Such a structure will look very unusual and will decorate any summer cottage. Inside a miniature house you can play, relax, spend time with guests, and gather with the whole family. Making it yourself is not as difficult as it might initially seem, although it is important to evaluate your strengths objectively. Usually they use ready-made drawings or make them themselves, taking into account their own needs.
Drawings and diagrams
There is no need to develop a sketch for the future structure yourself. The house is built from wood; other materials are rarely used for its construction. The construction must be light so that the tree can support it.
There are many ready-made drawings for every taste. Initially, it is recommended to decide on the size of the house, its internal layout, width and height of the walls. It is also important to think about the purposes for which this structure is intended.
If the children are quite old, then the room should be spacious for them
It is very important to take into account the structure of the tree on which the house is placed. It should be strong, durable, tall. The branches should be cut off in advance. If it is crooked, then you will probably have to modify the finished schemes or redo them, since they imply the construction of a building around a straight trunk.
It is important to remember that trees change their shape over the years.
If you plan to develop a more complex building that will serve not only for children’s games, then you will have to think through everything to the smallest detail, drawing up a diagram yourself. It is not recommended to take on difficult projects if you are not confident in your abilities. A large house will be expensive and will take several weeks to build.
There are also structures that are placed on several trees at once. It looks very beautiful and impressive.
Required tools and materials
Tools that will be useful:
- hacksaw;
- plane;
- roulette;
- chisel;
- metal corner;
- building level;
- drill;
- screwdriver or hammer;
- sandpaper (for sanding wood);
- brushes and paint for painting a house or any finishing material such as lining or siding.
You also need to prepare in advance by purchasing the following materials:
- timber for making a frame (recommended section 50 x 50);
- lumber for sheathing;
- nails, screws, nuts, bolts;
- plywood (thickness not less than 8 mm);
- roofing material;
- brick;
- paint or varnish for covering wood;
- glass for windows.
Glass may not be inserted if the house will be used as a summer veranda. But you will have to build bars for safety reasons.
Step-by-step manufacturing instructions
All work on building a house for children is carried out on the ground. But supports belong to the category of high-rise work. Initially, you will have to install a solid frame foundation and then proceed to the house itself.
If it is not possible to raise the building, then it is advisable to select in advance those schemes in which the structure of the house is placed very low.
The sequence of actions is as follows:
- It is necessary to take measurements, then construct a frame and fix it around the tree trunk. The exact size of the platform depends on the chosen scheme.
- Later, the house itself will be built. The sequence also depends on the selected drawing. It is a little more difficult to build houses from beams than from clapboards. In the classic version, the building has walls and a roof, but you can simplify the work and make a triangular gazebo.
- Afterwards, a ladder is installed - it is advisable to make it wider so that it is also convenient for adults to climb up. There must be railings that you can grab onto - this guarantees additional safety.
- The last stage is the exterior and interior decoration of the room. The roof can be covered with tiles - it looks stylish and will protect the building space from precipitation.
Some people make small balconies in their houses, others prefer to cut out windows. It is advisable to install glass so that you can be inside the building during the cold season. If this is not possible, then it is recommended to install gratings made of wood or other materials.
Interior design ideas
A DIY tree house will look very cozy and original. It is extremely important to take care of the internal improvement of the building.
In a children's tree house you can put furniture - a coffee table, a chest of drawers for toys, a small sofa. Or lay carpets, soft mattresses, pillows. Despite the fact that the wood is treated with sandpaper, there is a high probability of injury, the floor must be covered with something.
It is better to place some paintings, joint photographs, and decorations on the walls. Be sure to provide at least one source of lighting - a hanging lamp that runs on batteries or with a rechargeable battery is perfect.
Do not forget that space in the house is small, and it must be used wisely. Old things that take up a lot of space cannot be brought into the building.
It is also important to consider that different types of homemade hanging houses have different technical characteristics. The floorboards may not support a lot of weight; this must be taken into account at the planning stage.
In some cases, it is recommended to purchase individual parts ready-made. Lightweight booths are sold that are installed on stilts around a tree pole. Such a structure, bought in a store, will make the work of the master easier. If there are doubts that it will be possible to repeat the results seen in photographs or other people’s diagrams, then it is better not to risk it. The work must be assessed objectively: one person cannot build a treehouse, especially if he has no experience in similar activities. Stairs are also sold separately; their selection is huge and varied.


Electronic homemade products for radio amateurs and novice electricians
Making a kite from paper: drawings with dimensions How to make a kite diagram
DIY double bed made of wood
DIY wooden bed
How to choose a charger for a screwdriver and can you make it yourself?