In the modern market of goods and services you can find absolutely everything, but many people prefer to make a piece of furniture themselves, without the help of specialists. A self-made double bed, drawings and diagrams of which are attached, can become a real decoration of the bedroom interior. To make such a bed, you need to familiarize yourself with the general recommendations of specialists, make a drawing and a plan of sequential actions. The drawing is needed to calculate the necessary materials, funds for their purchase and draw up a sequence of installation work.
Preparatory work
A do-it-yourself double bed has a number of advantages - the ability to choose the required size, design, shape of the legs, as well as the quality of the finished product in the final result, thanks to which the bedroom turns into a masterpiece.
The main details in its manufacture are:
- design, which can be classic or with a lifting system;
- a drawing to assist in the preparation and manufacture of parts;
- plan of sequential actions.
Drawings and diagrams
No work on the manufacture of interior items is complete without drawings and diagrams. The production of a double design was no exception. Below you can see several options for drawings and diagrams often used in the manufacture of double models.
Having decided on the type and size of the double bed, you need to make a detailed drawing. The scheme allows you to buy the required amount of building materials of a certain size or order their production in a furniture workshop. The drawing is also used throughout the entire construction process, for making individual elements with your own hands and their fastenings.
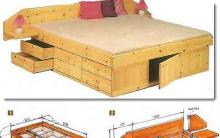
 Double bed with several drawers
  Assembly diagram
  Bed with two drawers on the sides
 Main details
 Beds with nightstands
 Side view
  Frame assembly
 Materials and tools for work
A double bed can be regular or with a lifting mechanism. Their manufacturing technique is slightly different from each other, since a product with a lifting mechanism has an additional box for storing things and a lifting bed frame.In order to determine the size of the product, you need to take into account the dimensions of the factory mattress that you plan to purchase.To make a standard double bed with your own hands, you will need the following materials.
When choosing a material, many are faced with wood of different quality. Experts recommend choosing high-quality wood only for the supporting structure. For the legs and bottom slats, you can purchase second-rate material. If you don’t have enough money for quality material, you can purchase chipboard or plywood.
If you plan to make a product with a lifting mechanism, then you will need a little more materials. Since, in addition to the main frame, it is also necessary to make a lifting frame for the berth. For its manufacture, you can use metal building material. The drawing should include not only the building material, but also the type of lifting mechanism, because its installation plays a big role.
 Choosing a board
 Tools you will need:
- roulette;
- pencil or marker;
- brushes;
- sandpaper;
- wood putty;
- varnish, stain;
- wood glue;
- self-tapping screws (30, 50, 60 mm);
- measuring square;
- drill;
- jigsaw;
- clamps;
- grinding machine;
- construction stapler;
- hacksaw.
When cutting parts according to the dimensions of the drawing, you need to mark them as accurately as possible.
Main frame
The process of making a double bed with your own hands begins with the main frame. A product with a lifting mechanism is also made from its base, which consists not only of four boards, but also of the bottom, as in the photo.
 Frame assembly
 Frame manufacturing steps:
- in the prepared parts it is necessary to make holes for fastenings using a drill. The diameter must correspond to the 30 mm screws that are used to fasten the boards;
 Prepare holes for fastening
 - clean the ends of the boards using sandpaper or a sanding machine;
 We clean the ends of the boards with a sander
 - open them with wood glue;
- Insert self-tapping screws into the drilled holes and fasten the boards together using a screwdriver or screwdriver;
 We fasten the boards using self-tapping screws
 - Having finished fastening, you need to remove all excess glue using a damp cloth;
 Remove excess glue with a damp cloth
 - upon completion, it is necessary to check all the corners of the structure, make sure that they are straight, using a construction square;
- After the frame has dried, you need to paint it. The color of the stain is chosen solely from the personal preferences of the owner;
 Finished frame after painting
 - if the frame is made in the form of a box, it is necessary to make a bottom, which can be solid (made of plywood) or slatted.
Attaching supports for slatted bottom
The supports for laying the slats are attached according to the same principle as the frame.
Technology for fastening supports for slatted bottom:
- in the support boards it is necessary to drill holes for the thickness of the screws, in increments of 25 cm;
- to fasten the boards, it is better to place the frame on its side and, having drawn a line at a distance of 5 cm from its bottom, you can proceed to installation steps;
 To attach the boards, I placed the frame on its side
 - Before attaching the support boards, they must be lubricated with wood glue;
- fastening is carried out along the frame along its edges, using 50 mm self-tapping screws;
- For stability while the glue dries, the support block must be pressed; for this you can use clamps. An example can be seen in the photo;
 The frame with the block was fixed until completely dry.
 - the middle support board is attached parallel to the previous two, at the same height, by drilling holes in its ends;
- the remaining holes from the fasteners must be sealed with putty and cleaned with sandpaper after it dries.
Legs
Making legs with your own hands is the easiest step in the entire construction process.
The whole manufacturing process:
- the prepared timber with a cross-section of 10x10 cm needs to be cut into 6 bars 10.5 cm long;
 Blank for future legs
 - fastening is carried out to the support bars;
- to strengthen the frame, two additional legs are attached under the central support, at a distance of 50 cm from the edges of the frame;
- To decorate them, you can give them any shape. You can saw off one of the corners approximately 3 cm from the bottom, at an angle of 45 degrees, as in the photo;
- Upon completion of the work, all sides must be sanded.
Fastening all created elements:
- as mentioned above, the legs are attached to the frame support boards. To do this, you need to use 60 mm self-tapping screws. You need to spend at least two on each leg;
 This is what the leg mounting looks like from the inside
 - holes are pre-drilled with a drill, a drill whose diameter coincides with the cross-section of the screws.
 Legs attached to frame
 Before screwing in the screws, you must first drill holes, which will reduce the risk of splitting the boards.
Decorative elements
Decorative elements play a big role in finishing the product; thanks to them, the bedroom will sparkle with new colors. One of the options for finishing elements is wooden slats, 5 by 2.5 cm thick, which should also be included in the drawing.
Manufacturing process:
- it is necessary to make the required size of slats from the prepared materials;
- the prepared slats must be sanded and painted with stain, the color of which is chosen based on personal preferences and the design of the room;
- after drying, they are coated with water-based varnish;
- After opening the first layer of varnish, you need to sand the slats to prevent the appearance of all kinds of bubbles. Next, apply two more layers of varnish;
- The painting procedure must also be carried out with the legs.
Fastening:
- decorative trim is attached with glue;
- it is necessary to apply glue to the surface of the frame and finishing slats;
- using clamps, press them for a while, preferably until the glue dries completely;
- all excess glue must be wiped off with a damp cloth;
- The slats can be fastened using either nails or self-tapping screws.

Fastening the lifting mechanism requires additional skills, since its installation must be of high quality and safe. There are three types of mechanisms, each of which is installed differently. Therefore, having chosen a certain type, you need to carefully study its installation diagram or seek the help of specialists.
Reiki
To make classic beds with your own hands, the slats are laid on the support boards of the frame. And in products with a lifting mechanism, they are placed on a lifting frame. Or it is possible to lay them on two frames at the same time, since on the frame they are used for the bottom, and on the lifting frame, for laying the mattress.

The slats are made very simply:
- according to the given dimensions, it is necessary to measure the length of the slats and cut them from purchased boards;
 Marking boards for making slats
 - for convenience and practicality, so that there are no discrepancies in the length of the slats, the first plank can be used as a sample, and subsequent planks can be marked on its basis;
- Having finished the process of making slats, you need to sand each one.


How to make a headboard and what you need for it
A headboard in a double bed is necessary for three main reasons:
- it is a decorative element;
- protects wall coverings from rubbing;
- for comfort.
The headboard can be of different sizes, shapes and coverings, it all depends on personal preferences, the interior of the room and financial capabilities. Here are photos of several examples.
Before making it, you also need to make a drawing with your own hands, which will indicate the dimensions and necessary materials. Basically, a sheet of plywood, upholstery fabric and foam rubber are used to create a soft and airy headboard.
Complete manufacturing technology:
- The first thing to do is measure the width and height of the headboard. Transfer all dimensions to a sheet of plywood and cut out the parts;
 Cut the foam according to the dimensions of the workpiece
 - if the rectangular shape of the headboard does not suit you, it can be made round or ornate. To do this, prepare a template and a jigsaw in advance;
- irregularities and notches resulting from the cutting process must be treated with sandpaper;
- To make a soft headboard you will need foam rubber, a stapler and upholstery fabric. Attach the foam rubber to the headboard blank using a stapler and cover it with the prepared fabric;
 Foam rubber must be stapled and covered with upholstery fabric
 - if you plan to make a regular headboard, then the plywood blank needs to be opened with varnish or paint;
- The finished headboard can be attached directly to the bed or to the wall.

The bedroom should create an atmosphere of warmth and comfort, which is achieved through design and furniture attributes. A good bed is needed not only to decorate a room, but also to ensure a sound, comfortable sleep, which can be achieved with the right bed. You can not only purchase it, but also make it yourself. Having fulfilled all the requirements, the product will serve for a long time, performing all its intended functions.
After a hectic day at work, or a long trip on a train or plane, you feel the need for comfort and relaxation on a soft bed more than ever. To just stretch to your full height and relax, to temporarily throw all unnecessary disturbing thoughts out of your head. Only a truly comfortable double bed with your own hands can give you such peace of mind and a state of bliss. Of course, comfort is mainly determined by the quality of the mattress. But something definitely depends on the design of the bed itself.
How to make a double bed with your own hands
Conventionally, a do-it-yourself double bed is a prefabricated structure consisting of a backrest (headboard) and the mattress box itself.
The design of the box is radically different in two cases: when it is designed for an orthopedic base and consists entirely of laminated chipboard.
- The orthopedic base is a metal frame with a bed of flexible lamellas. In minimalistic variations it is often used without additional add-ons. In all other cases, a hollow box is assembled around it, to which the back is attached. You can build drawers into the overall structure, but do not forget about the central support leg of the orthopedic base itself, which must somehow be “bypassed”. The best option is to make boxes on wheels that are absolutely not attached to the internal partitions; they can be completely pulled out and retracted. It is better to choose upright wheel supports.
- A do-it-yourself double bed with a base made of chipboard is much more expensive in terms of material consumption. Inside the frame, you need to install partitions on which the base for the mattress will “lie.” The edges of the bottom should also rest on something; usually a narrow strip is used around the perimeter. Drawers can also be made on wheels or attached to partition guides. The second option allows you to make the drawers deeper, approximately to the height of the wheels.

The assembled body can be used in interesting ways - for example, to implement designer runway options. 
But the main decoration of a double bed is still the headboard. It can be complemented by bedside tables, shelves, and consoles integrated into the overall design.
Do-it-yourself double bed, drawings and diagrams of headboards
The easiest option is to order a ready-made MDF backrest from a company specializing in the production of kitchen fronts, or from a solid wood carpenter. 
But you can also make a beautiful headboard for a double bed with your own hands. There may be several options.
You can give the headboard an interesting shape by first drawing the template diagram on a scaled drawing. 
The trend is for double beds with soft headboards and vinyl leather and foam inserts. It’s easy to make a double bed of this kind with your own hands: holes are drilled in a chipboard template for pulling buttons, foam rubber is applied, and a custom-made cover made of vinyl leather or any selected furniture fabric is “put on.” Buttons on the legs (it’s better to take metal ones) can be covered in the color of the material or left as is. 
Options with a thicker headboard look impressive. You can run the panel along the top and sides of the headboard. Or arrange it in the form of “columns”. 
You can extend the edges of the headboard beyond the bed frame and complement it with cantilever shelves or hanging cabinets. There is one BUT - the limitation of the laminated chipboard sheet. If the headboard of a double bed is longer than 2750 mm, a joint in the center cannot be avoided. 
The same situation will happen if the headboards are released behind the backs of the bedside tables. But here there is an option to implement an asymmetrical shape, with the headboard extending beyond one cabinet. 
The standard width of bedrooms is about three meters. With the generally accepted length of a sleeping place being two meters, this does not allow you to implement practical drawings and designs of double beds with your own hands with voluminous headboards, in the depths of which an additional niche is “hidden” for storing seasonal bedding, blankets, bedspreads and pillows. But if your room is wider, why not take advantage of this. 
Also, owners of spacious bedrooms have the opportunity to implement interesting options with inclined and curved headboards. 
Decorating headboards for beds without a backrest
Often, the design approach to bedroom interior design assumes that all furnishings will be located in strictly designated areas. Double beds are built into niches, illuminated bay windows, complemented by canopies and interesting ceiling designs. In this case, you don’t have to make a headboard for the bed, but “mark” its position on the wall. 
In this case, it is also not necessary to make a box for the bed - an orthopedic base with a mattress is quite enough.
Updated:
 2016-08-30
Making a wooden bed with your own hands may not be the easiest solution, but it is the most profitable. At the moment, almost all such furniture products are very expensive, so it would be advisable to purchase the necessary materials and make a wooden bed on your own. Of course, this will require tools and some skills, but the simplest model will require patience and basic skills in handling tools. In any case, almost everything that is needed to make a comfortable wooden bed with your own hands will be described below.
 Before you start assembling a wooden bed with your own hands, you need to decide on its future dimensions, location in the room and other nuances. This is necessary for the rational distribution of materials and own forces.
It's best to start with a diagram that you can draw yourself or find in furniture-making literature. In the books you can find not only photos of the final look of the furniture, but also step-by-step design, assembly and some tips. Video can also be a great help.
Wooden beds, like any other, must have a mattress. This design element is the most important, since comfort during sleep will depend on it. If you don’t pick it up in advance, it simply won’t fit or, on the contrary, it will “ride” in a niche. Accordingly, this will cause discomfort, and very strong.
There are two options for solving this problem: order a mattress in advance or make a bed with your own hands from wood and only then start looking for a suitable mattress. Whichever option is more convenient should be chosen, but the first one is much simpler because it will save time. In any case, before you make a wooden bed with your own hands, you need to decide on the size of the mattress.
Materials and tools
After all the preparations, you should acquire the following tools for work:
- sanding machine or sandpaper;
- wood hacksaw, jigsaw or circular saw;
- hammer with rubber striker;
- hammer with an iron striker;
- square;
- screwdriver or Phillips screwdriver;
- drill;
- tape measure, ruler, level;
- chisel.
With materials the situation is a little different. In order to assemble beds with your own hands, you will need a certain type of wood. The most suitable ones are walnut, mahogany and beech. But such expensive breeds are not affordable for everyone, and they are not suitable for beginners, since they will end up with too much garbage. The most affordable option is pine.

Do-it-yourself wooden beds can be made from a variety of wood species, but cheaper options are also suitable for the first time.
The materials required for the structure are:
- pine wood preparations;
- screws;
- varnish coating;
- stain;
- wood glue.
After all the materials and tools have been collected, you can begin to work.
Assembly sequence
A lot depends on the work plan. Do-it-yourself drawings will have their own nuances that will have to be taken into account during work. The simplest design is a regular frame on 4 legs with a niche for a mattress. Even making a double bed with your own hands can be done quite quickly if you have certain carpentry skills.
For the frame we will need several bars and boards of different sizes, namely:
- 2 beams 100x100 mm, length 2.6 m;
- 2 beams 50x50 mm, length 2.6 m;
- approximately 12 boards 25x75 mm 2 m long;
- 5 boards 50x150 mm, 2.6 m long.
The work order will be as follows:
- A beam with a cross-section of 100x100 is sawn into blanks for legs. 2 blanks should become the back legs of the bed, and 2 should become the legs at the head of the bed. The dimensions should be compared with the drawings, but most often the legs at the headboard are twice as high as the back ones.
- Grooves are cut into the legs on both sides 50x150 mm - for the longitudinal boards of the frame and the transverse ones (for attaching the legs).
- On one side of the legs, chamfers of 1 cm are removed at the ends.
- Next comes the assembly of the frame. It is worth noting that the length of the frame should be slightly longer than the length of the mattress by about 5-6 cm, and the width by 10 cm;
- Boards 50x150 mm are cut into blanks. 2 - along the length of the bed and 3 - along the width. All resulting parts are ground smooth.

The first thing to assemble will be the frame. It works like this:
- The transverse sides of the bed are connected to the longitudinal boards. Everything is held together with glue and screws.
- The base for the cross boards is cut out of 50x50 timber. It is attached so that the niche for the mattress has a recess of 3 cm.
- 25x75 mm boards are laid on the base, which correspond to the internal width of the frame and are secured with screws.
- The last boards to be installed are at the headboard.
Afterwards, the entire homemade bed is sanded several times, treated with stain and varnish.
Another option on how to make a bed is presented in the video.
- Before you make a bed out of wood, you need to check all the wood for defects.
- It is necessary to acquire spare materials in case of incorrect processing.
- We must not forget that even if you do something according to the instructions, the result may not be exactly what is shown. It is necessary to check the sequence of work or change the action plan.
Conclusion on the topic
As it turns out, making a bed out of wood with your own hands is quite simple if you follow all the instructions and sometimes consult with the craftsmen. In addition, you can not only assemble beds with your own hands, but also beautifully decorate them to match the style of the room. For those interested in how to make a wooden bed more attractive, some books with photos on decorating wooden products can help.
Today, many people are concerned about the environmental cleanliness of their living space. Health-safe furniture products, the production of which uses materials of natural origin, are no exception. This question is more relevant for furniture in the bedroom, in particular for the bed, where each of us spends a third of our lives, resting and gaining energy to actively work during the day. Nowadays such beds are purchased in stores, but they are quite expensive, and problems arise with the selection of sizes or design solutions. So, more and more often, many people decide to make such furniture themselves.
Choosing material
How do you make a double bed with your own hands, the drawings and diagrams of which are given in this article? First you need to decide on the materials. The main thing is to purchase MDF, the thickness of which is three centimeters. You will have to cut out individual parts from it so that their texture resembles expensive wood.
In addition to MDF, it is recommended to buy laminate boards. In this case, during installation work you will need nitro glue, while MDF is normally connected with a simple PVA adhesive. This is one of the reasons why professional craftsmen prefer to work only with MDF. It should be noted that purchasing sheets of material at retail prices is not entirely profitable. If there is a furniture factory in the city, it is best to buy sheets with edges prepared for work there. Interior elements can be prepared from wooden boards, two centimeters thick, or multi-layer plywood.

So, in addition to MDF, you will need to buy:
- sheets of construction plywood (2 x 1.6 m);
- one and a half meter long board (2 x 10 cm);
- beams 8 m long (5 x 5 cm);
- boards 2 m long (4 x 10 cm).

The choice of wood species is at your discretion. But one condition must be met - boards, beams and plywood are purchased edged and planed.
Tools you will need for your work

To avoid difficulties in making bed elements, fitting them and assembling furniture, you must always have the following assistants on hand:
- a circular saw that is attached to the table;
- miter saw;
- hammer and nails;
- a sander or just a set of sandpaper;
- construction tape, square, marking pencil;
- screwdriver;
- rubber hammer;
- clamps;
- sawing sawhorses;
- socket wrench with a set of removable heads.

Drawings of a double bed with drawers

Here are several options for drawings according to which you can make a bed for two beds:

And this model has a drawer at the head in which you can store bed linen:

Another version with drawers located near the floor:

We detail the future bed
We have decided on the materials and tools; now we need to cut out the elements. If there is no special equipment and sufficient free space, then you should seek help from specialists. Moreover, in an apartment it is quite difficult to achieve rectangular sections when cutting. Since the bed is supposed to have a mattress, a base for it should be made of sixteen-millimeter plywood, the parameters of which are 1.6 by 2 meters. The remaining elements should be manufactured in specified quantities according to certain sizes, according to the developed drawing. From the main parts it is necessary to make the upper and lower base of the podium, the top for the headboard (1 piece), transverse stiffeners (at least three), two rigid transverse ribs, four limiters for the headboard and three racks.

Fasteners required to assemble the bed
Simple fasteners are used to connect individual wooden elements. You can purchase it in a regular store that sells furniture fittings. To make the furniture durable, you should buy self-tapping screws and metal corners with holes:

Selecting a mattress
In most cases, a double bed made on your own ends up being much cheaper in the long run. And the maximum part of the costs is spent on purchasing a mattress. To purchase it, you need to clarify the dimensions of the bed so as not to remodel it or change the mattress, choosing a model that is suitable in size.

To make the crib comfortable, it is not recommended to save money on this element. The mattress must be of high quality and comfortable, and lie correctly on the base.

Many people try to make it, like a bed, on their own. But such work raises certain difficulties, because you want to do it in such a way that the final mattress turns out to be no worse than an orthopedic one that can be purchased in a store. You need to know that a homemade mattress should not be used by people under twenty-five years of age. And if a person experiences problems with the spine, he should definitely choose an orthopedic model in the store, taking into account his weight category, age and height when purchasing.
How to choose a mattress support
When the design solution for making a bed does not include a side, the mattress will most likely fall off it during sleep. On average, such a product weighs about eighty kilograms and is located on a highly sliding surface. This can cause injury and other unfortunate consequences.
In addition, the mattress must be weathered and “breathe”. And a double bed, made by yourself, most often under its base does not have the space necessary for ventilation.

In such cases, the mattress should be attached to the base of the bed, but not tightly. After all, you will have to change the mattress covers, replace the product with a more comfortable one. In such cases, you should use Velcro for clothing. One side is sewn to the mattress, the other is fixed to the bed using a stapler. To improve ventilation, holes should be drilled with a milling cutter.

Sample instructions on how to make a bed
First, the frame base is prepared. This part of the work is the easiest, because appearance at this stage is not particularly important. All mistakes made in the work can then be easily hidden with decorative finishing.

Now you need to determine the height for the legs (if provided for in the drawings), and add to its data the height of the panel, which is located on the sides. Four pieces of equal length are sawn off from the prepared block. A fastening element is fixed to each of them using self-tapping screws or nails.

If you already have a mattress, you need to measure its width and cut a couple of pieces of board to fit, leaving a small margin. They are fixed into metal fasteners, which are already installed on the legs. The next step is to measure the length of the mattress. Based on the data obtained, we prepare a pair of boards, the length of which is shorter than the mattress board by a value equal to the width of one leg. If the mattress is quite wide, it is recommended to provide an additional support beam in the central part of the frame base. To do this, the distance from the short sidewalls is measured, the board is cut to the required length and inserted into the central part of the base, secured with special metal fasteners.

Boards are attached transversely to a rectangular base, the gaps between which are about five centimeters. With their help, the mattress will be held and additional shock absorption will be created. The length of such boards should match the width of the future bed. They are fastened with screws.

It's time to move on to finishing work. We turn the manufactured frame base upside down. A board intended for finishing is placed along one edge, marked in size and cut. Similar actions are carried out on the second side.

The boards are glued to the frame base using carpentry glue, trimmed along the edges of the legs (top), secured with clamps, and the time required for the adhesive to dry completely is waited.
The edge is mounted on top. To do this, you will need a board whose width is eleven centimeters. It is necessary to cut boards from the workpiece along the length of the sides of the rectangular frame, bevel the ends at an angle equal to forty-five degrees. Small stiffening ribs made from a bar with a cross-section of five by five centimeters are installed on the walls. Everything is secured with glue and nails.

If you want the legs to look aesthetically pleasing, prepare boards that will hide them. Their height should be somewhat less so that the load from the bed does not cause damage. This finish can be secured with glue or self-tapping screws. In this case, you should try to ensure that the fastening points are not noticeable.

Now it's time for the headboard. At the back of each leg we attach boards 5 by 10 cm. Their height exceeds the base, but should not extend beyond the top edge. We grab the boards with clamps and drill holes that should partially go into the legs. We insert the bolts here and tighten them with a wrench, not forgetting the washers. The headboard turns out to be the simplest, in the form of a regular shield, adjusted to the size you need. If you decide to make a bed with a soft headboard, you will have to work a little more, but the task is quite doable.

All that remains is to seal the holes with putty and sand all the elements of the bed. Their surface should be processed until it becomes perfectly smooth. Now you can treat the bed with stain and only then with a varnish composition.
Benefits of a homemade bed

The product is environmentally friendly. After all, the work uses materials of natural origin. The bed is durable and can be used for a long time, withstanding significant loads. It is possible to develop design solutions of various shapes, decorate at your discretion, and decorate the front and back walls with wood carvings. Working independently, you can make a bed of the required size, successfully fitting it into the interior of the room. In addition, there is a good opportunity to save money.
If you want a double bed to fully meet your requirements and not be too expensive, try designing it yourself.
The material for work should be selected so that it can be processed without difficulty and is not too expensive. It will be easier to purchase ready-made sheets and cut out the necessary elements from them, following your drawings.

It is recommended to acquire all the necessary tools. They will help you in your work and will always be useful in the future.
It is best to make a double mattress to extend its service life and give it strength. It is best if each layer is made of materials of different densities - this will provide additional comfort. Try to make the top layer denser. For cladding and padding, use natural materials that do not contain synthetic or chemical additives. Otherwise, there is a high probability of developing an allergic reaction. It is best if the mattress is purchased in a store.

If such work has never been performed, then it is best to place the double bed on a podium made of laminated chipboard. It’s not difficult to make; any novice craftsman can handle the job. There is no need to rack your brains over the design of retractable elements and lifting parts - free space is already provided on the podium.
It should be remembered that the design of the bed should be in harmony with the room and combined with other furniture.

Sleep is the main form of rest for the body. And to make it healthy and of high quality, you should sleep on a comfortable bed. And if it is also made with your own hands, the holiday will seem doubly pleasant. Go for it, and everything will work out for you!
All photos from the article
Making a wooden bed with your own hands is not only interesting, but also profitable, since the price of furniture is rising every day. Moreover, you and your loved ones will be pleased to sleep on an item of your own production, and it will look absolutely harmonious in the interior of a wooden house or cottage.
We want to tell you how to make a wooden bed with your own hands.
Preparatory stage
Model selection

You can make a bed with your own hands from wood with drawers or “floating” cabinets, pull-out compartments, a folding backrest or a canopy, or you can do it yourself - it all depends on your requirements and taste. In any case, the first step is to choose the most suitable model.
Here you should be guided by considerations of practicality and stylistic compliance with the overall interior of the room in which the product will be installed.
That is, you must determine the general direction of the design and provide for all the design nuances that will make your stay as comfortable as possible.
Let's start with style. Do-it-yourself wooden bed design can be represented by the following basic examples:
- Classic option. Usually this is a massive bed with carved elements, sometimes inlaid with velvet, metal and stones. Often such furniture is equipped with a canopy for the most comfortable, if not royal, relaxation;

- Provencal style. It is distinguished by the use of light-colored wood - ash or birch, and is often coated with white or beige paint. The product is equipped with high carved backs, massive drawers, and exquisite fittings;

- East style. Oriental furniture is characterized by ascetic, but at the same time rational minimalism, severity of lines and forms. The beds, as a rule, are low, made of dark wood - cherry or wenge;

- Modern modern. Here, simplicity and functionality come to the fore; shapes and lines are laconic and strict. The joints are invisible, sharp corners are smoothed, all the nuances are thought out.

The next stage will be the selection of technical and design features. It could be:
- two-tier or single-tier model;
- double or single;
- children's or adults;
- folding;
- with drawers or side cabinets.
Even a do-it-yourself folding bed made of wood is quite possible, it all depends on your preferences and capabilities.

Important! If you are a beginner, then you should choose simpler designs. A do-it-yourself two-story bed made of wood is practical, but requires calculations and appropriate skills.
Selection of materials

When the model is selected, you should select the necessary lumber. Of course, we are considering exclusively solid wood, no plywood or MDF.
You can use a wide variety of wood, both coniferous and deciduous. Coniferous species are considered more beneficial due to the content of certain resins and phytoncides, which have an antiseptic and antimicrobial effect.

| Wood type | Peculiarities |
| Pine | One of the most inexpensive and popular breeds. Easy to process, resistant to moisture and pests, quite durable. It has a beautiful beige-yellow texture and a pleasant smell. |
| Larch | The most durable coniferous species, characterized by unusually high performance indicators, is not afraid of moisture and pests. Has a reddish-brown tint and is difficult to process |
| Oak | The most popular hardwood for making furniture. It is characterized by high strength, resistance to rotting and moisture, incredibly beautiful texture and relatively high flexibility for processing |
| Ash | It is characterized by high strength (comparable to oak), light wood and an interesting grain pattern. It is afraid of insects and requires mandatory treatment with an antiseptic; it is poorly polished |
| Linden | A durable and ductile rock that resists dampness and moisture well. It has a white or creamy tint, can be stained well, but requires antiseptic treatment |

Important! When choosing a material, consider its flexibility and accessibility. If you don’t understand the issue well, choose pine.
Making a bed

We will not consider complex drawings of a wooden bed with our own hands; it is better to start with a simple one.
- First of all, we cut out the legs from 100x100 mm timber and select the length to suit our own height.

- We attach metal fasteners for the side boards of the frame to the legs using self-tapping screws. The dimensions of the fasteners can be selected when purchasing exactly to fit the timber.

- We cut two 100x50 mm boards to fit the width of the mattress and fasten them between the legs along the short side of the structure.
- Then we cut out three boards along the length of the mattress, attach two of them to the legs, and install the third in the center of the bed, fixing it to the short boards of the frame with metal fasteners.

- We cut planks of 75x25 mm boards according to the width of the mattress and stuff them onto the frame with a gap of 50 mm. The slats will cushion and support the mattress.

- We cut a board with a section of 250x25 mm in width and glue it along the upper edge of the legs, pressing with clamps.

Glue a decorative overlay on one side.


Gravilat Chilean planting and care growing from seeds
Organization of daily life in the house, competent housekeeping
Hotel design Requirements for toilets in hotels during design
Detailed instructions for restoring a chair with wooden armrests
French folding sofas