Dacha plots can be of the most intricate shape, not only in terms of their borders, but also in terms of topography. Often, these are not just flat areas on which you can build houses and plant plants, but also not particularly convenient ones, with hills, slopes and even serious cliffs.
If we talk about the standard six hundred square meters within the boundaries of the cooperative, then practically no such problems arise, but if the dacha is located outside the city, then it is often built near a forest or river. But here the terrain can change very much. That is why DachaDecor.ru today talks about the topic of slopes and slopes that need to be strengthened.

Why strengthen slopes and slopes?
Many people have avoided this task for years, and nothing... that’s what those who are used to living in the classic dacha mode will say - coming here in the summer to plant, and leaving in the fall with the harvest, until spring. Well, we are a little different, and our dacha should not only be productive, but also very attractive. And also convenient, safe and extremely practical. This means that everything that we build, create, and even plant should be useful for many years. And sometimes this requires additional care.
Strengthening slopes, slopes and banks is one of these concerns, especially for summer residents who own areas with difficult terrain. Here, there may be slides of soil, slides from the top point and directly into the yard or garden, erosion of the bank and washing out of the same lawn, melting of snow into a mud pile during the spring melt, and breakdown of plants. These are just a couple of reasons that already draw attention to the complexity of the problem. But it also happens that not only does a snow cap fall from a steep hill at a dacha, bringing with it a little dirt and roots, but also multi-ton, extremely dangerous landslides that we would like to prevent.

It is clear that such precedents take place in mountainous areas, or in areas of forested areas and even former construction sites, where there are hills, ravines, pits and other non-standards that lead away from a simple and flat topography. But at our dachas there are also places that should be treated with caution. Therefore, let's study methods that will help qualitatively strengthen the slopes with our own hands.

How to strengthen a small slope with plants?
If the slope does not exceed 8-10%, it is most advisable to strengthen it with plants with a strong root system. Thanks to the planting of grasses, cereals, shrubs and small trees, living soil reinforcement is created inside the soil, which prevents landslides and unauthorized distortion of the relief.
In this regard, you should not remove plants on slopes, if there are any in your dacha. At first, after uprooting, changes may be observed, as you will disrupt the soil bond. But problems may arise in the future, when a lack of plants gives the slopes the opportunity to quickly collapse.
 Retaining walls are an excellent choice for a summer resident who has decided to combine “repair” of the soil with decorating the site
Strengthening slopes with biomats
Slopes up to 45% can also be strengthened with plants, but there are much more risks here. They exist because plants take a long time to form a root system, which must reinforce the soil. Atmospheric factors also work here - the presence of precipitation, wind, humidity associated with nearby or on the slope itself, as well as even tremors.
Biomats are laid on the surface of the cleaned slope and evenly fixed. Next, seeds of various plants are sown over the entire area of the material, which in the near future should create a single layer with the biomats. These can be not only special flowers and herbs, but also plants for landscape design of your dacha area that you yourself have chosen.

Fixing slopes with geotextiles
Geotextile is a dense material based on polyester or polypropylene fibers. It is artificial, but is excellent for a wide variety of jobs, as it is quite durable and water permeable.
Thanks to geotextiles, it is possible to strengthen slopes of 173% or 60°. Geotextiles are laid out along the slope and subsequently reinforced with special anchors. After final installation and fixation, you can always plant plants on top of the material, or decorate the slope with stones or tiles.

We strengthen the slopes with geomats
Another way to make a high-quality and reliable slope is the use of geomats. This material, which consists of several layers of polypropylene gratings, even somewhat resembles a washcloth.
But the positive side is that, along with high strength, geomats are also permeable to air, water and plant roots. That is, laying geomats on a slope will not only qualitatively strengthen it, but also, as in previous cases, plant all the necessary plants on top of the material, which will soon create a uniform and fairly dense layer.
An additional advantage of the material is the ability to use it on slopes up to 70°.
Application of geogrid
The geogrid allows you to work with exactly the same slope angle. It is a material made of polyester or glass, which is quite easy to work with.
The geogrid is laid in the following way: initially, the material itself is laid on a more or less prepared surface. Next, soil, sand or even crushed stone is poured into the geogrid cells. But it is most correct to place them in cells where plants can be planted immediately. This will make it possible to obtain the highest degree of strength for strengthening a slope or slope in just a few months.

Application of geogrid
Experts say that geogrid is more reliable in use than geogrid. This material is a cellular frame that stretches over the surface. After laying on a slope, the geogrid can be fixed in different ways, but the most popular is fixation with fillers. What’s interesting is that almost anything can be used - soil, sand, pebbles, crushed stone.
Further landscaping is also possible, but, as you understand, this is possible with the use of almost any material to strengthen slopes and slopes.
Gabions on a summer cottage (video)
We strengthen the slopes with gabions
We have already talked about this topic and also studied it in detail in other articles. We never cease to be amazed at the possibilities of simple metal structures filled with various materials inside. They are assembled quite simply, and can even be made independently in a summer cottage.
Regardless of the slope, gabion structures become reliable reinforcements. Only the initial condition of the slope, as well as its height, plays a role. The larger it is, the more difficult the task ahead, but if we are not talking about mountains, but a simple dacha terrain, then any problem is reduced to nothing by gabion structures.
You can install gabions vertically or lay them at the desired angle. But it is worth remembering that they have sufficient weight not only to restrain collapsing plumbs, but also to independently slide along the surface at an angle. Therefore, it is worth reliably strengthening each structure, creating a support in the form of a foundation under the lowest one.

Slopes and retaining walls
We will not dwell on this section for long, since an interesting thematic article has already been written on the topic. Let us only point out the fact that retaining walls are an excellent choice for a summer resident who has decided to combine “repairing” the soil with decorating the site. It is also worth adding that they should only be used for slopes of low height, with low soil pressure.

Other options for strengthening slopes, slopes and banks
Often the situation itself dictates to us the choice of materials for work and the solution to the problem. The reasons may be money, time, available materials, the condition of the slope, its height, distance from buildings, bodies of water, or the need to combine complex work and decoration. Therefore, it is necessary to have many options at hand, by assessing the features of which it will be possible to determine the most suitable one:
- If your dacha has a difficult terrain area, its boundaries can be strictly defined by trees. Over the course of several years, their root system will “bind” a solid foundation, thanks to which the slope will remain in the condition we need for a long time. But remember that fixing with biomats while planting trees will provide a good safety net;
- Strengthening the required slopes can also be done with the help of logs that are dug to the required depth. Each individual case requires accurate calculations, and therefore we are not ready to state the values for the installation depth and diameter of the log... it’s just one of the good ways;
- It is also convenient to make a sloping slope in the form of steps by installing the same gabions or retaining walls sequentially, for example, along the slope every few meters. This way you will protect the slope and install an original shaped design at your dacha;
- Partial fastening with geomaterials is also possible, which are selected depending on the angle of the slope. Small trenches are dug under them, and geomaterial is placed at the bottom. Next, the trench is filled up, and the edge of the material leaves the ground and goes upward, as if hugging all the soil laid in the trench. At a distance of several meters from the trench, that is, above it, the edge is pinned. After just a year, you get a dense layer that is reliable due to the reinforcement with the same mesh and plant roots.
There are many more methods, but today we have described the most popular and used ones. Therefore, take them into service and be sure to strengthen the slopes and slopes in your dacha, if there are any on the territory.
Such work with relief is considered complex and therefore requires a serious approach. We recommend drawing up a work plan in advance and making accurate calculations, making sure to select only high-quality and appropriate materials for the soil strengthening process.
(markov_content)
Most of the territory of our country is not a flat plain, but hills and valleys of varying steepness. However, the slope itself is nothing more than a complication for construction. A significant danger is posed by soil mobility: landslides, soil erosion, and erosion by groundwater. All these risks are neutralized by strengthening the land plot - thereby stopping the process of soil destruction and creating a reliable foundation for buildings, paths and small architectural forms.
Theory and terminology
The process of soil strengthening increases the natural stability of the land and earthen structures, making it possible to erect certain buildings on steep slopes. Stability is the ability of soil to maintain its shape and size. Slope refers to the amount of change in ground level per unit height. For example, a slope of 10% means that for every 100 m horizontally there is an increase of 10 m. Stability can decrease both in conditions of increased slope of the land, and due to changes in the level of soil, the impact of wind loads, heaving of soils during freezing, etc. d.
The method of soil strengthening depends on the level of the natural slope of the ground. At small and medium angles (up to 8%), the land is usually strengthened using so-called natural methods. For example, plants are planted (horizontal and vertical germination), the root system of which strengthens the soil and prevents erosion and landslide processes. If the slope is higher than average, but does not exceed 15%, then use logs, stones, and blocks dug into the soil. Finally, for slopes of 8% or more, modern geosynthetic materials are used, specifically designed to solve soil stabilization issues.
Tradition and science
So, the most profitable option for the homeowner is a plot of land with a low slope, the absence of pronounced processes of shedding and landslides. In such an area, to strengthen the soil, it is sufficient to plant ground cover plants, such as periwinkle, sunflower, and ivy. By and large, any herbaceous materials help improve soil characteristics.
Planting shrubs on a slope also increases its stability. Quince, cotoneaster, elderberry, barberry, etc. will come in handy. You can also plant any creeping and climbing bushes and flowers. Individual trees will also help, including fruit and berry trees (apple trees, cherries, plums, etc.). Experts recommend choosing several types of trees and shrubs and planting them evenly, loosely against each other.
On slopes above average (from 8 to 15%), in addition to green plantings, thick logs, oblong stones, ceramic or concrete blocks are dug perpendicular to the slope, thereby creating a certain frame to increase soil stability. You can also drive metal anchors from below stones, logs or blocks. An artificial tray for draining water during precipitation will also be beneficial.
Special geosynthetic materials have been developed specifically to improve the technical characteristics of soil. Actually, the presence of the prefix “geo” (from the Latin “earth”) in their name indicates the scope of application. And the word “synthetics” implies the presence in the composition of materials of such components as polyester, polyester, polyamide, polypropylene or polyethylene. There is no need to be afraid of the presence of unnatural components - geosynthetic materials are completely non-toxic and generally safe from an environmental point of view and their impact on the environment. In addition, they are weather resistant. In general, geosynthetics generally “hide” the sublayer of soil and the green spaces located above.
But the main thing is different. Geosynthetics effectively solve the issue of strengthening the soil even on steep slopes, reliably stabilize the soil and maintain stability even during subsequent soil movements (caused, for example, by seismic reasons). The average service life of such products is about 50 years.
Based on their qualities, geosynthetic materials are divided into two large groups - waterproof (geotextiles and geomats) and water-permeable (geogrids and geogrids). The latter, in addition to strengthening, also perform a drainage function.
Geotextiles
Durable and wear-resistant geotextile fabric is most often used in road, technical and pipeline construction. However, there is also a use for it in “private” conditions: being a waterproof material, geotextiles provide effective protection of sloping (and even) soils from erosion under the influence of rain and wind. It also helps in the case of weak and loose soils. The maximum permissible angle of inclination of the site for the use of geotextiles is 6o%. On steep and complex slopes, geotextile is most often used to create a sub-base for subsequent strengthening.
The advantages of geotextiles include:
- increased shear strength (ability to withstand tensile stress up to 120%);
- good filtering abilities;
- frost resistance, thanks to which the ground on the site is protected from deep freezing;
- preventing the mixing of different soil layers underground;
- absence of rotting, decomposition and formation of by-products.
After delivery to the site, the geotextiles are divided into the required pieces (the material can be easily cut even with an ordinary kitchen knife). Then, on the protected surface, the soil is removed to a depth of about 20-50 cm, the bottom of the resulting excavation is leveled and a geotextile fabric is laid on it. A layer of crushed stone or gravel is poured on top and a second layer of geotextile is rolled out. Sand is poured on top of it, and the outer covering is laid on it. The latter can be either a layer of fertile soil or paving stones, decorative stone or paving slabs (the latter, of course, is mounted on cement mortar).
Geomats
Another good “rival” of movements and landslides is a rolled material made of polymer threads thermally bonded to each other at intersections, called geomat. Outwardly, it resembles a washcloth, since technically it is a multilayer polypropylene lattice. This structure protects the soil, and in its upper layers you can plant certain plants.
Distinctive qualities of the material:
- strength and stability of properties;
- preservation of qualities at temperatures from -30 to +100 °C;
- resistance to ultraviolet radiation and moisture;
- low level of fire hazard and smoke in case of fire;
- the ability to carry out installation in frosty weather;
- reduction of installation time due to its simplicity.
It is also important that the open structure of the material does not interfere with the germination of the plant’s root system, promoting the rapid overgrowth of slopes, and thereby guarantees their protection from erosion.
To install geomats, the surface of the slope is cleared of debris and leveled from “folds”, humps and recesses. Trenches are dug from below and above to a depth of 30 cm (they are also called anchor trenches). Geomats are laid out with the smooth side facing the ground and reinforced at the edges with anchors - wooden or metal bolts. When laying sheets in the longitudinal direction (relative to the slope of the site), an overlap of 15 cm is made. If the layout is made across the slope, the upper geomat is placed with an overlap of 20 cm on the lower one. The mats are also secured to the surface with anchors based on the approximate calculation of 2 anchors per 1 m² of area. It is important that the laid out geomats fit well and tightly to the slope, repeating its outline if possible.
After installation, the anchor trenches and the geomats themselves are covered with a 3-5 cm layer of soil, compacted and sown with herbaceous plant seeds. By the way, the seeds can also be scattered under the mats, on the prepared surface. By growing its roots between the fibers of the material, the grass will only strengthen the geomats. Such a slope will not be afraid of either water or wind erosion or landslides.
Geogrids
Among the variety of geosynthetic materials, the most frequently used are so-called geogrids - products made of polymer cells (they are formed by polyethylene tapes), fastened together in a checkerboard pattern using high-strength seams. The cells are connected using ultrasonic welding, due to which the weld can withstand increased loads and is characterized by high tensile strength.
The scope of application of the material is very wide: geogrids are used for soil reinforcement, strengthening slopes, erecting retaining walls, strengthening artificial and natural reservoirs, creating a substructure for garden paths, terraces, artificial embankments, driveways, etc. In general, any surface areas which may be subject to prolonged and significant exposure to one or another load (both atmospheric and mechanical), it is better to strengthen them using a geogrid. It is also useful as a protective substrate for landscaping, since the cellular structure protects the roots of lawn plantings from damage.
Among the useful properties of geogrids, the following should be noted:
- ease of transportation;
- reduction of construction time and costs due to the fast installation process;
- possibility of using any local soil;
- flexibility and, as a consequence, resistance to local shifts on slopes;
- the ability to protect slopes of great steepness, at which the filler cannot be held on its own;
- reliable operation over time.
Geogrids are selected according to geometric parameters, namely the height and area of the cell. Thus, the minimum possible cell height is 50 mm, the maximum is 200 mm. Geogrids with cells from 160 x 160 to 320 x 320 mm are produced along longitudinal sections.
When choosing a specific material, take into account the steepness of the slope on which it will be used. The rule here is simple: the greater the angle of inclination, the smaller the cell size should be. To select the height of the cells, the proportion is the opposite: the steeper the slope, the greater the height should be. The maximum permissible values are given in the tables. The quality of the site is also taken into account: the lower the strength of the soil, the smaller the size of the selected cell, but the greater the height.
At the beginning of work, the area is cleared of vegetation, stones and dirt, the soil is leveled and compacted. After this, the entire prepared area is covered with a geotextile cloth. This layer will serve as drainage. Then sections of geogrids are laid and secured with metal anchors.
The fasteners are driven completely into the ground, flush with the surface of the cells. The anchors are distributed in a checkerboard pattern based on an approximate calculation of three to four fasteners per 1 m². The distance between the anchors is chosen equal to the size of the geogrid cells.
The cells of a fully fixed geogrid are covered with plant soil, concrete or cement mortar. The choice is made taking into account the further intended purpose of the territory. The aggregate is usually poured in excess and then compacted.
For many regions of Russia, sites on hillsides or on the edges of ravines are a very common occurrence. Many buyers are afraid of such areas and consider them to be unnecessarily problematic.
Main types of slope fortifications on the site
However, this is not entirely correct. With the right approach to strengthening slopes and landscaping, the problem of slopes can be effectively solved.
So, you have purchased a plot of land with a slope or ravine - but do not dramatize the situation.
This arrangement also has its undeniable advantages:
- the situation with stagnation and accumulation of water on the site is absolutely excluded;
- if the slope is facing the sunny side (south or east), various types of vegetable crops and ornamental plants can be effectively grown in this area;
- an unusual plot with a slope makes it possible to create a unique composition for the design of your country estate;
- if you are planning to build a waterfall or an alpine slide, you will not have to build special structures, you can simply take advantage of the terrain features.
Now let's move on to the disadvantages of areas with slopes:
- plants planted on a slope will have to be watered additionally and regularly, because water is almost not retained in the soil under slope conditions;
- growing a beautiful, smooth and silky lawn on a slope is quite problematic;
- slopes are very difficult to use for practical purposes. You can’t install a gazebo, barbecue, or table this way. This option is also not suitable for a playground;
- slopes and slopes need strengthening, and this is associated with inevitable financial and labor costs.
If you decide to do slope strengthening yourself, you should consider a number of factors that influence the optimal choice of method.
This is about:
- probability of shedding, erosion, landslide;
- location of groundwater;
- tilt angle;
- soil structure.
If we talk about a gentle slope, the ideal option here would be to plant plants whose root system will serve as a “fixer” of the soil. In the case of a steep slope, plants alone will not be enough; special structures will have to be installed. Here we are talking about: geogrids, concrete blocks, stones, gabions, biomats, etc.
So, in cases where the slope angle is no more than 10 degrees, the soil cover can be stabilized with the help of trees, shrubs, and flowers. The root system penetrates deep into the soil and thereby prevents landslides and erosion.
Of course, large trees have the most powerful root system, but you shouldn’t cover the entire surface of the slope with them. Separate, not very tall shrubs and trees will look much more interesting.  You can effectively decorate a steep slope with the help of rose hips, cotoneaster, barberry, Japanese quince, viburnum, and broom. Varieties of flowering bushes can also be beautiful decorations. The same applies to plants that have lush flowers and long shoots.
A composition of climbing bushes that is too large and bright will be too much. It is enough to plant one or two densely flowering varieties. Some types of ground cover plants are perfect for decorating a slope. Take a closer look at sunflower, ivy, woolly cherry and periwinkle. These plants can perfectly serve as a background for large shrubs and trees.
Of course, ledges, depressions and elevations are a real “paradise” for those who love rockeries and alpine slides. Three or four varieties of flowers, coniferous wood and ordinary stones - this set is sometimes enough to create a real masterpiece of landscape design. However, let us remind you once again that plants located on a slope need frequent and abundant watering.
About the option with fences
With the help of artistically designed fences made from a variety of materials, you can effectively strengthen slopes with almost any slope angle. Installation of wooden elements or laying of stones is carried out on the outer sides of the slopes. Fastening can be carried out using various methods (digging into the ground, with or without a foundation). If we are talking about a stone fence made of granite, cobblestones, limestone slabs, such a fence is laid out in the form of a wall. Attaching a wooden fence is usually done in the form of a ladder. 
The next option for strengthening a steep slope is the use of geotextiles. Often this material is used in combination with planting. It consists of polypropylene and polyester fibers that are highly permeable to moisture. In addition, geotextiles have a very high level of strength.
Laying the material is a very simple and fairly quick process. A piece of geotextile of the appropriate size is stretched over the slope and secured at each edge with anchors. It is best to use a combination of natural stones and colors as decoration. 
Biomats and geomats are used to strengthen the surface of cliffs with a slope angle of up to 45 degrees. Like geotextiles, this option will be used in combination with planting trees and bushes. To produce biomats, straw fibers are used, which are attached to layers of cellulose. Geomats are varieties of multilayer polypropylene gratings.
It is known that the development of the root system of a plant takes time. In this regard, first of all, it is necessary to equip the slope with geomats, and then begin planting plants.  Rolls of geomats or biomats are laid out all over the slopes, then each of them is secured around the perimeter. After this, you can move on to sowing flowers, herbs, and shrubs. Biomats have a fibrous, loose structure, so the seeds are easily fixed and germinate. At the end, you get something like a thick natural carpet, under which there is a reinforcing layer invisible to the eye.
If your site has crumbling slopes, we recommend solving this problem with the help of a volumetric geogrid. A geogrid is a polymer tape-type product. The design consists of elements welded to each other, and really resembles a coarse mesh lattice. The cells must be filled with one of the heavy building materials. Alternatively, you can use concrete, gravel, crushed stone, sand or fertile soil (for planting vegetation).
Before starting the process of reinforcing the slope, the soil should be prepared. All types of large plants should be removed, and the soil should be compacted and leveled as much as possible.  There are two main ways to install a geogrid. The first method involves laying the grating directly on the prepared soil. The second option uses a drainage layer, the role of which is played by a layer of geotextile.
Video: 5 solutions for strengthening slopes and slopes
HOW TO STRENGTHEN A SLOPE
It’s beautiful if you got a piece of land with a perfectly flat topography, plus there are no landscape defects next to it in the form of ravines, embankments and high hills. Live on such a plot for your own pleasure, build a house, plant a garden, create flower beds, in short, do whatever your heart desires. But if this area is sloped, and even quite steep, the question of how to strengthen the slope becomes one of the most important. This knowledge will also be needed by those who have a flat plot, but it is located at the foot of a steep hill. This hill, although it is not your property, will have to be strengthened so that the earth does not slide down onto the beds during floods, stones and any natural debris do not fall down. Let's consider how you can strengthen the slope of the dacha plot itself or the slopes next to it.
TERRACES
If you have taken ownership of a piece of land to engage in gardening, or to build a house on it, plant a flower garden, or arrange a recreation area with a lawn on which you can place a table and sun loungers, the most reasonable, but also incredibly labor-intensive, strengthening of the slope on the site – this is the construction of terrace steps with the installation of retaining walls. This method is not particularly popular among Russian summer residents, but in those areas where there are few flat areas (for example, in Greece or Italy), 80% of the land has the form of such terraces. They grow vineyards, build villas with swimming pools, and plant olive groves. So creating terraces is quite possible. These designs have significant advantages, such as the most rational use of the site area, ease of maintenance and the effectiveness of its appearance.
If the entire site is more or less flat, but there is a single hill on it, it is also wise to arrange stepped terraces on it, rather than leveling it to the ground. On such steps it is simply ideal to cultivate strawberries. Some gardeners who do not have hills on their territory even specially pour them in to grow strawberries.
So, how to strengthen a slope using stepped terraces? First you need to determine the angle of inclination of the site. The smaller it is, the fewer terraces will have to be made, and the wider they will be. It is desirable that their platforms have no slope at all. Otherwise, the upper ones will begin to destroy the lower ones over time or during heavy rains. But a small slope of up to 3° is allowed in extreme cases. The height of each such “step” should be within 60-65 cm (maximum 80 cm), because it will experience considerable soil pressure from the side of the hill.
 After measurements and calculations, we begin the construction of our terraces. Strengthening the slope on the site is carried out in the following sequence:
1. It is necessary to divide the area into future flat areas (terraces) and mark their boundaries with pegs. For convenience, you can stretch a string horizontally between them.
2.Starting from the bottom, select excess soil from the first future terrace (it can be used to construct decorative shafts) until the area becomes level.
3. On the side of the hill there should be a vertical earthen wall perpendicular to the site. It needs to be strengthened immediately. The external design can be anything - facing tiles, tuff, decorative stone, but inside it must be done according to certain rules.
Strengthening a slope on a site using terraces with a step height of more than 50 cm requires fixing the retaining wall with beams and pillar supports. The easiest way is to make them wooden, just don’t forget to treat them twice with an antiseptic, mastic or bitumen before using them. If you have the opportunity, coat the posts and beams once with coal tar creosote, just as you would treat railroad tracks. sleepers. The strength and stability of the tree will be ensured for 50 years.
4. Drive the finished supports into the ground in close proximity to the sheer earthen wall. It is advisable to drive them into the ground by about 20 cm. The distance between them depends on the height of the step. The larger it is, the more often the supports are placed. Strengthening a slope in an area that is not very steep, where low supporting walls can be made (up to 30 cm), is done without supports.
5.Having driven in the posts, attach the beams to them.
6.Pour a strip of screenings approximately 15-20 cm wide and about 20 cm high along the entire length of the terrace.
7. Make a concrete base on top of the screenings, and on it stone or brickwork to the upper level of the supporting wall or slightly higher. Some plot owners leave everything like that, while others decorate the masonry, creating an incredibly beautiful design.
When the first terrace is ready, all that remains is to cover it with a layer of fertile soil.
The rest of the terraces are made in the same way, and a storm drain is installed on the top one to protect the area from water flows.
Now let's look at how to strengthen the slope of a site where gardening work is not planned. In this case, modern technologies offer the use of various artificial, semi-artificial and natural materials. All of the following methods do not change the landscape of the site, do not reduce the angle of its slope, but only protect it from destruction.  ORNAMENTAL PLANTS
This is the easiest, cheapest and least labor-intensive way to strengthen slopes, but it has an important drawback. The fact is that you need to use only plants that form a powerful root system. Mostly trees have this property, and they grow for a long time. Therefore, while they begin to work as a strengthener, your slope will have time to cause you a lot of unpleasant moments. Using only herbaceous plants to strengthen slopes gives only short-term results.
REINFORCED CONCRETE PLATES
Their advantages are durability and high operational reliability. Their disadvantages are labor-intensive work and high cost. Before laying reinforced concrete slabs need to make the slopes perfectly smooth. In principle, they have to be leveled when using other materials, but for reinforced concrete slabs this is most important. This material is usually used to strengthen the inclined walls of irrigation canals, elevations near bridge supports, and steep banks of reservoirs. Strengthening the slope on the site using reinforced concrete. structures are sometimes combined with terraces. Then you can make the supporting walls of the steps not perpendicular to the ground plane, but with an inclination of up to 45°.
BIOMATES
They are made from natural materials:
straw;
coconut fiber;
straw-coconut mixture.
To improve performance, they are attached to a layer of cellulose and stitched with polypropylene thread. As a rule, biomats already contain grass seeds located in the middle between two layers of fibers. These sandwich designs are produced in three varieties:
- stitched (the most popular, but the seeds in them germinate unevenly);
-made using the needle-punched method (the most expensive and most convenient);
-with a layer of seeds attached with special glue (the cheapest, but the seeds in them take a very long time to germinate due to the glue).
 How to strengthen a slope using biomats? In principle, it's easy. The work algorithm is approximately this:
1.Dig a shallow ditch at the upper edge of the slope. You don’t have to do this, but with a groove the fastening is more reliable.
2. Prepare the slope - level it, remove stones and unnecessary vegetation, compact the soil.
3. If the surface of the slope is too rocky or solid clay, it is necessary to lay a layer of soil on it, which must be compacted, for example, with a hand roller. Then the grass will grow better and, accordingly, reinforce the slope more reliably.
4.Proceed with laying the biomats. This is done with a cellulose layer towards the ground. Place the first roll with the free end into the groove and securely fix it there.
5.Roll out the roll down the slope to its foot.
6.Cut.
7.Secure the entire laid module well (nail it to the ground) with stakes, iron brackets and other fasteners. In order to achieve a working strengthening of the slope on the site, it is necessary to ensure complete contact between the surfaces of the biomat and the ground.
8.Secure the edge of the second module, like the first, in the groove.
9. Unroll the roll down the slope to the foot. In this case, it should overlap the first by about 20-30 centimeters.
This way the entire slope is covered. Next, the biomats are sprinkled with a little earth. You can water it. Grass seeds treated with special growth stimulants should sprout within a week. They grow directly through the fibers of the mat, securely fastening it to the ground.
The positive quality of biomats is that you can later plant flowers or even shrubs on them. This type of reinforcement is used on slopes with an inclination angle of 45°, and if the inclination angle is 30° or higher, experts recommend laying a geomat on top of the biomat, attaching it well to the ground, and pouring about 2 cm of soil on top.
In addition to biomats, biomesh and biofabric are also available for sale.
GEOMATS
 This material is a three-dimensional (three-layer) structure of randomly woven fibers of synthetic polymers. This design allows you to very reliably (for centuries) reinforce the slope and fix the roots of small plants (herbs, flowers). Strengthening the slope on a site with geomats is carried out according to the same scheme as with biomats. The difference is that you will need to sow the seeds yourself. It is important to lay this material with a smooth surface to the ground. The advantages of geomats are their high resistance to all chemical solutions, including salt water, resistance to microorganisms, ultraviolet radiation and critical environmental temperatures. It is important that geomats do not decompose or rot, so they will lie on your site until you remove them yourself. They allow you to strengthen slopes at an angle of 70°.
GEOTEXTILE
 Sometimes they use reinforcement of a slope on a site with geotextiles (the second name is geofabric), which is structurally not much different from geomats. This material is lightweight, can be cut well with improvised means, does not allow water to pass through, is resistant to aggressive environments, can withstand high mechanical loads, can resist stretching (120%), does not puncture or tear. With its help, it is possible to strengthen a slope in an area with a slope angle of 60°.
How to strengthen a slope with geotextiles? Some authors suggest doing this according to the same principle as strengthening with geomats. However, the technology developed by specialists is somewhat different. You need to lay geotextiles on the prepared slope, secure it, install formwork around the perimeter, pour sand, and distribute it evenly and carefully over the surface. Place a second layer of geotextile on top and cover it again with sand (or gravel). Next, the entire structure is covered with decorative material - tiles, stone and similar materials.
GEOGrid
 This is a structure made of glass or polyester threads intertwined in the shape of square cells. Geogrid is sold in rolls. The threads from which it is woven are very strong, resistant to chemical and mechanical damage, and do not decompose in the soil. Their thickness may vary. Unlike geomats, which have a solid texture, geogrid allows a wider range of plants, including shrubs, to be planted on the slopes reinforced by it. How to strengthen a slope with geogrid? The algorithm is like this:
1. Level the slope.
2. Lay out the geogrid modules over it, doing this end-to-end.
3.Secure the cells to the slope by driving special hooks or anchors into the ground. 4.Pour soil into the cells.
5.Smooth. If seeds are sown immediately, the soil is watered.
Geogrid allows you to strengthen slopes with a slope of 70°.
GEORETT
 This material is made from strips of geosynthetics bonded in such a way as to provide very high performance in protecting slopes from erosion, sliding and landslides. How to strengthen a slope with geogrid?
1. Drive anchors into the ground along the slope area. The marking is made along the perimeter of the module being laid.
2. To ensure maximum reliability of strengthening the slope, lay geotextiles under the geogrid, but you don’t have to do this.
3. Fill the geogrid cells with the selected material (soil or stones). A geogrid can be used to strengthen a slope with a slope of 70°. In operation, it is more reliable than geogrid.

METAL GRID
On very steep slopes, as well as in mountainous and rocky areas, where there is a high probability of rockfall, a more expensive metal mesh is used. It is made by twisting galvanized steel wire in the form of cells of various sizes. Galvanized mesh can be produced with a polymer coating, which extends its service life.
GABIONS
 This slope strengthener consists of metal wicker structures like large boxes. Inside they are divided into sections. The wire from which the boxes are made has double torsion, which provides high strength and allows you to preserve the structure as a whole if it breaks in one place.
How to strengthen a slope with gabions? The technology is as follows:
1. Install the first row of boxes at the base of the slope.
2.Attach them to the ground with metal rods.
3.The next row is attached to the previous one using a rigid wire. 4. Fill the installed gabions with stones so that the large ones lie in the corners and along the perimeter.
Such structures serve not only to strengthen slopes, but also to protect against rockfalls. They can be used on slopes of any steepness. Over time, grass and other vegetation appear in the gabion stones, which makes them even more reliable.
LAWN GRILLES
 These reinforcing materials are very easy to install, inexpensive and easy to use. They can be used where the surface inclination angle is up to a maximum of 8°. These gratings are made of plastic, which gives the grass surface of the lawn additional stability, but does not decompose in the ground. Lawn gratings are sold in separate 40x60 cm modules, which are fastened to each other with special latches at the work site.
 How to strengthen a slope with such structures? First you need to prepare it by pouring a layer of earth or gravel up to 3 cm thick on it, level it, lay the lattice module on top, fill the cells with soil, sow the seeds, and water.
In conclusion, I would like to note that when strengthening slopes, depending on local landscape conditions, it is advisable to simultaneously use several different materials, for example, combining gabions with geomats and geogrid, geogrid with geotextiles, planting trees with biomats or with other materials and structures that provide quick Effect. This will be somewhat more expensive in terms of finances and labor, but it will make it possible to strengthen the slope with high reliability.
In the minds of a metropolis resident, a suburban area is a piece of paradise with a beautiful house, green lawns, fragrant flower beds, a stream or a swimming pool, and neatly laid out beds. But often the reality is exactly the opposite of the fairy-tale ideas, and you acquire a plot of land with a ravine or on the edge of a hill. Don't worry: proper strengthening of slopes and landscaping will solve all problems.
If you become the owner of a dacha area with uneven terrain, you should turn unpleasant surprises in a favorable direction. First, you need to remember the advantages of an unusual site:
- Stagnation of rainwater in any area that has a slope is completely eliminated.
- The plane facing the sun is well lit, so ornamental plants and vegetable crops will quickly develop on the slope, especially on the south side.
- Unusual terrain is a unique opportunity for original design of a personal plot.
- Taking advantage of the natural relief features, there is no need to specially erect structures to create a waterfall, cascade or alpine slide.
Let's also remember the disadvantages. For plants planted on a slope, additional frequent watering will definitely be required, since water will practically not be retained in the soil. Lawn lovers are out of luck - it is quite difficult to achieve a smooth, silky carpet on an inclined plane. Uneven terrain cannot be used for more practical things, for example, a playground or a clearing for recreation, and it cannot be installed on it. And the main disadvantage is the additional costs of strengthening slopes and slopes, landscaping, and arranging beds or flower beds.
So now we can get down to business.
In general, to choose the right method of strengthening, it is necessary to take into account some factors:
- soil structure;
- degree of slope;
- proximity to groundwater;
- the likelihood of natural destruction: landslides, washouts, sloughs.
Suppose that for a gentle slope it is enough to plant plants that will fix the soil with their roots and stop the process of destruction. Steep slopes require a more serious approach: crumbling can only be prevented by specially made structures made of biomats, gabions, stones, concrete blocks, and geogrids. After selecting the material, it is necessary to determine the exact working area and carry out preparatory work.
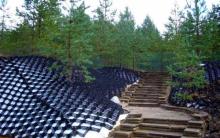
Even the steepest slopes can be turned into a magnificent stone garden by laying the retaining walls with beautiful decorative tiles and the adjacent paths with paving stones
It is not necessary to make the reinforcing structure of the same type or single layer: structures in the form of stairs or terraces visually increase the area of the territory
If the angle of inclination does not exceed 8-10 degrees, then plants are suitable to stabilize the soil cover: trees, shrubs, flowers and herbs. Their flexible roots penetrate deep into the soil, thereby protecting it from landslides and erosion. Trees have the most powerful roots, but it makes no sense to plant the entire slope with large plants. Compositions made from free-standing low trees and shrubs look much more attractive. Broom, elderberry, viburnum, Japanese quince, mackerel, barberry, cotoneaster, and rose hips are well suited for decorating a steep edge or ravine.
The uneven relief allows you to create real masterpieces of decorative art: the combination of stones of various shapes, bright colors and flowing water looks more than picturesque
Flowering bushes also serve as decorative elements, as do plants with long shoots and lush flowers, such as climbing roses. You shouldn’t make a too bright cocktail of climbing plants; 1-2 densely flowering species are enough. Ground cover plants are ideal for decorating a sloping surface. Periwinkle, woolly cherry, ivy, and sunflower create a dense carpet that serves as a backdrop for larger species.
Ground cover plants are a good way to strengthen gentle slopes, and with the help of color variety and height differences, hide small relief defects
The uneven terrain with hills, ledges and depressions is a real find for lovers of alpine hills and rockeries. From a pile of stones, coniferous trees and several types of flowers, they can create a real miracle, decorating any summer cottage. The only thing you need to take care of before setting up a flower garden is to create favorable growing conditions, that is, ensure regular watering.
Artificial methods of strengthening
Decorating a slope with plants is considered a natural way to protect against crumbling, although strengthening the slope on a site can also occur artificially - with the help of stones, logs and structures made of polymer materials.
Material about geoplastics in landscape design will also be useful:
Retaining walls made of durable material and stairs are the most common methods of strengthening and parallel decoration of slopes in summer cottages
Option #1 - fences made of stone or logs
Artistically designed fences made of various materials are good at restraining surfaces of any degree of steepness. or wooden elements are laid on the outside of the slope, secured in various ways: using cement or fixing in the ground (buried in the ground). Limestone slabs, cobblestones, shell rock, pieces of granite are stacked in the form of a wall, and wooden parts are laid as a ladder or fence.
Option #2 - features of laying geotextiles
Steep slopes are difficult to stabilize naturally by planting trees or grasses. In this case, geotextiles come to the rescue - a dense material made of polyester or polypropylene fibers, which perfectly permeates water and has high strength. A fragment of material is stretched onto the surface, secured on all sides with anchors, and then decorated. Natural stone or tiles, mixed with flowers planted on a fertile layer of soil, are great for decoration.
The anchors that hold the layers of geotextile must be removed after backfilling with soil - unfixed material is easier to remove if necessary
Option #3 - geomats and biomats
Both types of soil cover are used to more effectively protect surfaces with a slope of up to 45% (some types of geomats - up to 70%) when planting plants. Biomats are made from coconut fibers or straw attached to a cellulose layer. Geomats are multilayer lattices made of polypropylene. The root system of plants does not develop immediately, therefore, to immediately stabilize the soil, retaining structures are first laid, and plants are planted on them.
Biomats have two important advantages: greening of the surface for 2 months and partial fertilization of the soil due to the decomposition of the material
Geomats are a practical and relatively inexpensive material with many advantages, including easy installation, high efficiency and durability.
The rolled material is laid out over the entire surface of the slope, each piece is secured around the perimeter and grass or flowers are sown. The loose fibrous structure allows the seeds to take hold and germinate, and subsequently form a thick carpet with an invisible reinforcing layer.
Option #4 - step-by-step example of geogrid installation
Even a novice landscape designer, in other words, a dacha owner, can strengthen a small area. If there is a small ravine or ditch with crumbling slopes, you can use a volumetric geogrid - a modern polymer strip structure.
By filling the geogrid cells with plant soil, you can prepare excellent soil for planting climbing or erect flowers, lawn grass, and small shrubs
If a country house or bathhouse is located on the edge of a cliff, then a geogrid reinforced with gravel is an excellent way to create an obstacle to the gradual destruction of the slope
The elements welded together resemble a lattice with large cells, which are filled with heavy building material: crushed stone, sand, concrete or nutrient soil for planting.
By strengthening both slopes of the ditch crossing the dacha plot, you can create an original stone stream or an unusual rock garden with coniferous plants and flower beds
Before starting reinforcement, it is necessary to prepare the soil: remove large plants, level and compact the soil as much as possible. There are two options for laying geogrids: on geotextiles or directly on the ground. In the first case, geotextiles are spread over the entire width of the slope, which plays the role of a drainage layer, and then a grate is placed on top. The second option involves direct installation of the mesh - directly onto the cleaned area.
Particularly susceptible to destruction are slopes consisting of sand or other sedimentary rocks, which begin to crumble under the influence of wind and rain.
The geogrid cells should be located along the slope. The basic principle for choosing material: the steeper the slope, the wider the tape. The lattice segment is stretched in different directions and secured along the perimeter with anchors or specially planed pegs.
On small slopes, especially in arid areas where drainage is not needed, one geogrid is sufficient - there is no need for additional insulating materials
The cells are filled with either fixing crushed stone (sand) or soil under the turf. If you plan to plant flowers, the soil should be fertile and fertilized.
To fill the grate with soil or sand, you can use construction vehicles, a garden wheelbarrow, or just a bucket with a shovel.
This is one of the simplest options for strengthening a slope in a country house. By turning on your imagination and using one of the decorating methods, you can turn an ordinary crumbling slope into a blooming garden - beautiful and original.


Long burning wood boilers
Water pump for heating: consider water pumps for heating a private house. Installation diagram of a heating pump.
Heating pump connection diagrams: installation options and step-by-step instructions Connection diagram for the oasis circulation pump
Heating system in a private house: diagram from a gas boiler
Liquid for heating boilers - parameters for selection and some features