There are several ways to organize water supply for a bathhouse from a well. They have different levels of complexity, cost and provide different degrees of comfort. But they all have one thing in common: since usually baths are not used constantly, but periodically, the entire water supply system must be protected from freezing in the winter. There are only two solutions: either ensure a constant positive temperature (heat the bathhouse constantly) or make sure that there is nothing to freeze in the pipes and other devices, i.e. ensure that water is drained from the system and devices.
Water supply schemes from a well
The organization of water supply for bathhouses and cottages can be done in different ways. There are very simple options that require a minimum of money and time for organization; there are more complex ones, but they provide a greater level of comfort.
The easiest and most economical way
The simplest option is to lower a submersible pump into the well (without a check valve), run the pipes through the air, but so that they are not horizontal, but have a slope either towards the well or towards the bathhouse. Important: there should be no taps or other shut-off devices along the entire length of this pipeline.
When turned on, the pump pumps water. While the water rises through the pipes and reaches the building, some time passes (depending on the depth of the water mirror and the distance to it, the power of the pump). When the container (bucket or tank) is almost full, the pump is turned off. The water remaining in the pipes partially flows into the container, and partially back into the well.
This system provides minimal convenience, but it is very simple and functions without failures even in winter. All that is needed for its operation in the winter is an insulated house for the well, which you can make yourself, spending a little time, money and effort.
With console pump
There is a more complex scheme, but also not particularly expensive, but providing a higher level of comfort. It uses a cantilever pump.


In the diagram, it is installed in a bathhouse (or in a house in the country), and wiring already goes from it. This scheme of water supply from a well will be good provided that the water level in the well is not lower than 5 meters and the water flows well enough. At greater depths, you will have to be tricky - fill the suction pipeline with water to the level of the console pump, which will create better conditions for its operation and water will be able to flow from a depth of up to 7 meters.
To ensure the operation of such a water supply system in winter, it is necessary to insulate the canopy for the well. The pipe exit from the well (sealed) must be made below the level to which the soil freezes in winter in your region. At the same level, lead the pipeline to the entrance to the room and there raise it to the pump.
To prevent pipes from freezing in the event of abnormal cold weather and soil freezing below the average, it is better to wrap them with thermal insulation materials or lay them deeper than the freezing point. Both options have their drawbacks: you either need to dig deeper than 1.5 meters (the usual freezing depth for the middle zone), which you don’t really want, or spend money on thermal insulation and waterproofing materials.
One of the options for maintaining the temperature of the pipeline in winter is to use a heating electric cable, but in this case you must have a guaranteed power source, which, alas, is not always realistic for rural areas. Costs are costs, but replacing the entire pipeline after winter is much worse. So it is advisable to take one of the measures.
With storage tank in the attic

One of the varieties of such a scheme involves installing a storage tank for water in the attic, in the attic, etc. This option is good because after pumping water into the tank, you can turn off the pump, and the water will flow into the comb by gravity. But in order to prevent water from freezing in the pipes or in the tank in an unheated room in winter, you need to make a pipe to drain the water. It is advisable to take it back into the well, or into the sewer system - as you decide for yourself. In this option, you will need to think through everything carefully so that the amount of water in the valve pipes is minimal.
With water-air tank, hydraulic accumulator and control system
For those who do not want to endure absolutely no restrictions on comfortable conditions, there are more complex schemes using modern equipment. These are pumping stations. They maintain constant pressure in the system, they can lift water from any depth, the main thing is to choose the right pump. Moreover, these systems can also pump water from a centralized water supply system, which is necessary if the system is worn out and the pressure in the network is low.


Scheme of water supply from a well with a hydraulic accumulator

For information on how to choose a place for a well, where to place it and how to dig it, read the article “Where, when and how to dig a well”
What pipes to use for water supply from a well
When organizing water supply for a cottage or bathhouse, it is important to choose the right pipes. They should be:
- Safe, especially if you use the water for drinking.
- Durable, since most of the pipeline is laid below the soil freezing level, replacement entails a large amount of work.
- They tolerated temperature changes well.
- Easy to install and repair.
Previously, only metal pipes were used. There were no other options. But, firstly, they rust quickly, and secondly, installation and replacement are only possible with a welding machine. Today there are other options.


Polypropylene pipes for water supply
In order for the water supply to serve for a long time and properly, the best option for a summer house and bathhouse is polypropylene pipes. They feel great at low temperatures; when connecting them, rubber or other gaskets are not used, which over time lose their elasticity and require replacement. They do not emit any harmful substances, do not rot or oxidize, are not damaged by fungi and microorganisms, and manufacturers claim a service life of about 50 years.
But. Polypropylene pipes require special equipment for welding. A special soldering iron is used to heat the pipe. When heated, it is quickly connected to an angle, tee, tap, etc. Important: do not make any rotational movements when welding. This is especially true for reinforced pipes. After connecting, give it a couple of minutes to cool and you can continue assembling the water supply further. The device is not very expensive, and you don’t have to buy it. You can rent a soldering iron for polypropylene from almost any company that sells polypropylene pipes.
Another good thing about polypropylene pipes is that they are available for both cold and hot water. That is, the internal wiring of the water comb in the room can also be made from the same material. Another plus: a flat and smooth outer surface, which is easy to care for and does not require painting.
Polyethylene
To supply cold water (it cannot be used for hot water), HDPE pipes are often used - low-pressure polyethylene. They have practically the same characteristics as polypropylene (they are not afraid of frost, do not rot and are not susceptible to fungi, but at the same time they are environmentally friendly), but they have one big advantage: they can not only be welded, but also use detachable fittings. This is much more convenient, does not require special equipment, and repair/replacement becomes easier. Watch the video to see how to connect HDPE pipes.
But, on the other hand, detachable fittings mean there is a high probability of leaks. Therefore, they try to plan the pipeline so that all collapsible fittings are in accessible places and not underground.
Insulation and pressure compensation
When laying pipes (polyethylene or polypropylene - it doesn’t matter), it is advisable to take measures to compensate for soil pressure. If your soils are heaving, this is a must. You need to lay the pipe (preferably with insulation, but possible without) in a corrugated hose of larger diameter. It will, firstly, serve as thermal insulation, and secondly, protect against excess pressure.
There is also Energoflex tubular insulation, using which you can solve the issue of thermal insulation in one fell swoop and protect pipes from excessive loads.


Insulation for water supply pipes "Energoflex"
Recommendation based on personal experience: buy pipes and all corner tees and taps in one place, preferably located near the house/bathhouse. Why? Because even professionals rarely manage to perfectly calculate the entire circuit at once, so during the installation process you will have to buy, change, return something more than once, and sometimes more than twice. Therefore, immediately upon purchase, find out how and what you can/will need to do to exchange and return parts of the plumbing system.
Well insulation
Preventing the water mirror from freezing is not very difficult - the water in the depths always has positive temperatures and all that is required is to prevent the cold from coming from outside. Thermal insulation of a well includes two components - insulation of the shaft and the construction of a protective house on the surface.

Do-it-yourself insulation of a concrete well
To insulate a well from the outside, you need to choose a material that does not absorb water. Typically polystyrene or foam is used. These materials are inexpensive, durable and chemically neutral. Although there is one “but” - they are afraid of ultraviolet radiation - they are destroyed under its influence. This problem is easily solved: a well house is built around the insulation, or the outside of the material is lined with finishing material.
A simpler and faster option is to apply two layers of paint to polystyrene or foam. In this case, you cannot use acetone paints: they corrode these materials. If the well is round in shape, you can use polystyrene foam “shell” - products of a semicircular shape. All that remains is to select the appropriate diameter, connect the parts of the shell, and seal the joint with reinforced tape. If there is no such “shell” of a suitable size, you can cut polystyrene/foam sheets into strips and attach them to well rings.


Thermal insulation of the walls of the well with polystyrene foam: at the top there is a finished “shell”, at the bottom there is slab material cut into pieces
Thermal insulating material should be laid slightly below the soil freezing level in your region. To do this, dig a well to a given depth, install protection, and secure it with tape or any other fastener you can think of. To protect against the effects of water, you can wrap the entire structure on top of the insulation a couple of times with plastic film (it can also be secured with tape). Next, you need to either build a wooden house for the well, or lay finishing materials - your choice.
There is another option for insulating a well - foamed polyurethane foam. This mixture is applied at positive temperatures (from +20°C to +30°C) using a special device. This mixture is inexpensive, as are the services for its application, but has the advantage that the material fills all cracks and defects in concrete rings, extending their service life. The downside of this material is the unpresentable appearance of the treated surface, but this can be eliminated by exterior finishing or building a house for the well.

Cover/house for well
Regardless of the complexity of the water supply system that you will install in your bathhouse, the well must be equipped with a warm house, or at least an insulated lid. This is necessary to, firstly, prevent dust/dirt/leaves, etc. from getting into the well, and secondly, to prevent the water from freezing in severe frosts. Wooden wells do not need insulation - wood itself serves as an excellent heat insulator, but wells made of concrete rings need to be insulated.
To maintain a positive temperature in the well, some craftsmen lower a boiler equipped with a thermal relay into the water, which is set to operate at +1°C. At this temperature, the boiler turns on, heats the upper layers of water and turns off. But such a scheme is realistic with a guaranteed power supply. Power outages for 5-8 hours in cold weather, and that’s it, the water will freeze.
It is more troublesome, but also more reliable - during construction, insulate the rings of the well from the outside, to the depth of freezing of the soil or slightly below (just in case) and build a well-insulated house for the well on top.
There are two types of houses:


Cover for a well made of wood
It is also made from wood - the board is taken quite thick (about 50 mm). It’s even easier to build a lid for a well with your own hands than a house. The outer part can be square or round. Choose the sizes to suit your taste, but they must exceed the diameter of the well.
The cover usually consists of two layers of boards laid perpendicularly (at 90°). The inner part must exactly match the shape and size of the well ring and fit tightly into it, blocking access to cold air.
Often, in order not to raise and lower it every time you need a bucket of water, a door is made in the lid on hinges (the door should tilt completely - this is more convenient).

In addition to the lid, you can make a canopy for the well. This way the structure becomes even more attractive, and the roof, although small, protects both the well and the person who collects water from precipitation or sun rays in the heat.
conclusions
Building a well near the bathhouse is still half the battle. It is also necessary to properly supply the water from it to the bathhouse and insulate the well to prevent the formation of an ice plug in the winter.
Water supply for baths in winter and summer
Water supply for baths is a recent requirement. We are becoming more and more accustomed to comfort, and the tank into which we carry water in buckets from the nearest well or river is no longer suitable for many people. Increasingly, a complete bath water supply system is required.
Sources of water for the bath
When planning a water supply system for a bathhouse, you first need to decide on the source from which the water will be drawn. There may be several sources:
- centralized water supply;
- well;
- well.
The easiest way is, of course, with centralized water supply. You simply connect to the system, make connections to the area and the bathhouse, and pay for using the services.
If you don’t have such a luxury as a centralized water supply, you need to take care of your own water source. This could be a well or a borehole. Which one you need is up to you.


Artesian wells for water supply to dachas
Wells can be artesian (it would be more correct to call them wells reaching rich aquifers) or sandy. Artesian wells are not a cheap pleasure. Aquifers lie quite deep from the surface of the earth and require special equipment.


How deep you need to drill a well depends on the location of your bathhouse. The range of depths is very large - from 30 to 300 meters. There is a similar spread in drilling costs. But usually drilling artesian wells pays off. They have a lot of advantages:

Filter wells for summer cottage water supply
Wells are also sandy or filter wells. In this case, they are drilled to the nearest sand layer. The depth of the wells in this case rarely exceeds 30 meters, but depends on the geological and hydrological structure of the soil in your area.
When organizing this type of water supply for a bathhouse, it is necessary to make a filter column. Its complexity and structure depend on the degree of looseness of the sand layer: the looser the horizon, the greater the likelihood of clogging and sanding of the well, which means the more complex the filter structure. Usually a filter of gravel and fine mesh is combined, but much more multi-layer designs can be used.
The main advantages of a sand well are its low cost and high speed of its development. But there are quite a lot of disadvantages:
- It is impossible to predict how much water is contained in the aquifer, and how long such a well will “work”. Often its service life is only 5-7 years.
- A small amount of water does not allow pumping out a lot of water per hour. The average amount is a cubic meter per hour (this is approximately the volume that flows from an open tap with a centralized water supply).
- When using a well “on sand”, even with good filters, gradual siltation occurs. Often the bottom sludge reaches the submersible pump and causes it to fail. With irregular, periodic use of the well, such a scenario is inevitable.
- You may be interested in reading “How to choose a water heater for a bath”
Wells for water supply to cottages
The traditional way to organize a water source near the bathhouse is to dig a well. It reaches the nearest aquifer, but is not distinguished by either the purity of the water or the stability of its level: during rains and floods, the water level in the well rises, and in dry times it decreases. In addition, during a flood, natural filters do not always cope with their task and the water in the well may be cloudy or even have biological contaminants.
Read about the construction of a well in the article “Where, when and how to dig a well for a bathhouse”
The problem can be partially solved using the so-called Abyssinian well. Its peculiarity is that a long pipe with a filter at the end is clogged to the next aquifer. Maximum 10-12 meters.


Its peculiarity and main part is a pointed section of pipe in which a large number of holes are drilled (a kind of filter). This section of the pipe is driven into the ground using a tripod and headstock - cast iron or a cylindrical piece made of reinforced concrete using high grade cement. Having hammered in the first piece of pipe, screw the second, third, etc. onto it. until water appears in the pipe. Its presence is checked by sharply lowering a piece of hollow pipe of a smaller diameter, tied to a strong twine, into the pipe being driven. When hitting the water, a characteristic pop is heard. The depth is sufficient when the water in the pipe is at least 50 cm, and preferably 1 meter.
After reaching a sufficient depth, an exhaust pump is installed at the top. In this case, you can raise water from a depth of 7-8 meters. If the water is at greater depths, you can use a submersible pump.
Modern models have small dimensions and power sufficient to lift water from 30 meters. If the water depth is shallow, you can use a hand pump.


The Abyssinian well is good in cases where there are no very dense layers or large boulders between the aquifers. In this case, it is necessary to use special drilling equipment and it would be more expedient to construct a well.
Read “Water supply for a bathhouse from a well: options and schemes”
Organization of a water supply system in a bathhouse
When using wells to supply water to a bathhouse, a pumping station is required. The best option is with a decent-sized hydraulic accumulator. If you choose a model with a small reservoir, the pump will constantly turn off and turn on when water is consumed.
The type of pump - exhaust or submersible and its power depend on the depth from which you need to lift water and the required amount of water.


An important part of the bath water supply system is the pipes. If you use the bathhouse only in the summer, then you can use regular or reinforced flexible hoses, connected using special or homemade adapters or splitters. The summer water supply system can be laid on the surface of the ground without burial. If you plan to use the sauna in winter, you need to make sure that the water in the pipes does not freeze in winter.
In any case, in addition to the pump and water storage tank, you will also need a pressure gauge (water pressure sensor) and a check valve. Next comes the installation of pipes inside the bathhouse.
Read about how to make a shower in a bathhouse with your own hands.
Winter water supply in the bathhouse
After you have installed a water source on the site, in case of winter water supply, it is necessary to lay the pipes through which water will be supplied to the bathhouse to a depth greater than the depth of soil freezing. In this case, you can use plastic or metal-plastic pipes (copper is too expensive, and cast iron or metal are a thing of the past). It would also be useful to insulate them using materials that are not afraid of moisture.
In order to insure against severe frosts, you can pour 30 cm of expanded clay or foam chips into the trench, and lay insulated pipes on top, which can also be partially covered not with soil, but with a heat insulator.
But if the bathhouse is not heated in winter, the temperature in it usually drops almost to the street level.

With this option, the water remaining in the pipes in the bathhouse will certainly freeze. Therefore, it is imperative to provide for the possibility of maximum drainage of water from the system after each visit during the winter period.
Pipe routing
If the bathhouse is heated with gas, then it is quite possible to keep the boiler on the wick in winter. In this case, a standard gas burner burns about 2 cubic meters of gas per day. The temperature in a well-insulated small bath will correspond to room temperature, i.e. water will not freeze in cold weather.
Reinforced polypropylene pipes can be used as water pipes.


For water supply pipes with a diameter of 20 mm or 25 mm are sufficient. The video shows one of the options for installing water pipes in a bathhouse. Water is supplied to the shower, water heater and sprinkler.
As a rule, installation of a water supply system made of polypropylene pipes can be done with your own hands. In addition to pipes, you will need taps, fittings, elbows, couplings and an apparatus (“soldering iron”) for soldering foam pipes. The video shows the Defort DWP-2000 welding machine.
Foamed propylene pipes are suitable not only for cold water, but also for hot water. How to properly solder polypropylene foam is shown in the video.
If you have any questions regarding the organization of water supply for a bathhouse, ask them in the comments.
Bath water supply: types and installation

 Today people no longer use rocker arms and buckets to fetch water for a bath. Modern buildings have automated delivery systems that make it possible to consume the required amount of it in hot and cold form all year round. We will tell you how to organize such a system in our article.
 - Water supply materials
- Installation of a water supply system
- Hot water supply
A competent water supply is a clean flow of water under a comfortable and constant pressure designed to heat it. The availability of water is a pressing issue; without it, neither hygienic nor health procedures in the steam room are unthinkable. It is not difficult to make a water supply in the bathhouse with your own hands. It is much more difficult to organize a water source for it when one does not exist near the building.
Types of bath water supply


There are two main seasonal types of water supply to bath buildings, let's look at them.
The first, simplest type is the summer supply of water to the bathhouse. This system is designed to operate only during the warm season. Water is delivered, in addition to the bathhouse, to other buildings located on the site. The system is built sequentially, when its branches are connected to the supply water pipe as necessary to distribute water to all its consumers. When cold weather sets in, water is removed from the summer system by gravity to its lowest point through the drain valve.
The second type is a winter water supply option. Its difference from summer water supply lies in the possibility of general and selective water supply to a particular building. In addition, the pipeline is equipped with a heating cable installed in its cavity and a valve for supplying or turning off water in the selected room. The cable prevents water from freezing in cold areas of the water main. To take a steam bath, just open the water supply by turning the shut-off valve. At the end of the procedures, the pipeline is closed in the same way, and the water from the system is removed by gravity into the sewer network.
To supply water to a bathhouse in winter, there is also an electronic option for controlling the distribution of water flows through the pipeline system. Water supply to buildings is carried out remotely using a distribution block, which is installed near the water source and controlled by pressing the necessary keys from the buildings connected to the system.
Sources of bath water supply
Depending on the source of water, the water supply for a bathhouse can have the following options: from a well, from a borehole, from rainwater storage tanks, from the central water supply system of the house.Water supply for a bathhouse from a well


Quite often, this option for providing a bathhouse with water seems to be the only possible one, but some of its disadvantages should be taken into account:
- Sudden changes in water levels depending on the weather or season, so during dry periods the well's resources may be insufficient.
- Well water usually contains suspended particles, since its natural filtration during rains or floods may not cope with its task.
- In winter, the well head requires insulation, otherwise there is a high probability of water freezing in it.
Advice! To reduce noise when the pump operates, you can equip it with a receiver for 50 liters of water, this will help equalize and maintain the pressure in the system, which is of no small importance for heating water in the bathhouse.
Water supply for a bathhouse from a well


When choosing a water supply for a bathhouse from a well, it is necessary to place a pump in the source, which will pump water into a storage tank as it is consumed.
There are two types of water wells:
- Sand wells. Their service life is from 5 to 15 years, it depends on the volume of the aquifer and the rate of water consumption. The average depth of wells is 10-25 m. One well produces about 1 m3 of water per hour. With temporary seasonal use, it gradually silts up.
- Artesian wells. Their water is of high quality, requires almost no filtration and is extracted from a depth of more than 30 m. The installation of an artesian well is very labor-intensive and costly, but for 50 years you won’t have to worry about water supply problems.
Bath water supply with rainwater


The main vulnerability of this option is dependence on natural vagaries. The basis of a rainwater water supply system consists of two elements:
- Storage tank made of environmentally friendly material;
- Distribution - ordinary water pipes designed to deliver water to the bathhouse.
Bath water supply from the central water supply system of the house

This is the simplest version of a bath water supply system, which does not require searching for and arranging water sources. When locating a bathhouse in an area with an existing water supply, you need to obtain permission from the owner, make a connection to the house, bring pipes to your building, make their internal wiring and connect plumbing fixtures.
Materials for bath water supply


To transport water to the bathhouse from any source, pipes are required, which are made of various materials:
- Polypropylene pipes. They are indispensable when installing the external water supply of a bathhouse. Such products are elastic, which allows them to bend during installation. The pipes are securely connected to each other using special soldering.
- Metal-plastic pipes. They are most often used for internal water supply in bathhouses.
- Steel pipes. They are now rarely used for baths due to their rapid corrosion.
- Copper pipes. They have excellent performance characteristics, but do not withstand competition in the market due to their high price.
Installation of a bath water supply system


After preparing the water supply source for the bath, pipes are laid out and the corresponding equipment is connected to them indoors. Installation of a pipeline to a bathhouse used only in the summer can be done in simplified ways.
The water pipeline can be made on top of the ground and dismantled with the onset of cold weather, as well as laid underground at a shallow depth to avoid mechanical damage from walking or garden carts. For winter water supply, pipes are laid below the soil freezing level and insulated.
External work must be performed in this order:
- A trench of the required depth is dug from the water source to the bathhouse.
- At the bottom there is a sand cushion on which the pipes need to be laid.
- The products are connected to each other using special fittings.
- The pump is installed and connected.
- A water heater is being installed.
- A pumping station is installed in a specially designated convenient location.
- Water purification filters are installed.
- The installation and distribution of pipes in the bathhouse is carried out according to the principle: first, vertical risers are installed, and then their horizontal branches.
- Plumbing fixtures are connected to the pipe outlets.
Hot water supply for baths

Any bathhouse, even when used in the summer, requires hot water. Before making hot water supply in the bathhouse, you need to choose one of its methods:
- Hot water is supplied to the bathhouse from the house through the water supply in any quantity and at any time. If the house has a well-organized hot water supply all year round, it would be rational to connect the bathhouse to the general system.
- Autonomous method. It requires the installation of a water heater. Its type, type and brand must be selected taking into account the optimal energy sources for use. Storage heaters from Gorenje and Electrolux are practical and convenient. They only require one reliable outlet. Such heaters compete with similar flow-through devices, but for full operation, especially in winter, flow-through heaters must have appropriate power and use a three-phase connection.
- Hot water supply can be provided using electric or gas boilers, which can be flow-through or storage.
- Hot water can be obtained by heating it in a tank from a stove.
That's all science! If you wish and have time, you can supply the water to the bathhouse yourself. Surely, clean water of any temperature will please your household. Author: editors of TutKnow.ru


According to the rules, it is necessary to plan the installation of water supply systems at the design stage of buildings. It is better to think through and calculate the entire range of communication issues in advance. However, more often than not, serene summer residents will first acquire bathhouses and greenhouses, and then remember that for the civilized use of country property it would be nice to have a summer water supply. Fortunately, it is never too late to lay it, but you should know the specifics of constructing a dacha system that can cover the water needs of the bathhouse and the area.
Rules for the construction of a country water supply system
Most summer residents need running water during the period of traditionally active exploitation of six or more suburban acres, and of a bathhouse built on the site. Let's forget for a moment about the adherents of taking bath procedures in the winter. The vicissitudes awaiting them will be discussed in a separate article.
Now let’s look at how to properly arrange a summer water supply system in a dacha, the construction methods of which are somewhat different from standard urban options, because:
- A periodically operated water supply system requires mandatory conservation. If it is installed permanently, it is preserved, i.e. drain water from pipes, heaters, filters at the end of the summer season. If the simplest temporary water supply is laid directly over lawns and beds, it should be dismantled and stored in a house or barn;
- For spontaneous drainage of water for the purpose of conservation, both the internal and external pipelines are laid with a slope towards the water intake facility. It could be a well, a nearby pond, a well, or a connection point to a centralized water supply network;
- Piping inside the building is carried out exclusively according to a sequential scheme. Otherwise, the water will not drain by gravity and the installation of drainage stimulating mechanisms will be required.
All three points proclaim the golden rule for constructing a dacha water supply system. This is to ensure unhindered drainage of water from equipment and pipes. It is necessary to drain without question so that frozen water does not destroy the parts and components of personal communications. There is no need to lay the water supply system to be preserved below the depth of groundwater, because it will not function during frosts.


There is also a specific feature in the drainage device, depending on the type of water intake facility. If the source of water supply is:
- a well or reservoir, drainage is carried out completely into it;
- well, the water supply system will have to be unloaded before winter in two directions. Partially back into the well, partially into the sewer, because the water intake facility will not be able to accept the entire volume of water being drained;
- centralized network, water is drained again in two directions, one of which will be a drain well.
Like any member of the family of water pipes, the summer version includes an internal and external part. Internal arrangement is carried out for all types of systems according to the standard. But the external component can be laid in two ways, on the basis of which numerous subtypes have been created.


Choosing the optimal scheme
In order to determine the most suitable scheme, you need to take into account a number of important circumstances, including:
- frequency of use of the country bath;
- quantitatively expressed need in liters;
- financial capabilities of the summer resident;
- the owner’s desire to lay the water supply once and forget about annual assembly/disassembly for 10-15 years;
- length and configuration of the external line.
It is imperative to take into account whether the owner wants to lay the summer water supply system with his own hands or has decided to prefer the services of a team of builders. We, of course, will not be able to consider all special cases, but we will set general postulates in choosing a scheme.
There are two options for laying a country water supply system that is not subject to winter operation, these are:
- Temporary. A pipeline laid on the surface, installed on low racks or lightly sprinkled with earth. They construct a system from flexible hoses with latches or from PVC pipes with fittings, corner couplings, and taps. The advantages are ease of assembly, accessible to an inexperienced craftsman. The speed of construction and relative cheapness are attractive. The disadvantages are the possibility of accidental damage, accessibility to theft, and the inconvenience of elements that interfere with movement around the site.
- Stationary. A water supply system laid in a shallow trench buried 0.3 - 0.8 m from the surface. To construct it, you usually buy PN pipes, which are joined by welding, or HDPE pipes with convenient connecting and corner fittings. The advantages are reliability, comfort on the site, protection from unwanted attacks. And you don’t need to bother with annual assembly. The downside is the costs, both financial and labor.
The advantages of both methods include a small amount of excavation work compared to the construction of a winter water supply.

There is no need to bother with deepening the line of even a stationary summer pipeline. It is not afraid of frost if the system is mothballed. The depth of its laying is determined by the criteria for using the land plot:
- 0.3 - 0.4 m is quite enough to locate the water-bearing line under the lawn or along the country path;
- 0.7 - 0.8 m is needed if the main line passes under the beds, so as not to damage the pipes with a shovel.
If the laying is shallow, you can use a folk trick and cover the pipeline from above with a bent “house” of sheet iron, an old large-diameter pipe cut lengthwise, etc. A protected summer pipeline will not “dictate conditions” when moving flower beds and beds.
Summer water supply technology
Let's start with the planning and calculations necessary in any situation, so that the buyer does not have excess material or experience a shortage at a crucial installation moment. It is important to know that a straight line is recognized as the optimal configuration of an external water supply system, but if turns cannot be avoided, it is advisable to minimize their number.

Traditional planning
Let's start designing by drawing up a paper plan. Looking at it, let’s get our bearings and decide:
- how best to lay and make a convenient summer water supply system, so as to avoid bends as much as possible and not create annoying obstacles on the site;
- where it is more expedient to bring the line to the bathhouse;
- how to introduce water supply into a building: drill a hole in the foundation or in the wall;
- where is it more convenient to place hydrant points for irrigating flower beds and vegetable gardens, so as not to pull hoses through the beds;
- how to comply with the slope required by technological rules for drainage; by the way, this is an optional condition when constructing a temporary ground line.
We selected and drew the optimal route. Now you need to go to the site to lay it out on site, because... paper parameters often differ from reality. Pegs and twine in hand for laying out, after which you need to take actual measurements and calculate how many pipes, taps for collecting irrigation water, corners and other consumables are needed.


We drew the outer route, laid it out on the ground and calculated its length. Now let's figure out what is needed to build a water supply system.
Despite the fact that all existing schemes for installing summer water supply systems in summer cottages are based on two fundamental methods, there are many variations on the theme. They appeared thanks to the use of additional components or the exclusion of equipment that, according to the owner, was irrational for use. However, there are components whose necessity cannot be doubted:
- drain tap, instead of which you can use a solenoid valve - devices that allow draining water, which is mandatory for all stationary systems;
- a pump, preferably a submersible type, but if the groundwater level is high, surface pumping equipment is suitable;
- pipes for internal and external summer water supply lines of the selected type, the diameter of which depends on the installation location. To lay an external route fed from a well, a pipe with a diameter of 25 mm is usually used. If a conditionally autonomous water supply is connected to a well or to a central network that does not please users with stable pressure, it is better to take a Ø 20 mm pipe. Inside the bath, wiring is carried out with 15 mm pipes.
- A hydraulic accumulator is a very useful thing, especially if it is a membrane type. The volumetric tank allows you to stabilize the pressure, thereby reducing the number of starts of pumping equipment, which means extending its service life. In addition, the water supply in it will eliminate complications during a power outage. However, lovers of savings often, to their own detriment, refuse to install a hydraulic storage tank;
- a coarse filter installed in “sand wells”, i.e. in workings buried in sandy soil. It is not very necessary for collecting technical water from a well;
- fittings for the formation of stable operating parameters of communication, including pressure gauges, ball valves, pressure switches;
- water heaters, the installation of which is refused if the bathhouse already has equipment of this type or a heater.
What will be used in laying the summer water supply is up to the owner, but the system will work better and longer if all the listed components are included.


Assembling a temporary pipeline from plastic pipes
It’s a sin not to figure out the construction of a landline from hoses or polyethylene PND yourself, but the algorithm for constructing it from plastic pipes deserves a separate discussion. It is impossible to connect a temporary pipeline by welding or gluing, because then the opportunity to dismantle it before winter stagnation will disappear. It is constructed using combined fittings made of plastic with metal threads.


Virtually all types of polypropylene pipes are applicable. Material marked PN-10 is suitable for areas transporting cold water. Internal wiring from the water heater to the water intake points should be done with PN-20 pipes, possibly PN-25 pipes, or products with similar properties. Connecting and corner elements are selected according to the pipe nomenclature. To ensure repeated disconnection of the water supply from the water supply source, you will need a plastic coupling with a galvanized union nut. You will also need kits for installing watering points with accessories for attaching a hose. Naturally, a drainage device for a temporary external line is not needed, because the pipeline will be dismantled at the end of the season.
We choose in advance whether we will lightly sprinkle them with earth, so as not to tempt unkind people, or honestly lay them along paths and beds. You can also install it on purchased or homemade low stands, then the water supply will not be a hindrance to the plants.
The main problem with installing a temporary water supply system is the formation of threaded connections with external and internal threads. To unconditionally exclude any hint of a leak:
- we clean the metal parts of the combined fitting with gasoline from dust, grease, and rust;
- We seal the joining area by winding 7-8 turns of fum tape onto the external thread. We apply the layers along the thread tightly, carefully, trying to avoid the formation of folds and wrinkles;
- We screw the supporting part to the connection wrapped with tape, trying to maintain the alignment of the joined elements, and finally tighten it a little with a wrench.
How to seal a threaded connection with flax tow, watch the video:
Following our independently developed plan, we assemble the summer pipeline and prepare for its easy dismantling in due time.
Laying a major summer water pipeline
All the secrets of planning and laying out a stationary system have already been sorted out. It remains to indicate the sequence of work:
- along the intended route, we dig a shallow trench so that the point of entry of the external line into the bathhouse is approximately 50 cm higher than the point of connection with the source;
- on the side, let's start from the bottom by installing the first piece of pipe with a filter and drain device. Although there are opinions that it is more convenient from above, starting with the installation of a threaded coupling with a union nut.
- We assemble the underground part of the stationary pipeline. You can connect pipes using fittings, for installation of which you will not need anything other than your hands and a wrench. However, welds will be cheaper. Scissors for cutting and a machine for welding plastic pipes can be rented from a construction organization or in a specialized store. You need to cut very carefully, checking the dimensions and location of the axes of the parts to be connected seven times. Heating of the welded surfaces lasts no more than 12 seconds;
- All elements of the external pipeline: tees for the outlet of watering taps, corner parts, a filter for coarse cleaning are installed according to the created project;
- We introduce the line into the bathhouse, where we connect all consumers sequentially using tees and install the fittings necessary for efficient operation.
Do not forget that the pipes inside the bathhouse are laid with a slight slope towards the drain. And that it is advisable to make the pipes for connecting equipment to a minimum size so that all water from the system is drained.

Once again, more details about soldering plastic pipes in the video:
Before covering the installed pipeline with earth, you need to do a pressure test. We call a plumber with a device that pumps air into the system. If flaws and suspected leaks are not identified, we will bury the structure with peace of mind and begin operation.

The principles of constructing summer water supply systems will help both those who decide to lay a water supply system on their own, and those who need to supervise the work of a team of builders.
We set up the water supply for the bathhouse with our own hands
In order for the bathhouse to be used comfortably, it must be provided with water. After all, no one wants to carry it by hand. If you live on the site only in the warm season, then it will be enough to supply the summer bathhouse with your own hands. If you live permanently in the countryside, you will have to take care of its winter version.
Which pipes are best to use?

Where to get water from?
Before supplying water to the bathhouse, you need to decide on the source of water. There are two of them outside the city - a borehole and a well. We do not take open bodies of water into account, because... purifying water from them is too difficult and expensive.
Advice from the master!
There are two types of wells: artesian and sand. The first type drills down to rich aquifers that can supply the needs of dozens of families. However, such layers lie very deep - this significantly increases the cost of artesian wells. The sand analogue is much cheaper.
Such a well must reach a second aquifer that has sufficient purity. It is arranged, unlike its artesian counterparts, in one pipe. Moreover, the pipe must be combined - steel on the outside, thick-walled plastic inserted inside.


Water layout diagram
The cheapest option is to dig an ordinary water intake well. The rings for it must be connected using tenons and grooves. Such a system will prevent the danger of their horizontal displacement. It is also advisable to tighten the rings together with special steel brackets.
It is necessary to create a filter layer at the bottom of the well. It can be made from stones, crushed stone and geotextiles.
To supply water inside the bathhouse, you will need to install a pump. The best option for one family is a submersible (deep) unit.
When choosing a pump, pay attention to the following parameters:
- operational safety;
- durability;
- the height to which it can pump water;
- sufficiency of power;
- correspondence of dimensions to the diameter of the well/borehole.
The bathhouse is constantly heated in rare cases. Therefore, an important question that has to be solved is how to install water supply to the bathhouse in winter so as not to freeze.
Plumbing in a country bathhouse.
Simple winter water supply to the bathhouse
Sometimes a water supply is laid from the source to the bathhouse by air. To use it in winter, the pipes are well insulated, but this does not guarantee that they will not freeze. A method is used when the highway is laid with a large slope in any direction. Hoses are not used for this - they sag, and there is always a place where a little liquid remains. Pipes are used that are connected to the pump at one end and lowered into a storage tank at the other.
When the pump is turned on, it pumps water into the tank. When it is turned off, the liquid flows by gravity into the well or reservoir, leaving nothing in the pipes. No shut-off valves are installed on the pipeline. Pumping equipment must ensure water drainage if the slope is in its direction. Vibration models have these properties. For others, a drain valve is installed on the supply pipe. If water is drawn from a well, it is insulated and a caisson is installed at the well.
Laying pipes in dry soil
If pipes are laid underground, take into account the level of soil water. If they are far away, installing an underground water supply to the bathhouse is not difficult. The pipes are made of polyethylene; other plastic or steel are not suitable. They dig a trench at least 0.5 m deep. Even if the polyethylene pipe freezes, it is so elastic that it will remain intact. To reliably protect against frost, they are buried 20-30 cm below the soil freezing level and insulated.

Laying the pipe in a trench under the bathhouse.
The weak point of the water supply system is the metal taps and fittings used to connect individual branches of the system. Polyethylene pipes can be joined with couplings if water drains from the pipes. In an unheated room, steel couplings and bends are discarded. They are connected end-to-end using a soldering iron, creating a continuous line. Classic taps are made of cast iron or other metal - they are not as sensitive to frost as ball taps.
Winter water pipe with valve
In regions with frosts greater than -20°C, a valve drain is installed on the water supply in a bathhouse without heating. This is done like this:
- A well is dug under the main pipe using a garden drill. Its depth is 0.5 m greater than the freezing level.
- An elbow made of the same plastic in the shape of the letter U is soldered into the pipe above the well. A hole is drilled at its lowest point and a fitting is inserted.
- A sand cushion is placed at the bottom of the well. A hose is put on the fitting, its other end is covered with a geotextile cover. It should rest against the sand at the bottom of the well.
When people wash in a bathhouse, part of the water entering under pressure goes through this valve into the soil. There is not much of it: if you use the bathhouse all day - 1-2 buckets. When the inlet valve is closed, the water goes through the drain elbow into the ground. Even if a mini-well is installed outside and the water begins to freeze, the pipes will not burst. As the liquid expands, it pushes excess moisture into the soil.

Valve drainage of water from the bath.
The only thing that needs to be taken into account is the depth of the water layer. If it is close to the surface, this option is not used - the underground aquifers will be polluted.
Material for different parts of the water supply system in the bathhouse
Long service life is the main requirement for pipes. They are laid underground - replacement is difficult and unprofitable. The second requirement for the material is resistance to temperature changes. Plastic has these qualities. Polyethylene is more suitable for the underground part of the water supply system. It retains plasticity down to -50°C - such frosts do not occur at depth.
Polypropylene can withstand up to 25 freezing and thawing periods without damage. It is possible that in a few years the external water supply from it will collapse. Polypropylene pipes are most suitable for internal systems. They are easy to solder, the connections are strong and durable. They are convenient to install in hard-to-reach places.
Piping inside the bathhouse
In a bathhouse that is heated occasionally, drain taps are provided in the internal wiring. The pipes from them are discharged into the sewer system.
It is important to ensure drainage:
- from the storage tank;
- cold water from the boiler;
- from a heat exchanger connected to the hot circuit of the water heater.
The drain system takes advantage of the properties of the steam in the heat exchanger. When the firebox is turned off, increased pressure is created. Steam forces liquid to leave the water heater, tank. The taps are opened and the moisture flows down the drain.
A drain valve is also installed at the main entrance. It may be near a sewer or on the street. After this, internal wiring is performed. Any circuit is used - sequential, parallel or mixed. The choice depends on which method of water supply will provide more opportunities to connect consumers with maximum compactness and use fewer pipes.
Points of consumption are located taking into account the interconnection of individual premises. The shower is installed in a place where it is most convenient to supply cold and hot water and organize drainage into the sewer. Its remote location means extra pipe footage and maintenance problems. In practice, the most convenient place for a shower is the room located close to the steam room.
The most common diagrams for connecting pipes in a bathhouse
The following sources are used to supply water to the bathhouse:
- centralized water supply main;
- a well on a summer cottage;
- well;
- internal home plumbing.

Piping diagram inside the bathhouse.
Intermittent heating of the bathhouse affects the peculiarities of connecting the water supply to it and the internal wiring. The most difficult thing is to connect to a centralized highway. It is necessary to obtain permission and make an insert, involving specialists.
But later this results in ease of system maintenance. Connecting to your own well, well or home water supply is done by yourself.
Summer plumbing by air can be used as a temporary option. To prevent communications from freezing, several methods are used to install water supply in a bathhouse:
- The pipes are laid lower than the ground freezes.
- Ensure constant movement of water in pipes.
- Drain the water from the system after visiting the bathhouse.
- The pipes are heated with a special electric cable.
- Water pipes laid above the freezing point are reliably insulated.
Constant heating is expensive. During power outages, the heating cable will be ineffective. Constantly pumping water through the system is unprofitable in terms of energy costs or payments to the water utility.
For a bathhouse without constant heating, an acceptable option is to provide a drain so that not a drop of moisture remains in the pipes, containers, and fittings. The external water supply is additionally insulated or laid below the freezing point of the ground.
How to supply water to a bathhouse from home or a centralized network

Plumbing from the house to the bathhouse.
The central highway does not freeze. It has a constant flow of water and sometimes high-quality insulation. The water supply from it to the bathhouse is in different conditions. The same applies to the pipeline laid from the house. The advantage of water supply from a centralized main is that a constant pressure is maintained.
The bathhouse is built in such a place that the length of the water supply system is as short as possible. At the same time, sanitary and hygienic requirements and building codes are taken into account.
To tie into the main highway, you need to obtain permission from the water utility, sanitation station, and order a project. After analyzing the technical capabilities, documents are issued, and water utility specialists make an insertion into the main pipe. Further work can be carried out independently. A counter must be installed.
The technical data provides information about the pressure in the main line. Taking them into account, they buy equipment that is insensitive to pressure changes. The pressure may need to be increased. To do this, purchase a pump. The pressure of the water that comes from a residential building depends on the equipment available in it.
Connection diagram of pipes to the bathhouse and to the main line
It is advisable to use elastic polyethylene pipes, which have increased resistance to freezing. If you take a coil of the required length, the number of connections is reduced to a minimum. Fittings and taps are the most vulnerable parts of a pipeline. First of all, they freeze and lose their tightness. To protect them from the cold, an insulated well is installed at the point of connection to the main line.
Constructed from bricks and concrete rings. Provide reliable waterproofing and insulation of walls. To do this, they are wrapped on the outside with roofing felt and moisture-resistant heat-insulating material. The trench is covered with earth. Before constructing a well, a concrete pad is installed. These simple measures prevent melt and groundwater from entering the well. The top is closed with a lid with a hatch.
At the beginning of the home water supply, a tap is installed in the well to shut off the water supply if necessary. A drain valve is installed at the entrance to the bathhouse at the lowest point. A well is also being built in this place and insulated. The bottom is not concreted, but a layer of crushed stone is poured so that the liquid goes into the soil. They are constructed 5 m from the foundation so that it does not erode or settle.
You can build an inspection well next to the foundation and bury a sealed plastic container underneath to collect liquid. To drain water from the system, proceed in the following order:
- block the pipeline at the inlet;
- open the drain valve in the room;
- go down into the drainage well and open the valve.
After this, the pressure in the system is equalized, the remaining moisture drains through the tap in the drainage well. There are not many of them - about 10 liters.
Connecting the water supply from the house to the bathhouse
If the sauna is no further than 7 m from the heated building, the water supply can be installed without any particular difficulties. Polypropylene pipes are used for hot water. They are reinforced with foil, which retains heat well. Connected to a boiler, geyser or other hot water supply device in the house. Water at this distance cools slightly.

Connection to centralized water supply.
Can be connected to an internal home cold water system. In this case, a special electric cable for heating is mounted on the couplings. The pipeline is laid on a sand cushion in a trench. The main line is additionally protected from frost with polypropylene thermal insulation, covered with expanded clay, and covered with earth.
When the distance to the steam room is more than 7 m, heating is provided. A self-regulating electrical cable is used, which is wound over the foil. Put on a heat-insulating stocking and place it in a trench. For safe operation of the heating cable, a circuit breaker is included in the circuit.
Water supply is organized using a pump lowered into the shaft. At a distance from the surface that exceeds the soil freezing depth by 0.5 m, a hole is punched in the wall in order to insert a pipe through it into the trench. At the same time, the power supply cable for the pump is laid in a corrugated sleeve.
It is important to ensure conditions under which the water in the well does not freeze. If the water mirror is at great depth, a house is built above the head - this is enough to maintain a positive temperature in the source. An insulated lid will protect you from freezing if difficulties arise with the construction of the house.
For shallow wells, additional measures are needed. They freeze through the walls, so they provide external thermal insulation. They use materials that are resistant to moisture - polystyrene foam, polystyrene, polyurethane foam. It may be enough to insulate the head and cover it with boards. If the water is at a depth of 2-3 m, insulate the first well ring in the ground. They dig a trench around it, wrap it in sheets of heat-insulating material or fill it with expanded clay. The top is covered with clay soil.

Connecting water supply from a well to a bathhouse.
Arrangement of water supply from well to bathhouse
For winter water supply, the bathhouses are insulated. A caisson is constructed from brick or other materials. It needs a solid concrete base with waterproofing. The walls are also coated with bitumen or covered on the outside with roofing felt. Such measures will protect the structure from flooding. The depth of the caisson is located below the freezing soil, and the width should provide space so that a person can freely fit there to service the well.
The building is insulated. Since it is located in the ground, frost protection is only needed from above. Install a double hatch with insulation. If local climatic conditions are harsh, insulating the walls on the outside will not hurt.
A drain valve is installed on the supply pipe. A short elbow goes from it into the shaft. To drain moisture from the bath, open the valve for 10 minutes and then close it.
The article discusses the option of organizing hot and cold water supply for a bathhouse at a summer cottage. First, let's formulate the basic requirements for the system. Due to the fact that residents spend weekends on the site not only in summer, but also in winter, the bathhouse should be all-season. And this imposes the following requirements on the organization of water supply.
- Protecting water from freezing in winter, at least during weekends;
- Simple pouring of water into the internal water supply system and the same simple draining of water from the system.
Due to the permanent residence of the female half of the family during the summer-autumn period:
- there must always be hot water in the bathhouse for washing and washing;
- using a water heater should be simple and safe.
The steam room should operate in two modes:
- sauna (dry steam);
- “Russian” steam room (wet steam).
In the bathhouse, it is desirable to have a “cool” relaxation room for intimate conversation over a glass of “tea” between visits to the steam room.
To ensure cleanliness in the bathhouse and for ease of maintenance of the heater, the firebox should be located on the dressing room side.
Note: all bathhouse equipment must be fire and electrical safe.
As a result, a scheme for organizing the water supply of the bathhouse was developed, shown in the figure.

A characteristic feature of the water supply scheme is the absence of a pressure tank, usually installed in the attic of the bathhouse. A pumping station is used to provide water pressure. This water supply scheme guarantees water pressure in the system from 1.5 to 3 atm. (no worse, and sometimes even better than in the city), control of filling the tank with water and, most importantly, simplicity in ensuring the conditions for protecting the system from freezing when using the bathhouse on weekends in winter. It must be said that at the first stage the scheme was somewhat simpler, but during the implementation process it began to acquire additional elements that improved its consumer qualities and increased its maintainability.

The main elements of the system are: a water tank 1, a pumping station 2 and an electric water heater 3. Water is poured into the tank 1 through a pipeline 4 leading outside.
The filling level of the tank is controlled using a transparent PVC tube 5, connected through a tee 6 to the drain line 7 (to valve 8).
To prevent water from overflowing from tank 1 after it is filled, an emergency drain 9 with a diameter larger than the water inlet is installed in the upper part of the tank.
The emergency drain 9 is connected to the drain line 7 and led out into the street.
Water from the tank is sucked in by pumping station 2 through a coarse filter 10 and a check valve 11.
Between tank 1 and filter 10 there is a shut-off valve 12, which allows you to cut off water from the tank for repair of the pumping station and the entire pressure line.
After the pumping station, cold water flows through pipeline 13 into electric heater 3 and shower mixer 14.
After heating, hot water also flows into the shower mixer 14. Valves 15 and 16 were installed during the system debugging process to facilitate the elimination of leaks in the threaded connections of the shower and water heater.
These valves allow the amateur plumber to achieve tightness of all connections without draining the entire system.
Valves 17 and 18 are used to drain water from the water heater and the pipelines supplying water to it.
These valves allow you to use hot water when washing, including with an automatic washing machine.

Particular attention is paid to node A (see diagram), which ensures, if necessary, guaranteed drainage of water from the water heater. The fact is that all water heaters are equipped with check valves that prevent the release of hot water into the “cold” pipeline, and the hot water is drawn in at the top of the water heater. Thus, hot water becomes “locked” in the water heater tank. In the proposed design, water is supplied to the water heater through a bypass formed by: tee 19, drive with lock nut 20, American angle 21, coupling 22, American angle 23, check valve 24 (from the water heater kit), tee 25. To drain water From the water heater there is valve 26, which is closed in the operating position. Photo 1 shows the design of node A in working condition (valve 26 is closed).
A polyethylene container for drinking water with a volume of 500 liters was used as a tank (photo 2). As experience in operating the system in the hot summer has shown, this volume is sufficient for daily use for a week by a family of 3 people. Tanks of this type are currently sold in all decent markets and are equipped with inlet and outlet pipes. It should be borne in mind that round tanks of this type are approximately 1.5 times cheaper than rectangular ones, but they take up more space and, as a rule, do not fit through a standard doorway.
A domestic pump with automation was used as a pumping station; the volume of the membrane tank is 25 liters (photo 3). The purchased station is additionally equipped with a “dry running” sensor, the so-called “hydrostop”. This sensor turns off the pump motor if there is no water in the pressure pipeline and thus protects the station from an accident.
In our company Agrovodkom you can purchase various models of such stations, both domestic and imported. These are, for example, produced by the Russian company "Dzhileks" and the company ESPA.

To facilitate the operation of the pumping station, a tank with a water supply is installed on top (see photo 2). Thus, the water in the pump is under slight excess pressure, which reduces the load on the pump electric motor and serves as an additional “passive” protection of the station from “dry” running. A water heater with a volume of 50 liters is used to heat the water (photo 4).
It is installed under the ceiling, in the dressing room, on the wall bordering the shower stall. The hot pipeline is very short, which ultimately saves energy and hot water, and access to the heater is simple and convenient. Note: metal-plastic pipes were used as pipelines. An amazingly convenient thing, easy to install, repair and use.
To install a water pipe yourself, you need desire, a hacksaw and wrenches. All main parts of the system (tank, pumping station, electric heater, shower) are connected to the main line with flexible connections, this not only facilitates installation, but also facilitates maintenance of the tank, which must be washed periodically, the water heater, which requires annual cleaning, and the pumping station, which also need to be checked periodically. Photo 5 shows the connection of a flexible line and a metal-plastic pipe fixed to the wall using a special support.
At the end of the article, there are some tips for those who decide to implement a similar system at home.
Develop the most detailed project possible, which will ultimately save money and time.
Important! Buy all fittings (couplings, valves, adapters from metal-plastic to flexible hoses, etc.) in one store, preferably located close to you.
Be sure to keep your receipts. Because you will definitely make a mistake in your calculations, and you will have to go to the store several times, change something, buy something more, return something.
To protect the pipeline from freezing and rupture in winter, when installing metal-plastic pipes, it is necessary to ensure a constant slope towards drainage of water within the range of 0.02-0.05.
A bathhouse is a room with high humidity, so you need to be very careful about the electrical wiring.
All electrical equipment used must be grounded and connected to the electrical network through separate circuit breakers.
There are quite a large number of ways to build a water supply system in a bathhouse, from an ordinary rubber pipe - a temporary structure laid along a wire stretched between buildings, to a serious self-regulating system with heating and automatic drainage. The water supply scheme for a bathhouse is traditionally selected based on operating conditions, remoteness of the water source and frequency of use of the steam room. The main thing is that in winter the pipes and shut-off valves of the water supply system are not torn apart by the frozen water inside.
Simple winter water supply to the bathhouse
Air laying of temporary water supply in a bathhouse is allowed only if it is insulated and regularly uses the steam room and water. But even in the warm climate of the subtropics of Sochi, frosts occur in winter, so sooner or later, such a water supply system will freeze. Therefore, all ground and air options can only be used in summer, and for a winter dacha, the water supply system will need to be laid in the ground.

Laying pipes in dry soil
The first thing you need to pay attention to before running water into the bathhouse is the level of groundwater. The most ancient and proven method of laying a water supply for a steam room without any unnecessary wisdom and tricks requires the fulfillment of two conditions:
- Maximum dry and dense soil, with a low level of surface water;
- Pipes for water supply to the bathhouse should be made only of polyethylene, no polyvinyl chloride or polypropylene.

A polyethylene water pipe laid to a depth of at least 50 cm is flexible and elastic enough to withstand the pressure of frozen water without damage. The only weak point in the bath water supply remains the metal fittings - taps and pipes, with the help of which the individual branches of the water supply system are traditionally connected.

Advice! To avoid destruction from ice jams, a section of polyethylene water supply laid in an unheated room is not joined with steel pipes and couplings, but soldered end-to-end, in the form of one continuous line.
If, after closing the bathhouse, less than ¼ of the internal volume of water remains in the pipes, then the winter water supply system made of polyethylene can be connected in any available way, but the main line itself is insulated with polystyrene foam.
Winter water pipe with valve
For areas where there are frosts of more than -20 o C in winter, the water supply in a bathhouse without heating can simply be retrofitted with a diffusion drain valve. The process of arranging the valve drain is as follows:
- Under a polyethylene water supply pipe, in a convenient place, perhaps even in a bathhouse, a mini-well is punched in the ground to a freezing depth of plus 50-60 cm. The diameter of the punched hole is slightly larger than the diameter of the water pipe;
- In the area above the mini-well, a U-shaped elbow, also plastic, is soldered into the polyethylene line. At the lower point of the elbow, a fitting is cut into which a plastic drain pipe is placed, with a length equal to the depth of the mini-well;
- A thick geotextile cover is placed on the end of the drain tube. A small amount of sand is poured inside the mini-well so that the end of the drain pipe connected to the water pipe elbow rests slightly on the sand cushion.

Advice! Before making a well for water in the bathhouse, you will need to conduct a small reconnaissance of the depth of the water layers. Otherwise, instead of draining into the ground, you can end up in an underground spring, and then all the work and effort done will be in vain.
It is clear that when working under pressure, part of the water flowing through the plastic water pipe will fall into the ground. But this will be a very small amount, no more than 20-25 liters for a whole day of active use of the bathhouse. After the valve at the inlet is closed, all the moisture remaining in the winter water supply pipe will begin to flow into the elbow. After 20-30 minutes, the water will begin to freeze, expand and squeeze the excess into the ground. There are no negative consequences for the bath water supply.
Material for different parts of the water supply system in the bathhouse
Often, before building a winter water supply system in a bathhouse with your own hands, the problem arises of choosing the appropriate pipe material. The answer to the question is not as obvious as it might seem. For example, polypropylene pipes No. 25 are ideal for distributing water in the shower bath of the wash compartment. Plastic is easy to solder and lay in the most inaccessible places, so most of the plumbing in the bathhouse is made of polypropylene.

For a winter water supply system laid in the ground between the well and the bathhouse building, polypropylene pipes must be seriously insulated and equipped with heating. If water regularly freezes inside a polypropylene container, then after 20-25 cycles of freezing and thawing, cracks will appear in the welding areas, and after a couple of years the bathhouse will be left without running water. It is better to immediately replace them with polyethylene, which has amazing plasticity even at -50 o C.
Inside the bathhouse, plastic can be used without restrictions. With the water supply valve closed and the taps open, the water will in any case flow to the lowest point of the water supply system, which is usually equipped with a liquid discharge line. The exception is the transition from the water supply manifold to the taps and hot water tank inside the steam room. This part of the water line in the bathhouse is made from a half-inch steel pipe.
Piping inside the bathhouse
One of the typical options for laying pipes indoors is shown in the diagram below.
Water enters the building through the floor or wall of the dressing room. A mud filter and a tap for draining water from a storage tank, usually raised into the attic of the building, are also located here. The design of the water supply system provides three independent drainage systems:
- From a storage tank;
- From the cold circuit of the boiler;
- Drain from the hot circuit connected to the furnace heat exchanger.
Despite the apparent complexity, the scheme is quite simple and effective in operation. After shutting down the furnace firebox, excess steam pressure will squeeze water out of both the boiler and the water storage tank. The drain taps located under the subfloor in the bathhouse are left open, which ensures a relatively complete release of liquid from the water supply in a short time.

The most common diagrams for connecting pipes in a bathhouse
In addition to the material and climatic conditions, when laying a winter water supply system, you will need to take into account the method of supplying water to the bathhouse. As a rule, water for the steam room and washing department at the dacha can be supplied in three ways:
- From a centralized water supply system;
- From a well drilled at a distance of 15-20 m from the bathhouse;
- Collect water from a well located a short distance from the bathhouse building.
Connecting a winter water supply for a bathhouse in all cases is somewhat different from the water supply system for a summer house or residential building due to the lack of constant heating of the room. The most difficult connection is considered to be the connection of the winter water supply to the centralized water supply line of the holiday village.
How to supply water to a bathhouse from home or a centralized network
The main village highway may be located at a shallow depth; high pressure and constant flow prevent the water from freezing even at sub-zero air temperatures. If high-quality insulation is added to this, then the pipe can freeze only in the event of an accident. Another thing is a small winter water supply directly connected to the bathhouse.
Connection diagram of pipes to the bathhouse and to the main line
If you use water pipes made of polyethylene, then you don’t have to worry too much about their integrity. Plastic will withstand any freezing. The situation is more complicated with the valve and filter, with the help of which the water pipe is connected to the central main.
In this case, the only technically competent solution is to build a caisson or well, as in the diagram.
If the bathhouse is used once a week, and there is no residential, constantly heated room nearby, then you simply cannot do without installing a caisson. There are many schemes for heating winter water supply, but their reliability leaves much to be desired. Especially in a situation where the bathhouse is located far outside the city, where the owners go once a week in winter, or there are constant power outages.
The water supply system will need to install two drain valves:
- One directly after the inlet valve;
- The second is at the lowest point of the water supply inside the bathhouse.
After completing the paired procedures, you have to lower yourself into the well, turn off the water at the entrance to the water supply and open the drainage tap. But until the drain valve inside the bathhouse is opened, the water will not leave the system. You need to go up into the room and unlock it. The air pressure in the line will equalize, and the remaining moisture, which is about 10 liters of water, will flow into a plastic container in the well.
Connecting the water supply from the house to the bathhouse
The situation is greatly simplified if the steam room is located next to a heated house. In this case, the water supply to the bathhouse can be laid without any special tricks or reinsurance.
The material you can use is polypropylene pipes, preferably the “Stabi” brand, reinforced with thick aluminum foil. In the house, the winter water supply pipe is connected to the hot water supply system. It can also be connected to the cold water outlet, but in this case, to heat the main line, you will need to put a heating element on the connecting coupling. The thermal conductivity of the foil will be sufficient for the heat supplied to the pipe to spread over 5-7 m of the length of the water pipeline.

To lay the main line, it is enough to dig a trench 60-70 cm deep between the house and the bathhouse and fill it with bulk thermal insulation. The plastic pipe is covered with two-layer polypropylene thermal insulation, laid on a cushion and covered with clay soil.
If the distance between the bathhouse and the house is more than 7 m, then you will need to use a self-regulating heating cable. The plastic line is pre-covered with metal foil, then a 24 V cable is wound in a spiral, after which a “stocking” of thermal insulation is put on and laid in the prepared trench.

It is clear that you will have to heat the winter water pipe in the bathhouse around the clock, so to ensure fire safety for electric heating you will need to make a separate step-down transformer with a circuit breaker.
Water supply to the bathhouse from a well
Very often, the main source of water for a bathhouse at a dacha or in a suburban area remains an ordinary well, dug quite far from the steam room. You have to take water from the well using a submersible pump. The water supply pipe is laid in the ground to a depth of at least 2 m and led into the well shaft through a hole in the side wall. A rubber corrugation or hose for the electrical wiring supplying the pump is laid along the same line.
To avoid defrosting of the winter water supply, a check valve is not installed on the pump, and a drain air valve is installed on the inlet line in the bathhouse. After completing the bath procedures, it is enough to open it for 10-15 minutes so that the water runs back into the well. The liquid can drain without an air throttle, but the process will be quite long, and in severe frost the water at the drain in the well shaft may be covered with ice.

Arrangement of water supply from well to bathhouse
The second most popular method is to supply water to a bathhouse from a well. The water supply system for a bathhouse is not much different from the system for an ordinary residential building, but it also has its own tricks.
If the bathhouse has a full-fledged sewage system that drains dirty water into a septic tank, then a well for water supply can be drilled under the bathhouse building. It is clear that in this case it will be necessary to make a full-fledged MZL foundation with insulation of the support tape and blind area.
If the well is located outside the building, then the shaft will have to be equipped with a warm brick caisson with a double hatch. In order not to freeze the valve fittings of the water supply system, the entrance hatch at the well head is supplemented with a warm sash made of polystyrene foam or expanded polystyrene 70 mm thick. The caisson walls can be insulated with PPS or polyurethane foam up to the very bottom.
To discharge water from the water supply system, a drain valve with a short adapter elbow connecting the pipe to the well shaft is installed on the outlet line of the submersible pump. To drain the remaining water accumulated in the water supply in the bathhouse, just open the valve for 5-10 minutes and remember to close it back.

Many owners install remote-controlled electric valves so as not to lower themselves into the caisson after each wash in the bathhouse. This is convenient, but in practice manual valves are more reliable.
Conclusion
Winter water supply in a bathhouse, in addition to a well-thought-out design and high-quality assembly, will require regular maintenance. At least once a quarter, each valve and valve will need to be fully opened and closed a dozen times. Plastic fittings stick easily, and if you do not monitor its condition, then in a year or two the taps may sour and jam.
There are several ways to organize water supply for a bathhouse from a well. They have different levels of complexity, cost and provide different degrees of comfort. But they all have one thing in common: since usually baths are not used constantly, but periodically, the entire water supply system must be protected from freezing in the winter. There are only two solutions: either ensure a constant positive temperature (heat the bathhouse constantly) or make sure that there is nothing to freeze in the pipes and other devices, i.e. ensure that water is drained from the system and devices.
The organization of water supply for bathhouses and cottages can be done in different ways. There are very simple options that require a minimum of money and time for organization; there are more complex ones, but they provide a greater level of comfort.
The easiest and most economical way
The simplest option is to lower a submersible pump into the well (without a check valve), run the pipes through the air, but so that they are not horizontal, but have a slope either towards the well or towards the bathhouse. Important: there should be no taps or other shut-off devices along the entire length of this pipeline.
When turned on, the pump pumps water. While the water rises through the pipes and reaches the building, some time passes (depending on the depth of the water mirror and the distance to it, the power of the pump). When the container (bucket or tank) is almost full, the pump is turned off. The water remaining in the pipes partially flows into the container, and partially back into the well.
This system provides minimal convenience, but it is very simple and functions without failures even in winter. Everything you need for its performance in the winter is something that you can do yourself, spending a little time, money and effort.
With console pump
There is a more complex scheme, but also not particularly expensive, but providing a higher level of comfort. It uses a cantilever pump.

In the diagram, it is installed in a bathhouse (or in a house in the country), and wiring already goes from it. This scheme of water supply from a well will be good provided that the water level in the well is not lower than 5 meters and the water flows well enough. At greater depths, you will have to be tricky - fill the suction pipeline with water to the level of the console pump, which will create better conditions for its operation and water will be able to flow from a depth of up to 7 meters.
To ensure the operation of such a water supply system in winter, it is necessary to insulate the canopy for the well. The pipe exit from the well (sealed) must be made below the level to which the soil freezes in winter in your region. At the same level, lead the pipeline to the entrance to the room and there raise it to the pump.
To prevent pipes from freezing in the event of abnormal cold weather and soil freezing below the average, it is better to wrap them with thermal insulation materials or lay them deeper than the freezing point. Both options have their drawbacks: you either need to dig deeper than 1.5 meters (the usual freezing depth for the middle zone), which you don’t really want, or spend money on thermal insulation and waterproofing materials.
One of the options for maintaining the temperature of the pipeline in winter is to use a heating electric cable, but in this case you must have a guaranteed power source, which, alas, is not always realistic for rural areas. Costs are costs, but replacing the entire pipeline after winter is much worse. So it is advisable to take one of the measures.
With storage tank in the attic

One of the varieties of such a scheme involves installing a storage tank for water in the attic, in the attic, etc. This option is good because after pumping water into the tank, you can turn off the pump, and the water will flow into the comb by gravity. But in order to prevent water from freezing in the pipes or in the tank in an unheated room in winter, you need to make a pipe to drain the water. It is advisable to take it back into the well, or into the sewer system - as you decide for yourself. In this option, you will need to think through everything carefully so that the amount of water in the valve pipes is minimal.
With water-air tank, hydraulic accumulator and control system
For those who do not want to endure absolutely no restrictions on comfortable conditions, there are more complex schemes using modern equipment. This . They maintain constant pressure in the system, they can lift water from any depth, the main thing is to choose the right pump. Moreover, these systems can also pump water from a centralized water supply system, which is necessary if the system is worn out and the pressure in the network is low.

 Scheme of water supply from a well with a hydraulic accumulator
What pipes to use for water supply from a well
When organizing water supply for a cottage or bathhouse, it is important to choose the right pipes. They should be:
- Safe, especially if you use the water for drinking.
- Durable, since most of the pipeline is laid below the soil freezing level, replacement entails a large amount of work.
- They tolerated temperature changes well.
- Easy to install and repair.
Previously, only metal pipes were used. There were no other options. But, firstly, they rust quickly, and secondly, installation and replacement are only possible with a welding machine. Today there are other options.

Polypropylene pipes for water supply
In order for the water supply to serve for a long time and properly, the best option for a summer house and bathhouse is polypropylene pipes. They feel great at low temperatures; when connecting them, rubber or other gaskets are not used, which over time lose their elasticity and require replacement. They do not emit any harmful substances, do not rot or oxidize, are not damaged by fungi and microorganisms, and manufacturers claim a service life of about 50 years.
But. Polypropylene pipes require special equipment for welding. A special soldering iron is used to heat the pipe. When heated, it is quickly connected to an angle, tee, tap, etc. Important: do not make any rotational movements when welding. This is especially true for reinforced pipes. After connecting, give it a couple of minutes to cool and you can continue assembling the water supply further. The device is not very expensive, and you don’t have to buy it. You can rent a soldering iron for polypropylene from almost any company that sells polypropylene pipes.
Another good thing about polypropylene pipes is that they are available for both cold and hot water. That is, the internal wiring of the water comb in the room can also be made from the same material. Another plus: a flat and smooth outer surface, which is easy to care for and does not require painting.
Polyethylene
To supply cold water (it cannot be used for hot water), HDPE pipes are often used - low-pressure polyethylene. They have practically the same characteristics as polypropylene (they are not afraid of frost, do not rot and are not susceptible to fungi, but at the same time they are environmentally friendly), but they have one big advantage: they can not only be welded, but also use detachable fittings. This is much more convenient, does not require special equipment, and repair/replacement becomes easier. Watch the video to see how to connect HDPE pipes.
But, on the other hand, detachable fittings mean there is a high probability of leaks. Therefore, they try to plan the pipeline so that all collapsible fittings are in accessible places and not underground.
Insulation and pressure compensation
When laying pipes (polyethylene or polypropylene - it doesn’t matter), it is advisable to take measures to compensate for soil pressure. If your soils are heaving, this is a must. You need to lay the pipe (preferably with insulation, but possible without) in a corrugated hose of larger diameter. It will, firstly, serve as thermal insulation, and secondly, protect against excess pressure.
There is also Energoflex tubular insulation, using which you can solve the issue of thermal insulation in one fell swoop and protect pipes from excessive loads.
 Insulation for water supply pipes "Energoflex"
 Recommendation based on personal experience: buy pipes and all corner tees and taps in one place, preferably located near the house/bathhouse. Why? Because even professionals rarely manage to perfectly calculate the entire circuit at once, so during the installation process you will have to buy, change, return something more than once, and sometimes more than twice. Therefore, immediately upon purchase, find out how and what you can/will need to do to exchange and return parts of the plumbing system.
Well insulation
Preventing the water mirror from freezing is not very difficult - the water in the depths always has positive temperatures and all that is required is to prevent the cold from coming from outside. Thermal insulation of a well includes two components - insulation of the shaft and the installation of a protective house on the surface.

Do-it-yourself insulation of a concrete well
To insulate a well from the outside, you need to choose a material that does not absorb water. Typically polystyrene or foam is used. These materials are inexpensive, durable and chemically neutral. Although there is one “but” - they are afraid of ultraviolet radiation - they are destroyed under its influence. This problem is easily solved: a well house is built around the insulation, or the outside of the material is lined with finishing material.
A simpler and faster option is to apply two layers of paint to polystyrene or foam. In this case, you cannot use acetone paints: they corrode these materials. If the well is round in shape, you can use polystyrene foam “shells” - products of a semicircular shape. All that remains is to select the appropriate diameter, connect the parts of the shell, and seal the joint with reinforced tape. If there is no such “shell” of a suitable size, you can cut polystyrene/foam sheets into strips and attach them to well rings.
 Thermal insulation of the walls of the well with polystyrene foam: at the top there is a finished “shell”, at the bottom there is slab material cut into pieces
 Thermal insulating material should be laid slightly below the soil freezing level in your region. To do this, dig a well to a given depth, install protection, and secure it with tape or any other fastener you can think of. To protect against the effects of water, you can wrap the entire structure on top of the insulation a couple of times with plastic film (it can also be secured with tape). Next, you need to either build a wooden house for the well, or lay finishing materials - your choice.
There is another option for insulating a well - foamed polyurethane foam. This mixture is applied at positive temperatures (from +20 o C to +30 o C) using a special device. This mixture is inexpensive, as are the services for its application, but has the advantage that the material fills all cracks and defects in concrete rings, extending their service life. The downside of this material is the unpresentable appearance of the treated surface, but this can be eliminated by exterior finishing or building a house for the well.

Cover/house for well
Regardless of the complexity of the water supply system that you will install in your bathhouse, the well must be equipped with a warm house, or at least an insulated lid. This is necessary to, firstly, prevent dust/dirt/leaves, etc. from getting into the well, and secondly, to prevent the water from freezing in severe frosts. Wooden wells do not need insulation - wood itself serves as an excellent heat insulator, but wells made of concrete rings need to be insulated.
To maintain a positive temperature in the well, some craftsmen lower a boiler equipped with a thermal relay into the water, which is set to operate at +1°C. At this temperature, the boiler turns on, heats the upper layers of water and turns off. But such a scheme is realistic with a guaranteed power supply. Power outages for 5-8 hours in cold weather, and that’s it, the water will freeze.
It is more troublesome, but also more reliable - during construction, insulate the rings of the well from the outside, to the depth of freezing of the soil or slightly below (just in case) and build a well-insulated house for the well on top.
There are two types of houses:

 Cover for a well made of wood
 It is also made from wood - the board is taken quite thick (about 50 mm). It’s even easier to build a lid for a well with your own hands than a house. The outer part can be square or round. Choose the sizes to suit your taste, but they must exceed the diameter of the well.
The cover usually consists of two layers of boards laid perpendicularly (at 90°). The inner part must exactly match the shape and size of the well ring and fit tightly into it, blocking access to cold air.
Often, in order not to raise and lower it every time you need a bucket of water, a door is made in the lid on hinges (the door should tilt completely - this is more convenient).
 A canopy, a well cover and external insulation with finishing are good protection from frost
 In addition to the lid, you can make a canopy for the well. This way the structure becomes even more attractive, and the roof, although small, protects both the well and the person who collects water from precipitation or sun rays in the heat.
conclusions
Building a well near the bathhouse is still half the battle. It is also necessary to properly supply the water from it to the bathhouse and insulate the well to prevent the formation of an ice plug in the winter.

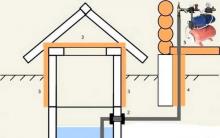


Design of a corridor in an apartment, color scheme, choice of wall and floor coverings. Hallway with blue walls
Kitchen corners and sofas Kitchen sofa room with sleeping place
Desk for two children
TV stand in a modern style: photo, equipment, selection rules Stylish TV stands
Long TV stands are an excellent solution for the living room