Sweet candy compositions have been very popular lately. Every needlewoman can master the art of making such bouquets if she wishes.
This master class consistently and in detail with step-by-step photos shows all the stages of creating a bouquet of sweets “Roses in a Basket” with your own hands, starting from the technique of attaching the sweets themselves and ending with the moment of assembling all the elements into a single composition. Using this description, even craftswomen without experience in this direction of needlework will be able to easily master the basic techniques of “candy” floristry and do their first work.
How to make a bouquet of roses from sweets and corrugated paper?
Here is a list of materials that will be needed:
- Floral corrugated paper (its color will determine whether it will be white, red or pink buds);
- Threads;
- Skewers or wire;
- Double-sided tape;
- Candy box;
- Kraft paper;
- Sisal fabric;
- Sisal fiber;
- Styrofoam;
- Toothpicks;
- Floral organza;
- Decorative elements (beads, ribbons, artificial leaves);
- Hot melt adhesive.
Manufacturing instructions with step-by-step photographs
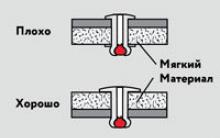
- At the first stage, we glue each candy with its base to one of the ends of the skewer.

- From corrugated paper, cut out a rectangle 2 corrugations wide and about 10 cm long. We fold the rectangle into 6-7 accordion folds. When folded, round the upper part of the paper blank using scissors and unravel the paper.

- Then between the “roundings” we make cuts with a depth to the corrugation line. The upper edges of the petals are slightly stretched.

- We wrap the candy on the skewer in the resulting blank with petals, and the paper should wrap around the candy quite tightly. At the base of the candy we fix the assembly with a thick thread.

- We slightly stretch the corrugation at the base of each petal. In this way we straighten all the petals, starting from the outer ones and gradually moving inside the flower.

- Next, we cut out a blank from paper, similar to the first one, but only about 15 cm long.

- We make 5 petals from it and also wrap it with threads around the base of the bud. We slightly stretch the petals from below.

- Now, using a toothpick, turn the edges of each flower petal outward from the top.

- Then we proceed to decorating the sepals and stem of the flower. To do this, we cut off the excess paper at the base of the bud so that the transition from flower to stem is smoother. We wrap the calyx of the bud with tape, slightly capturing the beginning of the stem.

- Next, we make a square of green paper measuring 5*5 cm. On one side we cut out long thin triangles with scissors. We twist the tops of the resulting sharp leaves with our fingers. We wrap this paper around the base of the bud and secure it with thread.

- At the final stage of making the flower, we cut off a thin horizontal strip of corrugation and wrap it around the entire length of the stem. We fix the ends of the paper with glue.

- Making a closed bud is somewhat easier and faster. To do this, cut out three rectangles from paper, 2 corrugations wide and 3-4 cm long.

- We round each rectangle with scissors at the top, and make small side bevels at the bottom.

- Then we sequentially wrap the resulting petals to the base of the candy. In order for the bud to be truly closed, the paper must cover the candy filling very tightly.

- We slightly stretch the upper part of the petals - this will give them a more natural look.

- We make the sepals and stem of the bud according to the description given above. Only the blanks should be cut a little narrower (3-4 cm), because the base of the bud is not as voluminous as that of an open flower.

Making a basket
To assemble the composition, you can use a wicker basket, but if you don’t have one, an empty candy box can serve as the basis for the bouquet.
- To do this, wrap the box in craft paper; the edges of the paper can be glued or simply secured with a stapler. Then we decorate the outer sides of the box from above using hot glue with a sisal cloth.

- Next, you need to place a piece of foam plastic on the bottom of the box so that it “sits” tightly enough and does not fall out of the box. If it was not possible to cut the foam so accurately, then it can be glued to the bottom. We decorate the foam on top with sisal fibers.

We form a composition of a candy bouquet of roses
- Now you can begin to form the composition of the bouquet. First, you should place the largest elements evenly around the perimeter of the box, then fill the remaining space with smaller flowers.

- We close the free gaps between the colors with the help of “pounders”.

- We make them as follows: cut out two small squares from organza, pierce the fabric in the middle with the sharp end of a toothpick, drop a drop of hot-melt glue into this place and squeeze the fabric around the toothpick.

- If you have decorative artificial branches, you can also use them and use them in the composition. To do this, cut large branches into smaller elements, attach each such segment to a toothpick using hot glue and place it organically inside the bouquet.


You can do the same with sweets if you want to include them in the bouquet without paperwork.
The master class on creating roses from candies and corrugated paper is coming to an end. The finishing touches are to glue decorative beads onto individual elements of the composition, and decorate the box with an elegant bow made of beautiful ribbons.
Hello again, my guests! I continue to take photographs out of my chest, as I did DIY candy roses and tell you step by step about each stage.
The simplest candy composition is a basket of roses, you can make buds, you can make open buds. So let's get started!
For the candy basket you will need:
Corrugated paper (red and marsh color)
DON'T FORGET ABOUT MY ONLINE STORE "Ermilova Decor", where you can buy everything at once, as we always have everything in stock!
Floral wire
Tape
Wicker basket (you can also buy a wicker basket in my online store)
Penoplex (or polystyrene foam)
Candy (I used "Autumn Waltz")
Satin ribbons
For pounds: organza, toothpicks, double-sided tape, stapler)
Tools (glue gun, pliers, scissors)
I always start by preparing a basket. I cut out the foam plastic for the basket, glue it to the bottom with a hot gun, and glue a handle if necessary.


We stretch the edges of the narrow workpiece, and in the second workpiece we stretch the middle. Next, fold the edges in with a skewer.

We wrap our candy in a narrow piece and secure it with tape. Next, we wrap our bud in a second blank and also secure it with tape.

We cut out the leaves from the greenish corrugation as follows, and also fix them with tape.

We cut the floral wire (I always use 1.2) into 3 parts. We cut the base of the bud with scissors, apply hot glue to the cut and insert a wire into the bud.

We take a strip of greenish corrugation and use hot glue to wrap the stem of our rose.

We trim the roses to the desired height and insert them into the foam. We insert COUNTIES between the roses. See. In my new Master Classes you will see how I make bouquets without using a single pound)))

We continue to insert pounds and roses!

Here are our DIY candy roses in a basket ready! Watch my new master classes, where I will explain step by step how to quickly make a bouquet of candies without a single pound!

A pink candy bouquet is a delight, but look at it differently - you can create one today!
If you need to make a beautiful present, don’t rush for flowers and chocolates, try to combine these two pleasant surprises into one, creating a beautiful bouquet in which roses made from candies and corrugated paper look like real ones. Such a luxurious gift can be given for a birthday, March 8, Teacher's Day, or even as a thank you to an artist in the theater. It will take a little time, but a few tens of rubles in money.
Preparation of materials for creativity
The following tools and materials are required for work:
- candies;
- corrugated paper in pink and green colors;
- green tape;
- green ribbon for decoration;
- bamboo sticks;
- white organza;
- white satin ribbon;
- Styrofoam;
- cardboard tube from foil;
- narrow tape;
- scissors;
- transparent universal glue “Dragon”.
Instead of pink ones, you can make red, yellow or burgundy roses, it all depends on the mood and the occasion. If this hobby is new to you, take a look at this one.
Master class on assembling a bouquet
First make paper roses with candy. Attach the candy by the tail to the bamboo stick with narrow tape. Cut a rectangle of pink crepe paper, rotate it 180 degrees in the center, and use your fingers to stretch the middle of each half of the rectangle. 
Wrap the resulting bow around the candy and secure with tape. Round off two corners of another rectangle. Stretch the rounded edge with your fingers. Make a bulge in the rectangle by stretching the paper along the length of the rectangle in its middle.


Wrap the resulting piece around the candy. Fold the paper several times to cut out several rose petals at once. Petal shape may be approximate. You can even make a simple oval.


Stretch the top edge of the petal and make a bulge in the middle of the petal, giving it the desired shape. Prepare a lot of petals at once.

Attach the petals in a spiral until the flower shape seems complete to you.


Use green crepe paper to make a flower petiole. Fold the paper 4-5 times and cut it into a triangle.

Wrap the piece around the base of the candy rose and secure. Use your fingers to place the green corners in the desired position.

Wrap green tape around the bamboo stick. 
Similarly, make the number of corrugated paper roses you need with candy inside.
Prepare the base for the candy bouquet. Use a knife to shape the piece of foam into the desired shape. Make a blind hole in the center of the foam and insert a cardboard tube into it. For more secure fixation, use universal glue.

Decorate the foam with green corrugated paper and the tube with tape. Using tape, attach 15-20 cm of decorative tape to several roses, which you then divide into thin strips.

Insert candy roses into the base of the bouquet, first applying a drop of glue to the puncture points.

Twist the strips of decorative tape by lightly running the blade of the scissors along them. Wrap the base of the bouquet with white organza, folded in half. Secure with narrow tape. You can point-fix the inner layer of organza to the base of the bouquet with transparent universal glue. Tie a wide white satin ribbon in a bow over the tape.


A bouquet of sweets with delicate roses is ready! Watch master classes on creating other delicious flower arrangements. Use your imagination and don’t be afraid to experiment.
We will be glad to see you among our friends in our groups for passionate women! In Odnoklassniki you can not only admire the works of other needlewomen, but also sell your crafts.
Every year, beautiful and original DIY crafts are becoming increasingly popular. Handmade craftsmen create amazing things from the most common materials at hand. There are a lot of handicraft options, and one of the most delicious areas of floristry - sweet design (sweet in English means sweet) is gaining momentum and gaining more and more fans around the world. Stylish and original crafts that combine beautiful flowers with sweets will become a wonderful decorative element or a wonderful gift.
The history of this trend in needlework is inextricably linked with the emergence of the sweets themselves, as well as their beautiful design and packaging.
The first sweet delicacies were born in Ancient Egypt. Sugar was not yet known at that time, so sweets were made from fruits and honey: figs, dates and nuts were mixed with flour and herbs. In Ancient Greece and Rome, barley molasses was used as a base, the ancestors of modern candies were made with the addition of honey, poppy seeds, nuts, and a topping made from sesame seeds. The name “candy” itself comes from the Latin “confecyus”, which translates as “made”. An amazing fact, but the word “candy” was made common by pharmacists of that time. They prepared various bitters and tried to mask the taste with molasses or candied fruits.
At the end of the 17th century, candy appeared for the first time in the familiar form of a small candy bar. In 1663, in Germany, for the French ambassador, confectioners created pralines - soft sweets filled with nuts and honey. These sweets still remain one of the most popular in Europe.
In America, since the 1800s, sugar beets have been actively used; confectioners make caramel from it. By the mid-19th century, the first chocolate bars appeared in England, and in 1876, milk chocolate products joined the regular bars, thanks to Daniel Peters.
In Russia, apples and pears boiled in honey were used as sweets. Noble nobles also enjoyed raspberries glazed with sugar. But such delicacies were available only to the richest, because sugar was very expensive. This situation changed during the Napoleonic Wars. England no longer made deliveries to a hostile country, and the emperor, who adored sweets, gave the order to find something that could replace the unavailable English goods. This is how sugar was born from special sugar beets. Now candies were made not only from beet sugar, but confectioners made full use of molasses to make soft toffees. Sugar beets have taken root well in Russia and the making of sweets has become ubiquitous.
Starting from the end of the 16th century until the mass production of sweets from cheaper sugar, they were stored and sold in beautiful boxes - bonbonnieres. These packages were an art in themselves, made from leather, silver or gold. There were very few candies there, but together with the beautiful packaging, it was a chic and original gift of that time. Now, when sweet production has acquired an industrial scale, a completely different packaging was required. The familiar candy wrappers were born in the mid-19th century. Thomas Edison suggested using paraffin-impregnated paper. Sweets in such packaging did not stick together into one unappetizing lump even on hot summer days. At first, the name of the manufacturer’s company was printed on such paper, and then it was the turn of bright, beautiful pictures.
Nowadays it’s difficult to surprise with a bright candy wrapper. Creative and talented needlewomen came up with an excellent option - beautiful flowers with candy cores. This bouquet will definitely delight you with both its original appearance and delicious content.
Corrugated paper is very popular in suite design. It is from this that very beautiful and realistic-looking flowers are obtained, the basis and core of which is candy. This type of craft paper appeared relatively recently. If regular paper has existed since 105 AD, then the corrugated version has only been around since the 50s of the 19th century. The first mention of it occurs in 1856. Corrugation is used as a lining for hats of British subjects. Nowadays, quite a large amount of such crumpled paper is produced in a wide variety of colors and shades, which florists and other needlewomen are happy to use.
In this article we propose to make the most beautiful flowers from corrugated paper with a sweet candy center - roses. A bouquet of roses in a suite design will be an excellent gift. Such flowers can be packed like a regular bouquet or placed in a basket, and step-by-step photos and a detailed description of the work will help you make it.
Bouquet of coral roses in a basket
Materials and tools:
- Candies;
- Corrugation for petals and leaves;
- Floor wire 1 mm;
- Floor tape or tape;
- Styrofoam;
- Wicker basket;
- Green organza;
- Toothpicks;
- Stapler;
- Double-sided tape;
- Glue gun;
- Scissors;
- Tools for working with wire (pliers, wire cutters).
First we need to prepare a basket where we will put our roses. You need to cut a piece out of polystyrene foam that will fit tightly in the basket. The height of the foam should not be greater than the sides of the basket. Glue the workpiece to the bottom.
Let's start creating roses. From corrugated paper intended for petals, you need to cut out two rectangular pieces: one wider, the second narrower. Now we round off one of the narrow sides of the smaller piece, and cut out three narrow petals from the larger one, leaving a common base (see photo).
We stretch a separate petal from a smaller piece along the upper edge. Gently stretch the large piece in the middle with your fingers and use a toothpick to turn the edges of the three petals outward (see photo).
Take the candy and wrap one petal around it. At the bottom we make a loop of tape and thus fix the candy inside. Now we wrap the workpiece into three petals with a common base and again make a turn of the tape with tape for fixation.

The next stage of work will be the sepals. To do this, cut a narrow rectangle of green paper. Now we cut out the sharp long leaves, leaving the bottom intact.
We wrap the green blank around the rose and apply another round of tape.
We cut the base of the flower obliquely on both sides, cover the wire with hot glue and insert it into the rose. Now we take a thin green corrugated tape, glue the surface of the wire and the base of the flower and wrap it with this strip.

Now you need to make decorative elements from organza, they will mask the gaps between the roses in the basket.
The fabric should be cut into squares slightly larger than the flowers. Wrap double-sided tape around one end of the toothpick. Now fold the organza square diagonally, fold down. Place a toothpick with tape in the middle and fold the fabric beautifully 2-3 times. Using a stapler, we fix the position of the material and the decorative element is ready.

Now we begin to decorate the basket. Cut the wire in the roses to the required length. We stick the roses into the foam and decorate the gaps with organza elements.

Dark coral roses

In this master class we will show you how to make one rose. You can assemble the bouquet yourself from the number of flowers you choose.
Materials and tools:
- Delicious and favorite candies;
- Wooden skewers for shish kebab;
- The corrugated paper is green and the shade chosen for rose petals;
- Scissors;
- Glue gun or glue;
- Scotch.
The first stage is securing the candies. They need to be attached to the skewers using tape. The splendor of your bouquet will ultimately depend on the number of blanks.
Now take the paper for the petals. We cut out blanks of about 10 petals for each flower. The direction of the corrugation strips is lengthwise. This is a mandatory condition, because in the future we will need to expand each petal. Their size will depend on the size of the selected candies. We cut out the blanks into rectangular shapes and round one of the narrow sides, like a real petal. You can even use a real rose petal as a reference. Now take the rounded edge and gently stretch it with your fingers, making the edge wavy. Cut petals of two to three sizes.
In order to make the center of the flower, you will need a rectangular piece of paper. It should be longer than a piece of candy. Approximately 18 x 10 cm. Now use your fingers to carefully stretch it in the middle. The result is such a convex workpiece.

We wrap the candy with it and secure the end with tape on a skewer. Now we begin to attach the petals in the same order as a real rose - slightly overlapping.
When you attach all the blanks, you will need to bend the petals a little so that you get the effect of an open flower. Even if the candy center peeks out a little.

Now you need to glue the bottom of the flower and the skewer. We wrap them with a strip of green paper and the rose is ready.
Pink rose made of corrugated paper with a sweet candy center

Materials and tools:
- Candies;
- Corrugated paper;
- Threads to match the paper;
- Toothpick;
- Scissors.
From paper you need to cut 4 identical rectangles and one slightly larger.
From the first rectangle we cut out 2 petals and round off one narrow side. We fold the three remaining rectangles (two smaller and one larger) into four and begin to cut out the petals, rounding one side. We don’t cut it all the way. We will get 4 petals in one piece with a common base.

Now carefully stretch the petals in the middle. They will turn out to be convex, or concave (on the reverse side). Now we take the candy and wrap it in the first two petals, which we cut out separately. Place the candy in the recess in the center of the petal. You should leave enough paper at the bottom to make it comfortable to hold on to. Gradually wrap the candy with the blanks. We overlap the petals.

When all the petals take their place, tightly wrap the paper leg with threads to secure it. Using a toothpick, slightly curl the edges of the outer petals to make our rose more open.
Now you can attach these roses to the stems and make a bouquet or a beautiful basket.
English rose

Materials and tools:
- Candies;
- Corrugated paper (two colors for petals and sepals);
- Toothpick;
- Thin tape;
- Floor wire;
- Scissors;
- Glue gun.
First, let's cut the petal blanks. Length/width cm = 2 pieces 7/5 (the very first ones, we will wrap the candy directly in them), 12 pieces 7/3, 5 pieces 7/4. One of the narrow sides must be rounded. This is the top of the petals.

Gently stretch the first two petals in the middle with your fingers, without touching the top and bottom. We stretch the next 12 pieces both in the middle and a little on top. The last five petals will be the outer ones. Use a toothpick to curl the top edge, slightly touching the sides (see photo). Now we stretch the middle of the petals with our fingers.

Take a piece of wire and glue the candy to one end using tape.
Now we take our first two petals and wrap the candy in them. First, glue one with hot glue, and then the second so that the edges of the first petal are covered by the middle of the second.

Now we glue the next 12 petals overlapping and in a checkerboard pattern. They should be located slightly above the first petals. The first layer will be of three petals, and the next two of four.

Now we cut out a blank of five sepals from green paper on a common base. We widen the middle of each a little with our fingers, and on the contrary, twist the ends so that they become thinner.

All that remains is to glue the sepal to the base of the rose and wrap the wire with a strip of green corrugation, having previously lubricated it with glue.
To create such a composition of delicate tea roses with delicious chocolates you will only need one evening and a good mood. A step-by-step master class from Arina will help you do it yourself.
We place seven lush roses made of corrugated paper in a small flowerpot. Add to the bouquet several sprigs of small artificial flowers, harmonizing in color with the main shade of the roses. The result is a beautiful, sweet gift for any occasion for friends, family or work colleagues, made with your own hands. Sweets can be selected in accordance with the preferences of the person for whom such a gift is intended.
The number of roses in a bouquet can be either more or less - in this case, choose a pot of the appropriate size so that the bouquet looks harmonious.
Bouquet of tea roses made of corrugated paper with sweets in flowerpots
Materials and tools:
- corrugated paper yellow, cream, green,
- glue gun,
- scissors, ruler, LL40 threads,
- kebab sticks,
- sweets (not very large),
- small pots (approximately 9-11 cm high),
- a piece of penoplex or polystyrene foam 15 x 15 cm and 2.5 cm thick,
- green floral sisal,
- artificial small flowers and leaves for decoration.
To make one rose, we need corrugated paper (preferably Italian) in two shades: yellow for the middle of the flower and a delicate cream color for the petals. We use green paper for the sepals; we also use it to decorate the stems of our flowers.

From yellow paper we cut 8 x 9 cm pieces for the rose bud and round the top as in the photo. At the bottom we cut out a few cloves so that in the future the lower part of the flower will not be too voluminous.

We stretch the workpiece in the middle part with our fingers to create a recess for the candy. We tuck both tails of the candy towards each other, place it in the center of the segment and wrap it with a little tension. We select a candy that is not very large (in this version it is “Golden Lily”). We fix the base of the bud with threads, making several turns and pulling the thread well.

From pieces of cream paper 3 x 8 cm, cut out 10 petals for one rose in the form of a drop.

We stretch each petal in the middle part, giving them a voluminous shape, and curl the edges of the petals using a wooden stick on both sides.

We apply five petals in a circle to the middle bud and fix it with several turns of thread at the base of the flower. You can also use hot glue in this case to secure the first row of petals.

We add the next five petals to the first row, placing them in the space between the petals of the first row. We fix all the petals with thread or hot glue.

From a piece of green paper 4 x 8 cm, cut out the sepals and stretch each of the five leaves a little in the middle. We twist the leaves at the top with our fingers, giving them a pointed shape.

Glue the sepals to the base of the rose, secure with a few turns of thread and cut off the excess paper at the corner.

Glue a wooden skewer into the middle of the corner base using hot glue.

Apply a drop of hot glue to the edge of a strip of green paper measuring 1x10cm, apply it to the base of the flower and carefully wrap the entire stem of the rose from top to bottom, periodically gluing it in several places to be secure.

Add 1-2 artificial leaves to the flower using hot glue. We glue the leaves at the top of the stem.

We got this delicate tea rose with a candy inside.
It is very simple to get the candy out of the flower: you need to pull the upper tail with ordinary small scissors or tweezers and it will be outside, because we did not glue the candy, but simply wrapped it in paper.
In total we need seven roses for the bouquet and now we just need to add six more to the already finished rose.

We need to cut out the base for the future bouquet from a piece of penoplex or polystyrene foam and place it inside the flowerpot. The diameter of the base should be such that it fits tightly inside the pot, but does not fall through, but remains approximately at the same level with its upper edge.

Using a construction knife, we cut out a circle and adjust it to the size of our flowerpot.

Fill the pots tightly with crumpled napkins or any paper to about ¾ of the volume.

We place the prepared circle base on top and decorate with sisal.
Sisal can be glued in several places with hot glue.

Now all that remains is to assemble the bouquet from the prepared parts.

We choose the most magnificent rose, cut the stem diagonally with scissors to the desired length and insert it into the center of the future composition. You can first mark holes in the base for all flowers with a wooden stick in order to place them evenly at the same distance.

We insert the remaining 6 roses in a circle closer to the edge of the flowerpot with a slight slope from the center. Add twigs with small artificial flowers and decorative greenery. The inserted flowers can be additionally fixed with hot glue, but in the case of penoplex this is not necessary - everything is held together quite firmly.


The result is such a wonderful bouquet of tea roses made of corrugated paper with sweets in a flowerpot, made by yourself.
For more step-by-step tutorials on making gifts from sweets, see the section.


Home care for hippeastrum
Create a photo book online with your own hands
How to make a New Year's wreath on the door with your own hands New Year's wreath from a foam blank
Drip irrigation for a summer residence
How to sharpen kitchen knives correctly - instructions for use How to sharpen a knife on a whetstone