For ordinary onions, virtually any tree growing in Russia is suitable.
So, bows can be made from maple, juniper, ash, hazel, birch, oak and elm.
The workpiece must be cut down in winter at a frost of 10 to 15 degrees.
The workpiece must be free from thermal and mechanical damage and free from excess build-up.
The length of the bow blank should be 30 cm longer than the length of the bow, as cracks may appear; for this purpose, 15 cm is left on both sides.
There is no need to remove the bark from a cut log.
It is necessary to cover the ends of the workpiece with oil paint. This is done so that drying is uniform and internal defects do not appear in the wood. If you don’t do this, you won’t be able to eat enough for the long life of the onion.
After processing, the workpiece must be dried at room temperature and in a vertical position. At the same time, the air in the apartment should not be very dry, because the wood may dry out and everything that has been done will be in vain. Drying takes from 2 to 5 months, depending on conditions.
First treatment.
So, the existing workpiece is a log.
From it you need to make a board like the one in the following figure.
You can do this using one of the options below:
- Process with an ax
- Cut with a saw
- Split using wedges.
The board should be as thick as the future bow in the handle, approximately 3 cm.
Once the board is of the required thickness, you need to make markings on it.
You also need to carefully inspect the board for defects and cross-layers.
In the following figure, you can see how to correctly make a marking scheme.
Please note that the bark has not yet been removed, so you need to be extremely careful not to damage the outer part of the onion.
All excess must first be separated with an ax, and then continue working with a knife and a plane. Once done, you will have the side profile of the bow in your hands.
Now you can begin to form the front profile.
The ratio between the width of the handle and the width of the end of the shoulder should be approximately 3/2. In the first stages of work you need to be very careful. The uniformity of operation of the bow arms will depend on the precision and accuracy with which everything is done. In the early stages, you should not bend the bow, as this can lead to splitting of the onion blank and ruin it.
The straight cross section of the bow depends on the existing thickness of the workpiece. It can be lentil-shaped or almost rectangular.


Steam treatment (last stage)
At this stage the bend of the bow will be formed. There are manufacturers who at this stage soak the workpiece in various solutions and infusions. But after treating the workpiece with steam, the wood also acquires all the necessary properties.
So, why do you need to steam onions?
- When the wood dries out during drying (that’s why you can’t bend the bow before steaming)
- In the case when the primary preparation was not straight. This happens often, there is no need to be afraid of it. The front profile of the bow does not need to be straight. This will not affect shooting.
- If you need to make a short bow (for example, one of the Slavic options 1 - 1.3 m).
- When making a bow with a reverse arch.
- When making a “light” bow (for example, a game bow).
- In order to give it an aesthetic appearance.
At the very beginning of production, the workpiece looks like this:
You need to get this bend:
To do this, you will need to steam the onion shoulders (when they are steamed, they become very plastic and can easily be shaped into this shape)
You need to steam the shoulder until it can be easily bent.
Only the parts shown in white need to be steamed.
It is necessary to steam at the same time so that the onion shoulders dry evenly and at the same time.
After the arms of the bow have been steamed, you need to restrain it in a special, pre-prepared slipway.

The bars are shown in black, between which the “hot” onion should be forced. The shape, quantity, and location of the bars depend on the required shape of the bow.
You can do it another way and steam the onion in the center.

Then place boards under his shoulders and tighten the middle with a clamp.

The bow should dry in the slipway for about a week, after which it should be removed and the ends of the bow should be shaped to tighten the bowstring. You need to prepare a place for the horn/bone tips or simply cut a “step” for the bowstring loop.
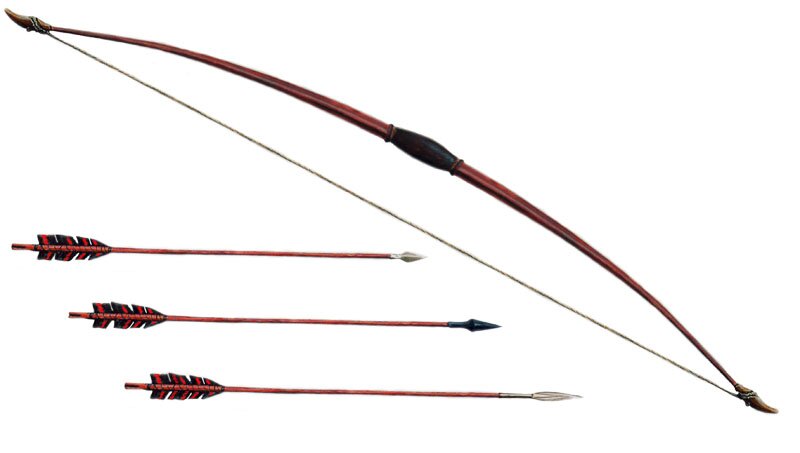
A hunting bow is the most affordable weapon that is not so difficult to make with your own hands. Its advantage over the purchased one is in cost, and also in the fact that it can be made “for yourself”, taking into account individual characteristics. The only thing that needs to be taken into account when making a bow for shooting with your own hands is that the maximum tension force of the string, established by law, is no more than 40 kg/s. You can learn more about how to make a hunting bow with your own hands.
Homemade bow
Before you make a bow with your own hands, you need to prepare the material. Wood for making archery weapons must have such characteristics as strength, flexibility, and elasticity. The material for the workpiece must be straight, even, without knots or any damage. In principle, any tree is suitable for making a bow: birch, oak, apple, juniper, maple, hazel, ash, elm, yew or teak.
The branch for harvesting must be cut down in winter, at sub-zero temperatures, so that the tree sap is preserved inside. The length of the workpiece should be the required length of the future onion, plus 30 cm for cracks during drying at each end, the occurrence of which is very likely. The bark is not removed from a cut branch. Its ends are coated with oil paint to avoid internal defects in the wood when it dries, which should occur evenly.
After this, the workpiece is left to dry for up to five months in an upright position at room temperature. In this case, the surrounding air should not be too dry, otherwise the workpiece will be deformed.
How to make a hunting bow with your own hands
After making the initial blank, you need to determine the natural bend of the wooden bow. This is necessary in order to make it convenient to use the weapon in the future. To determine this bend, you need to press one end to the ground while holding the other end with your hand. The frame will turn to its natural side.
 Make a bow with your own hands, diagram
 It is necessary to make a future hunting bow from a round blank. The width of the bow frame is usually 3 cm. It is better to cut off excess wood with a knife, while simultaneously checking for knots and other defects.
Since a simple bow consists of a solid frame, it is worth shaping its bends while processing it with a knife. Using a knife and a plane, its side and front parts are formed. The ratio of the width of the frame and the width of the shoulders should be 3/2. The size of the shoulders should be the same so that they are not inferior in elasticity to each other. At this stage of work, do not bend the bow to prevent its deformation.
Next you need to form the bend of the bow. For this, the water steaming method is used. In particular, the arms of the bow are steamed to give them the desired bend shape. To do this, the bow is fixed with special stocks (wooden blocks) in the desired position of the arms and treated with hot water steam. In this fixed position, the weapon dries for about one week. After this, the stocks are removed, and places for the bowstring are cut out at the ends of the arms.
It should be noted that all this time the bark was not removed from the onion. After steaming it begins to peel off. It must be carefully removed without damaging the wood fibers. The remaining bark is removed with sandpaper, and the surface is covered with fat, hot wax, varnish or paint.
There is another option for how to bend a bow:
- It is necessary to make a special board with cuts, which is attached perpendicular to the center of the frame.
- Both ends of the bow are connected with a thread.
- The thread clings to one of the cuts on the board to bend it according to the required radius.
Manipulations should be carried out slowly, because sharp bending may damage the wood fibers.
Making a bowstring
It is better to make a bowstring from multi-layered rope. The bowstring for hunting must be durable, made from several threads of Kevlar, nylon, lavsan, fishing cord in reels, and other artificial threads. A thin strip of rawhide, 3mm thick, will also work. The main requirement for a bowstring thread is strength, resistance to abrasion and stretching. It should be shorter than the length between the limbs of the bow to keep it in a tight position at all times. First, it is attached to one notch of the shoulder, tightened with a knot to the bow, then stretched to the other end and tightened there. A correctly tensioned bowstring should be 15 cm from the middle of the frame of the hunting bow.
Making arrows
Arrows should be of such length that it is proportional to the length of the bow and the maximum tension of the bowstring. In practice, this means that when the bowstring is taut, the arrow tip should protrude several centimeters beyond the frame of the weapon. The diameter of the arrow should be approximately 6mm, the shaft should be perfectly straight. The materials for making arrows are spruce, pine, birch - for hunting small game and birds, as well as ash, hornbeam, oak, and other heavy and dense species for hunting wild animals. You can chop them from logs, use boards, glazing beads, or wooden square slats. Then they need to be shaped into cylinders and sanded so that the surface is smooth. The smoother the surface of the arrow, the more accurate its flight will be. In the end part you need to make a small slot for the bowstring in accordance with its diameter.
The shape of the arrowhead is made depending on the type of prey. If hunting is intended for a bird, the tip is made pointed. If you plan to hunt larger game, the tip is made of stone or triangular metal.
The arrow will also need to be fletched. The simplest one is from bird feathers, but it can be made from other materials - plastic, paper, etc.
Compound bow

A hunting bow may have a composite design, i.e. consist of two or three parts. It is easier to find material for such a workpiece than for a simple one. Typically, a composite structure consists of a central frame to which are attached two arms (“horns”) that end in string mounts. For normal shooting, they are made the same size, but for shooting from the knee, the lower shoulder should be made shorter than the upper one.
To make the arms of a composite bow, you should choose bird cherry that grows near a pond. The blanks are cleaned of bark and dried in a dark place, or even better, in the fresh air. After cutting out the main parts, the workpiece can be dried in the sun.
The component parts are glued together; in camping conditions this can be done using fish glue (made from crushed fish bones). The frame is impregnated with resin and fat, and the joints with the shoulders are tightened with animal tendons (you can use fishing line, strong rope), and again soaked in fat. When all the parts are glued into a single structure, the onion is processed with a sharp knife. To give even greater strength and durability, the surface of the onion is covered with boiled birch bark, glued along the fibers.
Elizaveta Rumyantseva
Nothing is impossible for diligence and art.
Content
How to make a bow is of interest to many people. Indeed, archery is one of the most exciting sports. You don’t have to practice it professionally to enjoy hitting targets. You can go out into nature with friends and shoot at homemade targets at a short distance. For these purposes, you may well need a homemade bow.
How to make onions at home
First, prepare all the materials necessary to create a bow. You will need the actual piece of wood from which the future base for the bow will be made. For these purposes, ash, white acacia or maple are best suited. To make a bow, you need to use high-quality dried wood, without any knots or other defects. Also prepare a bowstring, which can be made from lavsan or twisted linen thread. Any bow structurally consists of two parts - the handle and the limbs. The handle is the central part of the bow; it is from the protrusion of the handle that the flight of the arrow begins.

Depending on the length of the arms, the length of the bow and arrow also changes. If a person’s arm span is 137-150 cm, the length of the arrow should be 55-60 cm and the length of the bow should be 137-152 cm. For people with an arm span of 150 to 165 cm, you need to select a bow with a length of 152-160 cm and arrows with a length of 60-66 cm. People with an arm span of 167-180 cm usually choose a bow with a length of 160-180 cm, while the arrow length is 66-70 cm.
How to make your own onions

A little about the bowstring. If the tension force is less than 16 kg, twisted linen threads, which are used in saddlery, can be used to make the bowstring. If the tension force is more than 16 kg, you need to use a thread made of lavsan. Now we proceed directly to attaching the bowstring. To correctly calculate the length of the bowstring, subtract 4-5 centimeters from the length of the bow. The resulting figure will be the length of the bowstring in centimeters. You can more accurately determine the length of the bowstring using practical tests.
To make a bowstring you need to do the following. We take a long block and drive two nails into it at a distance of 150 cm from each other. Now the free end of the thread without a knot should be secured to one nail of the device, and the thread should be wound in a circle. On average, make 5-6 turns for linen thread, and 50 turns for lavsan thread. When winding the thread, make sure that it goes without sagging and is evenly tensioned.

In the future, the resulting bowstring will serve you much longer. Then cut the thread and tie the loose ends, then divide the thread into two strands. At a distance of 8-10 cm, the middle of each formed strand should be wrapped with a dense nylon thread, after which, without removing the bowstring, wrap its ends. This way, you will have two loops with which the string is attached to the bow. Once the loops are completed, make sure that the length of the string matches the length of the bow.
On average, the distance from the handle to the bowstring is 20-21 cm.
After the bowstring is tensioned, you need to check the bow on the stand. To do this, you need to fix it on a vertical surface, and check the tension force and bending of the arms. Gradually increasing the tension of the bowstring, you need to check the reliability of the manufactured bow, while you need to monitor the uniformity and symmetry of the bend of its arms. You especially need to make sure that the ends of the limbs do not bend too much, otherwise the bow may break.

When checking the tension of the bowstring, you need to ensure that the bowstring is installed correctly. If the string deviates from the axis of the bow, this may mean deformation of the bow. You can try to correct the deformity by planing the opposite shoulder to the deformed one. After adjusting the bowstring, you can notice the tension of the bowstring using a dynamometer. The bow draw weight should be 10-12 kg for a beginner archer and 16-17 kg for an adult and experienced athlete.
After all the procedures for tuning the bow, you can finish it. First of all, you need to make it more convenient - for this you need to give the handle the most optimal shape. To do this, you need to attach a guide protrusion to the left side of the handle, the length of which should be 20-30 mm and the width should be 10 mm. The shape of the protrusion is a small inclined semicircle - this way the arrow will not jump off.
After making the bow, you can start making arrows. To make arrows for a bow, dried wood is used - spruce, pine, birch. The arrowhead is made of solid steel. For balance, a plastic or textolite plate must be glued to the back of the arrow, in which a slot is made corresponding to the diameter of the bowstring. The plate dimensions are width 2 mm, length 7 mm. To optimize flight, you need to attach a stabilizer to the rear tip of the arrow - usually a goose, eagle, swan or turkey feather.

When the arrow is ready, you need to center it. If the arrow's center of gravity is closer to its tail, its flight will be unstable and the arrow will wobble. On the contrary, if the center of gravity is too shifted to the front part, the arrow will, as they say, “nod off.”
You can center the arrow like this. First you need to find the middle point of the arrow, and then at a distance of 1 cm from it towards the tip on the arrow you need to make a mark. This will be the center of gravity. To ensure that the front and rear of the arrow have the same weight, the mass of the arrow can be changed by changing the weight of the arrow tip.
You can see how to make a bow with your own hands at home in this video.
That's all, now you know how to make a bow.
Found an error in the text? Select it, press Ctrl + Enter and we will fix everything! Materials:Skis: pieces of skis for making bow arms;
Lumber - for making a handle. You need either a large beam (minimum 8x8x50) or small beams;
A couple of bolts, washers, wing nuts - to attach the bow arms to the handle;
Nylon thread (or any low-stretch string) - for the bowstring.


Tools:
Clamps;
Hand drill with a set of drills;
Chisel, hammer;
Wood rasp or file;
Sandpaper of various grain sizes;
The tools listed below are not necessary, but will help make the process much easier if you are making a more complex bow handle.
Table saw;
Drilling machine;
Band-saw;
Plane;
Belt/disc sander.

Making a bow from skis
I used skis for mountain terrain. The ends are bent at an angle of 20 - 28 degrees. Bow limbs made from alpine skis will be more “strong” because... Alpine skis are tougher.Bow Handle Design


Original handles in real size:
http://www.instructables.com/id/Make-a-takedown-bow-from-skis/
Many people are interested in the question of how to make a bow with their own hands. There are already many photos, videos, various diagrams and drawings on the Internet that will help you find the answer to this question.
This is not surprising, because archery is one of the most interesting and exciting types of sports games. It does not oblige you to engage in this sport professionally.
You can also hunt various animals. Not only adults, but also children can shoot at the same targets, made with their own hands at home (targets can be downloaded). Shooting with a homemade bow is a good way to entertain your child.
What parts does it consist of?
The bow is one of the most ancient types of throwing weapons.
It is used to shoot arrows at a target.
They hunt animals of any type and size.
Nowadays, the main function of this weapon has lost its relevance; now it is used mainly for sports and for competitions.
Bow and arrow dimensions according to arm span:

Note: In order to start making a bow, it is worth noting that you cannot make it in one day. It takes patience and a lot of endurance so that you can reach your final goal.
The material, or more precisely the wood, that will be used to make these weapons is prepared in advance. The weapon that you want to make with your own hands has one drawback.
Over a short period of use, wood may lose its elasticity. This causes the bow to not shoot as well. It simply becomes unusable.
The classic version includes:
- main part (handle or kibit);
- shoulders;
- bowstring (elastic rope, necessary for the bow to bend during shooting).


Expert Note: The classic version includes three main parts, but there are also weapons with reverse thrust or block. Despite the fact that the components can be supplemented with different parts, the principle of using this weapon does not change.
To make a homemade one, you need to use a stick, the base of which will not be clearly visible. It is worth mentioning right away that such a mechanism can be used in hunting no more than six times. Afterwards it becomes unusable.
Classification

Classified according to various parameters:
Depending on the size:
- large (adult);
- small or mini (children);
- gift (decorative).
Depending on the type:
- simple;
- difficult.
Depending on the shape:
- straight;
- curved.
Depending on the material:
- wood;
- metal;
- created on the basis of fiberglass (or plywood);
- combined.
Depending on the location of the arrows:
- central;
- peripheral.

Compound Bow
Depending on the design:
- solid;
- collapsible;
- blocky.
Depending on the application:
- hunting;
- combat;
- children's;
- for shooting in indoor and outdoor areas;
- for long-range shooting.
Material
 There is a lot of material for making the classic version.
The most common materials suitable for making high-quality bows are maple, acacia, ash or birch.
When making a bowstring, it is necessary to start from the fact that the material must be strong and elastic, and it must also withstand a very heavy load.
The most commonly used synthetic material is polyamide. They also use lavsan, kevlar, nylon, dacron and other synthetic fiber threads.
Historical data indicate that previously animal hair, tree bark, and much more were used for bowstrings.
Expert advice: for the base it is necessary to choose a material of high strength. In order to make shoulders, you need to select a material that can bend and spring well.
Manufacturing technology
 It is worth remembering that a real bow is always a composite one.
All three parts should not be longer than two meters in length.
If the size of the weapon turns out to be more than two meters, the accuracy and power of the bow decreases accordingly.
Instructions on how to properly make it yourself:
- The workpieces must be cleaned and dried. The wood is dried for about 2-3 months in a vertical position at an average temperature of 22-24 degrees.
It is important to know: Drying workpieces in the sun is prohibited!
- Next, all the components must be planed using a sharp knife and then continue to dry. And then give the final look. Once the pieces have acquired the desired shape, you can begin to dry them in the sun.
- The basis is kibit. It serves as a specific frame for attaching the remaining parts. The parts are glued to the frame using special store-bought glue.
- Kibit must be soaked in melted animal fat or cedar resin.
- The joints between the kibiti and other parts must be tightened with a strong cord that has good flexibility.
- Afterwards it can be sanded until it becomes smooth.
Making arrows
 What material to choose for arrows depends on the animals that will be hunted when it comes to a bow for hunting.
If the animal is small, use spruce, pine, birch, if larger, use oak, acacia or ash. A good bow should come with at least four arrows. For manufacturing you will need slats and boards, the thickness of which is no more than four centimeters. The length of the arrows must be at least 80 cm (see size table above).
Note: The length of the arrows must be the same as the length of the bow itself, and also correspond to the tension of the bowstring. That is, if the bow is in a tense position, the tip of the arrow should at least protrude beyond the bow by two centimeters (the base of the bow is “kibit”, which serves as a frame for attaching the main parts).
Manufacturing stages:
- Using a plane you need to measure up to two centimeters of the thickness of the board.
- From the end, mark the board into squares and cut into arrows.
- Sand the shaft into an oval or round shape. To make the arrows beautiful, you can attach three feathers to each. However, archers prefer to make finger grooves instead of feathers, as they consider this a more practical option. The iron tip should be in the shape of a triangle.
Care
 You will learn traditional tips on how to extend the “life” of a homemade onion in this section.
Care does not present any difficulties.
It will be very easy for the person himself to carry out the following points without any problems:
- Stored exclusively vertically. It is most practical to store it in a special case.
- The bowstring should only be worn when shooting.
- Before you start shooting, the bowstring must be developed (pumped).
- Store only in a dry place.
- Dragging is prohibited.
You can even make it from a stick; the most important thing is to know the pattern according to which the bow you make will be as functional as possible in use.
It doesn’t matter what kind (elven or Russian, Asian or short, or maybe even from skis) you want to make, the main thing is to strictly follow all the instructions and then you will succeed. Watch a detailed video of DIY wood manufacturing technology:


Making a mini moonshine still
Dividing moonshine into fractions
Regular Panchenkov wire nozzle (RPN)
Analysis: fixing homemade wines at home
Manufacturing and use of a distillation column