We will send the material to you by e-mail
Gates are an integral part of any fence or garage. Today you can make them yourself, the main thing is to choose the right type of design. They will help you make the gate yourself: drawings, photos and videos. This information will also help you decide on the material from which the structure will be made.
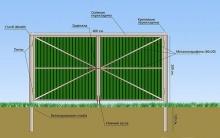
Gate in a private yard
A common option for everyone is swinging products. They are used in country houses, in private houses and in the construction of garages. A gate can also be located next to such options. The design involves the installation of two supporting elements along the edges of the canvas. Today it is quite easy to make swing gates with your own hands. Drawings, photos and videos will help you study all the intricacies of the work.
Arrangement of supporting elements
At the first stage of construction, it is necessary to install supports. Most often these are metal pillars of suitable diameter, which are concreted into the ground. Very often done with brick pillars. In this case, they can also be a support for the product. But do not forget, when laying bricks, to make metal embedded parts to which the hinges will be welded.

Preparing the sashes
From which side such hinges are welded depends on which direction they will open. That is why, when making a gate with your own hands: drawings, photos and videos must be viewed without fail. To make the sashes, a metal frame is most often used, onto which sheet material is attached. If the fence is wooden, then it is more expedient to make the gate from wood. In this case, the frame can be made from both metal corners and timber. It is important that the sashes are not too heavy, otherwise they will put a lot of stress on the posts and hinges. Over time, this can lead to deformation and the doors will not close well.

Therefore, it is worth studying some information before making swing gates with your own hands. Photo and video drawings will help you become familiar with all the intricacies of the work and prevent all sorts of defects. At the final stage, it is necessary to install a locking system on the doors. The simplest option may be a simple deadbolt.

Video: swing gates made of corrugated sheets and metal profiles
Features of sliding gates
Sliding options are increasingly being used during the construction of fencing. They take up relatively little space. In addition, the machine can be located just a few centimeters from the fence and this will not interfere with opening or closing them. The availability of a variety of building materials makes it possible for everyone to make sliding gates with their own hands. Drawings, photos and videos will allow you to more carefully study all the features of the work.

Sliding option
The main types of sliding gates:
- console;
- hanging;
- recoil.
Hanging variety
The hanging option is not particularly popular. This is due to the fact that a rail is installed in the upper part along which the canvas moves. This rail is a kind of limiter, so not every vehicle will be able to enter the yard.

Sliding products
To operate sliding options, the rail is installed along the wall and directly in the opening itself. It is not practical to use such a system in the northern regions. Because with a large amount of snow, the operation of the shutters will be difficult, and snow-covered areas will constantly need to be cleared.

Advantages of the console type
The console type is by far the most popular. They can be used in both southern and northern regions. The movement of the canvas occurs above the ground, so there is no need to constantly clear the path. In addition, the advantage is that there are no restrictions at the top. This makes it possible for even high-height vehicles to enter the yard.

For an installation of this type, only one support column is required, which will bear the entire load from the canvas. Therefore, it is important to make it as high quality and reliable as possible. The cantilever beam itself on the gate can be located below, above or in the middle of the door leaf.
Helpful information! The beam located in the middle is considered the best option, since it generally strengthens the entire structure.

Recoil model
Everyone can handle making sliding gates with their own hands. Drawings, photos and videos allow you to study the principle of the sliding system. It is important to take into account all recommendations when performing work.

Features of sliding gates
Sliding options can significantly save space in the yard. But at the same time it is necessary to control the space along the fence. For the system to function properly, it is first necessary to clear the area of debris and any vegetation.

Installation of support elements
The beginning of the work is the installation of the main support column, which will bear the main load. If you wish, you can do it and the video will help you follow the technology. To work you need to prepare the following tools:

For the sashes themselves, it is best to use galvanized material. It is able to last a long time, while maintaining its original appearance. Polymer-coated corrugated sheets are often used.
Helpful information! The use of corrugated sheets is considered the most successful solution, since it is treated with special agents that prevent corrosion.
Products of this type can be equipped with automatic or manual drive.

Sliding type drawing
At the beginning of work, it is worth preparing drawings according to which the work will be carried out. Drawings and diagrams also allow you to calculate the exact amount of material required. The height of the gate must correspond to the fence. The width of the opening can be very different. Sliding products exert pressure not only on the rails, but also on the pole, so special attention must be paid to its design. Its lower part must be immersed in the soil and properly concreted.

Arrangement of rails for moving the web
Sliding gates will run on a rail that is located on the ground. To do this, you need to choose a U-shaped metal profile. Its length should be equal to two lengths of the canvas. For reserve you need to make another 30 centimeters. It is important that the rail is installed on a concrete base. Only in this way can you obtain the most reliable design that will last for a long time. After all the rail systems are installed and secured to the support pole, the electric drive can be installed.

Assembly of the canvas and its installation
The door leaf is made from a metal frame, to which a profiled sheet will subsequently be attached. Rollers are attached to the bottom of the metal frame. The door leaf is installed last. Do-it-yourself sliding gates: drawings, photos and videos provide complete information about the design and process of the work.

Tips and tricks for doing your own work
Every person can make a gate of any design. It is important to follow the recommendations of specialists and study some information beforehand.
- Select only high quality materials for work. This will allow the structure to be used for a long period and no repair work will be required.
- It is important to pay attention to all drawings and diagrams. Only strict adherence to the scheme will allow you to complete all the work correctly the first time. Compliance with dimensions and parameters makes it possible to make a functional design that will work without problems.
- The installation of an electric type drive must be carried out with full understanding. If you have no experience in this field, you should entrust all the work to specialists. They will do everything efficiently and quickly. The products will open and close without difficulty.
- If the use of a roller system is envisaged, special attention should be paid to its selection. It is best purchased in specialized stores. In this case, such a system will work flawlessly for a long time.

Today, you can supplement your fencing with a self-made gate. Various materials can be used for manufacturing. The most commonly used materials are wood and metal. Before you begin, you should consider what type of construction is best to use. Starting to make gates with your own hands: drawings, diagrams and photos will help you solve even complex problems. Swing gates are a classic option with a design that anyone can handle. Their arrangement requires a lot of space so that they open freely. You can save space in your garden using sliding or sliding gates.

Save time: selected articles delivered to your inbox every week
When homeowners are constructing fencing around their properties or in the process of constructing garages, the need to solve the problem of building a gate always arises. First of all, it is necessary to accurately determine the appropriate type of gate. In this matter, an important role is played by the calculation of the smallest nuances, since situations often arise when, after installing the gate, you have to do additional work to arrange your site. It is for this reason that the design features of various types of gates should be studied before purchasing materials.
- Recoil;
- Swing;
- Lift-and-swivel.
Each such design has its own specific differences, so it is necessary to study them separately.
DIY swing gates
Construction stages:
- Installation of hanging racks.
- Making the gate itself.
The sequence, of course, can always change.
The following materials can be used as racks:
- Profile pipe with a certain cross-section;
- Reinforced concrete pillars;
- Masonry made of brick or natural stone. In most cases, stone is used for cladding purposes;
- Ordinary wooden beam.
Let's consider the existing methods of installing poles:
- Metal pipes are buried in the ground to a depth of approximately 1.5 m. This technique will always differ from others in terms of financial benefits and time savings. There is also always the possibility of emergency replacement of the rack. To avoid misalignment, it is recommended to strictly maintain the same level when burying pillars;
- Equipment of a kind of concrete foundation as a base for pillars.
More attention should be paid to the second installation method.
Sequencing
- Using an earth drill, a pit is dug, the minimum depth of which should be 1 m;
- A special cushion for concrete made of sand and crushed stone with a thickness of 150-200 mm is equipped. Such a platform is necessary so that the rack never deepens;
- The pillar is installed and gradually leveled using a regular building level;
- The stand is poured with concrete.
To assemble the gate, you need to determine the size of the upcoming structure. To simplify the work, it is recommended to create a drawing in which all dimensions will be indicated.
 After this, you can begin manufacturing parts for the frame according to pre-made drawings. When performing welding work, you should always remember safety precautions. It is advisable to entrust this matter to a qualified specialist. You should always remember that the number of stiffeners largely determines the resistance of future gates to external weather conditions. If pipes are used as racks, it is advisable to prevent water from entering them.
Gates can also be decorated with products made by cold forging. After the gate is assembled, you can put it on the hinges.
Let's list the main advantages of swing gates
- Economical;
- Relative ease of installation;
- All stages of installation can be performed on your own without much difficulty;
- To make such a structure, different materials can be used.
Disadvantages of swing gates

In general, installing swing gates is not difficult.
DIY sliding gates
Sliding gates are a little more difficult to install. When equipping such a structure, brick pillars are placed on both sides, on which rollers are fixed, holding brackets and fixing elements at a certain height.
The main weight should always be supported by the channel, which is fixed to a securely installed foundation on the inside of the gate or to iron supports.
 You can install a solid foundation or several strong pillars under the channel. For the foundation, you will have to equip a pit, at the bottom of which there will be a cushion of crushed stone and sand. After this, formwork with waterproofing is placed in the pit. A reinforcing grid is installed in the formwork, after which concrete is poured into the pit.
A channel with reinforcement is mounted on a concrete foundation. This element is strongly pressed into the solution until it is completely immersed. When the concrete hardens completely, you will get a fairly strong iron platform. Only after the concrete has hardened and the channel has been installed are the gates themselves installed.
 For the frame, you can use a square pipe or an ordinary iron corner. Additional stiffening ribs are necessarily welded to the square frame to increase the stability of the created structure. Each weld seam must be cleaned of the resulting slag. The frame is primed and then covered with a special paint that can protect against corrosion. Only after this can corrugated sheeting be installed on the frame.
When all the constituent elements of the structure are prepared, and the foundation with the built-in cantilever channel becomes strong enough, you can begin attaching the components of the sliding system.
Installation of a sliding system

Cantilever beams are mounted at different heights. When developing such structures, sizing must be done with particular accuracy, since the console can be deformed even with the smallest errors.
The disadvantages of sliding gates include only 2 features
- Compared to swing gates, sliding gates are a little more expensive.
- To be able to roll back, you will need a little space along the fence.
We list the main advantages of such gates

More information on installing sliding gates can be found in this video:
Installation of overhead gates
First of all, it is necessary to design the lifting and turning system. To do this, you need to change the dimensions of the opening and draw up a suitable sketch yourself or find a suitable drawing. After purchasing all the components and tools, you can begin installation, which consists of the following steps:

After the assembly is completed, finishing and painting work can be carried out. There should be a special groove for the seal at the bottom of the profile.
Advantages

The disadvantages of lift-and-turn systems include

More information about installing lift and slide systems can be found by looking at this
video:
To ensure the safety of a residential premises or industrial facility, it is customary these days to install fences and gates. Today, modern homeowners use three main gate assembly technologies. The essence of technology lies in the way it is discovered. Collecting any variety with your own hands will not be difficult for anyone.
Mounting and installation of swing gates can be done in different ways. First of all, the differences will relate to the installation method and installation of the poles. The period of use of the entry group will depend on the specific choice of installation method. It is worth noting that poles for swing gates have different characteristics and indicators.
Currently, hinged gates with cladding are most in demand on the market. These gates are installed on country houses, gardens and country houses. They are mounted and installed on metal poles with a certain cross-section, for example, 60×60 or 80×80. Since the gates are light in weight, the strength of the metal posts is quite sufficient, but if you wish, you can easily replace them with larger posts.
This installation method has several main advantages, we list them below:
- economically, installation is very profitable;
- installation speed increases several times;
- the possibility of replacement or repair arises;
- self-installation.
Metal poles must be driven into the ground to a depth of about 1.5 meters.
Drive into the pre-prepared hole, being guided strictly by the level. Next, we connect the metal posts to the outbuildings or to the rest of the fence. In this case, the pillars are connected to each other by a removable strip. It is necessary to weld the frames of two sashes to the ready-made exposed supports. 
Swing gates are made on a flat, smooth surface; a welding table is best to ensure that the entire structure is level and meets your expectations.
Installation of swing gates when concreting pillars
In addition, a reinforcing glass can be placed in the hole for the metal post to strengthen the entire structure.
The concrete mixture must be poured to a depth of 1.0 meters to 1.5 meters.
What should you consider when installing swing gates?
Characteristics and installation of swing gates
Entrance swing gates are very economical, quite simple and easy to use. This design is most often used for. They are used in garden plots, as well as in various production workshops, car service centers, and on the territories of large manufacturing companies. 
Over decades of use, not only the price of installing swing gates has changed, but also the material used, appearance, and characteristic features. For example, in the past, data was mainly processed only from trees. Now it is a durable and high-quality metal. Most often, when installing and installing swing gates, you can find an automation system.
The design of swing gates can be divided into two categories - with two leaves and one. At the same time, the cost of single-leaf or double-leaf swing gates varies significantly.
There is a more common type of gate design that combines two categories. These gates have two metal leaves and a wicket. This design saves space and material. And you won't need to create an additional login.
Today, there are three main options for installing automatic swing gates.
Everything will depend on the direction of the opening of the target: inward, outward or inward with modification of load-bearing concrete pillars. With each of them, the installation of automation occurs in a strictly defined sequence. Sometimes it may be necessary to install it outside, or in the future for future automation.
The system control unit can be located on the left or right; it is very important to select all wire sections correctly.
For installation, it has a characteristic feature; for it it is necessary to provide a certain distance from the load-bearing concrete pillar.
If you did not provide for this and the gate needs to be made inward, then simply carefully hollow out and arrange the places for it.
Swing gates - not a single rural yard in Russia, not a single country house, can do without them. It doesn’t matter what their design is: solid metal or wood, openwork forging or simple welding of rods, angles, pipes.
You can make it yourself
Their design is the simplest of all known: sliding, lifting, single or double leaf. They let in and out the owners’ car, a cargo scooter “Ant” or a walk-behind tractor with a trailer. They can be equipped with a yellow signal light or an antenna for remote control of the “close-open” mechanism. With a gate for adults and children in one part of the plow or separately next to it.

For those who have not yet had similar ones, read our recommendations for creating entry barriers, look at photos of gate drawings, collect the necessary tools, purchase materials and start working on your own.

And if you decide to build a garage in the yard, then the experience gained from assembling a plow on the estate will also be suitable for installing the entrance to it.

You can also download a drawing of a garage door on the website. The design of these gates is simple and clear, installation is simple, easy to open/close, and reliable.


Device principle
The design of such fences has remained unchanged for centuries. Only the materials for plowing are changed. To the traditional options (made of simple metal or wood), elegant profiles and polycarbonate are added.

The advantages of plowing are:
- ease of assembly and installation
- minimum cost when assembling with your own hands
- durability
- ease of maintenance
- Suitable for office areas, technical complexes, garage cooperatives
- Variation in sash widths up to fifteen meters

Let's pay attention to installation
The gates are mounted on side posts made of pipes with a diameter of 10 cm, a welded pair of corners or ready-made profiles. They are concreted to a depth of at least a meter so that the frost does not “drive” the gates.

The height is enough to be two meters, the same width of each door. They swing open either immediately or each separately, into the yard or out. This needs to be thought through right away. They are hung on hinges that are well lubricated with a graphite mixture so that they do not creak.

When closed, if there is no opening mechanism, they are fixed in several ways. Either transversely with an inch pipe mounted on a pair of hooks for each plow, or with fasteners at the junction of the mortars, mounted in the concrete. The lower fastening will also be needed in the case of simply fixing each plow.

The cladding, painted corrugated sheeting or polycarbonate, is attached to the frames with bolts or self-tapping screws. The last hardware per square meter of fastening is needed eight to ten pieces.

You leave the last material in its translucency or paint it with a color of your choice. The corrugated sheeting, which continues in the form of a fence from the gate along the entire length of the front part of the estate, looks good.

The disadvantage of the goal format is its large turn. This is a particular drawback for winters, when a lot of snow must be cleared in order to open the gate.

Mechanization
This convenience will have to be purchased as a finished product, but it will take a long time to make it yourself. The mechanism is similar to a door closer in entrances, only much more massive and powerful.

You can install it closer to the ground if winters have little snow, or better in the middle of each side of the gate. For the middle, less bulky door closers are sold.

In both cases, it is necessary to weld the structures to the fasteners of the plows. Our descriptions are minimal; you can see all the procedures in detail on the video of the gate drawings.


Alternative to swing gates
If swing gates do not suit you due to the opening area of the gate, look at possible drawings of sliding gates. Perhaps build them yourself. Only such gates will become twice as heavy. Because instead of the area of two swing doors, here they will be welded together. A cone will also be added at one end of this design.

It is necessary to completely cover the entry space. Therefore, manually moving such gates along one line along the fence is problematic.

Therefore, a mechanism is needed in the form of a gearbox or worm gear on the teeth of the slide. For winter use, it is necessary to consider protection from snow and rain.

Their length for a standard estate gate is four meters. The driving angle adds at least another 1.6 meters. The fastening is radically different from swing ones.


Along the length of the gate, a profile-slide is installed at the bottom to move the structure along it. On both sides of them there are rectangles embedded in concrete with a height slightly higher than the gate with a distance between the verticals of 10-15 cm. The frame moves through them, and when closed they hold it. On one side, you concrete the platform for two meters, and on it you strengthen the continuation of the profile and the entire movement mechanism.


You can also download a drawing of a garage door on the website. Below we will talk about one garage structure.

Overhead garage doors
There are two more types of gates - overhead and garage. The lifts themselves are mounted in a detached garage or built into a building. They are not suitable for open air, since they have a complex design for the street. When rising, it will create windage in the wind, which will lead to deformation of the frame.

A drawing of a lift gate for an integral garage shows that it can be opened in winter even if there is a snowdrift in front of the engine room.

The entrance leaf simply goes up along the lower slide, and the two upper wheels along the same guides lead the structure almost horizontally.

If the gate is made not of too thick metal, but of a profile, then you can raise and lower it manually. Provide a soft seal along the contour of the gate against wind, snow, and rain.


Photos of gate drawings


In modern conditions, gates are not only a security element that partially reduces the likelihood of theft or damage to a car, as well as unauthorized entry into the site or garage, but also part of the overall interior of the garage, house or site. In this article we will talk about different types of gates, features of their installation and operation, advantages and disadvantages, and also tell you how to install them yourself.
What types of gates are there?
Despite the fact that most types of gates are universal, that is, they can be used for a house, garage or fence, there are gates that are only suitable for one thing. Therefore, we will list the main types of gates and also indicate what they are best suited for.
- Swing.
- Recoil.
- Folding.
- Retractable.
- Sectional.
- Swing gates

This is the most common and universal type of gate, which has not changed its design for thousands of years and consists of two vertical supports, several canopies (hinges) and two leaves. Depending on the material of the valves, they can be divided into:
- solid;
- with gaps;
- wooden;
- metal:
- from sheet metal;
- forged.

The main advantages of swing gates are ease of installation and maintenance, the main disadvantage is sensitivity to the amount of snow cover and dependence on the free space in front of them. If the snow has risen above the lower edge of the gate or there is any obstacle in front of it (a car, a pile of garbage, a FS unit), then opening it will be problematic; other types of gates do not have this drawback.
- Sliding gates - drawing

The second most popular gate, which can be installed only where there is enough free space on the side, that is, 1.5–2 times the width of the gate opening. Because of this, they are installed only in fences and garages located in the basement or lower floor of a residential building. Despite the fact that there are sliding gates made partly from wood, they are not widely used, so almost all sliding gates are made of metal. At the same time, gates made of sheet, pipe and rod are in equal demand. The main advantage of these gates is that they do not require free space in front of them, but they require maintenance much more often than swing gates due to the more difficult operation of the rollers and carriages that ensure the movement of the gate.
- Folding gate

This type of gate has become widespread in various enterprises because it does not have the main disadvantages of other types of gates and is located in a protected area. Due to the fact that the lower guide is closed by the gate, even during heavy snowfall it does not become clogged with snow, so there are no problems with opening the gate. Therefore, these gates have only two drawbacks - the high cost of the installation kit and installation, as well as a weak security effect, because they perform only a decorative and logistical function. However, if executed correctly, these gates will look very nice on the garage under the house. However, these gates are not widely used in residential buildings.
- Retractable gate

Retractable or up-and-over gates are very popular in garages located inside protected areas. The gates do not depend on the level of snow and are relatively inexpensive, but they take up a lot of space under the ceiling, where they are removed when the garage is opened. Due to the fact that the gate is made in the form of one huge leaf, which completely covers the gate opening, their opening looks very beautiful - the gate rises, unfolds and goes somewhere inside the garage. In addition, such gates require regular professional maintenance, so they are installed only by those who can carry out all routine and repair work themselves or have sufficient finances to enter into a service agreement with a serious company.
- Sectional doors

Sectional, or roller, gates are the best choice for a garage located inside a protected area. They do not depend on the amount of snow cover, do not require a large space under the ceiling (with the exception of large-section doors), and are easy to maintain. Thanks to the use of modern materials, they provide good insulation of the garage without any additional measures, because the insulation is located inside the metal (less often plastic) frame from which the sections are made. Such gates are in great demand, but it is difficult to install them yourself due to their complex design and high requirements for accuracy and adjustment.
What gates can you make yourself?
If you are an experienced builder, have access to the necessary equipment, components and assistants with the necessary skills, you can make any of the gates described above yourself. If you are an ordinary person whose talents and abilities lie in other areas and have minimal construction, plumbing and welding skills, then you can only create swing and sliding gates. We recommend making swing gates - despite serious shortcomings, they are easy to install, look beautiful, and finding materials for them is not difficult. Below we will describe the main stages of creating and installing swing and sliding gates; this will help you better understand the process, evaluate your strengths and create beautiful and functional gates yourself.

How to create and install swing gates
To create a gate with dimensions of 2.2x2.2 meters you will need:
- steel profile (square) with a cross section of 30 mm, 20–30 meters;
- steel profile (square) with a cross section of 100x100 mm or a steel pipe with a diameter of 100–120 mm, 6–7 meters (two sections of 3–3.5 meters each);
- garage hinges 4–6 pieces;
- door hinges 2 pieces;
- door lock;
- corrugated sheeting 6–7 square meters;
- steel reinforcement with a diameter of 10–14 mm 3–6 meters;
- manual or mechanized drill with a diameter of 300–400 mm;
- manual tamper (you can use a log of suitable length and thickness), to which handles are attached for ease of use;
- Bulgarian;
- welding machine;
- drill with a set of different drills;
- self-tapping screws;
- screwdriver;
- roulette;
- sharp core;
- square;
- plumb and level;
- sand, crushed stone, cement and water;
- shovels;
- several assistants.
Creating sashes
When creating the sashes, you must determine in advance how they will be attached to the supports; their width depends on this. If from the inside, then the width will be equal to the width of the passage, if from the front (outside), then it will be equal to the width of the opening + double the width or diameter of the supports. It is also necessary to determine in advance whether you will cut a gate into one of the doors, because the location of the frame elements depends on this. After this, it is necessary to determine the number of vertical posts of the frame - in regions with weak winds on gates of this width, it is optimal to install 3 vertical posts on each leaf. If the winds blow strongly and often, then it is necessary to install 4 racks.
Mark the vertical and horizontal elements along the length and cut them using a grinder, then weld them from their frame. Be sure to use a square when marking, and also use it to check the shapes of the gates during welding, this will avoid skewing the gates and altering them. When the sashes are made, hang them on supports. Keep in mind that the strength of the gate will depend on the quality of the welds with which you connect the hinges to the supports and leaves. Some craftsmen who have to install gates in mountainous areas first mount the supports, and then make the doors for them and hang them. This approach allows you to adjust the gap between the gate leaves.
If you decide to make a gate with a wicket, then take into account the size and shape of the canopies, because the wicket should open and close freely, but there should not be large gaps between it and the frame of the door. You can hang the gate and install the lock both before and after hanging the gate.
Installation of supports

Using a drill, drill a hole for the supports. If there is no drill, you can dig it out with a shovel, but the diameter of the hole will be several times larger, which means you will have to either fill the support with stones or pour much more concrete. The depth of the holes for the supports should be 30 cm greater than their depth. This is necessary to create a sand-crushed stone cushion that will protect the gate from groundwater. This pillow must be thoroughly compacted with a tamper or log.
If it rains heavily in the fall in your region, and in winter the temperature drops below 15 degrees below zero, then the depth of the hole for the supports should be greater than the depth of soil freezing.
In addition, the hole must be made with a diameter of at least 40 cm and insulated at the level of freezing depth with polystyrene foam. You can also install (if free space allows) screw piles, which will act as supports. When installing supports, pay special attention to the distance between them and their verticality; for this, use a tape measure and a level or plumb line. Check with a level or plumb line from 2–3 sides. Having placed the supports, fix them and fill them with concrete. The gate can be hung after 20–25 days.
Hanging and plating
There are two technologies for hanging and covering gate leaves of this size - the first involves first lining, then hanging, the second, on the contrary, first hanging, then covering. The first technology is used when you can attract a sufficient number of assistants and lifting the doors is not difficult; the second is used if you are working together or even alone. Hanging the gate is done in the same way as ordinary doors or windows - the sash is raised, the canopy pin on the support and the hinge hole on the sash are aligned at the top and bottom, then lowered. This operation can be performed alone, but only on sashes without trim. At least 2 people (preferably 3) are required to hang cased sashes.
Cut the corrugated sheeting to the nearest millimeter, maintaining right angles, otherwise the entire structure will look clumsy and awkward. For fastening, use metal self-tapping screws; keep in mind that self-tapping screws are not bolts, so tightening too tightly will only lead to stripping of the thread.
Installation of latches and locks
There is no single standard for locks or latches for swing gates. Some limit themselves to a chain and padlock, others install a mortise lock or deadbolt, and still others install automatics. Therefore, experiment based on the materials available to you.


 Comparative characteristics of Good Warmth heaters")


How to make resin glue
Tree house for children
Master class: do-it-yourself soft headboard for a bed How to attach decorative pillows to the wall
Extension of a veranda to the house Do-it-yourself summer veranda to the house
How to get rid of aphids on indoor plants at home