When arranging a chimney, the question inevitably arises of how to cover the exit pipe. Temperature differences, exposure to the external environment and weather conditions - all affect the longevity of the chimney. An important part of the system is its decorativeness. Beautiful cladding will raise the level of aesthetic perception of the roof and give it a complete look.
Contents:
Selection of finishing materials
Initially, when choosing a material for finishing a chimney, you need to take into account its protective capabilities. Among the negative factors that reduce the service life of the chimney are the following:
- weather influence,
- temperature difference during the year,
- high operating temperature,
- ultraviolet radiation.

The main problem remains the difference between high operating and external atmospheric temperatures. Because of this, condensation forms in the chimney, which enters the structure and gradually destroys it. Good chimney insulation using facing materials can significantly reduce the formation of condensation. In addition, it is important to ensure that the facing materials match the roof roofing. The material used must have a high degree of weather resistance and wear resistance.
The chimney is finished using the following materials:
- decorative brick,
- tile,
- cement slabs,
- roofing material,
- ready-made solutions.
Finishing the chimney pipe with decorative bricks is the most practical option. Clinker bricks are especially good in this regard. It does not noticeably become dirty during use and goes well with any type of roofing. Clinker tiles are characterized by high mechanical strength and resistance to atmospheric influences and are more often used for lining tall thin pipes. For a powerful chimney structure, solid bricks are used, laid in a checkerboard pattern on a special adhesive composition.
Plaster is often used for decorative finishing. Due to its versatility and affordable cost, this finishing method is often used. The process of applying the material itself is similar to finishing facade walls, while choosing mineral or acrylic varieties will significantly increase the service life.
Cement boards are good because they are light in weight and have different texture variations, making it possible to recreate any surface with their help. At the same time, the material is environmentally friendly and non-flammable.
Corrugated sheeting is often used under the roofing material. It is a profiled metal sheet made from steel using the cold rolling method. Corrugated sheeting is interesting because in addition to its high protective properties and durability, it also has a low price and is quite decorative. Metal structures are lightweight and easy to install, while providing an attractive aesthetic appearance.

An original solution is to use ready-made structures. Most often these are rubber products that provide heat and waterproofing. A wide protective apron will protect the chimney from moisture and dirt getting into the roofing pie, but it is not a good design element. It is more suitable for external chimney pipes made of stainless steel.
What rules and regulations must be followed?
Before cladding, it is important to pay attention to the compliance of the finished structure with SNiP standards. Requirements for heating and ventilation include the following items:
- insulation of hot surfaces involves laying thermal insulation that can provide a temperature difference on the surface of the cladding and the inside of up to 20°C,
- pipelines and air ducts must be made of materials that have a protective anti-corrosion coating. Or from those that are themselves characterized by corrosion resistance,
- the free space between the pipes and the roof must be covered with non-combustible roofing materials,
- the use of asbestos materials is not allowed,
- if the stove is heated with coal, then in this case it is impossible to install chimney pipes made of stainless steel,
- the mouths of chimneys must not impede the free exit of smoke from the chimney,
- the thickness of chimney pipes made of clay brick should be less than 120 mm, and those made of heat-resistant concrete - 60 mm.
Stages of finishing a pipe on the roof
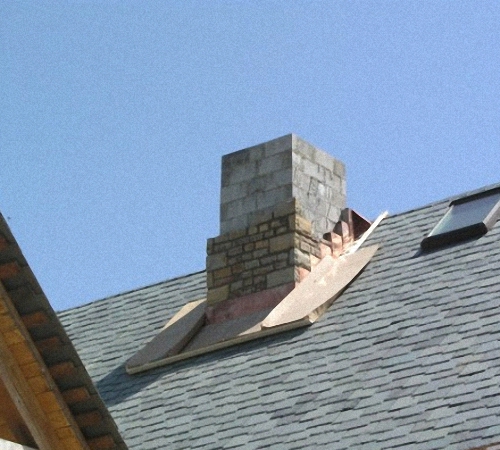
- The facing finish begins with the installation of a special protective apron at the point where the chimney pipe exits onto the roof. The apron is laid in two layers: one is placed under the roof, the second layer of the protective apron is laid on top of the covering. The junction points are carefully sealed.
- Additional pipe finishing is required in the following cases:
- insufficient draft in the chimney,
- ensuring decoration of chimney elements facing the roof,
- the lining of the chimney pipe was made of simple brick, which did not have the proper degree of aesthetics,
- the materials used for the chimney do not match the style of the house, standing out from the general appearance,
Pipe sealing
Finishing a chimney on the roof first begins with ensuring the proper degree of sealing of the pipe outlet. Relatively recently, codes required the construction of expanded brickwork at the exit point of the pipe. This was required in order to supply the roofing material in order to seal the joint. Ultimately, the design took on a rather bulky appearance and was unattractive from an aesthetic point of view. Modern materials make it possible to avoid such requirements and still provide effective sealing. Any roofing material must be wrapped onto the chimney pipe masonry. Next, a protective apron is installed around the pipe. The apron itself is often made of galvanized metal 2-4 mm thick, but requires a polymer coating for resistance to weathering. For aprons, non-flammable materials that can withstand high temperatures are always used.

The best option for ensuring high-quality sealing is a combination of a flexible sealing tape and a polymer-coated metal apron. The tape is made of aluminum foil with the addition of bitumen and polymer materials as a self-adhesive layer. It is laid under the apron, where the chimney exits onto the roof. After installing the apron, clear silicone sealant is applied to the seams to complete the seal.
Performing stitching
Finishing a brick chimney often requires additional lining. As a rule, it is required in the following cases:
- brickwork is made of simple bricks,
- with a high pipe height of more than two meters above the roof surface, weak draft is provided,
- aesthetic tastes.
In addition, if the air ducts have a light plastic base, then there is often no need for brickwork. In this case, the sheathing simply covers the frame through which such communications pass.

A profile of the same thickness and texture that is used for drywall is often used as a material for the frame. In this case, all connections are made using metal dowels.
Covering a chimney with sheet metal is one of the most practical methods. Labor and material costs are minimal, and installation is quite simple. If proper thermal insulation is provided, the surface of the skin will not be subject to strong heating, which will make it possible to cover it with rubber paint to provide additional protection from the effects of ultraviolet radiation and weather on the metal. Painting will also add additional aesthetics to the structure.
Pipe lining
Beautiful finishing of a brick chimney often involves lining the pipes with decorative stone of artificial or natural origin. In this case, it is necessary to line the pipe with high-quality decorative bricks and ensure the strength of the fasteners with reliable connecting materials. Otherwise, when exposed to temperatures, the lining may tear off the pipe. But it is worth remembering that high-quality decorative brick already has the proper degree of aesthetics. Often it does not need additional cladding, since it does not violate the integrity of the selected composition. If the cladding elements have significant weight, then in this case they will require additional strengthening. In addition to the adhesive composition, hardware or dowel fasteners are often used along the edges of the tiles.

Decorating a chimney inside the house: selection of materials
In a country house, a fireplace or stove is often built in the living room. The chimney often passes through the ceiling and often through all rooms. In this case, there is a need to harmoniously fit the protruding parts into the interior.
- First, a frame is constructed from a metal profile, which is then covered with sheets of plasterboard. Conventional material is not suitable for this, so you will need a fire-resistant plasterboard sheet, which is designated GKLO.
- Mineral or fiberglass wool is placed inside the frame to provide thermal insulation. Thanks to this material, the surface of the sheet is ready for finishing with any material, including even simple wallpapering on the sheet.
- Finishing the chimney inside the house does not require special expenses. For example, ceramic tiles or gypsum stucco will go well with many interior styles. It is advisable to make some elements in the form of a mosaic, especially its combinations of glass of different colors.
The most durable and durable material for finishing, both internal and external, is clinker brick. It is well suited for interiors designed in a minimalist style, and often does not require additional finishing.

Plaster is more often used for interior decoration to create a simple and antique look. This is the oldest method, which still retains many adherents.
The choice of decoration method depends more on taste preferences, since proper thermal insulation of the chimney will allow the exterior to be decorated with any material.
Advantages and disadvantages of cladding materials
The market offers a huge variety of different finishing materials. In order not to get confused in this assortment, it is important to know their distinctive types, as well as their qualities:
- Sidings are plastic panels for exterior decoration. They are installed on the chimney if high-quality thermal insulation has been provided. The material requires installation on a rigid base, is non-toxic and is not afraid of water. However, it melts when exposed to flame or high temperature and is characterized by low strength and frost resistance.
- Plaster is distinguished by its durability and resistance to atmospheric conditions, but at the same time it is quite labor-intensive to install and is characterized by high cost. Also, applying plaster often involves a subsequent layer of decorative style or painting.

- Clinker bricks are valued for their strength and durability. At the same time, its decorative properties are also at their best. Its disadvantages include its high price: from 1000 rubles per 1 m2, and its weight. Often the chimney design in this case will require additional reinforcement.
- Ceramic tiles are suitable exclusively for interior decoration. It is mounted on smooth and flat surfaces, and at the same time it is demanding in terms of preliminary preparatory work. The tile is characterized by its aesthetics and low price.
- Corrugated sheeting is one of the best materials for finishing roofs and chimneys. The material is lightweight, resistant to stress and weather influences. At the same time, manufacturers offer a wide range of colors. One of the disadvantages of corrugated sheeting is its poor sound insulation.
- Metal tiles are good for their ease of installation and durability. Finishing the chimney with a metal profile will ensure the aesthetics of the structure and its resistance to climate influences. Like corrugated sheeting, metal tiles are not capable of providing good sound insulation. In principle, this is not so important when finishing the chimney.
All private houses have an individual heating system. Even if it is a boiler and not a wood stove, it still requires the gas and smoke generated as a result of fuel combustion to be removed from the system.
When the heating boiler is located in the basement of the house, the instructions for its operation allow the chimney to be installed along the outer wall. And then it can be considered as an element of the facade, and its decor can be made in accordance with the exterior decoration of the house.
If the building has a stove or fireplace, the chimney passes through the space of the room in which they are located and the attic. In this case, the interior decoration of the attic roof is carried out taking into account the existing chimney.
The main problem with the design and finishing of the chimney is that hot smoke passes through it. Accordingly, its walls heat up.
So:
- The number one task is to perform insulation, which will guarantee structures and building materials from overheating and ignition. Moreover, the wood from which the structural elements of the roof are made: rafters, beams, sheathing is a highly flammable material.
- As, indeed, bitumen mastic, rolled roofing materials and many types of insulation. Only competent finishing of the roof with a chimney can guarantee the safety of its operation.

- Stainless steel or ceramic pipes are sometimes used to construct a chimney. The cylindrical shape of the pipe and its smooth surface avoid the formation of soot, but this is not the most convenient option for installing a roof - the hole formed in the roof is very difficult to fill.
- And when the diameter of the chimney pipe does not accurately cover the hole in the roof cutout, it is necessary to use reducing adapters and stove sealants. The construction of a chimney made of clay refractory bricks is a classic and most reliable option.
Moreover, the masonry and finishing of stoves and fireplaces is also made from this material.

- In the place where the pipe goes out onto the roof, a double protective apron must be installed around it. Its first layer is folded under the roof covering, and the outer layer, the so-called “collar”, covers the lower perimeter of the pipe on top of the roofing material.
- The apron is made of galvanized steel. Those who want to lay and finish the chimney with their own hands should watch a video on this topic.
No matter how much you read, visual information is always perceived better.
Ready-made elements are also sold on construction markets: both for pipe flashing and decorative parts. These also include caps that protect the chimney from snow, rainwater and dust getting into it.
External finishing of the chimney
The finishing of the part of the chimney located on the roof begins with its thermal insulation, regardless of what material it is made of.
So:
- If this is a pipe, then another pipe is put on it, but of a larger diameter. The difference in diameters should be such that the insulation fits between the pipes.
Various types of pipe insulation are sold in the form of detachable shells, which makes their installation very easy. - The price of thermal insulation material made from polystyrene foam or polystyrene foam is the lowest, but there are also more expensive options made from basalt wool, with a foil top layer.

- After insulation, the pipe can be decorated if desired. For example, use hollow chimney bricks for this purpose.
Or make a frame around the pipe and cover it with any roofing material. A pipe lined with brick will look like the photo below.

- For finishing a brick pipe, you can come up with many more options, starting with plastering. To do this, the chimney walls are properly cleaned of dust and solution particles, and then treated with any universal primer.
- Next, you need to install a reinforcing mesh with small cells. If you prefer a metal mesh, you will have to fasten it with long nails, driving them into the seams between the bricks.
It is more convenient to use a fiberglass option that is fixed with glue. - When the surface is reinforced, you can begin plastering. For this, heat-resistant plaster mixtures are used, and at least five layers must be applied, allowing each of them to dry.
For decoration, you can add marble chips to the finishing mixture.

- If you don’t want a structural surface, you can simply paint the plastered chimney with heat-resistant paint: alkyd or organosilicate. As an option, for decorative cladding of chimney walls, flexible acrylic tiles, stylized as masonry, are also perfect. By the way, inside the building, such a chimney decoration will look no worse.

- For all other types of finishing, you will have to make a frame from a metal profile. In this part, the finishing of the chimney is no different from the finishing of the facade or, for example, a balcony.
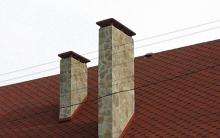
- There are even more possibilities here, because roofing materials can also be used for cladding. It is very beautiful when both the roof and the chimney are covered with the same material: tiles or corrugated sheets.
And here is a wonderful example of such work in the picture below.
As for the frame lining of the chimney, almost all types of panels used for finishing facades can be used here. Fiber cement boards that imitate brick or stone masonry are especially good in this regard.
With the same success, you can use natural stone or clinker tiles to line the chimney walls.
Chimney inside the house
As a rule, a fireplace is installed in the living room. And it is located on the first, or even basement floor.
If the house also has an attic (see Attic finishing options: making the right choice), then the chimney stretches through all these rooms. And it needs to be finished so that it fits harmoniously into the interior of each room.
And before you start finishing the chimney, you need to think about how it can be used in interior design. And there is something to think about.
For example: it can be used to create a niche made of plasterboard or designed as a column. Or you can combine both, as in the example below.

Just for this purpose, ordinary drywall is not suitable; you need to take a fire-resistant option (GKLO). It is necessary to lay fiberglass or basalt wool inside the aluminum frame, and then the surface of the drywall can be decorated with any material used for interior decoration: wallpaper (see Wallpaper decoration: choosing the right one), decorative paints, gypsum stucco.

If your stove is finished with beautiful ceramic tiles or stone (see Stone decoration of stoves and fireplaces: making a choice), it is better to decorate the part of the chimney adjacent to it with the same material. You can focus on this element of the interior by making a panel of pebbles, smalt, or glass mosaic on the walls of the chimney.
Or you can plaster and paint it manually or using a stencil. As you can see, with a little imagination, you can turn the chimney into an exquisite decoration of the room.
An integral part of modern houses is the roof chimney. At least three types of such structures go onto the roofs of residential buildings: smoke (heating equipment, stoves, fireplaces), ventilation (natural ventilation of premises - kitchen, bathrooms, basements, etc.) and ventilation of plumbing risers. When finishing pipes on the roof, it is necessary to seal the junction of the roof covering and the vertical surface, protect the channel and construction material from precipitation and, if necessary, insulate the chimney. The aesthetic design of these exits is also important. How to make a pipe on the roof, how to properly sheathe it and protect it - these are the first questions that people ask themselves when they are planning to arrange the roof of their house.
What is the best way to install a roof pipe? The optimal place for such a structure on the roof is the ridge as the highest point. Here there will be maximum traction, and waterproofing can be arranged much easier and more reliably. The farther the chimney is from the ridge, the higher it should be. The shape of the roof pipe should be considered from the point of view of its aerodynamic qualities. Caps installed on the head of the structure slightly reduce its draft. So they try to raise more than one chimney on the roof above the common cap. It is also worth understanding that any protruding parts of the pipe lining will interfere with the normal ventilation process. It is considered best to narrow the structure upward, while the cap should not be too low and large.
To ensure good traction, the pipe head should not be made with a large expansion. If it is necessary to install a single ventilation outlet above the roof, it would be most rational not to expose the brickwork to the roof, but to use a standard ventilation plastic or metal outlet, which is included in the package of most modern types of roofs.
Important! Conventional ventilation outlets on the market today are quite reliable, have good sealing and an attractive appearance. They provide the structure with protection from precipitation and can be adjusted in height. These products are excellent for single channels of most types of roofs.
Sealing brick pipes on the roof

When arranging the roof, bypassing the pipe on the roof must be done very carefully. The outlet of the vertical pipe to the roof must first be sealed. Taking into account new waterproofing technologies, the brick pipe of a house can be laid absolutely straight without ledges. Regardless of the type of roof, all films underneath or materials for waterproofing must be placed on the brickwork before installing the roof. Bituminous materials are not wrapped on chimneys; elastic, non-flammable tapes must be used here.
A protective apron is installed around the pipe. It can be made from galvanized metal coated with a polymer composition. If necessary, a flexible sealing tape is laid under the apron. These tapes can be purchased together with the roof covering or separately; their color palette is quite wide. They are made on the basis of aluminum foil, which has a self-adhesive layer of polymer-bitumen materials. The optimal material for the chimney apron is a combination of metal and sealed flexible tape. In the side and lower parts of the structure, the apron should be placed above the roof covering, and from above it should be placed under the covering. Regardless of the method of fastening, the connection between the apron and the masonry must be sealed. Clear silicone sealant works well for this.
Materials and methods of sewing pipes

How to bypass the pipe on the roof, what is the best way to frame it and how to securely fasten the materials in this case is a very serious question. The structure is sewn in the following cases:
- When the pipe height is high, there is no normal draft. In this situation, it is necessary to place a layer of insulation under the lining; usually basalt wool is used for chimneys because of its fire resistance.
- The masonry is made of low quality brick and there are fears that the material will collapse under the influence of weather conditions.
- If it is not possible to remove a brick pipe, only light plastic air ducts are removed. A strong frame is constructed, communications are passed through it, and everything on the outside is pre-sheathed with insulation.
- Aesthetic considerations.
To sew such structures, various materials and methods are used, which are worth considering in more detail:
- The most inexpensive and fairly neat material for lining today is galvanized metal coated with a polymer.
- Using a galvanized profile for gypsum boards is often very convenient; insulation fits perfectly into the spaces between the profiles.
- For any type of lining, you need to make a frame to secure the material and install insulation. You can assemble such a frame from a wooden beam, pre-treated with an antiseptic, or metal. The frame for chimneys is made only from a metal profile; the dowels must also be made of metal.
- Metal lining for a chimney is a fairly cheap and neat option.
- Sometimes pipes are covered with siding, but this is only suitable for ventilation.
- On a roof made of flexible tiles, it is appropriate to line the pipe with the same material. This solution is also not suitable for chimneys due to the flammability of the product.
Important! The connection to the metal tile pipe, carried out according to all standards, is very important. Bypassing the pipe with metal tiles should solve two main problems: prevent water from entering the home and properly remove water flowing down the roof.
Lining and caps on pipes

Artificial or natural stone is often used for lining pipes. But this is not always practical, because such cladding can easily come off from low-quality brick, while good quality brick looks quite acceptable anyway. In addition to the adhesive composition, the reinforced heavy cladding is fixed using hardware - secured with metal staples from the edges or dowels directly through the stone slabs.
The function of protection from precipitation and animals on the pipe heads is performed by special caps. This design impairs traction, so its dimensions should not be too large; the distance from the bottom of the cornice to the top of the pipe should not be less than 15 cm. The materials and shapes of the caps are very different. They also protect communications from birds by placing a protective grille or mesh in the openings.
Important! If the chimney is located next to ventilation ducts, it must be installed above the common hood.
Finishing of chimneys on the roof must be carried out in compliance with all relevant standards. Gases coming out of chimneys usually have an increased temperature if these are fireplace and stove pipes, chimneys of boilers operating on liquid or solid fuel. Some modern gas boilers, especially condensing boilers, have gases that are so cool that they can be considered absolutely safe from a fire point of view. But for any type of chimney, sufficient draft is mandatory. Often, currently used stainless steel chimneys with thermal insulation inside can be installed on the roof without brickwork by using a metal apron.
The correct choice of facing material for a pipe should take into account the roofing - metal roofing, like all other materials, has its own nuances. If you have never had to install pipes on the roof, line them or cover them before, then in this situation it is better to use the services of professionals to achieve the optimal construction result.
The article will discuss how and with what to insulate a chimney pipe. Several practical methods are presented.
Insulation of the chimney pipe is required to avoid leaks and overheating. Simply put, it allows you to increase the service life of the structure. Experts recommend performing complex work, which includes hydro and fire insulation.
Bath chimney
When insulating a chimney in a bathhouse, the safety of people should be a priority. The main threat indoors comes from open fire. Therefore, it must be protected by first making the ceiling resistant to high temperatures.
Basically, baths are built from wood, a flammable material. A very common misconception is the idea that covering the ceiling with metal sheets will be sufficient. But in reality, such protection is not enough. After all, the upholstery will still heat up, which can lead to fire. A popular solution to the problem is to insulate the chimney pipe with red brick. But this is not suitable for every bath design.

Now there are two good options for chimney insulation:
- Folgoizol. A bathhouse with such insulation will not lose heat; everything works like a thermos. At the same time, it warms up quite quickly, maintaining the temperature for a long time.
- Teploizol. The material is used for winding the chimney.
A popular solution is to use sandwich pipes, which demonstrate a high degree of safety. The insulation design consists of several sections that are easily combined with each other. This option is also suitable for saunas with a metal stove.

It is important to take a responsible approach to brickwork in the bathhouse. The service life of the building directly depends on its quality. You cannot save on materials or work. After all, the need for repairs in the future will be associated with much greater costs.
Metal chimney winding
“What should I use to wrap a metal chimney pipe in a bathhouse?” - a popular question among summer residents. After all, there are many materials used for this garden. The absence of flammable substances in the coating is a primary nuance that must be taken into account. It is preferable to use high-quality material that has all the necessary properties. It should also be completely safe to use.
The most common materials:
- Glass wool;
- Fibrous building materials;
- Mineral wool.
Insulation of a metal chimney
Insulation of chimney pipes of a metal chimney is a separate topic for discussion. After all, it contains a number of nuances, which will be discussed below. This is a very difficult task, so it is recommended to perform it during the construction of the bathhouse. It is more difficult to work with a finished building, because the roof may need to be reconstructed.
A good solution would be to use sandwich pipes. This design is easy to manufacture and will also reduce the cost of specialists. However, the material itself is not budget-friendly. But the service life and quality fully justify its cost. Sandwich pipes are additionally insulated with mineral wool.
How to insulate a chimney pipe is up to everyone to decide for themselves. It is important to remember that such insulation allows you to protect the chimney from the negative effects of combustion products, as well as moisture. If you do not take care of the insulation in time, there is a risk of destruction of the bathhouse. After all, condensate, enhanced by the action of acid, slowly destroys building materials. It poses the greatest threat in the spring, when the pipe begins to thaw (more details: " ").
Making boxes
How to insulate an iron chimney pipe was discussed earlier. Now you can move on to the next step. Many people think that making a chimney box is too difficult a task. In reality this is not the case. It is enough to approach the work responsibly and competently.
Required tools:
- Drill;
- Metal scissors;
- Compass;
- Metal sheets;
- Self-tapping screws.

Stages of work:
- Preparing the hole. Along the edges it is necessary to secure the bars, which will act as a support for the body.
- Two blanks are cut from a metal sheet. They are given a U-shape. Then the finished parts are screwed to the ceiling using self-tapping screws.
- Again, two blanks are made, but they are already secured to standing sheets with a small spade. This results in a seamless frame in the ceiling.
- Now the bottom for the box is made from a metal sheet. There should be a hole for the chimney in the center of the workpiece; a compass will be needed here.
- The box contains four two-centimeter fasteners. They are cut out and bent perpendicular to the bottom.
- Walls are attached to the bottom. Now the chimney is inserted into the box, it is additionally secured with clamps. The voids are filled with an insulating layer.
Chimney installation
Installing a chimney is not as simple a task as it might seem at first glance. There are many nuances that should be taken into account. If the chimney is installed insufficiently well, this can lead to damage to property, as well as creating discomfort for the people inside and harming their health.
Stages of work:
- The preparatory stage, where a work project is selected, materials are purchased, and the form of construction is determined. There are straight chimneys, as well as designs with various bends.
- Now you can begin assembling the chimney. Pipe connections, elbows and tees must be secured with clamps.
- Carrying a chimney through the roof using a special tool. To begin with, the level of the roof slope is determined, and based on the data obtained, a suitable location is selected. A hole is cut in it for the workpiece. Everything is insulated from above with a roof section, and from the inside - with a tire sheet. Read also: "".
- A special apron is attached to the pipe. The pipe is extended to the required size, its top is partially insulated with a special umbrella-shaped lid. It will prevent precipitation from entering the chimney.
Chimney fastening
The workpiece must be brought to the roof through the attic. All cracks, especially the voids between the roof and the pipe, are filled with waterproofing. When removing the workpiece, you must remember safety precautions.
An elbow is used to secure the chimney pipe. It is designed to regulate the vertical position of the structure. To give everything reliability, the pipe is additionally attached to the wall using suitable brackets. Usually they are included in a ready-made kit. They can also be made by hand; it is best to use metal corners as a base for them.

Once the insulating structure is in place and securely fixed, it is necessary to cover the chimney pipe with an umbrella. It is designed to protect the structure from precipitation, poplar fluff and fallen leaves. It is also necessary to think in advance about how to coat the chimney pipe in order to prevent leaks.
Replacing a brick pipe with a metal one
If a brick chimney is not enough, it can be further extended using a metal pipe. The task is labor-intensive, but completely achievable. It is important to approach it with full responsibility.
To begin with, a flat steel platform with a pipe is made. Moreover, its diameter should be the same as the diameter of the metal pipe that is planned to be used. The platform must be securely secured. It is fixed with dowels and screws. Sealing will add additional reliability.
Work order:
- On the brickwork you need to mark the points at which the fastening will be installed. They cannot be placed on a masonry seam. It is advisable to place them closer to the center of the brick, and not on its edge.
- Holes are drilled in the marked places to place dowels. At the same points, holes are made on the flat surface; the self-tapping screws will go there.
- Fireproof sealant is applied to the brick base, then a steel platform is placed there. Self-tapping screws are screwed into dowels. It is important to ensure tight fit and uniformity.
- Now all that remains is to wait for the sealant to dry completely and proceed directly to extending the chimney using a metal pipe.

Important installation details:
- If the length of the pipe section above the roof exceeds 1.5 m, it is recommended to equip it with special guy wires that strengthen the structure (read also: " ").
- You cannot install a pipe whose length from the stove to the tip is more than 5 m.
- Installing special plugs allows you to get rid of condensation.
- The section of the chimney above the roof must be longer than 1.5 m.
- You cannot narrow the pipe when installing the chimney.
- Nearby structures made of flammable materials should not reach a temperature of 50 o C.
- The chimney must not be placed near electrical wiring.
The decision on how to insulate a metal chimney pipe should be made based on the budget, as well as the needs of the structure. It is important to approach the task as responsibly as possible, performing work in full compliance with all standards and nuances. Then the chimney insulation will last a long time without complaints.
Finishing the chimney is not so much a desire for a good appearance of your roof as it is the need to fully protect the entire structure from the not-so-friendly influences of the environment. Wind, precipitation, birds, in the end, can cause disruption of the normal operation of the furnace.
But, on the other hand, the roof and the chimney above it are a kind of presentation of your home to the whole world. Hence the desire for design when finishing a chimney. This is the harmony between “should” and “want”.
Harmony of functionality and design

Chimney finishing can be divided into three independent stages:
- finishing inside - up to the exit to the attic;
- finishing inside - within the passage to the roof exit, and,
- Exterior finishing is already on the roof.
The most important stage is the last.
This is where we talk about the influence of external factors on finishing, and this is:
- constant exposure to the external environment;
- high temperature inside the chimney;
- significant temperature changes over fairly short periods of time.
Stages of work at the top
When finishing the top, we focus all the work on three interconnected elements of the chimney:
- base - the area where the pipe directly meets the roof plane; here the main goal is to ensure complete tightness of the joint and the inadmissibility of moisture and debris from penetrating inside;
- the body of the pipe itself goes up - here the main emphasis is on heat conservation, reliability, and good appearance;
- roof exit - remembering that “the end is the end of the matter”, we do not forget about the aesthetic side of the issue, but still the main thing here is to protect the chimney opening from rainwater and debris from the outside and at the same time not harm the draft.
Materials
If we talk about materials, we have in mind one very significant point that allows us to turn all the work into just an easy excursion to the roof, but under one condition:
- you carefully calculated the parameters of your furnace and upstairs pipes in advance;
- you have researched the building materials market specifically in the chimney finishing sector;

- and found that, it turns out, there are already excellent ready-made structures - metal (photos “B”, “D” and “E”), polymer (photo “A”), which solve the problem in a complex and provide the formation and protection of all three structural chimney element from the outside;
- So all you have to do, keeping the future in mind, is simply to calculate the dimensions of your chimney in accordance with the dimensions of the proposed structures;
- and this will be the best and ideal option for lining the chimney, and, looking at the examples, let’s say more directly and more definitely - a fabulous option for performing this important work;

- The finished structure comes with installation instructions and all fasteners, which allows you to focus on covering the roof itself, and not the chimney;
- The only problem is one thing - the correct calculation of the dimensions.
If your destiny is to finish each of the three components separately, then here at your disposal:
- traditional plaster, but with the characteristic of resistance to elevated temperatures, and, very importantly, its constant and sudden shocks;
- stone– very commonly used material;
- brick- and this one has long “settled” on chimneys;
- ceramics, famous for its resistance to any external influence.
Rules and regulations
All work on the chimney is regulated by the “Building Norms and Rules” (SNiP).
We note the main provisions of these rules under number 41-01-2003 (“Heating, ventilation and air conditioning”), which relate to the finishing of chimneys:
- all hot surfaces must be insulated, and the ignition temperature of the insulation used must be no less than 20 degrees higher than the expected temperature of the point of contact with the surface;
- all materials used must have anti-corrosion properties;
- if the pipe is made of brick, its thickness should be 120 mm or more;

- if concrete was used to make the pipe, then the thickness should be from 60 mm;
- standards allow the use of prefabricated asbestos cement or stainless steel, however, if the stove is not heated with coal;
- protection of pipe outlets is mandatory, in the form of all kinds of umbrellas and deflectors, but it is unacceptable that this protection even in the slightest degree prevents smoke from escaping from the pipe and thus reducing its draft;
- the gap between the pipe body and combustible elements of the roof must be at least 130 mm;

- if the pipe is ceramic and does not use insulation, then this distance increases to 250 mm;
- Insulation of the space between pipes and non-combustible roofing materials still requires non-combustible materials.
Work progress
To begin with, we present a general outline of future work.
Scheme
All work will consist of the design of four elements:
- A – chimney, as the “culprit” of all works;
- B – flexible tape applied to the tile and repeating its profile;

- C – metal profile;
- D – elastic band hidden under the tiles.
Helpful advice!
You need to understand that there are a huge number of ways to line the joint between a chimney and a roof.
They all pursue one goal - reliable sealing of the joint.
But the ways to achieve this goal may differ significantly. Therefore, we advise you to very carefully “play out” the entire algorithm of work before starting work.
Let's act
The work will consist of sequentially performing the following steps:
- First, we cover the entire pipe very carefully and around the entire perimeter with roofing material;
- then, along the entire perimeter of the pipe to fix the insulator, we complete the installation of the sheathing, as a continuation of the sheathing of the entire roof, then the tiles will lie on it;
- we lay tiles on the sheathing - the finishing of the chimney will go on top;

- Next, we measure all the facing material and prepare it for installation;
- then, starting from the bottom, fix it on the surface of the pipe;
- As a finishing touch, we carefully treat all joints with sealant.

Disadvantages with examples
Now for a bit of a good critical look at the options available.
In other words, we learn to look, analyze and draw conclusions:
- photo “C” - here, it seems, the size of the cladding plane extending onto the roof is too small, which will inevitably lead to moisture getting inside; (See also article.)

- photo “B” - here everything could have been done, in principle, more carefully and without pulling the metal of the chimney lining upward;
- Photo “A” - here the joint surface is also too small, but most importantly, the pipe outlet is unacceptably closed, problems with traction are possible.
Helpful advice!
If your chimney is made in the form of a round pipe, then we advise you to pay attention to the so-called master flush casings.
Working with them is perfectly illustrated in the attached drawing: prepare for work, insert the pipe, level it, fix it on the roof plane with sealant and additionally do not forget about the screws.
Often this innovative approach can be a lifesaver.

Indoor cladding
When we talk about the lining of the chimney below, we coordinate it with the general lining of the stove - the same material and the same requirements:
- brick, stone, plaster;

- extreme resistance to high temperatures;
- but at the same time high design qualities.

conclusions
If you have chosen the option of arranging each component of the chimney separately, then first insulate the pipe, then move to the junction with the roof, then close the exit, and finally put the design of the pipe itself in order. The additional video in this article will remind you of this sequence again.


 Comparative characteristics of Good Warmth heaters")


How to make resin glue
Tree house for children
Master class: do-it-yourself soft headboard for a bed How to attach decorative pillows to the wall
Extension of a veranda to the house Do-it-yourself summer veranda to the house
How to get rid of aphids on indoor plants at home