A hand-held circular saw is a powerful mechanism with significant productivity. One of the key advantages of a circular saw is excellent maneuverability. But there are also disadvantages, especially if large sizes of wood need to be cut. To make the process easier, you can simply make a table for the circular saw yourself.
Design requirements
Experienced craftsmen are ready to create a table for a circular table with their own hands without any techniques or drawings. However, certain conditions still need to be taken into account.
The essential requirements include:

The availability of different functions depends on the working conditions and wishes of the specialist. These include the ability to carry out high-quality longitudinal and transverse cuts.
Standard products, of which there are hundreds in shopping centers, are made of stainless steel. This is wonderful material , but further we consider the production of a table for a saw from wood.
 Table design for a manual circular saw is so elementary that most specialists produce it without preparatory drawings and techniques. This is a dense workbench that is created from wood and plywood.
The most durable table bases are made from alloy. They are the heaviest and require the presence of welding skills. Therefore, stands are often made from leftover lumber. A circular saw is attached under the tabletop, and the drive protrudes above it through a specially made slot. The lumber is advanced along the table top and sawn with a disk. For convenience and correct operation, the table is equipped with additional devices: an angular and longitudinal stop.
The tabletop “absorbs” part of the working plane of the disk; the depth of cut will decrease by the thickness of the tabletop. For this reason, it is preferable to choose a circular with the largest disc diameter, and the table cover is thin but rigid.
If you have not purchased an electric saw yet, choose modifications with high power (from 1200 W). They can handle cutting large-sized wood. Holes will be drilled to secure the base. The solid base may burst. For this reason, it is advisable to select a mechanism of a different type.
Material selection
To make a circular table with your own hands, you need to remember carpentry skills, have a lot of patience and a small number of materials and devices.
Materials:

Devices:
- jigsaw;
- screwdriver;
- drill;
- ruler.
The volume of the countertop will depend on the workshop area. At the same time, it will be uncomfortable to saw large pieces on a small table. If the part is completely fits on the working plane, the cut is made smoother and more accurately. The height of the legs is chosen depending on the height of the master.

Working with a circular saw is very dangerous, for this reason you need to worry about protecting your fingers. Cut a pusher from a piece of wood or furniture board.
Additions to the completed design
 Some craftsmen, when assembling a table for a hand-held circular saw according to unique drawings, completely remove the factory safety cover and replace the factory platform with a homemade one. If cutting at an angle is not planned, you can remove all devices for adjusting the tilt of the disk. The electric saw is fixed directly to the new base, which makes it possible to gain a couple of millimeters of cutting depth.
Without inner casing it is easier to remove the disc; the electric saw will not become clogged with shavings when working with wet boards. Dismantling will require extra time, but the service life of the motor is preserved and overload is prevented.
Mounting a circular saw
The matter remains small. The circular electric saw is located inside the prepared hole. The sole is secured with bolts, and the gear drive must fit freely into the socket.
The table for the circular saw is almost ready. Now it needs to be treated with a moisture-protecting material, then coated with varnish in several layers (to minimize slipping).
The resulting system can be supplemented with anything at the user’s discretion (safety cover, device for adjusting the tilt of the disk, carriage, etc.).
A few words about electronics
 A circular saw is electrical special equipment that operates from a 220 V power source. If the user has sufficient knowledge and skill in the field of electronics, he is able to bypass the start and pause keys of the saw, and then move them to a convenient place (usually the outside 1st of the stiffeners).
If the model seems complicated, you need to tighten the start button with a wire, and turn on the special equipment using a power cord. However, this method is bad because it eliminates the possibility of quickly turning off the device in the event of an emergency.
Safety requirements
- One of the most common causes of injuries when using a circular saw is considered to be a cluttered workplace. In addition, it is important to monitor the stability and strength of absolutely all components of the system, and if there is imbalance, take measures to eliminate difficulties.
- Before connecting the saw, you must make sure that it is well secured. If necessary, tighten the screws/bolts.
- It is strictly forbidden to hold the material close to the cutting site! This is dangerous as knots and chips bounce into the eyes or onto open parts of the body. Be sure to wear glasses before work and clothes with sleeves.
Making your own saw table is not as difficult a task as it might seem. If you have good material at hand, its characteristics are chosen correctly, and the power of the device ranges from 500 to 1000 W, the above instructions will be the basis of the work.
You should not lose sight of the fact that at any stage of table production you should control the accuracy of your own operations. Otherwise, if deviations in size or deformation of the legs appear when the ribs are tightened, it will be very difficult to restore stability. Nevertheless, making a table for a circular table with your own hands is an absolutely realistic task that will take several hours.
Additional Important Information
Carpentry work requires special attention. If you want to make a high-quality and highly reliable table for a circular saw with your own hands, then be well prepared for the work.
Do the following:

Using this article as inspiration, you can make a durable table saw stand for your circular saw.
A circular saw is specialized equipment that is used for cutting wood, laminate, some types of wall panels, sheet materials such as plywood, OSB, chipboard. When carrying out a number of construction and repair work and carpentry operations, the presence of a stationary sawing installation can significantly reduce time costs and improve the quality of the result. If it is not possible to purchase a factory-made model, then you can assemble a circular saw with your own hands. To make it yourself, you will need the most common metalworking tools and the skill to work with them. The more necessary materials and parts are available, the cheaper the project will cost.
A stationary circular saw is designed to perform fairly large volumes of work. The design of the implemented option in two forms is presented in the diagram below. It also indicates main installation dimensions, which are recommended to be used as a starting point for self-assembly.
In the drawing, the numbers correspond to the following structural elements of homemade equipment:
- 1 – frame (bed);
- 2 – side panel;
- 3 – starting device;
- 4 – mechanism for adjusting the height of the table, 13 – its stops;
- 5, 6 and 7 – two halves of the sawing table with a base;
- 8 – electric motor;
- 9 – platform for installing the motor;
- 10 – studs (M10);
- 11 – saw;
- 12 – shaft;
- 14 and 16 – driven and driven pulleys, respectively;
- 15 – belt;
- 17 – switch.
Advice! To improve personal safety when operating a homemade mechanism, its rotating parts located under the table should be covered with lids. A protective cover must be installed over the disk during equipment downtime.
It is better to place the starting device in a visible place on the panel (made of dielectric material) so that access to it is free. It is also recommended to equip the machine emergency switch. It is convenient when it is large in size.

Focusing on your own needs, you can improve the unit by making it with a jointer or planer. To do this, it is enough to secure a drum with knives on the existing shaft, and make a slot of the appropriate size in the table for it. This will allow you to expand the functionality of the created installation: plan lumber on it, chamfer and select a quarter from wooden blanks.
If you plan to regularly perform carpentry operations using homemade equipment, it is recommended to equip it with coordinate table with several guides. They need to be fixed at different angles. To organize productive work, it should also be possible to regulate the speed of the electric motor and quickly replace disks if necessary.
Selection of materials and parts
When creating a homemade circular saw, it is necessary to maintain an optimal balance between its functionality, safety during operation and manufacturing costs. To achieve this, you should select materials and parts with the desired characteristics. To reduce costs, you need to start from old or unused equipment that is available.
Materials for making a bed with a table
To make a bed (frame) you can use channel or metal corners(sizes from 25×25 mm to 50×50 mm are sufficient). If these materials are not available, then the most economical option is to purchase them at a scrap metal collection point. The legs of the machine will use water pipes or profile metal pipes.
Advice! Frame elements must be connected to each other using electric welding, because bolted connections unwind under the influence of vibrations.
When assembling the frame, it is also necessary to weld spacers at the corners to impart rigidity to the structure. To make it easier to move the machine, you can equip it with durable wheels (with a metal rim) equipped with locks. It should be borne in mind that the more massive the unit being created, the more stable it must be in order to avoid injury.

Metal pipe frame
The main requirements for a table for a circular saw: resistance to mechanical influences (vibration, shock), the ability to withstand workpieces weighing more than 50 kg without deflection, and surface smoothness. These properties characterize sheets of the following materials:
- become;
- duralumin;
- silumin;
- PCB;
- moisture-resistant plywood;
- organic glass.
If you use moisture resistant plywood, then it should first be covered with zinc-coated sheet metal. The use of chipboard or OSB is not recommended due to the instability of these sheet materials to vibration influences.
Important! The strength of the table is of great practical importance. If it cracks or becomes distorted due to deflection, the disk may jam. This can lead not only to damage to the workpiece, but also to injury.
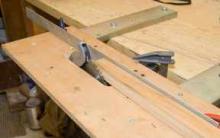
To carry out various work (for example, cutting logs into boards), you need to equip a table side stop. It performs the same function as a guide bar for a hand-held circular saw: it ensures even sawing of lumber. Moreover, its use makes it possible to obtain workpieces of different sizes.

Guide stop must be strictly parallel to the disk to avoid jamming of the latter. It can be made from a wooden block or a metal corner. In the first case, only hardwood should be used. To be able to adjust the working gap, the stop must be removable. It can be fixed using clamps or in special grooves (bolts) made parallel to each other on the working surface of the tabletop.
Selection of engine and starting equipment
The easiest way to use a drive for the considered version of a homemade circular machine is single phase electric motor. Its power must be selected taking into account the upcoming load. Indirectly, you can navigate by the diameter of the installed disk:
- if it is 350 mm, then for normal operation of the unit you need an electric motor with a power of 1000 W;
- for a disk with a diameter of 170 mm, a 500 W motor is sufficient.
In the latter case, you can make a drive mechanism from an engine from an automatic washing machine. It is able to work for a long time at an average load level. For disks with a diameter of 350 mm, an electric motor from an industrial ventilation unit is suitable. It should be secured firmly to ensure proper engagement of the belt drive. For this reason, it will not be possible to reduce the level of vibration by installing the motor on shock absorbers: it will constantly oscillate.

You can also equip homemade equipment three-phase electric motor(at 380 V) of suitable power. To start it from a 220 V network, you will need to additionally install working (phase-shifting) and starting capacitors into the electrical circuit. It should also be taken into account that the engine power will be less than the nominal value indicated on its plate or in the passport.

Starting equipment should be selected based on the power of the motor, on which the maximum current in the circuit will depend. A good option is to use a start button in conjunction with thermal protection - this will protect the electric motor from burning out the windings if the current increases when the disk jams. It is better to install the protection in a separate electrical panel attached to the side panel of the machine on the convenient side.
All connections must be well insulated so that the wires do not short-circuit to the frame of a homemade circular electric saw. The on and off buttons should be pressed without any effort. Due to the frequent storage of equipment outdoors, the electrical part must be well protect from getting wet. The simplest thing is to cover the installation with oilcloth or similar waterproof material.
Gear, shaft and disc
To transfer rotation from the electric motor to the disk, the best option is to use V-belt together with pulleys from the car engine. The use of gears is not recommended for safety reasons. This is due to the fact that if the disk jams, the belt will simply slip, and the gear drive, due to its rigidity, can cause failure of the entire drive unit.
Advice! If you use pulleys of different diameters, you can change the speed of the disk and install different types on the machine. This is true if there is no motor speed controller.
Shaft manufacturing It is better to entrust it to a specialist by ordering it from a professional turner. Moreover, when you plan to make a circular electric saw more functional by equipping it, for example, with a plane. But the simplest option is to buy a ready-made factory-produced part. A sample of it is shown in the photo below.

Disc for circular saw It’s easier to buy ready-made than to make it from a sheet of tool steel. The problem is one of balancing. An imbalance of the saw during operation of the equipment leads to its rapid failure and reduces the level of safety of the work process. If you have a circular saw for wood, you can remove the saw blade from it.

It is necessary that the diameter of the disk corresponds to the corresponding parameter of the sawn timber: for example, for 100 mm logs you will need to use a saw measuring approximately 350 mm. This is due to the fact that the disk should not protrude more than a third of its diameter above the working surface of the table.
Ignoring this requirement not only leads to a deterioration in the quality of sawing workpieces, but also increases the possibility of injury.
Algorithm for assembling a homemade circular saw
The assembly of a woodworking machine according to the drawing given earlier is carried out in the following sequence:
- a rectangular frame is made from the corners;
- four legs are welded to it at the corners of the required height;
- at a height of about 200 mm from their lower edge, they make a binding from the corners;
- a shaft is mounted on the upper frame;
- fix the driven pulley on one side and the disk on the other;
- a table with a lifting mechanism is made and attached to the frame;
- on the lower frame they make a platform from corners or sheet metal for the electric motor;
- the drive pulley is fixed on the motor shaft;
- put the belt on the pulleys;
- On and off buttons and an electrical panel are mounted on the side panel of the unit;
- using wires of a suitable cross-section, connect the elements of the electrical circuit of the equipment (motor, buttons, protection);
- supply power to the machine from a stationary network.
The final stage is checking the functionality of the assembled equipment. First, you should make sure that all moving parts rotate freely: to do this, simply twist the drive pulley by hand. After which you can start the unit in test mode. If strong vibration is detected, you will need to check the reliability of the bolted connections and fixation of the disk.
You can make a circular saw with a table consisting of two halves or a solid one. In the latter case, you will need to cut a rectangular slot in it for the disk. The design of the machine with a table consisting of two halves is shown in the video below. This video also demonstrates the design of the lifting mechanism for these parts.
Important! To prevent the possibility of the saw jamming due to the connection of fragments of the workpiece being cut, it is recommended to install a riving knife. It should be located at a distance of approximately 3 mm behind the disc.
To regulate belt tension, the electric motor must be installed so that it can be moved. The easiest way to achieve this is by creating larger slots than required for the motor mounting bolts. In this case, the expansion of the holes should be carried out in the direction of belt tension.
If you completely follow the drawing, you will need to make a more complex belt tensioning mechanism. The process will be carried out by pulling up the platform with the electric motor using studs and fixing it with locking bolts in the desired position (in the drawing these structural elements are indicated by the number 10).
The entire design and assembly process can be greatly simplified if circular saw blade. In this case, there is no need to install a number of parts (motor, disk, shaft, belt, starter). But the capabilities of the created model will be limited by the power of the tool used.

Homemade circular anyway must be grounded. It is also additionally recommended to install a residual current device or differential circuit breaker in the panel. These measures will protect against electric shock if the machine body is energized, for example, due to breakdown of wire insulation. It is better to select components for the electrical part of a circular saw so that they are suitable for repair and easy to maintain. Free access to equipment components will help you easily replace failed parts.
A circular saw is an important and necessary tool for many people, allowing them to independently do numerous types of work around the house. It is quite expensive, so many people are thinking about making it on their own. To do this, you need to prepare a workbench or table of the optimal size to replace this tool, and you also need to have the ability to work with metal. During the process, you should be careful and careful so as not to harm yourself, and also to get the perfect result of the work.
Do-it-yourself circular is made using the following components:
- rectangular profile pipe;
- corners formed from steel;
- engine.

How to make a hand saw from a grinder?
A homemade circular saw made from a circular saw with your own hands is considered quite popular. A grinder is most often used for this work. To do this, only some changes are made to the finished tool, which is equipped with a special sliding stop, and an axial handle is also installed.

All work on independently creating a circular saw from a grinder consists of the following steps:
- A sliding stop is created on the tool, represented by two small corners made of metal. They are installed on both sides of the main working body of the tool, represented by a disk with different teeth, used instead of a standard abrasive wheel. In this case, a gap of 4 mm is left on each side.
- To prevent the installed corners from clinging to the part being processed when using the finished saw, they must be slightly rounded from below. In front and behind they are connected by special transverse links, for which standard fasteners are used - bolts and nuts.
- A special clamp made of a tape formed from metal is attached to the grinder itself. In this case, its screw tie should be at the bottom of the tool. A strip of tin, previously folded in half, is fixed to this clamp, and it can be replaced with galvanized steel. This element must have a special hole designed to fix the rear bolt of the sliding stop.
- Identical gaps are created between the stop of the future circular saw and its working body.
- In the gear housing, which is an important element of the angle grinder, 2 to 4 threaded holes are created. They are designed to use small bolts. For this work, the gearbox is initially disassembled in order to determine exactly where holes can be created in its body with a drill. It is with their help that the axial handle is fixed, which can be purchased ready-made or made on your own.
- If you plan to make the axial handle yourself, then a metal tube is used for this, and a metal rod with an unusual curved shape can also be used. In the created handle, as well as in the gearbox housing, holes for fastening are formed, after which the fixation itself is realized.
- Next, an adjustment rod is created, for which a small section of a steel rod is usually used, and its thickness is usually 5 mm. One end of this segment is bent, resulting in a loop. A hole is created for the front stop bolt. Washers are selected on the front part of the stop, which will allow you to obtain a uniform and optimal gap width. On the other side of the rod, a thread is formed that fits into a hole on the saw handle. To do this, a nut is screwed onto this hole in advance, and as soon as the assembly is completed, the second nut is also screwed on. With the help of these nuts, which are easily tightened or loosened, the optimal and desired cutting depth is ensured.

Thus, the process of creating a manual circular plate is considered quite simple. There is no need to use expensive tools and materials, and all work can be easily done on your own.

How to make a tabletop circulation cooker?
You can even make a table for a circular table with your own hands with drawings that are formed in advance and are also high-quality and correct. With their help, you can obtain a design that is of high quality, safe to use and efficient.

A full-fledged circular saw, formed on your own, is represented by a serious, complex and unusual design, which is created only with preliminary consideration of all its elements, study of drawings and preparation of materials and tools.
It is important to decide whether the circular saw will be stationary or tabletop, and the choice depends on how often the tool will be used, as well as the scale of work expected to be carried out with its help.

Construction of a standard circular saw


“Real” stationary circular saw

A do-it-yourself circular table, the drawings of which are freely available, can be created easily and quickly if you know its design well. If all components are separately formed and prepared, the result is that they simply fit together securely and tightly, ensuring an optimal design.
The main elements of this equipment include:
- Table. It is usually covered with a sheet made of galvanized steel or tin. It is not allowed to use plastic or wood for these purposes, since these materials will not be able to withstand the significant impact of other materials and will therefore wear through, resulting in deformations, bends and holes.
- Cross connections. They are created for a table, and usually for these purposes a steel corner is used, the thickness of which is approximately 7 cm. These connections are equipped with a shelf attached from the outside in a horizontal position. In this case, the ease of forming the side limiter is ensured.
- Working body of a circular saw. It is represented by a toothed disk that protrudes beyond the table, as this ensures a good sawing process for various elements.
- The motor of the equipment must be powerful enough. Its choice depends on the diameter of the saw. If you plan to work with lumber whose thickness exceeds 15 cm, then a very powerful motor is selected, so the process of creating a circular saw will be quite complicated, since it is difficult to find this element in the public domain.
- Side support. It is made adjustable, and to create it, an even piece of steel angle is used, the thickness of which is approximately 7 cm. This stop should be approximately 35 cm longer than the length of the table. One vertical shelf on each side is cut off, so it is equal to the length of the table . The tails, which are flat, curve downwards. Holes for threading are formed in their lower shelves. The stop is attached to the table with bolts, and it is aligned exactly according to the template.
- Shaft. It is an important piece of equipment, and it is advisable to purchase it ready-made so that it has high quality and reliability. Usually the finished element has a special seat intended for the future saw blade.
- Bearings. They may be different, but the best choice is considered to be self-aligning elements that are ball-shaped. They are equipped with a double row of special balls. The inside of the holder is curvilinear in cross-section. If you use cheap and low-quality bearings in a homemade circular saw, they will not last too long. The journals are equipped with covers that prevent sawdust from getting into the bearings.
- Saw transfer. Usually a V-belt design is chosen, since if you choose a gear design, it is considered quite dangerous for amateur use. This is due to the fact that if lumber is used that has previously been used for other purposes, then it may contain a nail or other fastening element, which, if it gets on the transmission, can cause the engine disk to simply fly apart.
- Gear ratio. It is selected depending on the engine parameters, namely its speed and the disk rotation speed.
- Engine. It is best to choose an asynchronous motor, which is single-phase. Typically, standard washing machines are equipped with such elements. They are ideal for a homemade circular saw. It is not advisable to use commutator motors, which are usually installed in various electrical appliances, since they produce extremely high speeds and also cannot operate for too long, which is considered important for a circular machine.
- A three-phase motor is often used, but it is supplemented by a starting and running capacitor, which are equipped with fittings. They have a significant cost, and they must be either oil-paper or just paper.
- An engine starting circuit that can be used for a triangle or a star, and it should not require additional modification.
Thus, the process of creating a circular saw on your own is considered quite complex, but if you know what basic elements the equipment consists of, and also choose high-quality elements that connect reliably and safely with each other, then the work will be done correctly on your own.
If you read this article on the blog, be careful when experimenting and working with sharp instruments. Write reviews and share tips on working with saws and circular saws that you have made yourself.
Many summer residents and owners of private houses were faced with the need to process and saw boards, plywood and other lumber. For such work you will need a circular saw, which will not be difficult to do using available tools. Such homemade equipment will not be inferior to purchased equipment in functionality and quality of execution, allowing you to save several tens of thousands of rubles on the purchase of ready-made units.
Description of equipment
DIY circular saws can be stationary or portable. The design of the simplest circular saw will include a metal or wooden supporting frame, inside of which are mounted an electric motor, an electricity supply control unit, a table top and the working saw itself, which is mounted on the circular saw shaft or installed through gears and a trunnion mechanism. The saw is located in a slot in the tabletop, which makes it easy to cut lumber, performing high-quality wood processing.
The table top can be made from lumber or you can use ready-made metal blanks for this. Smooth easel tables are made from wood, The top of such a tabletop will need to be covered with a durable metal sheet. Otherwise, without metal protection, the wood will begin to wear out quickly, and the equipment will last several years during active use, after which complex and expensive repairs will be required.

First of all, you need to decide on the main tasks of the sawing machine. If you need to cut boards or firewood for the winter, then a simple installation of a sturdy table with a slot for a disk will be sufficient.
Some models imply the presence of an additional shaft to which knives, a jointer and a plane are attached. Such universal machines are equipped with powerful electric motors, which allows you to perform a wide range of wood processing work. When manufacturing a multifunctional machine, it is necessary to be guided by high-quality diagrams and drawings that will allow you to create universal and reliable equipment.
If you need to perform various types of carpentry work, then set up a coordinate table with guides. The existing stops and guides can be fixed at different angles, which allows not only to ensure safe operation of the machine, but also to perform high-quality wood processing, easily changing blades to saws of different diameters.
Advantages of homemade equipment
Homemade circulars are very popular due to their ease of manufacture, durability and reliability. Today, many summer residents use homemade units rather than buying expensive equipment in specialized stores.
The main advantages of this technique include the following:
- The versatility of the tool.
- Ease of manufacture.
- Possibility of significant savings.
- Reliability and durability of equipment.

The designs of stationary and mobile circular saws available on the Internet and in thematic printed publications make it possible to produce equipment for processing both thin workpieces and thick lumber. You can choose the simplest options that do an excellent job of processing lining, thin slats and plywood.
Characteristics and power
The functionality of using the equipment will depend on the correct choice of parameters, including speed indicators and drive power. The power rating is affected by the maximum permissible diameter of the toothed saw. It is believed that to process lumber with a thickness of about 10 millimeters, an electric motor with a power of 1 kW will be required. Based on the thickness of the processed and sawn timber, you should select the power of the electric motor.

Transmission from the drive in a self-made circular machine is best done using a V-belt. This allows you to ensure the necessary safety of using the equipment. When foreign objects get under the saw, the V-belt drive will slip on the pulleys, which eliminates injuries and jamming of the working disk.
Making a circular saw
Before proceeding directly to the manufacture of a circular machine, it is necessary to think through its structure and design, and ideally, select a drawing diagram according to which all work will be carried out in the future. When planning the manufacture of the frame, it is necessary to remember that such a design must be stable and reliable. For industrial powerful saws, the base is made of reinforced welded metal structure. For household models, you can use wooden blocks with plywood for the frame or weld a base from a metal corner.
The choice of electric motor used will depend on what kind of work and what kind of wood is planned to be processed on the machine. The drive can operate from a single-phase electrical network, or powerful industrial motors are used that operate from a three-phase electrical network.

You can make a powerful and easy-to-use circular saw from a washing machine motor. This won't be too difficult. Such motors are compact in size, operate on a single-phase network with a voltage of 220 volts, are reliable and are capable of operating at high speeds.
One of the most important components of a power saw is the shaft on which the working saw is mounted. You can use a ready-made shaft from similar equipment or make it using a milling cutter from round timber. Turn the shaft on a lathe, checking for perfectly accurate centering. Even minimal shaft runout is not allowed, since in the future it will be impossible and unsafe to work on such an incorrectly centered circular machine. Seats for pulleys and a circular saw should be made on the shaft.

The saw blade should rise above the surface of the worktop by a maximum of one third of its diameter. Otherwise, with a higher saw height, it will be difficult to process wood, and working on such a machine will simply become dangerous. If it is necessary to work with timber, the diameter of the saw blade will be approximately 350 millimeters. To process boards, you should choose small discs with a diameter of 250-300 millimeters. The quality of the saw blades used must be given due attention, since in the future the mini-circular saw will bear a significant load, low-quality blades will quickly become dull and require replacement.
Materials and tools
Making a circular saw with your own hands is not particularly difficult. For this work you will need the following materials and tools:

In each case, the design of the circular machine will be different, so it is necessary to select certain components, which will allow us to produce functional and reliable equipment. When using lumber to make a base and desktop, the wood will need to be coated with impregnations that protect the material from rotting and moisture.
Step by step assembly
You can make a stationary circular saw with your own hands from a grinder and a hand cutter without making any changes to the design of the working tool. The base is made of lumber, which significantly simplifies production, eliminating the need to use complex welding equipment. Step-by-step instruction:

This option for making a circular saw will be an excellent choice if you need a tool for cutting boards up to 3 centimeters thick. If you need to make a powerful and multifunctional device for your home, then use electric motors with a power of 5 kW or more, which allow you to process and saw boards 5-8 centimeters thick.
Making a homemade circular saw is not particularly difficult. You can use grinders or hand saws, which are mounted inside the wooden base of the machine.
Some craftsmen make more complex tools that involve the use of powerful electric motors, V-belt drives and larger diameter saw blades. If you have any difficulties, you can find thematic videos online that tell you how to make a circular saw with your own hands.
The household often lacks a circular saw, especially if major renovations or construction are underway. Not everyone can afford industrial products - they are too expensive. But you can make a circular saw yourself, using materials that are available in the household.
Design - main components, their purpose
A do-it-yourself stationary circular saw is created with advancement in several possible directions:
- adapting existing hand tools using the motor and circular saw for new capabilities;
- improvement of industrial products to expand functionality;
- assembly of individual parts, manufactured mainly in-house.
A stationary circular machine includes several main components: a table, a shaft, a motor and some others, the characteristics of which are not so important.
The table is used for fastening woodworking mechanisms. It can be assembled entirely from metal, which is preferable, especially for machines with a high-power engine. Wood also makes good circular tables. But it is necessary to take into account that the tabletop should be covered with a sheet of metal, otherwise the wood will soon wear out. Tables must be very rigid and stable, capable of withstanding considerable load during work. The surface is made perfectly flat; protective shields must be installed above the rotating parts.
For a homemade circular machine, a washing machine motor is quite suitable. Portable tools are less suitable: their commutator motors are designed only for short-term work. They have very high speeds, low efficiency, and are afraid of clogging. You can use a three-phase electric motor, but if the household does not have 380 V, you will need to purchase capacitors to make it work on 220 V.

The most important component is the shaft. Use a ready-made one, if available, or machine it from round metal. The work on the lathe is performed in one setup, then the assembly with the working parts is checked for centering. Even minimal runout is unacceptable, otherwise during work it will become stronger, at which it is unacceptable to work. Seats are provided on the shaft: for a circular saw and for pulleys on the other side. You can also make grooves for planing knives.
Main parameters - calculation of power, speed, gear
The characteristics of the circular saw, the engine and the maximum thickness of lumber that can be cut are interconnected. The maximum speed for which it is designed is indicated on the purchased circular disk. The number of revolutions transmitted by the engine to the shaft should be less. The engine power affects the maximum permissible saw tooth diameter. The diameter must be at least three times the thickness of the material, otherwise sawing will be difficult. It is believed that to cut materials 100 mm thick, you need a motor of at least 1 kW of power.
The transmission is made only by a V-belt - if foreign objects get under the saw, the material jams, the belt slips on the pulleys. Injuries in such cases are practically eliminated. It is important to choose the right gear ratio. We take into account two indicators: engine speed and the maximum permissible speed of the circular saw. We calculate the required pulley diameters. A pulley with a large diameter is installed on the engine, and a smaller one on the circular shaft to increase the number of revolutions.
The revolutions of the shaft with a circular saw are as many times greater than the engine revolutions as the diameter of its pulley is smaller than the diameter of the pulley on the engine.
Woodworking machine - a capital product for the home
To work with wood in large volumes, it is better to have a machine that allows you to cut the material, plan it, and select a quarter. A fairly powerful electric motor and a rigid table are required. We present a structure made of steel angle and sheet steel. It provides a cutting depth of 60 mm; you can plan boards 200 mm wide. A three-phase motor of 1.1 kW, 2700 rpm is used. To connect to 220 V, capacitors are required.

1 – machine frame; 2 – panel; 3 – starter; 4 – device for height adjustment; 5.7 – work table of two halves; 6 – base; 8 – engine; 9 – platform; 10 – M10 studs; 11 – circular disk; 12 – shaft; 13 – stops of the lifting mechanism; 14 – driven pulley; 15 – belt; 16 – drive pulley; 17 – switch.
The work table has dimensions of 700×300 mm. In the drawing we see that the height of the entire structure is 350 mm. The height is not sufficient for comfortable work; the circular saw will have to be installed on an additional platform; it weighs only 35 kg. You can increase the length and width, increase the height up to 1200 mm. We adjust the remaining sizes to fit them, but the design features remain unchanged.
First we make the bed frame from steel corners 25x25 mm. If we are not going to increase the height, we make another similar lower frame. For a frame with a higher height, first we weld four legs from the same corners to the upper frame, and then we tie them at a height of 15–20 cm from the bottom. The lower frame has grooves for the engine platform locking bolts. Two studs are welded to the back side of the platform, which go into the holes on the back of the lower frame. By tightening the studs, we tighten the belts, then we lock the platform by tightening the nuts on the studs that go into the grooves.
To adjust the height of the table in relation to the saw, we use a simple lifting mechanism. It consists of racks, in the upper part of which we cut grooves at an angle of 45°. A total of eight racks are needed - four on each side. We weld them to the frame with grooves located in a mirror image. We attach cross members to the outer posts. We drill holes in the middle of each of them and weld nuts. Threaded shafts will move along them to regulate the lift.
Their ends rest against racks welded to frames assembled from 75x50 mm corners. We weld studs into them on the side opposite the grooves for the adjustment mechanism. The table consists of two equal halves and is attached to the frames with countersunk bolts. The adjustment mechanism works like this:
- loosen the nuts on the racks;
- we turn the screw, which presses on the stop, raising or lowering the table;
- tighten the stud nuts;
- We perform a similar adjustment for the second half of the working surface.

The design can be simplified without installing an adjusting shaft. Raise and lower the table manually. If you assemble the table not from two halves, but from one piece, you will only need four racks for the lifting mechanism.
Hand-held circular saw - turning into a stationary one
It’s easy to make a stationary one from a hand-held circular saw, expanding its capabilities. The first thing you need is a table. A convenient material is Finnish plywood, which, unlike ordinary plywood, is laminated - the workpieces glide well over the surface during processing. It is thick enough to withstand a lot of weight, moisture resistant, and easy to process. You can use ordinary 20 mm plywood, but you just need to paint it, or better yet, cover it with sheet steel or textolite.
You need to understand that the depth of cut will decrease by the thickness of the cover. You will need a large diameter disk so as not to reduce functionality compared to a portable tool. We make the dimensions of the tabletop sufficient to ensure that the workpiece fits in width. It should be added that on a wide table you can additionally strengthen an electric plane and a jigsaw, which will make the machine universal.
Using drawings and explanations, it is not difficult to make additional accessories for a circular saw that will expand its capabilities.

We mark a rectangle of the required dimensions on a sheet of plywood, cut it out, and process the edges. Using the sole, we apply a hand-held circular saw to the surface and mark the attachment points with a pencil. We make a slot for the circular saw. You can slightly deepen the attachment point using a milling cutter, but not more than 10 mm, so as not to weaken the tabletop. This manufacturing method will allow you to bring the cutting depth closer to that indicated in the circular saw’s passport.
From the boards we make a frame (tsars), which we install from below to strengthen the structure. We fasten four boards into a box, glue them to the tabletop, securing them with clamps. We screw self-tapping screws into the boards across the table. We countersink the holes for them from above so that the heads of the screws are hidden. We attach the legs to the frames of the stationary saw, preferably with bolts, washers and nuts. The table should be provided with additional rigidity, so we make spacers at the bottom of the legs.
We make a limit bar equal to the length of the working surface. In it we drill two grooves perpendicular to the disk, in which the bar will move and be fixed at a certain distance from the saw blade. It remains to make changes to the control system: we fix the control button in the on state with electrical tape. We install an outlet connected to the network on the drawer. We install a switch in the gap in the wire going to the saw.
Some aspects of the execution of homemade devices
No matter how well a circular machine is made, individual errors can lead to its performance being limited. This concerns, at first glance, seemingly trifles. Let's start with the bearings for the shaft. Installing conventional ones is justified if the machine is used from time to time. For a homemade device with permanent use, it is better to install self-aligning bearings. They consist of two rows of balls and are adjusted by tightening the clamping nut. Be sure to install a cover to protect against dust and chips.
On the working surface we apply a scale in centimeter increments. This will make woodworking much easier when determining the width of the cut. Many people neglect to install a protective shield over the disk, but in vain - treatment for chips getting into the eye or in more serious situations is more expensive.
When working with various materials, it is often necessary to adjust the speed of the circular saw. A homemade design, as a rule, does not have the ability to regulate engine speed. There is only one way out - the use of pulleys of different diameters. They are installed on the motor shaft. If you decide to order pulleys from a turner, immediately make a solid pulley with two or three different diameters.
Many people want to install a three-phase electric motor on a sawing machine, without having 380 V. They will need capacitors designed for a minimum operating voltage of 600 V of paper or oil-paper type.

We calculate the capacitance of the capacitors based on the power of the electric motor: for 1 kW - 100 µF for the working capacitor Av. We take the capacity of the starting joint twice as large. The SB trigger is a button that automatically returns to its original position. Startup is simple: turn on SQ, press SB for a couple of seconds. After starting, the button is released, as soon as the engine picks up speed, you can cut.


")


Manufacturing and use of a distillation column
Do-it-yourself reinforcing column: what and how to do it correctly Drawings of a distillation column for moonshine with your own hands
The best drawings of gates and gates made of corrugated sheets Making gates with your own hands
Making a doghouse for your beloved German Shepherd Consumables for making a German Shepherd doghouse
Finishing a chimney on the roof: how to make a practical and beautiful chimney at a reasonable price Cladding a chimney