Compared to a bed, sofa or chaise lounge, a hammock has a huge advantage in the sense that resting on it restores strength much better. The invention is not new - the Mayan Indians came up with it. This invention has not lost its relevance to this day.

Types of hammocks
Manufacturers are coming up with more and more new product models, but, despite the delights and bells and whistles, they are classified into several main groups.

The first group is classic hanging hammocks. They are lightweight, durable and reliable, easy to install and dismantle. They are relatively easy to manufacture - they do not require making a frame; you need two trees or poles to which the hammock is attached.


The second group includes frame hammocks. Their main advantage is the ability to install them anywhere on a flat surface. They are divided into collapsible and stationary.

A stationary frame hammock is more reliable than a collapsible one, but when transporting it, you should take into account its weight and dimensions, since it will not be possible to disassemble it, which can cause some inconvenience. Although such problems do not arise with a prefabricated hammock, it is significantly inferior in strength, reliability and durability to a stationary one.

The hammock chair is versatile and practical. Manufacturers often make it so large that several people can sit on it. The price of such a product is slightly higher than that of a classic hanging hammock.

Hammock swings, thanks to their unique design and interesting design, not only serve their intended purpose, but also decorate the site. Some models require two poles or trees to mount, others have their own frame.


A hammock with a canopy is a type of frame hammock, characterized by increased comfort, protecting from direct sunlight in hot weather, and to some extent from precipitation in rainy weather. The price of such a product will be significantly higher than that of a simple frame one.

Rules for using hanging hammocks
Despite the variety of types of hammocks, there are certain rules for their operation. By adhering to them, you will be able to extend the life of the product and make your vacation safe and comfortable.

These are the rules that apply more to hanging hammocks, but in terms of the strength of the base they are also valid for frame hammocks:
After installing the hammock, you should make sure that it is securely and correctly fastened. The thickness of the pillars or tree trunks acting as supports must be at least 20 cm. The depth of the hole in which the pillars are dug should not be less than a meter. If the hammock sags too much, this is unacceptable - its base is damaged.


The distance between trees or poles to which the hammock is attached should be 3 meters, the height of the attachment should be from 1 to 1.5 meters.

First check the reliability of the fastenings. The thickness of the cable, which bears the main load, should not be less than 8 mm.

A tarpaulin or durable fabric is used as a base for a hammock. By saving on fabric, there is a certain risk that you will have to fork out money at the pharmacy. The service life of the base is two to three years, after which the fabric needs to be replaced.

When making your own hanging hammock from a mesh, it is recommended to use cotton threads that are resistant to abrasion, non-slip and well-tightened.


Decorating a hammock
After purchasing or making your own hammock and installing it, you should take care of its pleasant, aesthetic appearance. Although the hammock itself is a decoration for a summer cottage, if there is an opportunity to further decorate it, then why not?


Firstly, if you decorate a hammock with a canopy made of translucent fabric, then in addition to the decor you will receive protection from ultraviolet radiation and, to a large extent, from moisture and wind. To give the bed a more luxurious look, pillows in oriental colors and ribbons with bows are used - all these attributes are conducive to a comfortable rest.

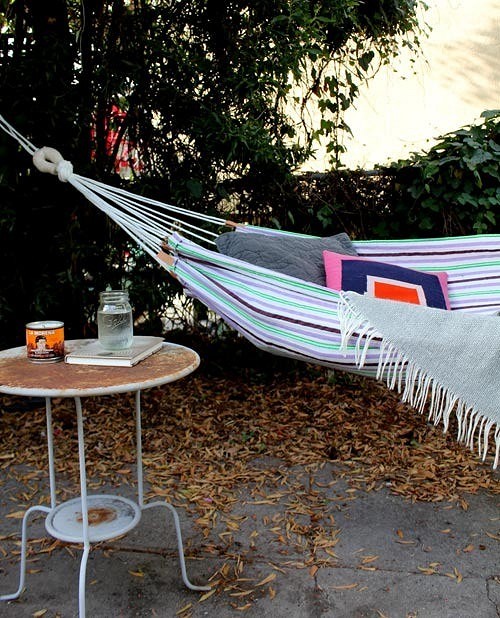
Photo of a hammock for a summer cottage with your own hands


This hammock is a symbiosis of a chair and a swing. It can be hung in the house on a hook screwed into the ceiling, and outside - on a crossbar or a fairly strong tree branch. To ensure that the hammock itself is strong and reliable, choose the appropriate fabric (thick cotton, tarpaulin), threads, cord and carabiners.
You will need:
Wooden plank (optimally oak),
Durable cord
About 2 sq. meters of durable fabric,
A durable carabiner (2 pcs.),
Sewing machine and strong threads,
Iron and ironing board.

1. Fold the fabric in half and cut it as shown in photo 1. Tuck the parallel sides of the piece and sew on the machine (photo 2).

2. Now on the two raw sides of the part you need to make drawstrings into which the cord will be threaded. When measuring the width of the drawstring, be guided by the thickness of your cord. Tuck and stitch the fabric as shown in photos 3, 4 and 5.
3. Drill two holes at both ends of the board, as shown in photo 6.

4. Thread the cord through the drawstrings and into the holes of the board as shown in the photo. Be sure to tie the knots tightly.


5. All that remains is to organize a place to attach the hammock and hang it.

2. Wicker hammock using macrame technique: master class

Macrame is the art of knot weaving from cords or thick threads. To make such a wicker hammock, you need to master a couple of the simplest knots of the macrame technique - it’s not difficult.
You will need:
Durable thick cord in one or more colors,
Scissors,
Ruler,
Two dies for the edges of the hammock (in this case, the dies are taken from an old hammock; you can also drill holes in strong planks of the length you need).

1. First, one of the hammock dies will serve as the basis for weaving. Secure it in a position convenient for work (mounts for the curtain rod are used here, but you can come up with something else).

2. Cut 21 pieces from the cord, each about 730 cm long. Fold each piece in half and secure it to a die, as shown in the photo.

3. When all the pieces of cord are secured, start tying knots. Step back a few centimeters from the die and proceed as shown in the photo.

4. Continue making knots. You should end up with something like this:

5. Having weaved the first row of knots, step back some distance from it and start a second row of the same knots in a checkerboard pattern. Continue in this manner until you have a network like the one in the photo.

6. Now remove the loops from the die. Trim the lower ends of the work and tie it to form loops. Thread ropes into the upper and lower loops and secure the edges of the hammock to the dies. Tie the ropes at the top and bottom in a knot, making a loop to which the hammock will be attached.

3. Hammock with leather loops: master class
Another version of the classic hammock is with hinges made of durable leather. If your machine will not accept thick leather, replace it with a fairly thick and wide braid made of cotton or synthetics.
You will need:
Hammock fabric (thick cotton, tarpaulin, other durable fabric),
Fabric for strengthening the edges of the hammock,
Machine and strong threads,
Leather for loops (option - braid for loops),
Twine or strong rope,
Scissors, pins.

1. Decide on the length and width of the hammock you need and cut out a piece of appropriate size fabric. Tuck the long sides of the piece and sew on the machine.

2. Finish the sides of the hammock to which the loops will be attached by making the hem wider and strengthening it with an additional strip of fabric folded in half on each side.

3. Cut the leather into pieces for loops. Focus on the thickness of your hammock cord.

4. At equal distances from each other, mark places for attaching the hinges.

5. Sew the loops as shown in the photo.


6. Thread a rope through the loops. Tie the ends with a knot on each side, making a loop (see photo). Wrap both loops with rope for strength.


4. A simple hammock in 10 minutes: master class
This hammock option is one of the easiest to make. In addition, it turns out to be very light (due to the low weight of the fabric) and mobile, since it does not have heavy and rigid parts. It is convenient to take such a hammock with you to the forest or park for a walk.
You will need:
Lining fabric (3x150 cm),
A pair of carbines,
About 6 meters of strong rope.
Follow the instructions shown in the video.
More hammock ideas:
1. This hammock can be made from a rug or blanket.

2,3. Two versions of hammock chairs - in different colors they look completely different.

Photo: decoritem.com, deas4homes.com
A hammock is strongly associated with a romantic holiday in unity with nature. As a relaxer after heavy stress of any kind - physical, intellectual, emotional - a hammock is comparable to expensive physiotherapeutic procedures or potent medications. But relaxing in a hammock costs nothing and has no side effects. Doctors, however, do not recommend sleeping in a hammock all the time: its beneficial effect appears after fatigue before. In modern living conditions, having your own hammock for trips to the countryside or nature on weekends or on vacation becomes necessary.
Making a hammock with your own hands means not just achieving 3-4 times savings in money. And not only get more pleasure by listening to the whisper of foliage in the creation of your own hands. By making a hammock yourself, you can quickly and easily acquire a lot of useful skills that will be useful in many other cases.
Story
Europeans first saw a hanging piece of upholstered furniture for sleeping and relaxing among the Caribbean Indians; the natives called it hamoc. At that time, the Caribbean islands were as green a hell as the present-day Amazon. The jungle is teeming with all sorts of dangerous creatures and it is impossible to sleep on the ground or in a bed: during the night someone will definitely bite, sting or infect you. And the means of subsistence in this apparent luxury is obtained through hard and dangerous labor.

Hammocks came to the attention of members of Columbus's first expedition. The Spaniards immediately appreciated the merits of hammocks as ship berths. It is impossible for our contemporaries to imagine under what conditions the great discoveries of the past were made. Imagine a long voyage in a stormy sea for six months, or even 3 years, on a fragile boat smaller than a river bus or a small fishing seiner, with a crew of 12-20 people and the same number of passengers on board. Impossible? The Niña, a caravel from Columbus's first flotilla, had a displacement of 50 tons. She crossed the Atlantic twice, back and forth, at its widest point. Withstood a force 10 storm and delivered back from Castile, in addition to her crew, the admiral of the sea-ocean himself with her satellites, after the flagship Santa Maria crashed on the reefs. Also, by the way, it’s not a cruise ship – as much as 200 tons. So, hammock bunks were adopted from the Spaniards by sailors from other countries, then by residents of port cities, and then by everyone else.
Varieties and features
There are several types of hammocks; the main ones are shown in the photo. The discoverers of the New World saw hammocks made of mats suspended on vines. Their modern modifications are known as Mexican hammock, pos. 1. It can be woven or sewn from fabric, but never contains hard, rigid parts, except perhaps an eye ring for hanging. Wicker hammocks are generally more complex and more expensive than sewn ones, but more hygienic, because... provide ventilation from all sides.

The main advantage of the Mexican hammock is simplicity. It can only be a piece of fabric + a couple of guy ropes, see below. Other advantages are more of a native-nomadic type: it can be carried with you in a shoulder bag or carried on a horse in a saddlebag-alforkh. Nowadays, an employee of a paid beach can take several pieces under his arm, quickly carry them and hang them on newly arrived clients.
However, the Mexican hammock is, generally speaking, not ideal. In order for the person lying in it to turn from side to side, the panel needs to be approximately 3 m long, and another 1.5-2 m for each suspension. The fabric consumption is excessive, and you also need a lot of hanging space. A Mexican hammock cannot be double: the cut on the bed will need such a length that the cocoon, already quite tight, will curl up into a stuffy tube. It is pleasant to relax in a Mexican hammock for no more than 1.5-2 hours. The sailors of the sailing ships and the gaucho shepherds didn’t care: after a shift or a working day on horseback from dawn to dusk, they would sleep like the dead and on a mattress made of hedgehogs. But a modern city dweller may be interested in a Mexican hammock only for relatively short-term occasional use.
At pos. 2 hammock... you're wrong, not Brazilian. Vietnamese, also known as Malay. The natives of the extreme southeast of Asia invented the hammock independently of the Indians and for the same reasons, only the Europeans got to them much later. There is a lot of fish in those parts and fishing is developed, so it is quite natural that the original Vietnamese hammock is wicker. Fortunately, the material is always at hand - a variety of vines. The tropics of the Western Hemisphere are not rich in vines suitable for small weaving.
A hammock made from a piece of dilapidated fishing net or stems of different mechanical properties required suspension from many sling branches and distribution of the load between them. Therefore, the Asians supplemented the panel with crossbars. It is more difficult to make and install a hammock on traverses, but it is much more durable, more comfortable than a Mexican one and can be double. In a hammock on the traverses, you can enjoy the day with all the cells of your body, without feeling the desire to get up and walk unless absolutely necessary.
Note: for a home craftsman or craftswoman to make a Vietnamese hammock in amateur conditions may be easier and cheaper than a Mexican one, if one focuses not on repeating machine-factory technologies, but on manual rigging and maritime practice. Of these, only the basics will be required, and they are not at all as complicated as is commonly believed; we will master them as we go.
The Brazilian hammock is shown in pos. 3. This is a modification of the Mexican hammock for people who are more civilized, demanding of amenities and technologically equipped. A Brazilian hammock can be hung in the native way, on ropes, or, if you insert a solid cross-beam into the drawstring straps, fully extended in width. For relaxation, it is no less convenient than Vietnamese; can be up to 2 m wide. Almost the entire width of the cut.
The convenience of a Brazilian hammock for all occasions does not come for free - it is complicated and expensive. Concentrated loads from suspension points “diverge” through the fabric more difficult than through the mesh, so they require a lot of suspension branches and drawstrings. And each one needs to be reinforced by inserting a piece of braided sling into it, as well as into the edging of the panel. Without reinforcement along the contour, the edges of the stock will soon sag.
As a result, there are many sewing elements on the wrong side (bottom side) of the cloth. Durability is not strength, but in order to at least hide them, the panel has to be sewn double: 2 identical cuts are sewn down on the short sides, the resulting short wide sleeve is turned inside out and the rest is sewn/sewn inside it, whatever is needed. According to the second method, which is more designed for skilled manual work, the long sides are first ground down, and the drawstrings are sewn into the resulting wide armholes. The fabric consumption doubles this way and that without any, in general, need. In general, making a Brazilian hammock at home only makes sense for an experienced seamstress who has a machine with a needle of at least No. 100, capable of cutting through 3 layers of dense fabric with a 1.5 mm thick sling between them.
Lying down or sitting?
A Brazilian hammock of reduced size and simplified design is nothing more than a soft hammock chair on a trapeze suspension, pos. 4. A hammock chair, or hanging chair, can also be a semi-rigid frame or even rigid; in this case, the cradle position is suitable for the suspension. 5. But hanging chairs are a special class of furniture. How to make a hammock chair using approx. for 500 rubles, or a hard one made from scrap materials, you can watch a couple of videos below, and for now we’ll work on hammocks in which you can lie, stretched out to your full height.
Video: DIY hammock chair
Video: how to make a hammock chair in 2 hours
Common to all

The complete structure of the hammock is shown in Fig. A thimble, for your information, is a reinforced loop of cable or rope for hanging. Here you can already see, firstly, parts that are clearly redundant, these are suspensions. When dealing not with vines, but with ropes made according to specifications, there is no point in making so many branches of the suspension when making them yourself. What is especially bad for amateurs in suspension systems made from many branches is that it is very difficult to achieve their uniform tension during handicraft production, and a hammock with a suspension that is not properly covered will not allow you to rest properly. An exception is hammocks suspended from one solid loop of cable, including slings supporting the long sides of the panel. One of these designs will be discussed below.
Note: rope is a twisted rope with a spiral twist. Cable - braided rope, cross or other lay with transverse transitions of strands. With the same diameter, a rope and cable made of the same material differ significantly in mechanical and operational qualities. In general, the rope loses strength more slowly during wear, and the rope better withstands large and, especially, short-term loads. Further, if it is simply said “rope”, then in this case it does not matter whether a rope or a cable will pass there.
For complete reliability of the hammock in its suspension system, 4 slings with 150 kgf of constant load and 300 kgf of instantaneous load each are sufficient; These are clotheslines from 8 mm in diameter. 4 interconnected and mutually influencing lines can be tightened in half an hour without any experience, and the 1.2 tf of permissible jerk will allow you to safely recall, on occasion, the scene between Jean-Paul Belmondo and Gina Prilipala from “The Game of Four Hands”: “I want you to master by me now! Immediately! Right here on this dressing table! - Why not skiing? Or standing in a hammock? So, perhaps it’s too much, but parents don’t have to worry about a child’s battle in a hammock holding 1.2 tf. If a suspension of 4 slings is designed optimally (see below), then if any 2 of all 8 branches break at the same time (since there are 2 suspensions), in the worst case, the panel will not dangerously skew, but the hammock will never will tip over.
The weakest points of the suspension are the braces. Each of them must maintain the same 1.2 tf, but for a long time, because There are 2 braces and a break in any of them means an accident. Therefore, for braces, it is preferable to take a rope with a diameter of 12 mm, and not synthetic, but cotton. The internal friction in it is many times greater than in slippery synthetics, and sudden breakage like a domino effect is excluded: worn out, unkempt strands will attract attention before the remaining ones become unable to bear the load.
About fixing in place
The hammock should be hung so that without load, but with a mattress, blanket and pillows, the lowest point of its bed is at least 0.8 m from the ground/floor. The braces should deviate from the vertical within 45-75 degrees. if they go steeper, you will have to lie bent over and raise your legs. Braces that are too shallow, according to the school parallelogram rule, will be overloaded.

The brace is tied to the eye or thimble with a bunk knot, on the left in Fig. To the support, not very thick, about the size of an adult man’s hand or thinner - with a bleached knot in the center. On a thick support, the sliding bayonet assembly on the right will be more reliable.
Note: if any of the knots here and further seem unreliable to you, tie it, tighten it and immediately try to give it away (release it). And the knot, covered under load, will hold, of course, no worse.
More about rigging

In addition to 5-6 simple knots, which we will get acquainted with later, to make a hammock you need to be able to secure the ends of the ropes from marking with binding - put stamps on them. A simple stamp will probably be enough for us (see picture on the right). Self-tightening is more difficult to apply; it is intended more for rigid and/or slippery cables and ropes, mainly steel. From the edge of the mark to the end of the base rope there must be at least 1 of its diameters; better – 1.5-2. Excellent brands on ropes suitable for hammocks come from shoelaces or similar. They are durable, relatively easy to tighten, sit tightly on the base and do not weaken over time.
Note: when tightening a simple mark, the first hose (turn) will come out weakened. To tighten it, the running end of the cord, pulled into a loop, is pulled out a little, and then tightened again, pulling up the root (initial) end. Do this 2-3 times, and the stamp will lie absolutely tightly. The cutting of the root and running ends of a correctly applied mark should occur approximately in the middle of its length.
Hammocks to choose from
Factory-made hammocks are most often made with a fan-shaped suspension of many slings. In industrial conditions, this is justified: overspending 20-30 m of rope is still more cost-effective than introducing into the cycle of operations for the production of a suspension that is no less reliable, but not so material-intensive.
The fan hanger is not so useless - you can put a pillow on it. However, as stated above, it is difficult to evenly cover many branches on your own, and without this the hammock will be uncomfortable. Manual operations for making a simplified suspension are not complicated, but hired workers need to be paid a salary for them, but not yourself. Based on this, at home it is preferable to make, in order of increasing complexity of work, the following types of hammocks:
- The simplest quick Mexican recipe from scrap materials, without any sewing or cutting work.
- Sewn with a panel on eyelets.
- Sewn universal, for hanging in Mexican style and on traverses.
- Wicker mesh, without any decoration, but practical.
- Woven using macrame technique.
About fabric and braid
The fabric for single-layer panels of sewn hammocks requires a dense and durable fabric: technical, upholstery, canvas, denim, any coarse satin or twill weave. In the case of using technical or upholstery, you need to ensure that the warp threads run along the length of the panel. This problem does not arise with dress and linen fabrics: the width of their pieces is less than the length of the hammock panel.
Coarse fabrics are still too rough to lie in a hammock without a bedding; they are rarely bright and patterned. Therefore, the panels of the sewn hammocks described below can be made double (see above, about Brazilian hammocks) from softer fabrics. In this case, single seam turns (see below) are sufficient, not double. The work is almost not complicated, because the power seams in the products described below run only along the contour of the panel. But simple trouser braid to strengthen loaded seams still needs to be laid in them: the weaving of the braid is designed so that it evenly distributes the load along the seam. The trouser tape is thin, and a regular household sewing machine will take it along with 2-3 layers of jeans or canvas.
It couldn't be simpler
During a short trip to the country, or, say, at a stop on a mushroom picking trip, a hammock of the “it couldn’t be simpler” type can be made from any suitable piece of fabric: sheets, blankets, bedspreads, covers, etc. Double bed linen should be folded in half lengthwise. How a simple hammock is made can be seen in Fig. A sheet or blanket of regular length produces a bed of 1.8-1.9 m. This is enough for an adult of average height to relax after work, and children will generally find heaven in a hammock. The production cycle time is less than 10 minutes, including the choice of hanging supports.

On the eyelets
A hammock with eyelets requires the minimum amount of sewing work for this class of product, but half a day or a day will be needed to wire the slings and tighten the suspension. The maximum width of the panel is 0.9 m; length - up to 2.3 m. The length of the suspensions along the longitudinal axis is within 1/4-1/3 of the length of the panel. The design feature is that the entire sling system is a single end (piece) of cotton rope.
Technological equipment, except for a sewing machine, is a simple slipway, a board with nails driven into the edges. A 3-meter board is enough to make a hammock with a bed of 2 m. But since it is much more difficult to fit short hangers, it is better to find a longer board and make the length of the hangers close to the maximum. This will not make the hammock weaker, but it will be more comfortable, but there will be more cable left.
The appearance and structure of the hammock with eyelets is shown in Fig. The braid in the seams on the short sides needs to be wide, from 8 cm. In the seams of the drawstring sleeves on the long sides, 3-4 cm of braid is enough. In the middle of one of the long sides in the drawstring seam, an armhole of 10-12 cm is left for tightening the cable.

Eyelets for curtains are unsuitable in this case: they are too weak and will soon begin to rust in the open air. You need to take grommets for truck awnings or sails. You can find them in specialty stores, at a cargo service station or at a yacht club. Pliers for crimping powerful eyelets are not available everywhere or always, so it is better to first make sure that the eyelets are within reach, agree on installation, and only then sew the panel.
If the hammock will be suspended by the eyelets, they are put on nails in the slipway. If the suspension is on homemade thimbles (see below), then the running end of the cable is simply wrapped around a nail. Tighten the cable as follows: armhole - half a sleeve, the outermost hole in the traverse, nail or eye, the next hole in the traverse - eyelet, etc., until the entire suspension is installed. Then - another extreme hole in the same traverse, a sleeve on the other long side, another suspension, other half-sleeves, exit to the armhole. The ends of the cable are connected with a benzel (item B in the figure) and the joint is tightened into a sleeve. The free ends of the cable must remain at least 5 cm long!
If the hammock is on arms, then before tightening the slings near it, they are collected into a bundle, applying a mark. This must be done without removing the workpiece from the slipway. If the suspension is supposed to be on thimbles, then first the slings are tied into a bundle with a temporary mark, and the thimble is woven only after the hangers are tightened.
It is best to do the tying by weight, hanging the hammock with one eye or loop of the harness on a nail, hook, branch, etc., and loading the lower ring/loop with a load of 10-12 kg. the traverse, then pick it up (pull it so that it loosens) through the grommet of the conjugate tight one. To prevent the tightness from being too long, and in general to avoid getting entangled in it, pairs of slings are sorted strictly in order, clockwise or counterclockwise. To eliminate any distortions that occur, the traverse is supported by the cable in the sleeves. If you don’t go astray, the hammock will be perfectly covered in 2-3 passes.
Universal
This is perhaps the most successful of the homemade hammocks: it is economical in material, comfortable, strong and durable. Its prototype is a hanging bunk from a military kung kit. The bed of a universal hammock can be up to 2.5 m long and up to 1.4 m wide. Hanging in any way in this case is possible because the hanging sleeves on the short sides will be reinforced at the edges with an embedded rope. If this hammock will be hung and/or only on a soft suspension (in this case, not Mexican at all), the length of the bed should be at least 2.2 m, and its width - no more than 1.1 m. Allowances for hems (pos. 1 in Fig.) the minimum permissible values are given.

Sewing begins with sharpening the long sides, pos. 2, and tightening into the sleeves of ropes with a diameter of 8 mm (pos. 2b). The drawstring for the rope is sewn with a double turn and braid, as in the previous one. case, pos. 2a. The ends of the ropes should not protrude beyond the edges of the cut, but they should not be more than 1-1.5 cm from it either.
Having turned up the suspension sleeves on the short sides (pos. 3a) and stitched the cuffs, places I (pos. 3 in the figure) are stitched with an envelope or mesh manually, grabbing the ropes in the sleeves of the long sides, now bent into loops. You will have to sew with a gypsy needle, and you need a thread that is waxed or impregnated with PVA and dried. Of course, loosened before impregnation and during drying into loose loops. The easiest way to impregnate the thread is in the same way as when making lampshades or Christmas tree decorations from threads.
Soft suspension
To hang a universal hammock without traverses, insert a bracing rope into the suspension sleeve and collect the panel into a bundle, temporarily grabbing it somehow. Then a gazebo knot with a rather large loop is knitted on a brace, pos. 4. The gazebo unit does not tighten under any load. Next, insert a spacer (pos. 4a) from any suitable material into the knot loop and do the same on the other side of the panel. That's it, you can hang the hammock.
Suspension on traverses
To make suspensions on traverses for this hammock, you will need 2 round wooden sticks with a diameter of 5 cm and a length of 3/4-4/5 of the width of the finished panel W. Cuts of shovel cuttings or one cutting of sufficient length sawn in half are good options. You also need to build a slipway from a pair of boards approx. 1.5 m, knocked down in a T-shape. A pair of nails are hammered into the T leg at its far edge along the axis at a distance of 5-10 cm, and cuttings of the cuttings, which will be the traverses, are secured to the T stick with 2 more pairs of nails. Not tight, the traverses should move freely between the nails to their heads.
Further on one side of the traverse, at a distance of approx. 5 cm from its end, knit a double bayonet knot (point II and the bottom row in the figure), only both ends of the cable (from 8 mm in diameter) are left the same length, about 2 m each. You can make a notch under the knot, but in general a double bayonet is a “dead” knot, in which a smoothly sanded and soaped thick log-post is held suspended. Or a heavy torpedo.
The next step is to measure the ends of the suspension lines Λ1 and Λ2 (item 5). Its length, from the traverse to the far corner, is permissible at least 1 m. If the hammock is on the arms, then immediately thread Λ2 into the ring. Next step - longer end Λ1 is inserted into the hole of the hardwood adjusting bar 5a, then, optionally, into the eye (if there is one) and out through another hole in the bar. The distance between the holes in it is approx. 5 cm; other dimensions are not critical. Then, on the other edge of the traverse, each end is tied with a simple bayonet knot (see below, about weaving a hammock), and marks are made on the slings with a ballpoint pen in point IV (item 5b). After this, the nodes on the left (according to the figure) end of the traverse are released.
Now you need to remove the traverse and put a cloth on it, gathering it evenly. If the hammock will be constantly suspended on traverses, then it is advisable, after finalizing the suspension, to also run an additional seam along the traverse to secure the folds. The fact is that if the traverses are wider than the panel and the suspension sleeve rests loosely on the traverses, then the panel will always slide to one side. And the folds form a kind of spring that holds the panel straight. After this, simple bayonets are knitted again on the left end so that the marks are in the same place.
Finally, a suspension is made in the same way on the other edge of the panel and the hammock is covered in weight, as in the previous one. case. But with a huge difference in labor intensity: to tighten it, it’s enough to move the adjustment bars. And in the future they can be used to adjust the slings. It is possible that during the initial adjustment of the slings you will have to tie knot III 1-3 times, but a simple bayonet gives as easily as it is tied. Finally, if the hammock is on thimbles, loops are braided on the tops of the suspension, see at the end. In this case, after adjusting the lines, you need to make marks on their bends so that the thimble does not “move” to the side.
Loose ends
In node III there are ends that cannot be used to decorate the hammock (see below). They can be secured with marks to the suitable ends of the slings. But it is better to leave it up to 3 m long, rolled into coves. If the hammock is suspended on a frame with a top bar or, say, from trees with horizontal or gently inclined branches, then the free ends of the slings can be thrown over them and swayed by pulling the strings.
Simplified version
The same principle of suspension allows you to significantly simplify the hammock panel if it is suspended only on traverses. A diagram of a simplified hammock on 4-sling suspensions with an adjustment bar is shown in Fig. But in this form it is generally not very comfortable: the head either falls in or rests against the crossbeam, and the pillow slides into the gap between it and the edge of the panel. A possible way out of the situation is to place 5-6 ordinary eyelets for curtains, only stainless steel, on the short edges of the panel, and tightly wrap the edges through them to the traverses with a cord.

Simple wicker
A net hammock is woven across the fabric, i.e. along the long sides. For the base you will need 2 traverses, the same as in the previous one. case, but 10-15 cm longer than the width of the panel. At their ends, at a distance of 4-5 cm from the edge, 3 holes are drilled side by side, or one oblong, for load-bearing slings made of cable from 10 mm. The supporting cable is carried out in one ring, fastened with a benzel, as for a hammock on grommets, but without bending to additional branches of the suspension. The load-bearing sling is passed through the holes in the traverses, wrapped in a figure eight.
The next stage is to prepare a pair of racks with a height greater than the width of the panel and at a distance from each other greater than its length. The base (frame) is attached to the racks, at least by attaching supporting slings to them with a cord crosswise, and they are pulled tight. The now hanging traverses are aligned by the distance between them and vertically, tightening/loosening the lines in figures of eight.
Next, prepare a shuttle for a cord with a thickness of 4 mm. The panel will need 120-200 mm, depending on the size of the hammock, so you will have to weave it in rows - so much cord will not fit on the shuttle at once. Therefore, based on the diagonal size of the network loop of approx. 7 cm, we count the number of rows of loops according to the width of the panel (this is how many pieces of cord will be needed), and multiply its length by 2.2. We wind a piece of cord of the corresponding length onto the shuttle, it will be enough for 1 row. The excess will go to waste, because... extra knots scattered in the middle of the cloth will not give it any appearance.
Now we begin weaving, pos. 1 and 2 in Fig. To ensure the evenness of the loops, use a round mandrel made from a smoothly sanded shovel handle or something like that. An angular mandrel is not suitable, it will get stuck! The fabric is knitted with the simplest flat knots, pos. 3, the same ones on which the primitive hammock was suspended. Nets are not tied with such a knot, it is wide and it will be difficult to pull the net in the water. But for the hammock in this knot, its small thickness is good; when tightened, it is less than 1.5 times the diameter of the rope.

When tying, the knots are only tightened so as not to dangle. They finally tighten everything at once by pulling the mandrel several times, this operation is called punching the knots. The first loops are thrown onto the mandrel along its entire length, and the continuation of the row is knitted, extending the mandrel halfway. When tightening the first and last loops, hold the free end of the cord with your hand.
Having knitted the panel, the free ends of the cords are tied to the traverses with a simple bayonet, pos. 4-7. You can also tie double bayonets, it won’t be any worse. Then they make 3-4 cap hoses at each bayonet node, pos. 8-10, they will create elastic links that ensure uniform tension of the network cells.
Now you need to decide what to do with the free ends of the cords. To avoid excess knitting, they can be cut to size. Then stopper knots are tied at the ends, and the very ends are fluffed into tassels. You'll get a pretty nice fringe.
It remains to make additional branches of the suspension, because 2 “bare” load-bearing lines are not enough for reliability reasons. This matter is solved simply: the additional ends of the rope, the same diameter as the ring support sling, are tied to the traverses with a double bayonet inside the figure eights of the main sling close to them. Next, they make a suspension as for a universal hammock. It makes complete sense to turn the loose ends into tassels; there will be 4 larger ones in the corners.
Macrame
There is no opportunity to look at macrame hammocks in detail here, and you can only take on one if you have mastered the technique of weaving macrame well. We will touch only on certain points, because... A hammock is not a table runner, a rug or a handbag, not only in terms of the amount of work.

First of all, a macrame hammock is woven not crosswise, like a net hammock, but lengthwise, hanging one of the traverses horizontally. The cloth is removed moving from top to bottom. A ring support sling is not necessary in this case - macrame weaving distributes the load on the panel very well on its own.

Secondly, in general, 2 weaving options are possible: in 2 threads, pos. A-B in Fig., and in one thread, pos. G-E. Weaving in 2 threads allows you to get by with a cord only 2.5-3 mm thick, which makes the hammock more comfortable, but also gives twice as many free ends, which are easier to get tangled in. Weaving with 1 thread (cord 4-5 mm) gives a large number of free ends at the edges, sufficient for a reliable suspension. A suspension made from many thin slings harmonizes perfectly with the patterned panel, and its tightening is not so terrifying compared to the overall labor intensity.
The main advantage of weaving with 1 thread is the ability to create snakes 30-40 cm long along the edges - elastic links that perfectly equalize the tension of the panel. I would lie and lie in such a hammock if it weren’t for the beer, damn it. More precisely, side physiological effects from its consumption. However, you can weave macrame “springs” using the 2-thread technique in the same way as bracelets are woven, see fig. on right. For this purpose, branches 1 and 4 take “springs” that are three times longer than branches 2 and 3.
Homemade thimble
A braided thimble for a hammock is a rather labor-intensive element, but it allows you to do without purchased steel rings - eyelets. A rope in a thimble wears out much less than one passed through an eyelet, and the suspension loop itself is much more reliable. The best material for braiding here is round shoelaces with a diameter of 1.5-3 mm. You will need 2-4 laces, but the quality of the thimble will not suffer at all from their joints. Step-by-step instructions for making a homemade thimble for a hammock are as follows (see also fig.):


Note 5: for the durability of the thimble, it will be very useful to pour it with hot wax or hold it for 5-10 minutes in PVA diluted two or three times with water and let it dry thoroughly.
More about nodes
All the nodes described above are not the only possible ones suitable for making a hammock. You can use other node options, respectively. destinations, see, for example, the video:
Video: convenient knots for a hammock
Addition in conclusion
It can be difficult to find a place for a hammock, especially in a well-equipped and well-kept area. In such a case, in Fig. – drawings of a wooden hammock stand. The design is quite bulky and not very mobile, but it will allow you not to risk fruit/ornamental trees, house walls, fences and not start excavation work on the lawn. The installation height of the hooks is somewhere up to the chest, and the distance between them is approx. 0.7 m less than the full length of the hammock with hangers, but without braces. In this case, the eyelets/thimbles are thrown directly onto the hooks. And then – it’s nice to lie around!

The hammock is an invention of the South American Indians. It is quite simple to do, and is used not only as furniture for comfortable sleep, but also as protection from dampness and midges.
Materials for production
The most important thing to consider when making a hammock chair with your own hands is the choice of material. The most durable fabrics:
- canvas;
- calico;
- mattress teak;
- camouflage or canvas fabric.
Synthetic products are also suitable for use, but they have one significant disadvantage - they do not “breathe”.
If we talk about cords, it is better to choose threads made of cotton. Synthetics in this case again loses. Cotton cords are more pleasant to the touch. They are easy to tie into knots and intertwine with each other.

General rules
Regardless of what kind of hammock chair you decide to make with your own hands, there are some rules that remain the same for all types of garden furniture of this type.
- The product is suspended either between two supports or between two trees. If you choose the latter option, the diameter of the tree trunk must be more than 20 centimeters. The supports are sunk into the ground to a depth of one meter.
- The ropes are strong and thick. They should reach 8 millimeters in diameter. In some cases, the fabric is strengthened using eyelets.
- Install the hammock at a height of one and a half meters above ground level. The distance between support pillars should reach 3 meters.
DIY hammock (video)
How to make a Mexican cocoon hammock
If you are thinking about how to make a hammock with your own hands, the presented option is one of the simplest. At the same time, it is quite convenient to use.
When folded, the hammock weighs 1 kilogram, making it convenient to carry. It is almost impossible to fall out of the “cocoon,” but you will have to work hard to get out of the product.
To make this type of hammock you will need:
- a cord 20 meters long (it can withstand weight up to 200 kilograms);
- dense fabric - 2 pieces of 3 meters each.

The assembly proceeds as follows:
- the cuts are folded together;
- they are stitched towards each other on both sides, it should look like a tunnel with unfinished edges;
- the narrow side of the hammock is turned up a couple of centimeters and stitched;
- the resulting tunnel is pulled through the cord;
- then the cord is crossed and tightened so that the fabric gathers slightly;
- The place of tightening is wrapped several times with a cord and a knot is tied.
Important! To avoid damaging the tree bark, there should be a cloth at the point of contact between it and the cord. You can see what the finished hammock should look like in the photo.
Wicker hammock
Previously, hammocks resembled a regular volleyball net. Now there are many improved options. It is enough to learn the macrame technique and you can make a beautiful and comfortable product yourself.

You will need:
- 2 slats - the length should be one and a half meters;
- rope with a diameter of 8 millimeters.
The rope is attached to the bars through specially made holes, whose diameter should be 20 millimeters. The distance between them should reach 5 centimeters. In order for the rope to fit firmly into the holes, the diameter of the latter must be made according to the 1/3 principle.
How much cord you need depends on the pattern you choose. How to calculate the amount of rope required? Measure the distance between the slats, multiply by 3. Then the result obtained should be multiplied by the number of holes.
Important! During use, a hammock made using the macrame technique does not lose its shape.
The technology is simple. To create a knot, 4 ropes are required. The cells should be less than 7 centimeters. Metal rings provide additional structural strength.
How to secure a hammock (video)
When installing a hammock on supports, the length of the product is adjusted by tension. You can tie it higher and make the bend stronger.
Brazilian hammock
How to make a Brazilian hammock with your own hands? You will need:
- nylon linen cord (2 packs of 10 meters each);
- 2 pieces of fabric measuring 90x200 centimeters;
drill; - 2 wooden sticks 90 centimeters long.
Assembly of the product consists of several stages.
- Two pieces of fabric are sewn together.


- Then markings are made for the eyelets; the distance between them should reach 8.5 cm. You can insert the eyelets. If there are none, loops are sewn on. The cord passes through them, as well as through the eyelets. If possible, it is better to use metal products, they are more reliable.
- The sticks must be marked. A distance of 2.5 centimeters is departed from the edges. Then measure 8.5 cm from the marks.


- For an 8mm cord folded in half, you need to drill holes with a diameter of 20mm.
- The cord is cut into meter-long pieces. Each piece is threaded through a hole in the stick. It must be inserted through the grommet, then again through the stick.
- At a distance equal to half a meter from the end of the stick, all the cords are collected together. All that remains is to tie a knot and tighten it.


- Next, the knot is braided. The hammock is ready to use! You can see what it looks like in the photo.
- You may also be interested in an article in which we talk about what can be made for a summer house from plastic bottle caps.
Anyone can make a hammock on their own. It is important to choose the right materials. The cord must be durable, the fabric must be reliable, breathable, and made from natural materials.

There are several types of hammocks, which one to choose is up to you. If you want to get a comfortable place to sleep, you should choose a “cocoon”; if the main thing is aesthetics, you can weave a product using the “macrame” technique. Whatever option you choose, you should adhere to the general rules for installing the product.


Making a hammock frame with your own hands is a good idea. These products are quite expensive, but their design is simple. Therefore, creating a stand for a summer house yourself will not be difficult. You just need to choose a suitable drawing, purchase some materials and spend a few hours of time.
A lot of effort will have to be put in if you need a stand with rounded shapes, as in the photo. In this case, you need to have a special tool for bending wood. This is quite labor-intensive and requires some experience. There are simpler drawings for beginners.
What to make it from?
A DIY hammock stand is made of wood or metal. The difficulty of working with both materials is approximately the same. Below are drawings of frames for summer cottages made of wood and metal.
Wood frame
The wooden support has a long service life, is quite durable and aesthetically attractive. It will become not only a useful item for a pleasant holiday, but also a decoration for the cottage.

For work you will need:
- saw, jigsaw or grinder;
- hammer, mallet;
- screwdriver;
- furniture conductor;
- clamps.
Materials:
- Wood. Beams and boards are required.
- Hardware – self-tapping screws, screws, nuts, washers, hooks (eyes).
- Furniture glue or PVA.
The stand is created in several stages:
- Preparation of all parts of the future structure.
- Base. Consists of two beams 1850 mm long and two boards 1500 mm long. Grooves are made on the beams at a distance of 200 mm from the edges. The depth is equal to the thickness of the boards used, the width is the width of the boards. At the ends of the beams, at a distance of 20–40 mm, holes are made for bolts. The beams are laid on boards parallel to each other at a distance equal to the thickness of the support beams used (on which the hammock will be hung). For better fixation, you can connect them using wood glue or PVA. In this case, the product must be clamped at the joints.
- Supports. 2 beams 1700 mm long are required. At one end a cut is made at an angle of 45°, at the other there is a hole for a hook. 2 supports with a length of 520 mm are also made.
- Opening with varnish. Since the stand will be used in the countryside, in the open air, it can be opened with alkyd compounds - the smell will disappear quickly enough. All openings must be protected before processing.
- Assembly of the structure. If the parts are made correctly, then there will be no problems with assembly - the drawing provided above will allow you to complete the work without difficulty.
Metal frame

The presented drawing shows a rack made using metal pipes and special connecting elements. You can choose the dimensions of the support yourself, depending on the dimensions of the hammock and the amount of free space in the country house. The main thing is not to change the width of the support. The drawings indicate the optimal value that is guaranteed to make the product stable. The connection points can be additionally secured with through bolts. You can also cut threads.
Bentwood frame

This product is well suited for those who like complex tasks. The frame has a simple design, the most difficult part of the work is bending the beams. To give wood a similar shape, it is necessary to soften, bend and dry it. There are several ways to make a material plastic:
- Steam finishing. The beams are loaded into a pre-prepared box, and steam is supplied to it. For every centimeter of beam thickness, approximately 1 hour of processing is required. You can also perform treatment with a steam generator.
- Soak in hot water.
- Use ammonia solution. The longer the tree is in it, the more plastic it becomes.
After the required softness is achieved, the wood is bent. To do this, they either use special machines, or simply place the beam on supports, and place a load in the middle. The greater the bend and the longer the material, the higher the supports will be required.


")


Manufacturing and use of a distillation column
Do-it-yourself reinforcing column: what and how to do it correctly Drawings of a distillation column for moonshine with your own hands
The best drawings of gates and gates made of corrugated sheets Making gates with your own hands
Making a doghouse for your beloved German Shepherd Consumables for making a German Shepherd doghouse
Finishing a chimney on the roof: how to make a practical and beautiful chimney at a reasonable price Cladding a chimney