Candles are an excellent item for decoration, thanks to the large selection of different sizes and shapes. Is it possible to paint candles with acrylic paints? Of course you can! Artistic painting, spraying, and the “point to point” technique look good on the surface of the candle. It all depends on the artist’s intention.
Most often, such candles are used as decorative interior decoration. But this does not mean at all that you should deny yourself the pleasure of lighting a beautiful candle, for example, on a holiday table. Today we will tell and show how candles painted with acrylic or contours behave when burned.
We take two candles for our experiment. One is completely painted with “Decolor” Red Gold, and the second is painted with elements of dot painting using contours and golden “Glitter”.
Let's light our candles.

After some time, changes begin to occur. The fully painted gold candle begins to melt under the layer of acrylic paint, and its top begins to sag slightly.
Candle with dot painting. When the flame reaches the outlines, it slightly scorches them because the design comes too close to the wick. However, no unpleasant odor appears. When the paraffin under the “dots” becomes liquid, they simply settle into it.

This completes the experiment with dot painting on a candle. No more changes, fires or spectacular effects. Dots of contours and curls of glitter float in the melted paraffin, shimmering and rolling in it.

The golden candle burns differently. Acrylic adheres to the melted paraffin with a dense, solid film, holding it inside, preventing it from flowing down the edges of the candle.

As a result, after a long burning time (about six hours), the candle wick simply drowned in so much liquid paraffin and went out. If this were an artistic painting made from separate strokes of paints of different colors, then the acrylic film would not be so solid and would allow the paraffin to drain.
You can also allow the paraffin to drain if you carefully trim the paint film with scissors during the burning process to the current height.

So, we found out that burning candles painted with acrylic paints and outlines is quite safe: the paints do not ignite, do not smoke, and do not emit an unpleasant odor. So have fun decorating candles with acrylic, give them as gifts and feel free to use them for their intended purpose.
Next week we will look at what happens when using decoupage decorated candles.
There are many options to make your candle unique. One of them is giving the candle color.
When I first started making candles, there wasn't much on hand as a candle dye. And most importantly, there was little literate stuff at hand. After all, mixing paraffin and dyes involves all sorts of chemical reactions, and you need to be careful with this.
Still, I wanted color. I started with gouache.
Bad, very bad. Fortunately, I don’t have a single candle painted this way. The fact is that it is almost impossible to paint candle mass with gouache: small particles of gouache settle to the bottom of the kindling, and even if you shake the paint a little when filling the mold with wax, it still settles. The result is a very pale shade, and this makes it cloudy and untidy.
I tormented the fragments of the candles for a long time, melting them over and over again until they turned into something ugly and dirty. I just decided to stop pouring paraffin for a while. Until I find a good alternative to the bad coloring.
One day I was simply visited by nostalgia (I still wanted to pour, even without normal dyes). And just to chance, I poured EARTH FROM A TANK OF FLOWERS into the melted wax!!! It looked funny, of course, a white candle with something dark visible at the bottom. At first glance, there seem to be no shortcomings. Especially when the candle doesn't burn :)
Very soon the fire reached the “earth” layer, and it began to smell like fertilizer. The melted wax began to hiss, and this is not very good for you and me. Because you never know, they could spit a mixture of hot paraffin and earth. Here, in the next photo you can clearly see how the wax hissed due to the super dye. Don't do that.
Part two, Optimistic.
And so, hurray, I didn’t look anywhere, but just remembered that I have wax crayons. Once upon a time I painted the walls of my room on Tulskaya. Since the crayons are wax, it means that by adding small pieces, you can color the candle mass.
These crayons can be found anywhere: in children's stores, in a bookstore, in a stationery store. Such things are produced by different companies, Crayola, for example. Boxes cost a maximum of 150 rubles. But I’ll tell you right away: look for cheaper, because it’s available. If you need anything, I can buy it for you for 70 of your rubles and give it to you in Moscow. In general, in Zelenograd you can find so many rare things and cheaper :) Come here, come visit :)
- To color your candle mixture, you only need a few mm of crayon.
- Some do not color the melted paraffin completely, but instead dip existing white candles into a colored wax/paraffin melt. The choice is yours! It's just a matter of convenience!
- In addition to single-color candles, you can also make multi-colored ones! Just pour the color into the mold not completely, wait until the first layer cools a little, and pour another layer. You need to wait so that the hot paraffin does not melt or stir the colors.
– this is truly a small miracle. It is pleasant and comfortable to be in a room filled with the flickering flame of a burning candle. It fills the room with an indescribable and delightful feeling of comfort and warmth.
Making candles is a great art, in which mastery comes only after many years of constant practice. Unfortunately, in the modern world, candle manufacturers are trying to reduce the cost of their products and speed up their production in order to make greater profits. This undoubtedly affects the quality of the candles and their safety for others.
In order not to become a victim of unscrupulous manufacturers and to be absolutely sure that there are no toxic substances in the products, you need to consider the option of making candles yourself at home.
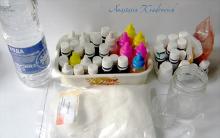
In this article we will not describe the entire candle production cycle, but will only consider the independent production of candle dyes and methods of using them.
What types of dyes are there?
They are divided into natural and synthetic. Natural dyes are made from natural ingredients and herbs (oak or ash bark, dry henna, rose hip foliage). To prepare them, you will have to collect the necessary ingredients and then process them to obtain a dye.
Synthetic dyes (colorants) are made from complex chemical compounds using special formulas that are inaccessible to the common man without a scientific degree in chemistry. They color the candle quickly and evenly, and practically no time is required for their preparation (as a rule, they just need to be mixed with water).
Also, non-natural dyes have a number of advantages: they are cheap, they are sold in many specialized stores, they are suitable for coloring both wax and paraffin.
You may not get the desired result right away, but trial and error will eventually lead you to the right path. If possible, read the materials and instructions for making candles and candle additives on specialized websites, and also consult with friends who are interested in making them.
By learning to make candles yourself, you will not only gain an excellent skill, but also receive rewards in the form of beautiful and
Individuality in your interior design will always be its winning side. Nothing adds a homely feel to an apartment like things made by the owners’ hands. And if until now you could not boast of such fruits of handicraft, you have a great opportunity to fix it. We invite you to try making candles with your own hands.
Candles are a wonderful souvenir that can brighten the atmosphere of any family holiday. Candles have long been an attribute of celebration, significant dates, and romantic evenings. Yes, just sitting in silence, listening to your favorite music to the trembling of a gentle light - this is sometimes so missing.
For some, a candle is nothing more than a cute decorative item. And there is nothing wrong with this either; such products serve as wonderful decorations in the home. But scented candles can become a real psychotherapeutic tool: they will help create the necessary atmosphere for relaxation, taking a person into the world of dreams and pleasant memories.
In addition, a candle is a wonderful gift. The warmth of your hands and the light of a beautiful candle will be the best wish for a loved one. Candles will decorate even the most modest furnishings, highlight the color scheme of your apartment, and become evidence of the excellent taste of the owner.

Needless to say, mothers on maternity leave can even earn extra money from such a pleasant activity. And not only mothers - everyone who is fascinated by the process of creating a candle. And you can be sure that there will be people who want to purchase such hand-made beauty.
So, we have many reasons to finally begin our creative process. But to make a candle, we need to stock up on certain materials and tools.
Materials for making candles
Indeed, how to make candles with your own hands without special materials? We will need the following in our work:
- Wax melting vessel
- Candle molds
- Pan (for water bath)
- Sticks (the first is to attach the wick, the second is to stir the wax)
- Decorative elements for decorating the product
- Wax crayons
- Household candles or stubs of old candles
- Paper threads (100% cotton)
All this will help us create, if not a wax masterpiece, then a beautiful original candle. So let's begin!
Candle wick
Now we have to learn how to make a candle wick with our own hands. Whether we make a gel, paraffin or wax candle, in any case we will need a wick. In order to make it, we need natural cotton thread without any impurities. Alternatively, use colored floss threads as a wick. It looks very cute and unusual.
The thickness and texture of the wick depend, first of all, on the thickness of the part of the candle that should burn out. For example, there are candles that are partially composed of flammable materials. Only the core burns out in them.
For those who are going to cast a candle from wax, you need to take thick threads and weave them not very tightly. Paraffin and gel candles, on the contrary, require a tight weave of threads (otherwise the wick will smoke when burning).

Wick for wax candles

Wick for gel candles
You also need to be attentive to the following detail: if the candle is colored with wax crayons, small shavings can clog the wick without dissolving in the paraffin or wax. In general, there are a lot of nuances in this issue; be prepared for the fact that choosing a wick for a certain type of candle will have to be done by trial and error.
If you use a very thick wick, it is possible that the candle will melt too much, which can lead to soot. If you make a very thin wick, it will constantly go out.
There are several options for designing a wick: it can be crocheted, braided, or twisted with a rope. Before pouring the candle, you can soak the thread with wax, or you can do both pouring and impregnation at the same time.
If you don’t want to waste time making a wick, then use a wick from ready-made household candles.

Candle mold
In this matter, your imagination plays a decisive role. You can use any plastic or metal molds that you think are cute and appropriate for making candles. Don't limit yourself to just ready-made molds: yogurt packaging, cream jars, baking molds, cans, glasses or mugs that can withstand high temperatures can also play an excellent role. Some even use milk tetrapack as a mold for a future candle.

Candles poured into tea cups

Candles made in eggshells
But for your first experience, it’s better not to split hairs: take something simple. For example, a yogurt cup. Be sure to remove the paper label first, as it may catch fire.
We take our glass and pierce a hole in the middle of its bottom with a thick needle - insert the ready-made wick there. The wick must be tied in a knot on the back of the glass. In this very place of the knot there will be the top of our candle, because it will be poured “upside down”: the knot minimizes the flow of paraffin, stearin or wax through the hole we made at the bottom of the glass.

Go ahead. We need to place any stick across the glass - a toothpick, brush or pencil. We need to tie the other end of the wick on it. It should be positioned strictly in the center in a vertical, level position. This way, you guarantee yourself that the candle will burn and melt evenly.
Coloring a candle
You will get really beautiful candles if you don’t forget to color them. The simplest and most acceptable way is to color candles using simple children's wax crayons.

Do you think it would be smarter to use watercolor or gouache? Indeed, the palette of these paints is richer than the color variety of crayons. But the problem is that both gouache and watercolor are made on a water-soluble basis: these dyes are not suitable for working with a candle. They do not mix well with wax or paraffin, they can float in them in strange-colored flakes, and then completely settle to the bottom.
Decorating candles can and should be done only with fat-soluble dyes, and these are our wax crayons.
Often, many craftsmen use lipsticks or shadows to decorate candles. If you don't mind your cosmetics, please feel free to follow their example. But rest assured that the aroma of lipstick will linger throughout the house, which is not always pleasant. Many people may find this smell intrusive.
If you decide to make decorative candles with your own hands, it is better to use less aggressive materials. When choosing wax crayons, we focus on soft types of this dye. Candles made using mother-of-pearl wax crayons are especially good.
If you come across hard crayons, melting them will be difficult. Yes, and planing them is quite problematic. So, we chose a piece of chalk, sharpened it using a grater, and added these shavings to the wax cinders. Mix the shavings and cinders thoroughly with a stick.
However, there is another coloring option. In specialty stores it is easy to find tableted pigments of different colors. They can be mixed with each other and dosed. Using such pigments, you will be able to make a truly unusual, bright or delicate candle. Pigments in tablets significantly expand the possibility of obtaining interesting shades.

You should not refuse to use dyes: they give the candle a unique look and create a unique pattern.
Pouring a candle
Now that the wick is ready, it’s time to fill it. We will need a regular tin can. It has to be flattened a little to form a kind of nose. This is necessary to make the process of pouring out the molten material easier.
It is better to lubricate the pre-prepared form with a thin layer of dishwashing liquid or simple vegetable oil. Both remedies are equally good.
We need to put the fragments of candles in a jar (candles must be of the same quality). If we are going to make a paraffin or wax candle, we can take a saucepan or ladle for melting, which is not too much of a waste. In any case, this container should be placed in the pan that will be used as a water bath. In principle, you can use whatever you want, except glassware.
So, we fill the pan with water, boil the water, and then immerse the container with wax or paraffin. This is how our material will melt.

When the material and shavings are completely melted, you can begin pouring the candle.
Fill the bottom of our mold with wax and let it cool. Do not rush to fill the entire mold at once, otherwise a lot of wax or paraffin may leak out through the hole in the bottom. We pour the wax in layers, and what has flowed out is re-sent for re-melting. When the candle is completely filled, it needs to be cooled. The temperature should be room temperature.

Many people make a mistake at this point: they try to speed up the cooling process by placing the candle in the freezer. In this case, it may spread unevenly.
This is not critical if we fill the candle upside down. If you use another method, then you should leave a little wax in order to fill the depressions next to the wick. And after drying they will definitely appear.
When the temperature of the candle becomes equal to the temperature of the room, you need to untie the knot at the bottom of the mold. At this moment, we remove the product itself by carefully pulling the wick.
If you can’t do this, you can cut the mold. Or put it in the refrigerator for a minute, and then put it under hot water for a few seconds.
After this, we cut off the excess part of the wick, leaving a tip of 1 cm. If there are unsightly seams left from the mold, they can be removed with hot water. But with these manipulations, the candle may become cloudy, its shine may fade. Therefore, the optimal solution would be to choose a candle mold that does not contain seams.
DIY aroma candles
Making scented candles with your own hands is quite possible. In particular, this is worth doing for those who are true fans of aromatherapy. In order for you to get exactly the aroma candles, you need to add some essential oils before pouring them into wax. The choice of oil depends on your taste: you can add any oil, except perhaps rose oil. After all, its smell when burning will be suffocating and heavy.
It would be great if the decor of the aroma candle matches the plant whose oil we use. For example, using lavender oil as the basis for the aroma, pink or lilac dyes should predominate in the decor of the candle.

Using laurel or mint oil, it is better to decorate a candle with green shades.

Vanilla or cinnamon will be organic in warm, beige-brown tones of a candle.

It's not just oils that can make your candle scented; regular coffee is a strong and pleasant scent.
In principle, achieving the scent of a candle is not so difficult. Aromatic oils are added to paraffin, wax or gel. And then the process of making a scented candle is no different from creating a regular candle.
We advise experimenters to mix oils: you are guaranteed an unusual bouquet of aromas. If you are afraid of “doing something weird” and synthesizing incompatible smells, look at perfume recipes. Follow their instructions, just don't add rose oil.
Gel candles
Now let's talk about how to make gel candles with your own hands. In order to make gel candles, it is better to use ready-made gel wax. The recipes for making candles are often written on the packaging with it, and you can use it.
For those who are used to doing everything themselves, the following recipe can help:
- 5 g gelatin
- 2 g tannin
- 20 ml water
- 35 ml glycerin
First we need to dissolve the tannin in the glycerin through the heating process. We continue to heat, adding the remaining glycerin and gelatin to the composition. Add water to the resulting clear solution. Bring the mixture to a boil. Some cloudiness of the solution should not scare you: it will soon disappear. Until the water completely evaporates, you need to boil the solution.

You can also add essential oil to gel candles; this does not contradict the recipe. A separate, especially pleasant process is decorating gel candles. At the bottom of any transparent container we freely place decorative elements: beads, beads, pebbles, shells, sequins, coffee beans, dry plant stems or flowers. Then fill everything with gel transparent wax. This candle looks simply incredible: transparent, delicate, with a magical pattern inside.

Coffee candles
Making decorative candles is also not difficult. For example, you can make an original coffee candle. The decor is, of course, coffee beans. The principle of operation is this: a small one is inserted into a large mold. Between the walls of the two molds you need to pour coffee beans, and then fill them with candle mass.

As soon as the mass with coffee beans has frozen, the walls need to be blown with a hot hairdryer. Thanks to this, excess paraffin will drain and the coffee beans will be clearly visible.

Now the outer layer with coffee beans is ready. We put it back into the mold, fill the inside with paraffin/wax of a different color.

Coffee candles can be like this:

You can make sea candles in the same way: instead of grains, they will contain pebbles or sea shells. As an option - transparent gel candles with small pebbles or coffee beans.
Candle decoration options
How else can you decorate a candle you created with your own hands? The first way to add originality to your candle is to use unusual, unexpected shapes. Sometimes an interesting shape can be more advantageous than even the most skillful decor. A wonderful decorative element for candles is various types of glass stands.
In a specialized store you can find special stickers for decoration. Or decoupage is a great way to decorate candles. By the way, it is very fashionable among professional candle makers. Most often, napkins are used as the basis for decoupage. Don't forget about safety precautions: use special varnish for candles.

For lovers of original decor, the following option is suitable:
Before pouring, place shells, pieces of dried fruit, cinnamon, seeds, and dried flowers around the edges of the mold. Or let it be coffee beans in an ensemble with rhinestones and beads. But in the latter case, it would be more appropriate to talk about the decor of the finished product: we insert decorative elements into melted paraffin/wax.
An already frozen candle can be covered with bamboo or cinnamon sticks. You can add star anise or the same coffee beans to them. This will be a beautiful decoration for aromatherapy candles.

If you are using dried plants (or any other decorative items that can become flammable), the candle wick should be thin so that the candle only melts in the middle.

In principle, if you have the opportunity to go to specialized stores for materials, you will get a lot of useful tools there. For example, markers and outlines are sold there; they do not burn, but during the smoldering of the wick they melt along with wax/paraffin.
If you don't want to collect old candle cinders, use paraffin beads or candle gel. In specialized stores you can even find ready-made wicks (with a metal holder). For floating candles, you can purchase specially formulated wax.

Today, the imagination of a creative person is practically unfettered by anything: prices for materials for making candles are not high, the process is exciting and not as long as it might seem. Having once created a beautiful candle with your own hands, you are unlikely to deny yourself the pleasure of experimenting again.
And for inspiration, we invite you to watch a wonderful video master class on creating carved candles
Categories
Handmade is gaining more and more popularity. Extravagant jewelry, paintings, toys, decorative elements, gifts - this is just a small part of what passionate craftsmen and amateurs create with their own hands. Today we will talk about how to make a candle at home.
This process does not require special skills or equipment. After reading our recommendations and detailed master classes, even beginners can begin this exciting process.
CREATING A CANDLE: WHERE TO START
Making your own candles is much easier than you might think. And the main advantage of such an activity is that the necessary materials are easily accessible. If you look hard enough, you can even find them in your home.
MATERIALS FOR HOMEMADE CANDLES

Wax, stearin or paraffin are best suited for the job. Moreover, it is better for beginners to start getting acquainted with the latter; it is the least demanding to use. You can buy paraffin at the store or use leftover old white candles.
WICK
It is best to use natural threads as a wick, ideally thick cotton ones. Do not try to use synthetic wicks: such wicks will burn quickly and leave behind an unpleasant odor. To check if the thread is natural, simply set fire to its tip. If it melts, forming a hard ball at the end, you have synthetics.

If you have an unusual candle in mind and are thinking about how to make an original wick for it, then use colored floss threads. This is an excellent and natural material.
Remember an important rule: the thicker the candle, the thicker the wick should be.
It's easy to make it yourself. To do this, prepare a solution: dissolve 1 tablespoon of salt and 2 tablespoons of boric acid in a glass of water. Soak cotton thread or floss in it for 12 hours. Then dry them and twist them into a rope or braid them.
If you find this process tedious, carefully remove the wick from your finished household candle and use it.
CANDLE Mold
First of all, decide on the configuration of the desired candle, and then try to find a hollow object of the same shape. You may find it useful:
Cardboard bags for milk and juices;
. plastic cups for yoghurts and desserts;
. egg shells;
. silicone baking molds;
. glass goblets, wine glasses, glasses and glasses;
. baby beads;
. shaped ice cream molds;
. tin and glass coffee jars;
. empty tin cans.
The only requirement is that the mold material must withstand heating up to 100°C.
Another interesting option is to pour candles into beautiful transparent glasses. You won’t be able to get them, but they will look very stylish and unusual.
Sometimes scented candles are made in tangerine or orange peel. The fruit is first cut in half and the pulp is carefully removed. You can also use large shells or coconut shells.

DYES
A white candle is elegant but boring. Naturally, the question arises of how to color paraffin in order to obtain bright interior decorations.
For lovers of candle making, the best and cheapest option is to take wax crayons for children's creativity. Want to get a special candle? Look for pearlescent crayons - your creation will be unique.

Do not try to use water-soluble gouache or watercolor - you will fail. The dye will inevitably settle to the bottom or fall out in flakes. The finished product will look very unpresentable.
Utensils for melting paraffin
In order to melt the paraffin, you will need a small saucepan for a steam bath and an iron bowl. Experienced craftsmen recommend heating paraffin in a steam bath, considering other methods, including the microwave, to be fire hazardous.
To begin with, we recommend that you also use this method, proven over the years: place a bowl of paraffin in a container of boiling water. If you plan to have a colored candle, add the chalk immediately and stir the melted mass several times to obtain a uniform color.
FLAVORS AND DECOR
Any available materials are suitable for decorating candles. First, decide on the topic of your work. Pebbles and shells will effectively complement marine-style candles. For a New Year's theme, use beads, small cones, small decorative balls, ribbons and bows. Decorate Valentine's Day candles with hearts, sparkles, bows, dried flowers, coffee beans, etc.
It is best to scent homemade candles with essential oils, which can be purchased at your nearest pharmacy. Another option is to find vanilla cinnamon in your kitchen. You should add flavors to the melted paraffin at the very end, after coloring.
STEP-BY-STEP MASTER CLASSES
We bring to your attention a selection of accessible master classes that will help beginners learn basic techniques and techniques. If you already know how to create candles with your own hands, you can draw interesting ideas from them to implement in your creativity.
We invite you to create heart-shaped candles that will be an unforgettable gift for your significant other for Valentine's Day or birthday.

Watch a detailed video of creating a fragrant coffee candle and you will see that everything is even simpler than it seems at first glance.
RAINBOW CANDLES
Want to add a pop of color to your home? Handmade interior rainbow candles will help you with this.
To make them you will need the following ingredients:
. paraffin;
. stearin;
. wick;
. cylindrical shape;
. dyes corresponding to the colors of the rainbow.
You will receive more detailed information from a detailed video tutorial. For beginning craftsmen, it shows all the stages of preparing candle mass and creating a gradient transition of colors.
COLORFUL CANDLES IN LAYERS
Spectacular multi-colored candles in a transparent glass will become the highlight of your interior. How to make them, see our master class, illustrated with step-by-step photos.
Materials
Before you make colored candles with your own hands, prepare:
Transparent wax;
wax pencils;
disposable paper cups;
glass cups;
wicks;
ice cream sticks;
aroma oils;
microwave oven;
grater

Step 1. Grate regular transparent wax and fill paper cups with the resulting material. They only need to be filled a quarter full with this material.
Step 2: Microwave the cup for 45 seconds. Get it out. Mix the wax with a wooden stick. It should melt completely; if this does not happen, place the glass in the oven for another 30 seconds.

Step 3. Place the wick in an empty glass cup. You can attach the other end to an ice cream stick and place it on the top of the cup. This will make it easier for you to continue working. Pour some wax into the glass and wait until it sets. Thus, the wick should be fixed in the center of the cup.

Step 4: Remove the paper wrapping from the wax crayons. Grate them and add the desired color of crayons into separate cups with wax. Add shavings of one pencil to a third of a glass of wax to get a fairly rich color.

Step 5. Place the glass of colored wax in the microwave for 2.5 minutes. Take it out and, stirring, add a few drops of your chosen aromatic oil. You don't have to do this, but with oil your candles will emit a pleasant aroma.

Step 6. While holding the wick, pour the first layer of colored wax into the glass. To get an interesting pattern, tilt the glass at an angle and hold it in this position until the wax sets.

Step 7. In the same way, melt cups with wax of a different color and also, but at the opposite angle, pour them one by one into a glass cup. Fix the container in different positions each time until the wax sets.

Step 8. After forming a multi-colored candle, let the wax cool completely.

Bright and unusual candles are ready. You can use them for their intended purpose or give them to friends as souvenirs.

SOURCE: http://www.rukikryki.ru/
Another interesting idea is a square multi-color candle. Wax pencils are also used to color it. If you are a beginner, be sure to check out the clear video tutorial, with its help you can easily make such a cool craft as a gift for friends and family.
OPEN CANDLES
Decorative candles can be of the most varied designs, because talented craftsmen never tire of amaze with their imagination and creative experiments. To confirm these words, we invite you to familiarize yourself with the method of making an unusual openwork candle.

To work you will need:
. paraffin;
. optional coloring and flavoring;
. wick and holder for it;
. cylindrical shape;
. small ice cubes.
Melt the paraffin in a water bath. If the candle is supposed to be colored, color the candle mass; if desired, you can also scent it.
Place the wick in the mold so that it reaches the bottom. Don't forget to secure it on top with an improvised holder. Fill with crushed ice, not reaching a couple of centimeters from the edges.
Pour the melted candle mixture into the mold. Leave the workpiece until the paraffin has cooled completely. In this case, naturally, the ice will melt, and cavities will form inside the candle.

Carefully drain the water and remove the product by pulling the wick.

Be careful, this beauty is quite fragile and requires careful handling. This unusual openwork candle will be a wonderful gift for your family and friends. If you use paraffin from old candles for your work, you will get this beauty completely free.

You will receive visual instructions for action from detailed videos of creating openwork candles. After viewing them, you can make such beauty yourself at home.
Video #1:
Video #2:
Option No. 3: And if you are wondering what to give your friends for the New Year, then surprise them with a handmade red openwork candle. It will be an unforgettable gift and will bring a holiday feeling and Christmas mood to your home. Watch the master's work and be inspired by your own masterpieces.
MASSAGE CANDLES
The main ingredient for creating a massage candle is soy wax. By adding useful components to it, you can get a product that has healing properties. It is no longer a decoration, but a homemade cosmetic product that makes the skin soft and well-groomed.

Healing properties of essential oils:
Lemon essential oil will help rejuvenate your skin and cleanse your pores.
. Orange oil has an anti-cellulite effect.
. Rose oil stimulates the regeneration of skin cells and promotes skin elasticity.
. Rosemary oil can clear the skin of pigment spots and make it smooth.
. Patchouli oil does a great job of moisturizing.
. Lavender oil will delight you with its healing effect.
Solid vegetable oils are also added to massage candles. For example, cocoa butter is used to moisturize and tone the skin. And with its regular use, cosmetologists promise you smooth and soft skin.
Exotic shea butter can save dry skin from flaking. Coconut oil, rich in natural antioxidants, can smooth the skin.
General algorithm for creating a massage candle:
1. melt the wax with solid oils in a water bath;
2. let the mixture cool slightly and add liquid oils;
3. Cool the mass a little more and add essential oils, extracts and vitamins;
4. pour the resulting candle mass into the mold, after inserting the wick into it;
5. Wait for the candle to completely harden and remove it from the mold;
6. The hardened candle is ready for use.
We offer you the most common recipes for effective massage candles.
Recipe No. 1
Soy wax - 85%;
. avocado and shea butter (aka shea butter) - 5% each;
. patchouli essential oil - 2.8%;
. ylang-ylang essential oil - 2%;
. vitamin E - 0.2% (a few drops).
Light the finished candle and let it melt a little. Put it out. Put some warm wax on your hand and you can treat yourself to a rejuvenating massage session. Don't be afraid to get burned - the melting point of such a candle is much lower than a paraffin candle.
Recipe No. 2 “Massage candle with a calming effect”
Soy wax - 80g;
. shea butter - 40g;
. almond oil - 40g;
. cocoa butter - 20g;
. essential oils of sage and lavender - 2 g each.
A massage session with such candles is best done before bed. The calming effect of essential oils will help you relax and sleep soundly.
Recipe No. 3 “Massage candle with anti-cellulite effect”
Beeswax - 100g;
. cocoa butter - 60g;
. ground chili pepper - 5-10g;
. essential oils of orange and grapefruit - 3 g each.
Make sure you are not allergic to any of the ingredients in the candle. After the massage, you may feel a burning or tingling sensation, which is due to the presence of chili in the composition.
Regular massage will help get rid of the hated “orange peel” and make the skin soft and elastic.
WE DECORATE CANDLES USING DECOUPAGE TECHNIQUE
If you don’t have dye, but want to create something bright and memorable, don’t worry. The simplest candle made from cinders can be turned into a work of art. To do this, you need to have a little patience and decorate the product to your liking.
CANDLE DECORATED WITH DRIED FLOWERS
Dried leaves, stems and flowers will help you create an exclusive candle that will be almost impossible to repeat. The use of natural materials is limited only by the local flora and your imagination. This is when the ability to collect a herbarium will come in handy.

*photo by Lyudmila Klimova
To work you will need:
. any dried flowers;
. 2 candles - for decoration and a regular one;
. tea spoon;
. tweezers;
. nail scissors;
. paraffin for final coating.
From the dried flowers you have available, create a composition that you want to bring to life.
Heat a teaspoon over a regular burning candle (with the inner side over the fire, since the spoon will turn a little black, and in order not to stain the candle, we will then carry out all manipulations with the other side of the spoon).

Place a dry flower on the candle to be decorated and gently stroke its petals with the outside of a spoon so that they melt into the paraffin and do not stick out. Thick stems may need to be ironed several times while heating the spoon.

Carefully trim off any excess stems that extend beyond the candle with scissors.
Glue the remaining elements in the same way, choosing the desired location for them. Make sure that the edges of the leaves and petals do not stick out.

All that remains is to consolidate the result. Melt the paraffin in a water bath and pour it into a container into which you can completely dip the decorated candle.
Holding the candle by the wick, immerse it in melted paraffin, place it on a flat surface and let cool. If the petals were not smoothed well and protruding ends remain visible, repeat this procedure again.

Such an elegant candle will conquer any heart and will not go unnoticed. Complement it with a beautiful candlestick and it will become a unique decoration for your home.
DECOUPAGE CANDLES WITH PAPER NAPLES
The desire to decorate a candle could come instantly, but there are no dried flowers at hand. In this case, you can get by with paper napkins. With their help you can easily decorate a candle for any holiday.

Choose a napkin with the pattern you want. Cut out the necessary elements from a napkin. Carefully remove the bottom two layers of paper from the resulting blanks. Further, the principle of operation is similar to decorating with dried flowers.

Place the prepared element on the candle and iron it with a hot spoon. Sand the cooled surface with the rough side of a regular kitchen sponge. There is no need to immerse the candle in melted paraffin with this method.

Your masterpiece is ready. Make a beautiful composition of New Year's style candles, fir branches and colored balls. It will bring a good mood and a festive atmosphere to your home.
PHOTO DESIGN IDEAS
Want even more inspiration? Browse our selection of decorative candles. You will definitely find one that you want to repeat immediately.


We were able to convince you that it is possible to create unique masterpieces even from scrap materials? That is why candle making has become a favorite pastime for many, beginners and not only masters.

Original form templates:


Now you know what and how candles are made from, you can get to work. Don't try to use the photo you like as a template and an unconditional ideal. Be inspired by ready-made projects to create your own unique candles. A little effort and perseverance - and your masterpieces will become a standard to follow.


How to make drainage around the house - options for drainage systems, design rules
How to dig a toilet in the country
Paper window decoration: templates
In the footsteps of Robin Hood: how to make a bow with your own hands How to make one from a bow
How to make a bouquet of roses with your own hands?