All photos from the article
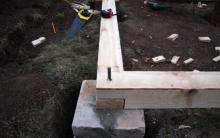
During construction, it is necessary to resolve the issue of attaching the first crown to the foundation. The further operation of the building mainly depends on this. For this operation, several technology options have been invented, which we will discuss below.
You will learn how to properly connect timber to a slab, strip, or pile foundation. We will tell you how this is done, and what materials and tools for them should be prepared in advance.

Two connection methods and their features
Before fixing the beam to the base, you need to decide on the type of the latter. Builders recommend using two options:
What do you recommend to our readers? Most builders are inclined to the first option, although here’s the paradox: they most often use the second method. This is due to its simple implementation, when you do not need to drill or tighten anything.

Fixation depending on the type of base
From other publications on our portal, you already know that in construction there are several types of foundations, each of which differs not only in design features, but also in the place where they are best installed.
This depends on various factors, among which the predominant structure of the soil on the site and the price of all work, since it is no secret that the earthen stage of building a house can exceed half the cost of the project.

Slab and strip
Before working on a slab foundation, you need to prepare:
- drill holes in the slab at a distance of 500 mm between their centers;
- insert bolts with locknuts into them;
- make holes of the same diameter and at the same distance in the beam while the foundation hardens.
Advice: it is best to carry out preparatory actions simultaneously with assembling the base or pouring it.
- Check the horizontalness of the top plane of the foundation and make sure that there are no depressions (fill them) or irregularities (scrape them);
- Cover the base with a waterproofing layer, for which ordinary roofing felt is excellent;
- Place a wooden crown on the studs and secure it with locknuts.

The same applies to the strip base. The only difference is that there is no need to install bolts in the upper part of the foundation; a dowel is used. In this case, the frame of the house should be prepared and assembled in advance.
Pile
For rigid fixation, the process instructions are as follows:
- insert U-shaped heads into the holes for the studs on the side of the piles;
- cut blanks from timber;
- install a beam into the hole in the head and secure it with a pin;
- mount the heads into the pile, for which you first place a beam on them, placing corner brackets under it, and then weld them to the piles;
- remove the log and weld the remaining heads onto the brackets;
Tip: place roofing felt between the metal and wood to avoid contact between them.
- install the foundation beams into the brackets and secure them with screws.

This method makes it possible to assemble the building much faster, since the lower tier of the building is used in the process.
Tip: If fasteners are not used, the timber should be mounted to the T-shaped head.
Upon completion of the work associated with installing and fixing the logs to the foundation, you can begin to build walls. It should be remembered that the crown beam must be completely dried so that there is no deformation of the house frame in the future.
Advice: before installing it on the foundation, the log must be treated with an antiseptic.
Tying the base with timber
This method can be used for foundations of any type, especially for pile foundations. Thanks to this, it is possible to evenly distribute the load from the frame of the house along the perimeter of the latter, thereby increasing its service life.
The tying process should begin after all cavities have been filled with mortar, but the heads have not yet been installed. Thus, it will be possible to avoid changes in the level of installation of piles due to processes occurring inside the soil.

In the photo - foundation piping
How to make a strapping
The process is as follows:
- Prepare a building level and check the accuracy and correct installation of the piles. All detected inaccuracies must be eliminated as quickly as possible;
- Place threaded rods in the corners filled with mortar;
- Also install aluminum corners in the corners;
- Join the logs together by sawing at the top and bottom, and then connect them at right angles. Be sure to wrap the joints with jute.
The technology for constructing frame houses came to us from America; of course, it has undergone changes adapted to our conditions and materials, but still the main points remain unchanged.
Installing the structure of such a structure does not present any great difficulties; you can cope with this work yourself, the main thing is to follow the instructions. One of the elements of building a frame house is the frame, which is divided into two types: upper and lower. Failure to comply with the correct technology when performing work on tying the frame will lead to the fact that the entire structure will not have a long service life and will lead to partial or complete destruction.
First of all, let's determine why it is necessary to bind the frame structure during the assembly process, and what functions it carries.
Purpose of the strapping

The implementation of strapping elements ensures, first of all, the structural strength of the structure, as well as the reliability of the house structure. The upper and lower trims have slightly different purposes from each other, although their design principles are the same.
Bottom harness . It fastens the strapping structure to the foundation base, redistributes the load from the walls of the house to the base; also, the lower strapping can serve as a foundation element such as a grillage.
IMPORTANT! The construction of the frame is impossible without installing the lower frame.
Top frame of a frame house. Performs the function of combining the internal and external walls of the house into a single whole. It also transfers the load and distributes it evenly from the walls or roof slabs located above.
Before starting work on installing the lower trim level, it is necessary that a high-quality foundation be provided for the house.
Foundation Features

The foundation of your house must be prepared in advance, a week before the start of work. Of course, the structural strength of the concrete structure will not be achieved earlier than in a month, but after 7 days the construction of the frame structure can begin. Such manipulations will not harm your laid foundation monolith in any way. For frame houses, you can use any type of foundation from the existing types. (You can read about it here) But there is one nuance that you must not forget about at the stage.
IMPORTANT! It is necessary to insert studs into the hardening concrete to a depth of at least 180 mm or drive in wooden plugs; they are necessary to secure the first row of strapping.
Of course, you can install anchor bolts after the foundation structure has gained strength. This can be done using a hammer drill, which will drill holes in the base and install anchors in them. But such actions can lead to destruction of the foundation in the future, so it is better to use the method of installing studs or wooden plugs. These methods will save your time on securing the strapping layer and money costs.
Materials

Before starting work, you should stock up on all the necessary building materials.
The raw materials you choose for construction will, of course, depend on the costs you have planned for home improvement. But you can’t discount design requirements that will dictate the compatibility of materials and their correct choice.
For the frame structure you will need:
- Wood for the frame. Lumber from it can be in the form of timber, boards or logs.
- Oriented Strand Board (OSB). It will serve for the construction of a frame wall.
- A waterproofing layer; ordinary roofing material is best suited for this.
- Fasteners. You will need nails - 50, 100, 150 and screws - 50, 100.
- Insulation.
If you contacted the services of a designer, then in the specification, he must provide a list of all necessary materials. Also their quantity and the possibility of replacing certain components. If you build it yourself, you still cannot do without design documentation, because you will not be able to calculate the necessary materials on your own without special knowledge. You can purchase a finished project by choosing the option you like. In any case, specialists carried out calculations for the selection of building materials, which were based on the following parameters:
- limit values for withstand loads;
- resistance to external and internal influences;
- the density of the material and, accordingly, its weight;
Requirements for strapping

A house made of a frame, like any other building structure made according to projects, carries many calculations, so each element must meet certain requirements. The strapping of a frame house is no exception:
- The board used must be identical and even; the standard size of boards for such work is 38x100 or 38x140; if timber is used, the dimensions will be 100x100, 120x120, 150x150.
- It is recommended to use coniferous trees as lumber; they have good qualities:
- long service life;
- required strength;
- straightness of the trunk, etc.
The wood used for strapping must be in good contact with moisture, which cannot be said about coniferous species. Its use will require additional antiseptic treatments. Hand processing of wood will be of very poor quality; it is not enough to protect the material from rot and mold for a long time. The ideal option is processing in special vacuum chambers. But as you yourself understand, this method will be expensive, and finding such an installation is quite difficult.
Another option is hardwood, they are very resistant to rotting, although the other parameters that softwood provides are lower..
- The binding layer should ideally follow the contour of the foundation base and correspond to the design dimensions of the house. Discrepancies in width will lead to moisture accumulation under the binding layer and rotting of the material. If the poured formwork has expanded over time and a protruding shelf has appeared, then treat it with a good layer of mastic, which will enhance waterproofing and preserve the wood used for tying.
- The devices used to fasten the binding layer should be located in the foundation in increments of no more than 1.8 meters. If studs are used, then their diameter must be at least 12 mm. One board should be secured with two pins.
- The surface of the foundation must be strictly horizontal. If there are irregularities, they can be eliminated with waterproof plywood. It is also permissible to use another row of boards, and plywood can be inserted between the first and second tying row.
Installing the bottom trim

This is the first layer of boards that is laid directly on the foundation base and is firmly attached to it. The materials have been purchased, the foundation has been poured and maintained, and the framing of the frame house can be installed:
- We check the surface of the foundation and eliminate distortions, if any, as described above.
- We lay a waterproofing layer. We glue the roofing felt using mastic onto the surface of the foundation. Waterproofing will protect your foundation from moisture penetration.
- The binding process begins by marking the corners of the assembled structure. We assemble the first corner from which the entire harness will start. The correctness of the work done can be checked using a construction triangle.
- We begin laying the boards. The corner joints need to be connected by sampling; the most famous and reliable options are “half a tree” and “in the paw”. Before fastening the assembled units, all corners and diagonals must be drawn out. There are several ways to capture these samples.
Let's look at some of them:
1st method. First you need to make a hole in the place where the corner with a diameter of 20 mm will connect. We drive a wooden pin into the resulting passage that corresponds to the size of the hole. The entering end from the surface should be 8-10 mm long.
2nd method. The connection is made by driving in nails. The size of the fasteners used must be at least 150 mm, and the distance to the edge more than 2 cm.
3rd method. Fastening is carried out using studs installed in the foundation or anchors, which are planned to be fixed during the strapping process.
The boards of the bottom trim, in addition to being connected to each other, are also attached directly to the foundation. We transfer the distance of the stud installation locations onto the boards and drill the corresponding holes. We install the boards of the lower trim row.
- Checking for correct assembly. Before fixing the assembled device, we control the horizontality, as well as the accuracy of connecting the corners using a construction square.
- Fastening the tested and assembled strapping device is carried out in three ways:
- The installed boards are fixed on studs with nuts, and be sure to place washers under them. Their use is mandatory because the nut being tightened can become embedded in the wood.
- if the studs were not laid in the foundation, fastening must be done using anchors. The installation location of the first anchor will depend on how the corner joints are fixed. If they are connected with nails or pins (methods 1, 2), then the position of the anchor will be on the line of the internal contour of the foundation. And the 3rd method involves placing the anchor strictly in the middle of the corner. The spacing between anchors will depend on the length of your walls. It must be at least 1 meter, but no more than 2.4 meters. Short walls should have at least two anchors.
- The connection of the lower frame with the foundation is carried out by driving nails into wooden plugs installed in the foundation. This method is the most reliable of the three.
- After all the boards are fastened together and fixed to the foundation, the assembled structure is checked again for correctness in level, then holes are made in the lower frame for the frame posts.
The installation process, which involves the lower frame of the frame house, can be considered complete. Now you can begin installing the frame posts. The top trim is laid only after all work on the construction of frame racks has been completed.
Installing the top trim

For these works, the same material is used as for the lower connecting device, the requirements for it are the same. The use of boards of equal size is necessary in order to obtain identical sections of the lower and upper frames. Fulfilling this condition will simplify the future installation of sheathing and insulation of walls.
Attaching the harness to the vertical posts can be done in two ways :
- connection using corners, for this purpose wood fastening materials are used;
- fastening by cutting, grooves must be pre-cut in the boards, and only after that they can be lifted upward for installation. Fastening with vertical posts can be done with nails; they need to be driven in at least 10 cm;
Important point! In both cases, the racks must take a strictly vertical position. In the version with fastening by cutting, the upper grooves should be located in line with the lower slots.

Failure to comply with this requirement will lead to a violation of the integrity of the entire structure. Diagonal bevels will help add rigidity to the entire assembled structure. One rack is strengthened by four such elements - two at the bottom and two at the top. At this stage, it is necessary to once again check, using a plumb line or level, whether the frame corresponds to horizontals and verticals and whether there are any curvatures, and eliminate them. If the width of the slopes is smaller than the racks, it is better to install from the inside of the frame, then the laid layer of insulation will be easier to install.
Upper double harness
It is not always possible to limit yourself to installing one row of strapping. If the house structure has a second floor, another row is simply needed for tying. Also, double piping of a frame house is performed on all load-bearing walls on which the ceiling will be installed. A second row is not required for interior walls only.
Previously, there was an opinion that the location of the joints of the second tying laying should be strictly above the racks, as it turned out, this is not at all necessary. The main thing is that the spacing between the joints of the first and second layers is 1200 mm. The material used for the second row is subject to all the same requirements as for the previous one. The lumber must be smooth and of the same size. The joints of the first and second rows should not coincide along the same line. The top board should overlap the joint of the previous row. After the second binding layer has been assembled, you must first complete the work on leveling the walls of the frame. And only after finishing can you start fixing the second row to the bottom layer of the binding. Fastening can be done using self-tapping screws or nails.
After completing the work on the piping equipment, you can begin the construction of the second floor or laying the floor. The next floor is built by analogy with the first. The piping of the second floor of the frame house is also identical.
To understand the construction of the frame of a house with your own hands, you need to consider how the lower and upper trim is performed and how to install the vertical posts of the frame, and determine the most important points of construction.
At this point you should be prepared:
- Foundation that has stood for at least 7 days. Concrete gains full strength in 28 days, the frame can be assembled after 7 days. It is safe for the frame and the foundation. When pouring a grillage, sometimes pins (anchors) are placed in it to secure the beam of the bottom frame. If you plan to fasten the beam this way, then the foundation at this stage will look like pillars connected by a grillage with protruding anchors.
- Wood for the frame of a house. If the wood is not dried, it must be mounted as soon as possible and, after assembling the frame, immediately covered with OSB. This means that OSB boards must also be prepared in advance.
- Lumber treated with antiseptic.
- Ruberoid for organizing anti-capillary waterproofing of the foundation. A simple roofing material without ultraviolet stabilization and sprinkling will do (it's a little cheaper).
- Fastening elements. It is impossible to calculate exactly the number of fasteners for the frame of a house, since fasteners are a material that often breaks; in some places less of them will be needed, and in others more than planned. To begin with, you can order 9-10 kg of nails (1 kg - 50 mm, 3 kg - 100 mm, 5 kg - 120 mm) and self-tapping screws (100 pieces - 50 mm, 500 pieces - 100 mm). Then it will be easy to estimate the required quantity and purchase the missing fasteners.
Tools:

Figure 1 – selection of wood to the floor and to the paw.
- perforator;
- Miter saw;
- hand saw;
- level;
- hammer;
- pliers;
- roulette;
- circular saw or chain saw;
- mites;
- crowbar;
- shovel and sledgehammer;
- drill;
- electric plane;
- a set of magnetic screwdriver attachments;
- construction pencils;
- jigsaw;
- screwdriver;
- metal square;
- axe;
- chop cord.
Before purchasing lumber, it is necessary to determine the thickness of the thermal insulation for the floor, walls and ceiling, since to increase the thickness of the insulation it will be necessary to increase the frame.
Return to contents
Methods for connecting beams

Figure 2 – Fixing beams at corner joints.
The timber is laid on the grillage along the roofing material already laid on it. Roofing felt is laid immediately before laying the beam of the bottom trim. If it is left uncovered for several months after installation, it may melt or tear. In addition, the roofing material comes here without UV stabilization, so it cannot be left open. Therefore, before laying the bottom trim beam, the foundation can be covered on top with plastic film. This will prevent the concrete milk from being washed away during rain.
Before laying the timber for the lower trim, check the horizontalness of the upper plane of the grillage with a level. You can lay timber and waterproofing if it is completely flat. Irregularities larger than 1 cm must be leveled with a solution and allowed to stand for 7 days, and then waterproofing and timber for the lower trim must be laid. Unevenness less than 1 cm is leveled by placing planks under the timber for the bottom trim, because a solution of such thickness will not sufficiently adhere to the tape and will gradually move away and crumble.

Figure 3 – Scheme of attaching the timber to the foundation.
The beams for the bottom trim are joined together by tapping at the corners. Of the various sampling options, 2 methods are recommended: sampling wood to the floor and to the paw. These are fairly reliable options; you can choose any of them (see Fig. 1).
The bars are fixed at the corner joints. You can use one of the following connection methods for this:
- The beams are connected with an anchor, which secures the beam for the bottom trim to the foundation.
- The beams are connected with nails (4 nails at least 150 mm long for each corner). Fasten the nails, retreating from the edge of the beam at a distance of 1.5-2 cm.
- At the junction of the beams, a hole with a diameter of at least 20 mm is drilled. A wooden dowel (a pin made of dried oak) is driven into the hole with a hammer; it should protrude at least 8-10 cm above the surface of the beam. This is necessary for the upcoming fastening of the corner posts. The diameter of the dowel should be the same as the diameter of the hole. Or the dowel may have a square shape with a side slightly larger than the diameter of the hole (Fig. 2).
Return to contents
Fastening the timber for the bottom trim

Figure a, b – Anchor installation diagram.
Before fastening the beams together, you need to check the geometry: angles and diagonals. In addition to the fact that the beams of the lower frame are attached to each other, they are also attached to the foundation. If, at the stage of concreting the grillage, studs were laid as fastenings for the strapping beam, anchors will not be needed. You can immediately begin drilling holes in the timber for the studs in places that correspond to the location of the concreted studs. You should skip the step described below and proceed to attaching the bottom trim beam.
If the studs were not laid, the beam will have to be secured with anchor bolts with a diameter of 16 mm. The anchor must penetrate into the foundation to a depth of at least 100 mm and therefore, with a height of the bottom trim of 100 mm, the entire length of the anchor is 200 mm (see Fig. 3).
Holes for the anchor are drilled into the hardened concrete of the grillage. Then holes are drilled in the trim boards in the places where the anchors are located.

Figure 4 – After fastening the beams of the lower frame together and securing them to the foundation, vertical frame racks are installed.
The timber is secured to the foundation using nuts and wide washers. The washer will increase the contact area between the nut and the wood. If you tighten the nut without a washer, it will sink into the wood, and this is completely undesirable. The nut must be hexagonal (turnkey). A square nut, a round nut, a screwdriver, etc. will not work here. When connecting the beams of the lower frame in the corners with nails or dowels, the anchor is not installed in the corner. In this case, the first anchors are placed along the continuation line of the foundation strip contour (see Fig. a).
If you did not fasten it with nails or dowels in the corner, the first anchor will be in the corner (see Fig. b) and between the corners in increments of approximately 1-1.2 m.
The pitch can sometimes be wider, but not more than 2.4 m. If there are short walls, then there should be at least 2 anchor bolts on one piece of timber for the bottom trim.
Now check the diagonals, angles and levels of the upper frame timber once again. If necessary, the upper plane is leveled with an electric planer. After fastening the beams of the lower frame to each other and securing them to the foundation, install the vertical posts of the frame (see Fig. 4).
Return to contents
Installation of corner and non-corner racks

Figure 7 – Scheme of timber cutting.
Install the corner posts of the house frame with your own hands.
- If the beam of the bottom trim was connected at the corners with an anchor or nails, then the corner post is secured with steel corners. To do this, use reinforced corners.
- If the method with dowels was chosen to connect the beams at the corners, then vertical extensions of wooden dowels of 8-10 cm will remain. Now corner posts are put on these dowels.
To do this, drill a hole with a diameter of approximately 20 mm in the lower end of the rack (depending on the diameter of the dowel). Each corner post is put on a dowel and secured with temporary jibs, which are also needed when fastening the corner post with steel corners.
Installation of non-corner posts
There are two options for mounting racks:
- Attach the racks using the cutting method (cutting into the floor of the timber or full cutting).
- Fasten with galvanized steel corners (approximately 2 mm thick).
Fastening with corners is best done with galvanized self-tapping screws, but you can also use black non-galvanized ones.
To attach the racks using the cutting method, markings are applied to the beam of the lower frame and grooves are made according to the size of the rack (depth 30-50% of the height of the beam). For example, if the height of the beam is 100 mm, make a cutting with a depth of 30-50 mm (see Fig. 7).

Figure 8 - Temporary fastening of the frame with long slopes.
Regardless of the method of fastening non-corner posts, they must be secured with temporary jibs. You can install a long jib on several racks at the same time or 2 short jib on each rack.
Temporary fastening of the frame with long bevels. (Fig. 8.)
If the frame layout for all walls was not made in advance, that is, it was planned to work without drawings, it is necessary to take into account at this stage that the pitch of the racks in the places of door and window openings may be different. Therefore, you should still sketch out all the main elements and walls, of course, with dimensions.
The height of the vertical post when fastened with corners is equal to the height of the floor. And when fastening using the cutting method, it should be higher by 2 cutting depths.
The bars of the upper trim at the corners are also joined using cutting.
The upper frame beam is attached to the vertical posts in the same way that was chosen for attaching the posts to the bottom frame (steel angles or cutting).
Modern designs of columnar and pile foundations have a very simple installation process and low cost compared to other types of foundations. In this regard, the popularity of such structures is increasing every year. Even an untrained person can handle installing a pile foundation, but, as in any construction, there is a nuance here. Most often, when constructing foundations of this type, tying a columnar foundation causes some difficulties.
Foundation for a wooden house
When constructing wooden buildings, columnar and pile type foundations are chosen. These types of bases have the following advantages:
- withstand heavy loads (from 5 to 12 tons);
- the pressure is distributed evenly to all support points of the structure (this reduces the load on the ground);
- increase the service life of the wooden parts of the building due to the natural air exchange of the foundation.
However, in order for the base to fulfill all its tasks, it is necessary to correctly carry out all stages of work, and especially the lower trim.

Strapping technology
The design of a pile and columnar foundation consists of several components, between which there is a certain distance. Tying a columnar foundation with timber unites the fractional parts of the foundation and makes them a single, functional element. If you neglect or make mistakes at this stage of work, the integrity of the walls and roof of the building may be damaged.
The beam system connecting the support points of the foundation is called a frame (grillage). The main role of the piping is to distribute the pressure of the building structure over all pillars or piles. Also, the grillage is a guarantee of the geometric correctness of the future frame and roof of the building.
Wooden harness
Traditionally, wooden buildings are placed on a wooden grillage made of timber. Selected raw materials are selected for this task
Important! When purchasing timber for a grillage, you should inquire about drying and processing of the material.
Due to constant contact with fumes and moisture, the grillage can be affected by fungus and rot. To increase the strength of the structure, when constructing piping, even from very high-quality raw materials, special attention is paid to waterproofing. You can do this work yourself.

The best material for a grillage is raw materials from coniferous trees. Unlike other materials, it has certain advantages:
- low cost;
- long service life;
- increased resin content of the rocks reduces the effect of moisture on wood;
- increased strength.
Note! When purchasing material for a grillage, you must inspect the timber yourself. Raw materials with rot, knots and large cracks are not suitable for such work.
Wood for tying must undergo careful preparation. After purchasing the timber, it is necessary to treat it with antiseptics, this reduces the risk of destruction of the material by beetles and putrefaction. To protect wood from fire, I treat it with fire retardants, especially for resinous species, which are most susceptible to fire.
The most durable type of wood for a grillage is laminated veneer lumber. During the production of this raw material, prolonged drying is required. In addition, due to machine gluing under pressure, each beam has a clear shape, which reduces the risk of errors during construction.
Types of grillage assembly
When the material for the strapping is selected, it is worth deciding on the type of fastening of the structure to poles or piles. Which fastening method to use for the grillage depends on the material of the pillars and framing beams.
Clamps
The technology is considered universal - it is used to fasten grillages made of wood and metal. The method fully performs its functions on fastening piles of any diameter. The technology is used only in cases where the structure does not have an inverted U-shape. For connection, oblong rectangular bars are used. They are attached to the piles by welding or self-tapping screws (depending on the material). To level the block, use a level. After fastening all the bars, beams are attached to them in the letter “P”. The bars create a strong fastening.
Thread
If the thread is made incorrectly, there is a high risk of cracking of the components. However, the other properties of such fasteners are very high. Each element of the foundation is wrapped with roofing felt and treated with drying oil (this reduces the pressure and protects the material from rotting). After that, a beam is laid on two distant pillars and fastened with self-tapping screws. The fixed beams are carefully punched to the desired depth with a hammer. Most often, the threaded fastening method is combined with connection with clamps to increase the stability of the structure.
Welding
The best way to connect a metal structure. Other types of fasteners are not able to withstand the pressure of a metal structure. Electric or gas welding is used for work. First, a metal beam is laid on two support points and welded to the piles, then two other beams are attached to the sides to form a U-shaped structure. Then the remaining elements are sequentially fastened.
When installing a wooden frame on a strip reinforced concrete foundation, a grillage is also used. The strapping here serves as a fastening of the timber and the concrete base. In this case, the fasteners are embedded studs or.

When performing work, many encounter problems that are not discussed in this article. Before you start working on the grillage, you should familiarize yourself with the following advice from professionals:
- The width of the beam for tying should be 2 times wider than the diameter of the pile or pillar; this must be checked before purchasing materials. Otherwise, parts of the foundation are subject to cracking, and this will lead to the destruction of the grillage and subsidence of the log house.
- To ensure that there are no differences in the foundation during construction, it is necessary to check the height of the pillars and piles. All components of the foundation must be the same size, otherwise the walls of the building will have large differences in height.
- In order for the pressure of the grillage to be applied evenly to all piles or pillars, the fasteners are placed strictly in the center. This technique also increases the service life of both beams and parts of the foundation.
In the video below you will see detailed strapping technology. Also, you will learn various tricks that will not only increase the strength of the structure, but also reduce construction costs.
The piping in a frame house is designed to ensure the joint operation of the main load-bearing structures. The lower one plays the role of a grillage for a columnar or pile foundation, and the upper frame of an individual frame house takes on the function of a mauerlat. Proper installation of these elements ensures high reliability of the building. It is necessary to consider each type separately.
Bottom frame of the house
The bottom trim is most often a wooden beam with a section of 150 by 150 or 200 by 200 millimeters. The section dimensions can be selected by calculation, but they should not be less than the thickness of the building walls. The main function of the lower frame is to ensure the joint operation of the free-standing supporting structures of the house, so it is not needed with a strip foundation.
The grillage can also be made from rolled metal, but this is usually prevented by the following points:
In addition, it is best not to combine wood with steel elements due to the difference in the physical properties of these materials.
When the strapping device can be neglected
In some cases, installing lower trim in the house will become an unnecessary event. These options include:
- construction of houses on strip foundations;
- construction using Canadian-American technology;
- frame-panel construction.


When building a house in the second case, SIP panels (sandwich panels) are used. The system involves quick assembly of a house, similar to a construction kit. The disadvantage of this technology is the impossibility of building a house with your own hands.
Harness requirements
When doing work with your own hands, you must carefully monitor the following points:
 Waterproofing diagram when attaching timber to the foundation
 - quality of lumber (coniferous wood of the first or second grade is used for load-bearing structures, humidity according to regulatory documents should be 12%);
- compliance with geometric dimensions;
- reliable connection of all piping elements, including high-quality fastening to foundation elements;
- reliable waterproofing in places where the strapping is attached to concrete or metal foundations;
- mandatory treatment with fire retardants (fire-retardant compounds) and antiseptics (prevent the appearance of mold and mildew on the surface of the wood), which is carried out for each element separately before installation work begins.
Material selection
As already mentioned, the lower frame of a frame house can be made of wood or metal. Wood is better suited, but when using it, the problem of choice again arises. There are two options for wood beams:
- solid timber;
- laminated veneer lumber.


The second option is characterized by increased strength and the possibility of use with large loads or spans. The price is higher than for a beam of the same section made of solid wood. To build a house with your own hands, the use of expensive laminated wood is most often not economically feasible, since ordinary timber is sufficient for light frame buildings.
Ultimately, we can conclude that for the construction of an individual house, the best option would be a solid beam as a frame.
Attaching the harness to the foundations
When the foundation of a house is made of concrete or brick, anchoring is used. At the stage of foundation construction, they are provided with anchor bolts with a diameter of 12-16 mm.
 DIY anchoring to the foundation
 The length is selected to ensure sufficient fastening of the strapping beam. It should go into the wood at least 8-10 cm, but it is better to provide through fastening.
The timber is attached through and through to the piles using bolts with a diameter of at least 12 mm. As a second option for fastening elements, you can use metal studs of the same cross-section. It is recommended to treat the fasteners with protective compounds to prevent corrosion.
Strapping beam connections
When doing the work yourself, it is necessary to ensure a reliable connection of the grillage at the corners, at the junction of the external and internal walls. If the building is long enough, the standard length of lumber may not be enough and you will need to connect the strapping beam along the length. Connections can be made in the following ways:
- “in the paw” and “in the floor of the tree” suitable for increasing length;
- "dovetail"(the most airtight, but difficult to implement) is suitable for connecting internal walls to external ones;
- "root thorn" Best used for corners;
- "butt"– the simplest type of connection, characterized by low reliability.


The length of the joints “in the paw” and “in the floor of the tree” is selected depending on the cross-section of the strapping beam. The connection size should be within 2-3 beam heights. For reliable fastening, dowels are additionally used.
Frame house floor
A rational and economical solution would be to use the bottom trim as an element of the floor of a frame house. The timber plays the role of load-bearing beams, between which effective insulation is laid. The first floor floor pie is mounted on top of the frame.
The required insulation thickness is determined depending on the construction area. On average, its size is 150-200 mm. The calculation is made according to the joint venture “Thermal protection of buildings”.
This beam is necessary to evenly distribute the weight of the roof and snow load transmitted by the rafters onto the walls. To simplify DIY work, the upper and lower trims are made of the same material with the same cross-section. The beams are fastened together in the same way as in the previous case.
 Scheme of the upper trim of a frame house
 Attaching the harness to the frame posts
Fastening can be done using notches or steel angles. When using the first method, it is necessary to calculate in advance the height of the racks, taking into account the cutting.
 Options for attaching vertical frame posts to the bottom frame beam
 In the strapping beam, special grooves are provided for each rack, and they must coincide with the grooves for fastening the racks in the lower frame. Additionally, the structure is fixed with nails. When fastening with your own hands using the corners, the racks are fixed with self-tapping screws.
Attaching rafters to the top frame
The Mauerlat absorbs vertical and horizontal loads from the rafter system. He distributes the horizontal one evenly on the walls. The horizontal load is the thrust.
Fastening is most often done by cutting. After which the structure is additionally fixed with two nails on both sides. It is possible to provide for fastening using corners.
 Installation of rafters to the top frame
 When tying a frame structure with your own hands, it is imperative to control the quality of the source material and the reliability of the connections.
This guarantees the reliability and durability of the structure. If the technology is followed, the timber will reliably connect all the free-standing frame elements into a single strong system and ensure the stability of the wall posts and the uniform distribution of the load on the foundations of the house and on the walls from the roof.


Fabulous and festive stencils for window decorations for the New Year
How to choose a watermelon - determine ripeness and sweetness How to tell if a watermelon is ripe or not
How to connect a water heater in a country house Connecting a boiler in an apartment
How to make a reliable drainage system on your site with your own hands How to drain a garden plot with your own hands
How to make drainage around the house - options for drainage systems, design rules