Finishing a house with metal siding is usually used as a roofing method. Meanwhile, the operational and design advantages of this material allow it to be used as a universal facade cladding - reliable, beautiful and quickly erected.
Finishing a house with metal siding - the pros and cons of a comprehensive renovation
The repair advantages of siding are due to its layered structure and modern technologies in the production of such cladding:
- Ease. A square meter of facade siding weighs about 1-1.5 kilograms, which means not only ease of installation. Many facade walls will not physically withstand cladding with stone or other heavy panels - siding allows you to significantly save on strengthening the wall base;
- Strength and durability. Siding based on steel sheets, coated with zinc and polymers, has the strength of steel, it is very resistant to atmospheric adversities and accidental mechanical shocks;
- Wide selection of colors and textures. Collections of large companies include metal siding for logs, the installation of which is relevant for walls, panels for roofs and plinths, elements for precise mating, and high-quality fastening fittings. Metal siding makes it possible to clad a house from the roof ridge to the drainage ditch according to a single design plan. Other materials will have to be combined, selected separately, purchased, installed, etc.;
- Cost-effectiveness and speed of repair procedures. Compared to natural wood or artificial stone, siding is several times cheaper. It can be installed on newly finished, so-called “fresh” walls, at any time of the year. The remains of the panels can be used as decorative inserts for interior decoration, so that there is almost no installation waste left;
- Possibility of finishing walls with fancy geometry. With a limited repair budget, there is often simply no other opportunity to veneer complex surfaces;
- Installation of metal siding is the installation of a ventilated facade. Internal installation gaps can be easily insulated without additional investments, or this procedure can be combined with insulation of walls from the inside. Thus, an attractive appearance will be combined with full thermal comfort of the entire house.
Of course, finishing a house with metal siding has its own characteristic “disadvantages”, but they are few. Firstly, this is the need for careful and labor-intensive installation of the frame. Secondly, the need for a large number of auxiliary materials - from initial profiles to fastening fittings, cornices and corners. Thirdly, with a lack of experience, a common mistake is inaccurate (uneven) cutting of siding panels - as a result, they are rejected, and new ones have to be used in place of the “inset”.
With the development of installation skills in working with siding, all the mentioned disadvantages are more than compensated for by the repair and design advantages of durable metallized cladding.
Metal siding under a log - installation of imitation solid wood
For a long time, sheets of metal siding were produced in the usual “flat” form. Relatively recently, three-dimensional structures have appeared that exactly repeat the structure of centuries-old log houses - geometrically, in texture and in color. This material is intended specifically for walls; there are no precedents for using logs for roofing work even in ancient Russian architecture. A log roof covering would be even less appropriate these days - but as a wall cladding, such a repair solution is distinguished by its versatility and practicality.
Durability of facade repairs according to the principle “Once and for all!” achievable only with siding based on metal sheets. Plaster has a service life of 5-8 years, cladding with natural/artificial stone - up to 15 years, With proper installation, metal siding will last up to 25 years without the slightest decrease in aesthetic appeal and operational reliability.
How to cover a house with metal siding - installation instructions
Like most repair procedures using a frame, at least 90% of the quality of all installation work depends on the accuracy of its installation.
How to cover a house with metal siding - step-by-step diagram
Step 1: Calculation and preparation
It is necessary to measure all the walls (and the basement with the roof, if included in the cladding plans). It is best to take measurements from scaffolding - this way you can evaluate the strength of the wall base for metal siding. If the plaster from the wall is falling off in whole layers, if the masonry is loose, and the beams are cracked, decorating a rotten house with siding will not help, you will only waste money and effort.
For proper fastening reliability, the strength of the walls is necessary. If necessary, a mesh can be applied to individual areas, followed by plastering with cement mortar, or individual bricks or beams can be replaced. It is necessary to carry out such installation preparation several days before installing the siding panels - the cement must “set” well.
Step 2: Cleaning and marking
The entire wall surface is swept with a broom, layers of mortar, flaking paint, remnants of the previous generation of putty, etc. are removed from it. All foreign objects (nails, trim, other decorations, etc.) must be removed from the walls.
The basic fastening element for wall siding is a proprietary bracket.
They are screwed in vertical rows, with a distance between each row of 50-70 cm and the same clearance. To fasten the brackets to the walls, use long (at least 50 mm) self-tapping screws. Vertical marking lines must be applied strictly according to the level, drawing even grooves on the walls. As a result, the house will be “lined” with vertical stripes for future fasteners.
Step 3: Mount the frame
A huge advantage of branded brackets is justifiably considered to be their adjustability in height (that is, distance from the wall). After installing the vertical rows of brackets, T-shaped strips are screwed to them. It is important to use metal T-bars, not wood! Saving on this fittings will lead to unreliability and a short service life of the entire cladding. Bolted (that is, collapsible) fastening of metal frame strips is preferable.
T-shaped metal strips can be fitted to the brackets using pre-punched mounting holes. However, the size of this adjustment is small, it is only a few centimeters. The frame is measured using a long (up to 2 meters) and precise level. If any part sticks out or is recessed, the brackets are reinstalled. Auxiliary planks are placed under them or the wall is cut down. The main task is to ensure that the T-shaped metal strips are completely plumb and parallel to each other.
Step 4: We complete the installation of the frame and insulate the walls
After precise installation of the T-shaped moldings, fastening strips under the siding itself are screwed to them using short self-tapping screws. It is important to maintain consistency of size between the fastening strips, with an accuracy of a few millimeters. Otherwise, the configuration of the metal siding will shift, and the entire structure will soon deform.
Before covering a house with metal siding, it is necessary to decide on the insulation and type of wall insulation. Any type of thermal insulation is installed under the metal sheathing - from rolled polymer to the usual polystyrene foam. It is important to leave a gap between the insulation and the back of the frame in order to maintain internal ventilation of the facade.
Step 5: Finish siding
With high-quality and durable installation of the frame, siding panels are installed quickly and easily. Work starts from the bottom up and goes all the way to the roof. It is convenient to cut metal siding with a sharp hacksaw. The joining of individual strips is carried out using special joining strips or overlapping; the first option is more reliable in the long term.
Short self-tapping screws for facade fastening are assembled with rubberized washers - they seal the holes and take into account the thermal expansion of the metal. Taking into account the large number of screws used (the installation pitch is from 12 to 18 cm), it is necessary to stock up on a screwdriver - manual installation of siding with an area of \u200b\u200b10 m2 will lead to calluses from a screwdriver on the most tired hands. Corners and joints are covered with decorative strips last, when the entire surface has already been tiled.
Everyone dreams of their home looking beautiful and aesthetically pleasing. It’s good if you have a new wooden house, which you can simply paint with special mastics, and it will look good. What if the house is old? A good and high-quality cashing of the building facade will help here. There are many cash-out materials available on the market today. Siding occupies a leading place among such facade materials. Siding comes in different types, such as vinyl and metal. Installation of metal siding can be easily done yourself. This article and the video that is presented in it will help you with this. Instructions are also included with each material.
Metal siding is a material in the form of metal panels that replicate wood siding, also called block house. These panels are made from the finest galvanized steel. The front side has a multi-colored polymer coating. Siding can withstand very high and low temperatures. That is why it is suitable for any climate. It is not fire hazardous and can be easily matched to the color of your roofing material. A wooden house covered with such material looks rich and has its own design.
If you attach the siding correctly with your own hands, its fasteners will not be visible from the outside. Siding can be placed either horizontally or vertically on a log. But if the panels are placed vertically on a log, the required sealing of the joints will not be achieved. 
The instructions for this material say that the thickness of the standard panel is 0.5 mm, the length can be different and is usually up to 6000 mm. It is 265 mm wide, profile height 15 mm. This panel weighs 5.13 kg.
The complete set of such panels consists of:
- Outdoor corner. (2 types)
- Inner corner. (2 types)
- Splasher.
- Mounting strip.
- Platband.
- Upper tide.
- Window drainage.
- Starting bar.
- Slope plank.
Using these components, you can easily install siding panels yourself. Calculating the number of components you need is quite easy. Draw a diagram of your house and count how many external and internal corners you have.
If you are unable to do this yourself, then when you buy siding in a specialized store, specialists will calculate everything for you.
Also, when purchasing components, you need to purchase mounting material. This:
- Dowel - nails (8x100)
- Galvanized self-tapping screws (4.2x16)
- Galvanized self-tapping screws with sealing gasket (4.8x35).
Installation of metal siding
To do this work yourself you will need: 
- metal siding;
- components;
- fasteners;
- screwdriver or hammer;
- roulette;
- level;
- metal scissors or circular saw.
It is not advisable to use an angle grinder, since when cutting it damages the coating, and this leads to corrosion.
The technology for installing siding with your own hands must follow a strictly structured order, which can be observed by watching the thematic video:
Instructions in pictures


Lathing for siding installation
Lathing is the installation of a structure onto which siding will already be attached. Before starting such work with your own hands, you need to measure the building and check the evenness of the walls and corners. If the building is low, then you can mount a cheap suspended structure directly on a log.The lathing for metal siding is made from steel profile elements. Since they are not susceptible to corrosion and the harmful effects of the environment. Of course, you can also use wooden profiles. The width must be at least 50 mm, the thickness depends on the thickness of the insulation you choose. Before attaching them to a log, you need to treat them well with wood antiseptics.
Siding attached to wood sheathing will void the store's warranty.

An example of such fastening can be seen in Figure No. 1 (26 - main lathing made of timber, 23 - insulation, 24 - windproof film, 19 - non-main lathing, which is attached to the main one, 29 - dowel-nails, 1 - wooden profile). This is one of the cheapest types of lathing today. The sheathing should be attached to the log and try to ensure that the fasteners do not get into the joint of the logs.
The protective film is attached to the sheathing with your own hands using a construction stapler. The pitch of such sheathing should be no more than 50 cm. The higher the number of floors of the building, the stiffer the structure should be and therefore the smaller the sheathing pitch.

Siding panels must be fastened to the sheathing on the profile with self-tapping screws, the diameter of which is at least 4.2 mm.
It is most advantageous to make lathing from metal profiles using ventilated purlins. The diagram of such a sheathing can be seen in Figure 2 (5 ventilation purlins, 1 metal profile, 27 dowel nails, 18 galvanized screws). Vertical purlins have a size of 0.7 mm and are attached directly to the log. This mount is quite strong and has ventilation, which is good for a wooden building. Its only drawback is that this design does not provide insulation. The pitch of this type of lathing, even at high heights, can be 50 cm.

The entire structure of the profiles is attached to the wall using galvanized screws with a diameter of 4.8 mm and a length of 50 mm.
These two options are designed for smooth walls, but what if the walls are curved and have a lot of unevenness? Here you can use the option using the L-bar and brackets (Figure 3).
This is one of the most durable sheathing models. And this design provides space for insulation. But in terms of price, this is one of the most expensive profiles.
In such a sheathing system, you can use brackets of any height, choose them based on the thickness of the insulation.
This design is attached to a wooden wall of a house with two screws 8mm in diameter and 80mm long. The pitch of such sheathing should be 50 cm. If you use insulation, such as roofing felt, you can increase the pitch between the fastenings to 60 cm.
Places for such sheathing must be planned in advance and marked on the wall with coal or chalk. To make such a design, you need to start from the corners, then move on to windows, openings and doors. Only when finished along the entire wall.
Insulation and waterproofing film

The entire design of façade siding provides for a ventilated façade. This means that insulation is provided in many designs. Wood has very poor thermal conductivity, which means the house will retain heat well. But if you choose insulation for the walls, then it needs to be built into the system.
To ventilate moisture from such a structure, a waterproofing film is placed between the insulation and the siding. It is made from fiberglass.
The insulation is inserted between the beams directly onto the walls from bottom to top. Under insulation, the outer wall of a wooden house will have a positive temperature even at minus 20.
The distance between the insulation and siding should be at least 40-50mm. A larger distance puts additional load on the fasteners, and the structure will lose its rigidity. And if you make the gap smaller, the ventilation of the building will be impaired.
For a wooden house, it is better to choose insulation that breathes and has a natural texture. This material is mineral wool. It is not very advisable to insulate new wooden houses from the outside, since wooden houses are already quite warm. But if this is an old house, then it is necessary to insulate the walls.
Mineral wool must also be protected from external harmful influences. For these purposes, a special film is laid. This material easily protects the insulation from the wind and plays the role of a waterproofer.

When installing the film, you should try not to leave gaps or tear it. If the sheathing is wooden, then the easiest way is to shoot such a film with a construction stapler. The film is glued to the metal sheathing. Over the entire area, the film is attached to the wall along with the insulation using dowels with a wide head.
The film is rolled out, starting from the bottom horizontally. The top layer overlaps the bottom layer by 15 cm.
When lathing with L-planks, it is attached under the bracket. To do this, a small cut is made in the film.
You cannot fasten the waterproofing so that it is tensioned, but you must not allow it to sag. The use of insulation without such a film is considered inappropriate.
Installation of panels and components

When you start fastening, you need to step back 5 cm from the ground. This is done to create ventilation. The entire structure is attached from the bottom up.
First, the drainage strips are installed. They need to be mounted above windows, doors and all openings, as well as above the base. This can be seen in Figure 4. Platbands are often installed at interplank joints, but this will not be correct. The casing will collect water.
All components are fastened with ordinary self-tapping screws. The starting strip is attached to the corners of the building. After this, the external and internal corners are installed (Figure 5). The outer corners must be attached carefully, as they can easily fall off.
Mount internal corners (Figure 6), there are no restrictions on the size of the sheathing. After installing the corners, H-profiles are installed. For this installation you need 2 battens. Then the cornices and trim are installed.
The panels themselves begin to be attached from below the starting strip. The first panel is secured to the starting strip at a distance of 5 cm from the ground. After installing the complex parts, the starting strip is very easy to attach (Figure 7). For this you definitely need a level. The last panel is fastened with force, inserting it into the lock under tension. Make sure that the lock fits in all the way and is secured there as deeply as possible.
After the entire installation, individual parts that are not painted can be painted to match the color of the entire structure. If the ground near the house is not level, then later a blind area is made under the entire system.
Prices for such material are quite varied. The price of vinyl and metal siding is not much different. On average, prices range from 250 to 350 rubles. It all depends on the manufacturer and of course the quality of the material. The most expensive part of such a purchase will be the components. But even here there are pitfalls. Corners and starters will cost a little more. But their number during installation is of course much less.
Installing metal siding on the facade of a house with your own hands is one of the effective options to give an outdated building an aesthetic appearance.
The most surprising thing is that for such work it is not necessary to hire professionals, since the following step-by-step instructions will allow you to complete the entire process yourself.
To make your work easier, we suggest you watch thematic videos where the entire process is depicted in detail. You can see what a house with metal siding will look like if the instructions were not violated during installation in the photo in the article.
General information about metal siding
Metal siding refers to a type of cladding panels. For the production of building materials, cold-rolled hot-dip galvanized technology is used.
When finished, it consists of two base layers: a metal base – gives strength to the structure; polymer layer – responsible for a pleasant appearance and durability. The house in the photo below gives an idea of the result of the work:

The paint on siding panels is applied using photo offset printing, which can provide the material with any color range.
The high level of color fastness does not allow the material to lose its original appearance under the influence of direct ultraviolet rays or precipitation. This is especially important for those who want their home to look beautiful.
Since block house metal siding is produced by a lot of companies, on the construction market you can purchase facade material in sizes from 0.5x0.26 m to 6x6 m, respectively, with a sheet thickness of 4 mm to 2 cm. Thus, no matter what size house you have was, there will always be materials suitable for the job.
Types of building materials and necessary tools
Main types of metal siding:
- Ship panel under a flat beam - the texture of the appearance of the facade material resembles natural wood - a block house. The process itself will be called “installation of metal siding under a log.” At the same time, the ship panel can have different color schemes, which are made using the polymer spraying method. A rounded block house is visually similar to a real wooden log, that is, your house will look like in a photo from a magazine;
- Basement metal siding - sheets are made in the form of rectangles joined together, the texture is created to resemble natural stone or brick. Has a high level of moisture resistance. Unlike other types of materials, it is painted in darker shades. They are used not only for finishing the basement of buildings, but also for cladding the entire facade. Such a house will have a pleasant appearance;
- Siding with insulation is a technology for producing a metal panel structure that consists of combining several layers: a load-bearing part based on metal; 1-2 insulating layers; internal protective layer and decorative external coating. Unlike conventional panels for a block house, siding does not require the use of heat-insulating materials when installing facades with your own hands;
- Vertical metal siding is distinguished from other facade materials by its installation technology. Installation of vertical panels occurs on the bars of horizontal sheathing. This method is not widely used, since there is a possible risk of breaking the joint tightness. And the house looks a little unusual as a result.

Before you start cladding the facade with metal siding (shipboard or under a log), you need to stock up on a set of tools:
- screwdriver;
- level;
- metal scissors;
- nibblers;
- drill;
- square;
- roulette.
Installation of metal siding also requires that fastening elements should be at hand: dowels, ordinary galvanized screws and with a sealing gasket.

As well as components for panels for ship timber:
- internal and external corners - in several copies;
- fastening board;
- clypeus, cap;
- window drainage;
- upper ebb;
- slope and initial plank.
The additional profile is used as decorative elements. At the moment, there are two types of components - complex and simple.
A complex additional profile is used in the cladding before the installation of panels begins. A simple profile is installed after finishing the facade.
From the photos in this section you can get an idea of what the house will look like after installing metal siding under the log.
Features of lathing installation
The sheathing is mounted on the prepared surface of the facade. Lathing is a structure that provides strong fastening of siding to the wall.
You can build it yourself. The installation instructions require the use of a wooden board or profile.
Experts prefer a profile, since a wooden frame, due to changes in temperature and moisture, can lose its original geometric shape, while the profile will retain this shape.

Subsequently, the metal sheets under the block house can become deformed, which threatens to tear out the fasteners and cause fungus to get under the log.
Unlike a wooden frame, galvanized steel elements are not affected by corrosion and moisture.
If you decide to mount the log siding on a wooden frame, then before installation, treat its elements with an antiseptic substance with your own hands.
The thickness of the slats used will depend on the thickness of the thermal insulation layer, and the width should exceed 5 cm.
Installation of the sheathing will require the use of a plumb line and level; under their control, a vertical and horizontal profile or board is attached with precision.
Installation of metal siding provides that if the wall of the building is not completely level, then the differences in the plane are compensated by the installation of special steel brackets.

The lathing is carried out in increments of no more than 40 - 60 cm, the width should be selected taking into account the width of the insulation roll.
For subsequent installation of the components purchased along with the siding for the block house, the sheathing is permanently fastened around the door and window openings.
Thermal insulation and vapor barrier of walls
As a rule, the future design of finishing the external walls of a building with “log-like” siding has a ventilated facade.
To additionally insulate the house with your own hands, pieces of heat-insulating material are placed in the sheathing, between the profiles or boards.
On top of it, a waterproofing layer of fiberglass film is fixed, which will allow moisture to erode rather than penetrate into the insulation.

When applying a vapor barrier to a wooden frame, the film is shot with a stapler and glued to the profile. Its joints are treated with construction tape.
After providing the facade with thermal insulation, you can begin installing the block house metal siding under the log on the sheathing.
Assembly of siding panels and additional elements
The initial strip of shiplap siding is mounted on the sheathing using rivets, starting from the bottom up.
With a gap of 50 mm from the ground, which ensures ventilation of the facade. The correct fastening of all subsequent block house panels depends on the accuracy of its horizontal position.
At the first stage, existing openings (windows, doors) are framed with additional elements.
To avoid moisture ingress, they are equipped with rubber seals, which have the property of reducing vibration load and eliminating rattling of the material in strong winds.
Drainage strips are installed, and their joints are equipped with platbands. Although some consider their use not justified, due to the collection and retention of moisture.
The components are fixed using simple self-tapping screws.
Using a plumb line, a starting profile is installed along the perimeter and corners of the facade - with the expectation that they converge horizontally at the reference point.

After that, the internal and external corners are equipped - having installed the starting bar along the corner, they control its vertical (they begin to mount it from the top).
The missing part is supplemented with a second strip, with compensation of 6 mm, having previously trimmed it.
Metal siding is an excellent and durable material made from galvanized steel with a layer of polymers. It is used in construction mainly for cladding residential and industrial buildings; we will consider how to attach metal siding after we understand the characteristics of the material.
Benefits of metal siding
You can fasten metal siding yourself, thanks to the simplicity of installation technology, but there are also other characteristics:
- Excellent durability.
- Tolerates temperature changes well.
- Possibility to choose from a wide range of colors.
- Environmental Safety.
- Fire resistance.
- Long quality guarantee period.
- Ease of installation.
- Easy maintenance.
The purchase and installation of metal siding is several orders of magnitude more expensive than vinyl, but this material is much stronger.
Physical characteristics of coatings

| Coating | Polyester, polyester | Matte polyester | Plastisol | Pural | PVDF |
| Isosurface | flat | flat | extrusion | flat | flat |
| Covering layer thickness, microns | 26 | 36 | 205 | 49 | 28 |
| Primer, microns | 6-8 | 6-8 | 6-8 | 6-8 | 6-8 |
| Thickness of the protective varnish layer, microns | 13-15 | 13-15 | 13-15 | 13-15 | 13-15 |
| Maximum possible operating temperature, o C | +125 | +125 | +60-85 | +125 | +125 |
| Minimum processing temperature, o C | -10 | -10 | -10 | -15 | -10 |
| Minimum bend radius | 3хt | 3хt | 0хt | 1хt | 1хt |
| Resistant to fading | **** | **** | *** | **** | **** |
| Resistance to fur. influences | *** | *** | ***** | **** | **** |
| Corrosion resistance | *** | **** | ***** | ***** | **** |
| Ability to withstand harsh weather conditions | *** | **** | ** | *** | ***** |
Procedure for fastening metal siding

For beginners who do not yet know how to attach metal siding, we offer the following recommended procedure:
- Using a building level, check the verticality of the walls.
- Examine the walls carefully and think about whether you want to insulate them or not. After all, at this stage it is relevant.
- If such a need arises, make a vapor barrier.
- Frame the walls and do not forget to take into account how much you need to trim the walls and corners.
- Carry out insulation (see).
Note! It is necessary to carry out waterproofing so that moisture cannot in any way get to the insulation.
- Install a windbreak.
- Execute.
- Work on difficult angles.
- Attach the H-profile and trims.
- Install the curtain rod.
- Place starting and ending stripes.
- Set up simple corners and joining strips.
- Clean the surface and you can start painting it.
How much metal siding will you need?

We will tell you how to attach metal siding a little later, but now we will figure out how much material is needed for your wall (see).
For your own calculation you will need:
- Calculator.
- Roulette.
- A piece of paper.
- Pencil.
All calculations are made in two stages:
- Determine how many panels you need.
- Calculate the number of additional elements.
Counting on the wall:
- Determine the area of the wall and subtract the area of windows and doorways from it.
Advice. Keep in mind that you will have waste, so add another 10% to the normal wall area, and if you have trapezoidal walls, then add 15%.
Divide the resulting number by the usable area of one strip of siding that you are going to buy.
Installation of metal siding

Metal siding must be fastened correctly, then your facade will be durable.
- Do not use tools that are not designed for working with metal. Some craftsmen make a big mistake when they use an angle grinder with an abrasive wheel.
Note. It is, of course, very convenient to use, but at the same time it damages the polymer coating, which causes corrosion after some time.
- There is no need to screw the screws in too tightly. Leave at least 1.5 mm between its panel and the profile surface. This is necessary so that the siding can be slightly deformed when cooling or when the ambient temperature rises.
- For the same reason, you need to leave 10 mm between the additional element and the rib.
We begin fastening the metal siding
First of all, purchase the required number of siding panels and additional elements, among which should be:
- Angles.
- Reiki.
- Planks.
- Brackets.
- Platbands.

Advice. If it is old, then be sure to get rid of crumbling plaster, plants and removable structures.
Installation of sheathing
Fastening metal siding to the wall is done using wooden lathing or. The first is made with a pitch of 500x500 mm and is cheaper, but metal is still more reliable.
Using disc dowels, install the insulation from the bottom up.
Install diffusion film
Even if you are not going to insulate the facade, this film still needs to be laid.
Advice. In the store, ask a consultant about its installation, since depending on its type, this material can be laid either directly on the insulation, or with a gap of 5 cm from it.
Metal siding, how to attach additional elements

4 cm before the level where you want to attach the siding panels, install the starting strip:
- This is where your installation of the façade covering should begin.
- After this, attach the end strip. As a rule, it is placed precisely under the eaves of the roof.
- Attach complex corner strips to the sheathing every 20-40 cm.
Why a seal?
The price of metal siding is already quite high, so many are trying to somehow save on heat insulation. For example, many people believe that metal siding panels fit tightly together, so there is no need for additional sealing of the coating.
After all, quite often natural precipitation gets into the ventilated system, which over time causes fungus, rusting and other unpleasant moments. Therefore, sealant is still necessary, especially in the area of corners, as well as near windows.
How panels are installed

Remember a few rules on how to attach metal siding to a wall:
- A small gap between the panel and the fastening element is required.
- Self-tapping screws must be located clearly in the intended centers.
Metal siding panels are mounted in the following sequence:
- Always start installation from a corner.
- Panels are always attached from the center to the edges.
- The very first panel needs to be hooked onto the original strip.
- Each next row clings to the previous one.
Advice. If you need to install small strips under a window or above a door, then measure the required distance with a tape measure and cut out a suitable piece of the panel in a horizontal position and only then continue installation.
Metal siding is a reliable and beautiful covering for your facade, which you can install yourself. And for more detailed information, it is recommended to watch the video in this article.
Siding - decorative metal panels that imitate plank cladding, intended for cladding. Panels can be made with or without wood embossing
Facade panel - smooth facing metal panels. Three types of profiles are manufactured. Wood embossing is possible.
2. Technical characteristics
RAW MATERIAL— rolled galvanized steel with polymer coating in various colors.
3. Accessories

4. Leveling system
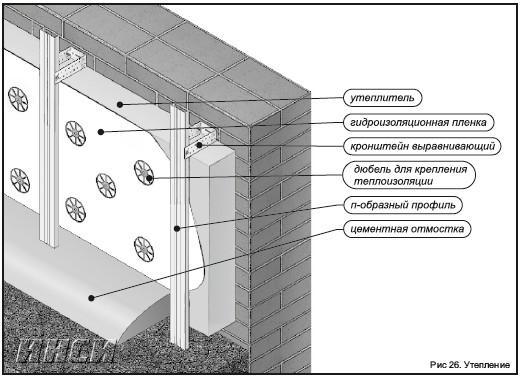
To create a mounting plane for metal siding and façade panels, a leveling system is used.
The leveling system is mounted from brackets and galvanized profiles or from brackets and wooden blocks with a thickness of at least 40 millimeters.
The design of the brackets allows you to adjust the size of the distance of the vertical guides from the load-bearing wall, thus making it possible to level out the actual deviations of the wall plane from the vertical. The design of the bracket allows for leveling the plane by 30-40 mm. An increase in the offset value is solved by choosing brackets of different lengths. Leveling brackets are attached to the base of the load-bearing wall using anchors and frame dowels.
To eliminate cold bridges, when insulating the facade, thermal break gaskets (made of paronite 3-5 mm thick) are installed under the brackets. All other elements of the leveling system are attached to the brackets.
To cover a house with metal siding and facade panels, depending on the direction of installation of the facing elements, there are two leveling systems for installing guides: vertical and horizontal.

Vertical leveling mounting system. For horizontal installation of facing materials (metal siding, facade panel), vertical guides (U-shaped profile) are attached to the brackets with galvanized steel rivets 3.2x8mm or self-tapping screws 4.8x16mm, at least two rivets (screws) on each side (Fig. 23). After leveling the plane, bend the protruding shelves of the bracket to the sides (Fig. 23). Pairing vertical
guide profiles should be made with a gap of 5-10 mm, to compensate for temperature deformations (Fig. 24). The maximum extension of the guide from the bracket is 150 mm.
Horizontal leveling installation system. For vertical installation of facing materials (facade panel, siding), vertical guides (U-shaped profile) are attached to the brackets with galvanized steel rivets 3.2x8mm or self-tapping screws 4.8x16mm, at least two rivets (screws) with each
sides. Horizontal guides made of a U-shaped profile are attached to the vertical guides (Fig. 25). The vertical and horizontal guides are fastened together with an “overlap”, with the side shelves at the horizontal guides being trimmed, using galvanized rivets 3.2x8mm or self-tapping screws with a press washer 4.8x22mm. The vertical guide profiles should be paired with a gap of 5-10 mm to compensate for temperature deformations (Fig. 24).


4.1. Control of the cladding plane
During installation of the leveling system, check the plane of the cladding using a level, a standard rule strip, or strings.
Permissible deviations in the position of the guide profiles:
- vertically (horizontally) in the plane of the wall - 5mm;
- vertically (horizontally) perpendicular to the plane of the wall - 3mm;
- from the specified distance between adjacent profiles - 10mm;
- coaxiality (coincidence of the central axis) of adjacent heights
profiles - 4mm;
- ledge of profiles adjacent in height - 3mm.
5. Insulation
The walls of a built house that do not provide a sufficient level of thermal protection require insulation.
Installation of insulation boards is carried out after attaching brackets to the load-bearing wall. The thickness of the insulation boards is determined by thermal engineering calculations. The density of the insulation must be at least 80 kg/m3. If the insulation thickness is significant (from 150 mm), it is divided into two layers. This is done to make it possible to bandage the joints of the insulation layers. For the inner layer it is possible to use insulation with a lower density of 40 kg/m3.
The insulation is fastened to the base using disc dowels with spacer elements made of carbon steel with an anti-corrosion coating, corrosion-resistant steel. Sleeves - made of polyamide, polyethylene, modified polypropylene. The length of the dowels depends on the thickness of the insulation. For the first and second layers of insulation, use dowels of different lengths to ensure a tight fit of the insulation. Consumption - at least 5 pcs. per 1 sq. m of facade surface with a single-layer arrangement of insulation boards, in the extreme and corner zones 8 pcs. per 1 sq. m. The insulation slabs of the lower supporting row of the first layer are secured to the wall with three dowels, the slabs of subsequent rows are secured to the wall with two dowels, and each slab of the second layer is secured with five dowels.
To protect the insulation from weathering and moisture, a wind-proof film is installed. The slabs of the outer layer and single-layer insulation are secured together with the wind-hydroprotective material with five disc-shaped dowels.
To ventilate water vapor and condensate, it is necessary to provide a ventilation gap between the outer surface of the insulation layer (wind-hydroprotection) and the inner surface of the cladding slabs. The gap should be 40-60mm. The maximum size of the ventilation gap is 100mm.
6. Horizontal installation
Before installing metal siding or facade panels with your own hands, you need to check the plane of the leveling system using a standard rule strip and install:
- initial strip (when installing metal siding);
- corner elements - external or internal corners (Fig. 29);
- Framing elements of window and door openings - slope strips, platbands (Fig. 30-32).
- In the places of planned joints, strips are installed (Fig. 29).


6.1. Setting the starting bar
The starting strip, which secures the first panel of metal siding, is installed along the lower edge of the cladding. The starting plank must be installed strictly horizontally using any type of level or geodetic instruments (Figure 28). The distance from the blind area or plinth to the starting plank is at least 40mm.
6.2. Installation of corners and strips
Set the outer and inner corners using a plumb line or level, secure them to the horizontal profiles of the leveling system, then install metal siding or facade panels (Fig. 29).
In the places of planned joints, an additional vertical guide is installed or horizontal guides are mounted between adjacent vertical profiles. The cover plate is installed level and attached to the guides with a pitch of 600 mm (Fig. 29).

6.3. Installation of cladding
6.3.1. Installation of metal siding
When installed horizontally, siding is installed from the bottom up. Hook the first strip of siding with the base onto the starting strip and secure the top edge with self-tapping screws, starting from its center. Before attaching the siding, make sure that it is firmly hooked along its entire length. All subsequent claddings are hooked onto those already installed and secured in the same way.
Be sure to check the horizontalness of the installed cladding. To avoid deformation due to thermal expansion, it is necessary to leave a gap of 6-9 mm between the end of the cladding panel and the vertical components.
6.3.2. Installation of facade panel
In the horizontal version, the installation of the facade panel is carried out from top to bottom. Fix the first facade panel into the U-shaped part with a self-tapping screw. After horizontal alignment, fasten the lower edge with self-tapping screws (fastening S-shaped part). Attach the top of the panel to each sheathing profile. The second panel is inserted into the first, and it is necessary to ensure that the second panel along its entire length is tightly inserted into the groove of the first. Then attach the second panel. Avoid uneven compression of the panel, this can lead to disruption of the flatness of the facade. All subsequent claddings are inserted into those already installed and secured in the same way. Be sure to check the horizontalness and flatness of the installed cladding. To avoid deformation due to thermal expansion, it is necessary to leave a gap of 6-9 mm between the end of the cladding panel and the vertical components.
6.4. Framing doors and windows
The framing of window and door openings can be: slope strip, aquilon, platband. A window drainage system is usually installed on the windowsill.
When installing door and window frames, you must first install the top parts, then the side ones.

6.5. Adjusting siding around windows
First, fit the siding panel so that the edges extend from both sides of the window opening. Then mark the width of the window on it, adding 6-10 mm. The resulting marks will show the locations of the vertical cuts. Make a sample horizontal cut. To do this, secure a small piece of metal siding near the window and mark it 6mm below the sill on both sides of the window opening, since it is not certain that the window level is ideal. Transfer the marks from the samples onto the metal siding panel. After this, make the necessary cut.
The siding is adjusted to the door frame in the same way.
For the façade panel, the window framing is done in the same way, only the installation direction changes.

6.6.Complete installation
The final touch to finishing the house with siding is framing the top edge of the cladding. It can be done, depending on the situation, with an internal corner (85*85; 50*50), an upper ebb or other components. All these elements are fastened with visible self-tapping screws or rivets, and it is preferable to use fasteners painted to match the color of the closing element. Screw pitch 400...500 mm.

When finishing with a façade panel, the connection to the plinth is made with an upper ebb. The upper ebb is inserted under the façade panel or inserted into the panel lock, after which it is attached to each sheathing profile. If the end of the finishing falls on a non-complete panel, the panel cut is covered with an additional element.
7. Vertical arrangement of panels
Depending on the situation, the starting element for a vertical arrangement of metal cladding can be: a starting strip, a fastening strip located vertically, corner strips, and slope strips.
The starting element is leveled and fixed to a frame made of a U-shaped profile. Make the frame of the leveling system as shown in Fig. 30 and 31.
The final horizontal elements can be: platband, slope angle, upper drainage. To avoid deformation due to thermal expansion, it is necessary to leave a gap of 6-9 mm between the end of the cladding panel and the horizontal components. The framing of door and window openings is carried out in the same way as described in the “horizontal installation” section.


Siding installation video
8. Necessary tools and fasteners for installing metal siding or facade panels
To fasten the cladding, depending on the type of leveling system, self-tapping screws with a diameter of 4.2 mm and a length of 16 mm for metal are used; wood screws with a diameter of 3.5 mm and a length of 40-50 mm - for a wooden subsystem.
Attachment of leveling brackets is usually done with dowels or anchors, depending on the specific site conditions. The guides are fastened to the brackets using rivets or self-tapping screws 4.8*16 mm.
Required tool:
- Screwdriver
- Hammer
- Nibblers
- Scissors
- Mallets (wooden, rubber)
- Rule
- Level


Beginning of a political career
Mysteries of history. Hitler's entourage. Georgy Litvin, "Hitler's Jewish entourage" Hitler's entourage
Atlantic Ocean: interesting facts Interesting facts about the Atlantic Ocean
Vilna and Lithuanian diocese
Plato's name day Plato church name