Without Analysis and Without Analysis
Without Analysis and Without Analysis adv. decomposition 1. Showing the same attitude towards something; without choosing
Explanatory Dictionary by Efremova. T. F. Efremova. 2000.
See what “Without Analysis and Without Analysis” is in other dictionaries:
Adverb, number of synonyms: 3 indiscriminately (19) without distinction (4) indistinctly (19) ... Synonym dictionary
indiscriminately
Indiscriminately, indiscriminately... Spelling dictionary-reference book
adv. qualities circumstances decomposed; = indiscriminately Efremova’s Explanatory Dictionary. T. F. Efremova. 2000... Modern explanatory dictionary of the Russian language by Efremova
Cm … Synonym dictionary
indiscriminately- indiscriminately and indiscriminately Do not grab indiscriminately (parsing) ... Spelling dictionary of the Russian language
Adverb, number of synonyms: 4 indiscriminately (19) indiscriminately (3) indifferently (119) ... Synonym dictionary
A, m. 1. Action according to the verb. disassemble disassemble (see disassemble into 1, 2, 3, 4, 5 and 6 values). Parsing. □ Vladimir opened chests of drawers and drawers and began sorting through the deceased’s papers. Pushkin, Dubrovsky. The lawyer came on his business and at the same time... ... Small academic dictionary
DISCUSSION, analysis, husband. 1. units only Action under Ch. parse in all meanings except 11, 12 and 13 parse. Analysis of the case. Product sorting. A detailed analysis of the contents of the book. Parsing. Parsing parts of a sentence. 2. An article dedicated to... ... Ushakov's Explanatory Dictionary
parsing- a (y); m. 1) to disassemble disassemble 1), 3), 5), 8) Start sorting things out. Case investigation. Detailed analysis of the book's contents. Analysis of parts of a sentence... Dictionary of many expressions
Owners of iPhone 5 and 5S are wondering how to disassemble the phone. Time is not kind to even the best devices: the panel can become frayed (especially on black models), the sensor fails, and those who like to “swim” have problems with the hardware. To replace iPhone parts, you need to know the internal structure and be able to disassemble the device.
What do we need?
Before you start disassembling, set aside enough time for this and stock up on all the necessary tools. This iPhone disassembly kit can be purchased at any specialized online store:
- Pentalob five-blade screwdriver (without it, the bolts are unlikely to yield to you);
- Phillips screwdriver;
- vacuum suction cup;
- plastic spatula for disassembling the case (or something similar).
Step-by-step instruction
1. The first thing we need to do is unscrew the two screws at the bottom of the case, on the sides of the Lightning connector. The iPhone 4 used Phillips screws; in later versions of Apple, to prevent self-disassembly of phones, developers began to use special five-lobe Pentalob bolts.

If you don't have a special screwdriver for them, you can try using a five-pointed star or take a flat one and sharpen it with a file on the sides. But be careful, if you use non-standard means you can grind off the bolt heads. Just in case, it is better to stock up on bolts of the same size, but with a cross-shaped head.
2. Using a vacuum suction cup, slightly lift the screen, helping yourself with a plastic spatula. Why a spatula and not a screwdriver? Thus, we reduce the likelihood of damage to the iPhone case or screen. This can be done without the help of a suction cup, by hooking something (some use a needle) on the top panel, but extreme caution must be used.

3. Carefully lift the screen from the side of the “Home” button. At this step, the first differences between the 5 and 5S models appear. On the iPhone 5, the front panel simply rises to form an almost right angle with the body.

On the iPhone 5S the situation is more complicated. The screen is attached to the motherboard with a cable, so do not lift it suddenly. You need to disconnect the cable before further work using a plastic spatula. And after that, raise the screen, as in version 5.

4. To finally disconnect the screen, use a Phillips screwdriver to remove the two screws that hold it in place.

Then carefully pick it up with a spatula.

The iPhone is divided into two parts, each of which can be disassembled into several more components.

5. Let's pay attention to the display panel. Unscrew the “Home” button. It is the same in both models.

6. At the top of the front panel, the 5 and 5S models again have differences. The 5S has a camera, a proximity sensor and a speaker, which are removed after removing the mounting plate.

In version 5 of the iPhone, the mount has an auditory speaker, which is held on by two screws and spring contacts. The front camera can be simply removed if necessary; it is held on by a cable.

7. The last step with the front panel is to get rid of the metal protection.

8. Let's move on to the device body. The first step is to get rid of the battery so as not to get an electric shock. We disconnect the cable from the board with a plastic spatula.

Using the same tool, we pry up the battery and pull the label (it is missing in the 5S, so we only use a spatula). If the battery does not budge the first time, there is no need to be alarmed, it is glued. The glue is not too strong, so the battery will give in easily with a little more effort.

9. Disconnect the main camera in version 5. It is held on by two screws; after removing them, the chamber is free. In 5S it is in this state initially.

10. The next step is to remove the motherboard. There is no difference between the iPhone 5 and 5S. Disconnect the antenna connector module from the motherboard. Unscrew the screws securing the board to the case and the contacts on the inner wall. Carefully remove the motherboard.

11. There is a processor on the motherboard: A6 for 5 and A7 for 5S. When disassembling for the first time, you will need to remove the protective film.

12. Let's continue disassembling the case. At its bottom there is a headphone jack, an earpiece, a Wi-Fi antenna (for version 5) and a bottom microphone - all of this is attached to the Lightning connector. We get rid of the mass of glue with a plastic spatula.
 Remaining parts on the top of the body
14. As a result, we get a disassembled phone. You can reassemble your device by following the same instructions in reverse order.

Version 5S looks like this:

Possible mistakes
- You are entirely responsible for assembling and disassembling the device. If you doubt that you will succeed, take it to the service center - the specialists will help.
- When disassembling the device yourself, remember the warranty period. Once you open the case yourself, the warranty is automatically void; subsequent repairs will be at your expense.
- Don't skimp on special tools: they will cost less than repairing or buying a new phone.
- Do not make any sudden movements; with your careless actions you can tear off the cable or break particularly fragile parts of the iPhone.
Video: iPhone 5 disassembly
Video: how to disassemble iPhone 5S
When creating the iPhone 5 and 5S, Apple made sure that they could not be easily disassembled. This process will take a long time, but it can be done by an ordinary person. If you are confident in yourself, you can try to disassemble the iPhone at home yourself, otherwise, take the device to a competent technician, he will know exactly what needs to be done.
Laminate is considered a durable floor covering; many manufacturers provide a guarantee for their products for over ten years. Unfortunately, unforeseen circumstances may occur: heavy objects may fall on individual boards or paint may spill. This method allows you to replace a damaged board without disassembling the entire floor. You can do all the work yourself. The method may not be ideal, but it can help you out in a situation where a complete floor replacement is impossible or too labor-intensive.
You will need:
- Replacement board;
- special vacuum holders (2 pcs);
- marker;
- ruler;
- cutter (or jigsaw with saw function);
- bit;
- hammer;
- wooden blocks, wedges;
- glue for laminate
First of all, apply markings to the damaged board - you will need to cut and remove only the middle part, leaving the areas where the locks are attached.
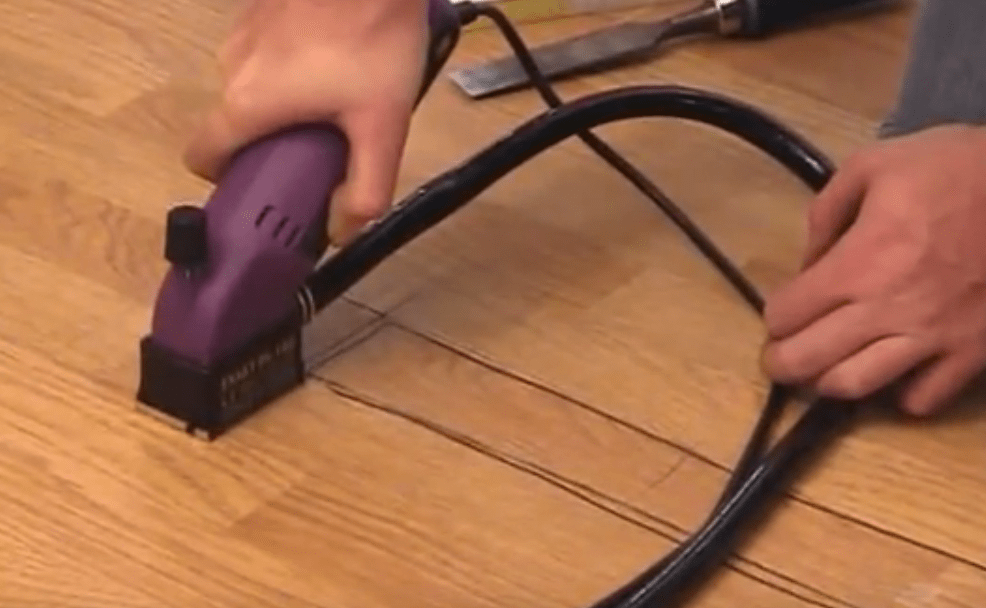
According to the intended markings, cut out a section of the laminate board. The easiest way to do this is with a jigsaw with a hand saw, but you can use a grinder, a parquet saw or a mounting knife.
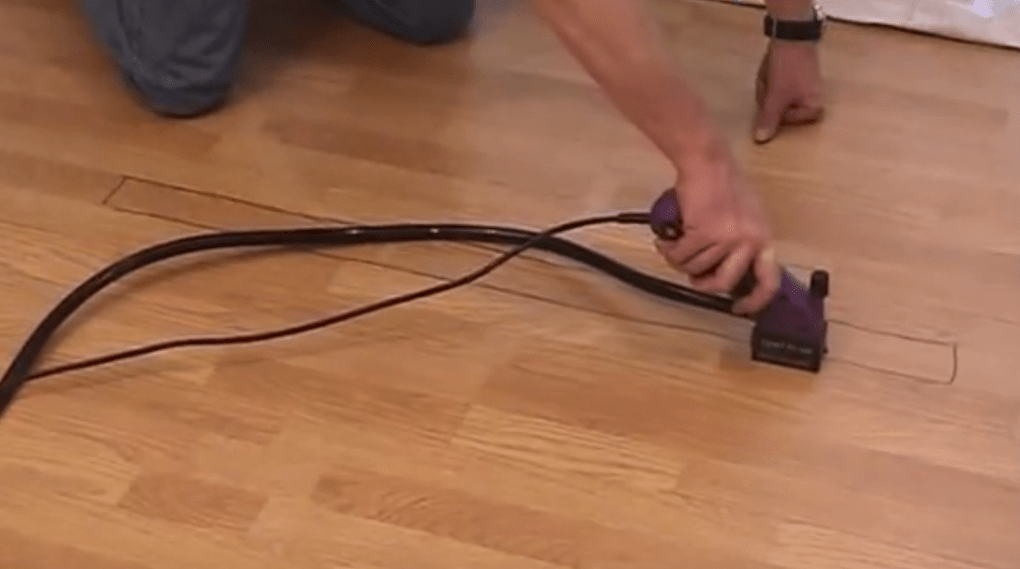
Make cuts along the edges, extending beyond the boundaries of the basting. In this case, the cut line should not reach the lock itself.
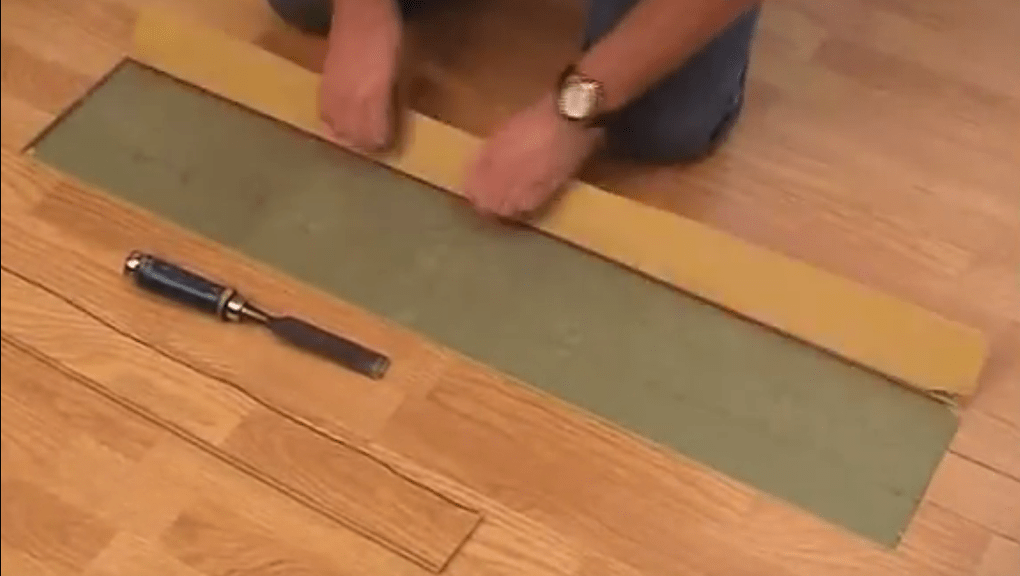
Using a hammer and chisel, separate the remaining pieces of board from the rest of the laminate flooring. Work carefully to avoid damaging adjacent floorboards.

After this procedure, parts of the board can be easily removed.
For further work, you will have to disassemble the part of the plinth into which the board rests, vertically adjacent to the damaged one.

Using a hammer and a wooden wedge, move the row of boards in which the area is changing an inch towards the wall. This distance will free up room for maneuver.
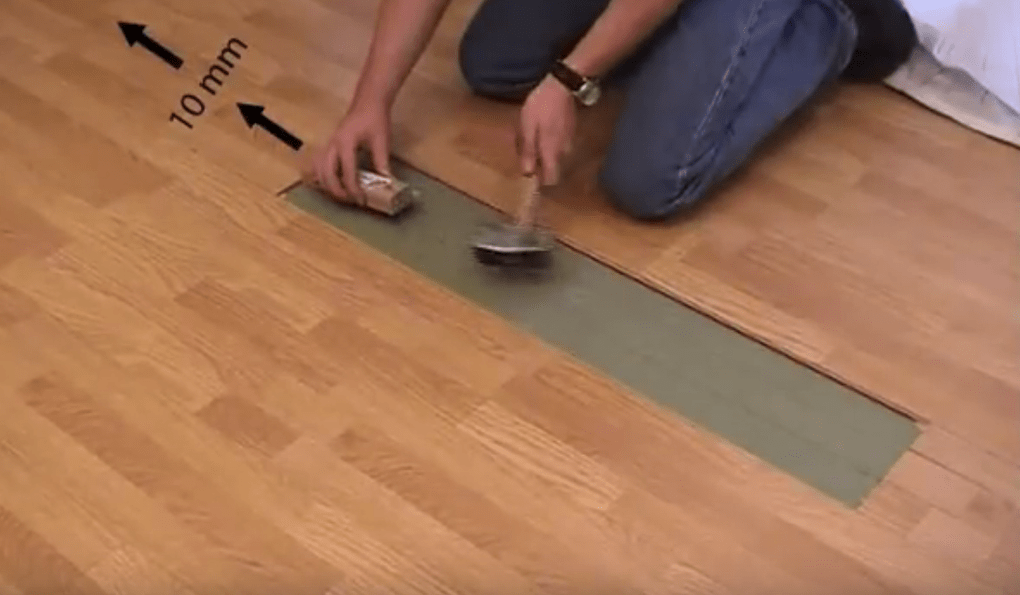
While resting the chisel on the part of the board adjacent to the lock, use hammer blows to move it towards the center of the resulting gap.

Now you should remove the top part of the board from this area using a jigsaw. This coating holds the board's components together. Once removed, the wood can be easily disassembled. Remove part of the board from the other side in the same way.

Carefully remove traces of glue from the locks using a scraper or chisel. Now we begin to prepare the board that will be used for replacement. Part of the lock along its length should be removed, leaving only the central part (1/3 of the length of the lock).

Apply laminate glue to the surface of the locks and install the board in its place. Now you should attach vacuum holders to the board being replaced and the one adjacent to it in the lock area. After this, both boards need to be pulled slightly towards you so that the lock falls into place.

Move the row of boards, hitting the baseboard area with a hammer, returning them to their original place.
Overheat- one of the three most common “ordinary” problems of all laptops. It occurs due to the fact that the cooling system of the laptop becomes clogged with dust over time, preventing hot air from escaping from the case.
If your laptop, some time after turning it on, begins to get very hot, make noise, slow down, or even turn off abruptly - all these are signs that you urgently need to clean your laptop from dust and change thermal paste.
You can contact a computer service, or you can try preventive measures on one's own.
All you need for this is a couple of simple, accessible tools, and a certain amount of accuracy and attentiveness. Well, some kind of algorithm for disassembling a laptop, which I will explain to you in this article on my computer blog.
Overheating begins to appear after 1-5 years of using a laptop, depending on the model and conditions of use. But, sooner or later, it will come, because over time, a layer of cosmic dust slowly but surely accumulates on the laptop fan.
I'll try to make my own subjective TOP Hottest laptop models:
- HP, especially models Dv6,G7
- ASUS
- ACER
- SONY
- LENOVO
- SAMSUNG
- DELL
- TOSHIBA
I have already written an article about that, as well as how fast and free.
We will assume that you have already An overheating problem was diagnosed. That is, they did a temperature test and found out that under load the temperature of the processor and video card of your laptop rises to 90 degrees or more.
But this was all theory and diagnostics. Now we will get down to practice and actual repairs - disassembling and cleaning the laptop from dust with your own hands.
Disassembling a laptop- not such a simple task as it might seem at first glance to a person who has never “opened” his laptop.
If in most system units, to access the “internals” you need to unscrew 2 screws and slide the lid, then in laptops everything is much more complicated.
There are many laptop manufacturers, and each has hundreds of different models, and all of them are handled differently. Somewhere you just need to remove the bottom cover. For example, this is exactly the case with . And somewhere, in order to get to the motherboard and remove the cooling system for cleaning and replacing thermal paste, you need to completely disassemble the laptop case, “down to the bolt.”
But general algorithm for disassembling a laptop, as a rule, is always the same. In short, you need to unscrew all the screws, disconnect all the cables, connectors, and open all the latches.
How to independently disassemble any laptop and clean it from dust - universal instructions.
Below I have drawn a laptop device with all the details indicated, so that it would be easier for you to navigate when reading this article.
1. Disconnect the battery
First of all, always disconnect the battery. Disassembling a laptop under voltage can ruin your laptop by accidentally dropping a bolt onto the motherboard. Therefore, the first thing we do is take it out.

On some laptops, the battery is located inside the case, such as. Before turning it off, be doubly careful not to short-circuit anything.
2. Unscrew all visible bolts on the bottom.
Pay attention to their length and thickness. If they are the same, you don’t have to worry. If some come across longer/shorter, we remember/sketch where they were twisted.

3. Remove all the caps on the bottom, and unscrew all the bolts under them
 We remove all the small covers on the bottom of the laptop (RAM, hard drive), unscrew all the screws, put them in the next pile. Disconnect all connectors, if any.
You may not have such caps; the bottom of the body may be solid. Don't be alarmed - go to step 5.
4. Disconnect the Wi-Fi module, hard drive, RAM, DVD.
To disable the Wi-Fi module, first remove the 2 antennas from it by pulling them perpendicular to the module. Remember where it was. Then unscrew the bolt securing it and pull the module out of the slot.

Having unscrewed the hard drive, we look at how it is connected. You can remove it by either moving it away from the connector, or by disconnecting the flexible wiring by pulling it.

As a rule, it is not necessary to remove RAM. But you can remove it and clean its contacts with an eraser.

At this stage, most often you can remove the DVD-ROM by slowly pulling on it.

The removable keyboard is easy to distinguish - it looks like a “block” keyboard, i.e. does not form one whole with the rest of the body.

If you are sure that your keyboard is sewn into the upper part of the laptop case (Sony, ASUS 500 series), go to step 8.
6. If the keyboard is removable, remove it.
Don't forget that there is a connection from the keyboard to the laptop motherboard. plume, so after removing it, do not rush to pull it, but first lift and disconnect this cable.

More often for removing the keyboard you need to carefully pry it off with a pick or spatula, and open all the latches around the perimeter.

It happens that before this you need to first remove panel above or under the keyboard.

On some laptops, another unpleasant surprise may await you - an additional keyboard held on by glue. In this case, carefully pry it up with a ruler/spatula/screwdriver, and, gradually lifting it, peel it off.

7. Unscrew all visible bolts under the keyboard, remove all cables and connectors
There are several main types of loops. They all unfasten differently. Some rise, some lift, some stretch.
I will try to systematize them in one of the following articles on the site.
Sometimes at this point you will need to pull long wires from the wi-fi adapter through the case.
8. Carefully “open” the laptop from the side around the perimeter and remove the top cover
For me, the most convenient way to do this is to use a guitar pick, preferably thicker - 0.8-1 mm.

Also, sometimes a spatula helps:

Having walked around the perimeter with a pick and unclipped all the latches, we carefully try to lift the lid. If it doesn’t work, check again that all the screws are unscrewed. If it still doesn’t work, check it again.
No need to use force! And an unscrewed screw often turns out to be imperceptibly recessed into the case, or hidden under a rubber stand at the bottom of the laptop.
The motherboard can be attached either to the bottom of the laptop case (most often) or to the top (this is what Sony Vaio does). Be careful and take your time.
9. Unscrew the remaining screws and disconnect the connectors, remove the motherboard
We look at which cables go to the motherboard and pull them all out.

Sometimes, in order to remove the motherboard, you have to completely unscrew and remove the top part of the laptop with the screen.
10. Remove the cooling system from the board
The screws on the radiator are usually marked with numbers - we unscrew and tighten them in the order of these numbers, so as not to accidentally damage the chip by misalignment.
We work very carefully here - a screwdriver can easily slip and knock down some element on the motherboard.

Having unscrewed all the bolts, carefully pry up the cooling system; if it doesn’t work, you can turn it a little in its plane. We try not to tear the thermal rubber bands, if any.
11. Disassemble and clean the laptop fan from dust
Actually this is the most important stage laptop disassembly. Right now, in fact, “cleaning the laptop from dust” will take place.
Usually, to disassemble the cooling system, you need to unscrew several small screws on it, and tear off a piece of fabric/adhesive tape, “turning” the fan outward.

We see dust accumulated on the radiator grille - remove it with a brush and blow it out. Congratulations! The laptop has been cleaned) But that's not all.
12. Remove the old one and apply new thermal paste
We remove the old thermal paste from the places where it was, on the chips on the motherboard, and on the cooling system. You can remove thermal paste with a dry cloth and cotton swabs. If you have them, you can soak them in alcohol and take them internally at the same time :)
Often, instead of thermal paste, you can see thermal pads. It is very desirable if they remain intact - it is quite difficult to find them on sale, only to order. If this rubber band is severely torn, most likely it is already “non-working”, you will have to look for it and change it. Or spread a layer of thermal paste. But I don't recommend doing this. Change it! Usually thermal pads are placed on elements that do not have a temperature sensor and protection against overheating, and your laptop may suddenly “die”, while showing normal temperatures on the processor and video card.
Apply new thermal paste. How to smear? As thin a layer as possible. Thermal paste is needed not to cover the entire surface of the chip, but to smooth out surface irregularities.

I will write a short review about various thermal pastes in one of the following articles on the site.
And in this video On my YouTube channel you can see how to apply thermal paste using the Pavillion G6 laptop as an example.
13. Reassemble in reverse order.
We assemble it in the same way as we disassembled it, carefully checking at each stage that all connectors are in their sockets. In theory, there should be no “extra, empty” ones (but there may be some).
It is advisable that there are no extra bolts left, but if there are some left, don’t worry! 😉 The main thing is that the bolts in the hinge area are screwed in - otherwise the laptop will fall apart over time.
14. We do a temperature test - rejoice! 🙂
Thermal paste needs some time to spread evenly under the pressure of the plate. So its maximum effectiveness is achieved after a couple of days of using the laptop.
Tips and tricks when disassembling a laptop yourself
- Collect screws from each stage of disassembly in separate piles - this way you won’t be mistaken about which screw comes from, and you won’t have any left over.
- Use the Internet - almost every or similar laptop model has detailed photos and video disassembly instructions!
- Don’t use force - if something “doesn’t work”, double-check 10 times to make sure you’ve unscrewed everything and turned it off. When in doubt, go online.
- Be careful and careful, take your time.
Results
So, from this article you learned how to disassemble and clean your laptop from dust yourself.
The first time it may be a little difficult, but the second time, I assure you, it will be much easier! After all, the neural connections in your brain will already be established. 😉
Good luck to all! Any questions left - ask! 😉
Many people are often interested in the question of how to disassemble a wardrobe for moving. And this is really important. Even if you are not moving, you will still want to change your surroundings by updating the interior. Not a single piece of furniture can stand in the same place for half a century. To move furniture or take it to another room, sometimes you have to disassemble it. But what about those who are planning to move due to unforeseen circumstances and have just bought themselves a new wardrobe? Don't leave him!
There is a solution and it, no matter how banal it may sound, lies in the simple dismantling of the structure. To cope with such a task, it is worth studying the disassembly instructions in detail, because the cabinet must be disassembled not even because of the inconvenience of transportation, but because when moving to a new place, some areas or structural parts may be damaged, ruining the appearance of the piece of furniture . It's sad, especially if it's new.
We present to your attention a simple guide that describes the main stages of disassembling the structure and comprehensively answers the question of how to disassemble a wardrobe.
What does the general dismantling scheme look like?
In order to understand the issue and then perform the assembly correctly, you do not need special knowledge or skills. When starting such work, it is worth remembering one important feature. In the manufacture of sliding wardrobes, different manufacturers use different modifications of parts as fasteners and fittings, each of which is characterized by its own characteristics. Therefore, when dismantling furniture, the main thing is not to rush. Everything else is easy to figure out without spending a lot of time on solving the problem.
So, how to disassemble a wardrobe. The general scheme consists of several stages and looks like this.
We remove facades
Follow the simple rules described below in this work. They will help you do everything right.
The subtleties of dismantling are that:
- Swing doors can be removed quite easily. They are held on hinges, so you will need a screwdriver to loosen the screws. They are located on each hinge on the side panels. After which the façade can be easily removed, it is important not to drop it.
- With bottom-mounted doors, things are even simpler. They are lifted, not forgetting to first open the locks on the wheels from below, and with a smooth movement they are moved down and towards themselves. Then the “rollers” are pulled out from the upper guide.
- With hanging doors, deciding how to disassemble a wardrobe is more difficult. It all depends on the type of suspension from the guides, which, as you know, can be mounted under or above the roof.
- The bottom rollers are often hidden under or above the flooring sheet. Each type of wheels is disassembled in its own way, so the procedure is slightly different, but the principle remains the same: lift the door, remove it from the guide from the top side of the support wheel, then from the bottom, from the holding bar, pulling the door slightly down and towards you.
Removing the rear wall
You are getting closer to the answer to the question of how to disassemble a wardrobe with your own hands. After the facade is removed, you can begin further dismantling, namely, removing the back wall of the product:
- It happens that the back wall is tightly screwed to the ends of the shelves and the base of the cabinet, so in this case you have to tinker and remove all the fasteners. This will make it possible to move forward with the plan.
- When the back wall is attached to the grooves of the side walls and the cabinet lid, leave this step for last and return to it when all other work is completed, namely, disassembling the frame.

Removing cabinet shelves

A wide variety of fittings are used to attach them, so they are also removed using a distinctive technology. Eg:
- Shelves sitting on eccentrics can be disassembled using a Phillips screwdriver and are located directly under the shelf. They are unscrewed clockwise, and the shelf is removed upward.
- When using European-style screws as fasteners, first unscrew the screws from the ends (you will need a hexagon for this), and then repeat the procedure, only from the side.
- When dismantling furniture shelves assembled on hexagons, first open the covers of the plastic parts, and then unscrew all the screws.

It's a small task: dismantling partitions
To disassemble the built-in wardrobe, all that remains is to dismantle the partitions and sides, following the principle described above, which is used when working with shelves. When disassembling standard furniture, you definitely won’t get confused. Therefore, problems should not arise in resolving the issue of how to disassemble the wardrobe, and then put everything back together, moving or transporting it to the right place.
What to consider during dismantling?
Please note that when moving on you should be extremely careful. Here, each mechanism is removed separately and preferably in the sequence described below:
- closer;
- locks and slings;
- each of the guides;
- bottom rollers;
- all fasteners that can be found;
- doors

Now you know how to disassemble a wardrobe, but do not forget that both the dismantling process and the assembly of any product, not just a wardrobe, require care. Follow the instructions strictly so as not to make a mistake in any action and damage the furniture. Remember, the more carefully you take it apart, the easier it will be to return everything to its original form.


Dream Interpretation new red high heel shoes
Glass jar according to the dream book
Seeing lice in a dream and killing them
Interpretation of the dream of demons in dream books
Snake man - rat woman Snake and rat compatibility in life