Decorative stripes are a very popular room decoration technique. It sets a certain rhythm, gives dynamics and makes the interior more alive. The stripe in the interior is a game of contrasts that attracts attention. You can implement such an idea as striped walls yourself.
1 Necessary materials and tools
If you decide to make your walls striped, you will need:
- Paints of selected colors
- Roller for painting walls and ceilings 12 cm
- Masking tape-adhesive tape 5 cm
In addition: spirit level, masking film, paint tray
2 Sequencing
|
|
|
|
|
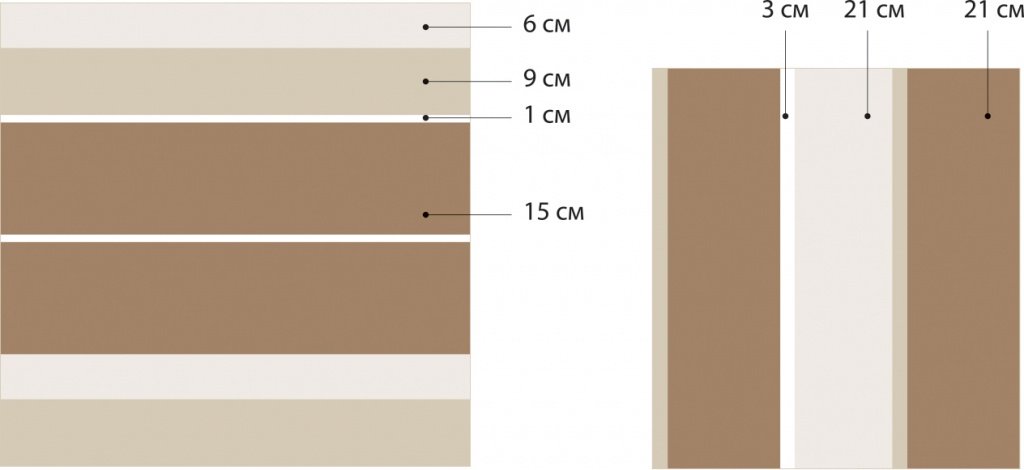
Diagram of a drawing on a scale of 1:10, which can be done by hand. |
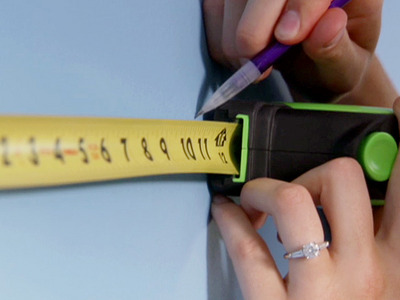
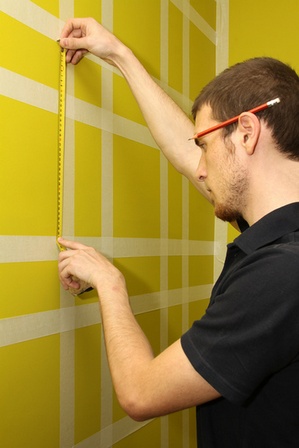
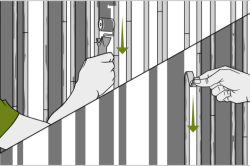
Step 1 On the wall in the color of double stripes, with a ruler and a pencil, we mark a horizontal line, on which we measure the width of the strips we need - three times 5 and once 10 cm. |
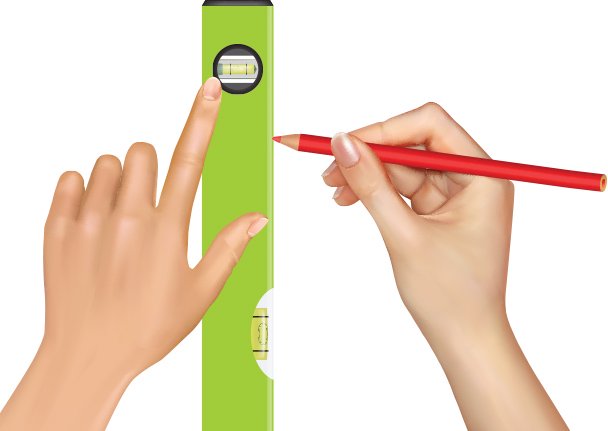
Step 2 We apply a level vertically to the points previously indicated on the wall and carefully draw lines corresponding to the edges of the strips. |
|
|
|
|
|
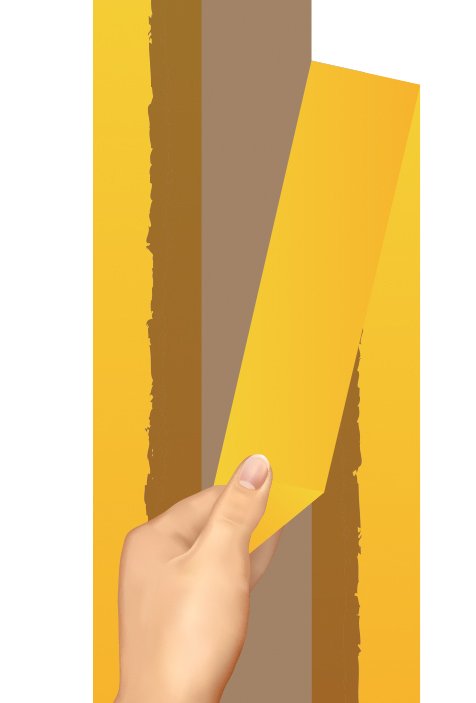
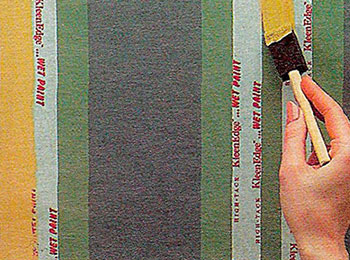
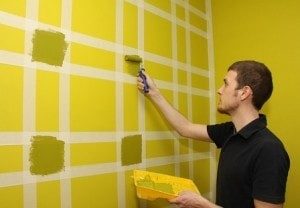
Step 3 The places that should remain in the color of the wall are carefully sealed with masking tape 5 cm wide (equal to the width of the stripes). |
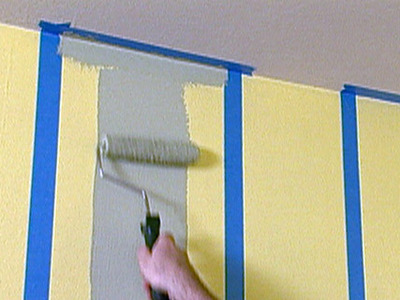
Step 4 We paint the narrow strips between the glued tape with a roller. When the paint dries, cover the wider strips with the next color (in our case, white). |
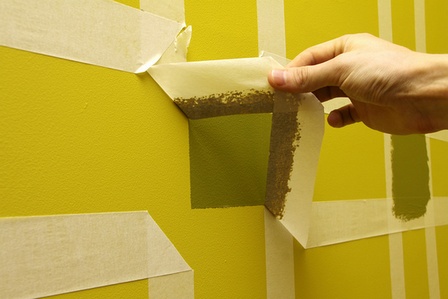
Step 5 After a few hours, repeat the painting. When the paint is dry, carefully peel off the masking tape, exposing the smooth edges of the strips. |

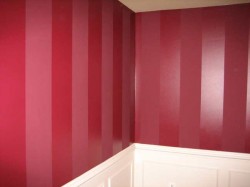
Stripes bring variety to the interior design of the room and correct some of its proportions. Let's imagine two more schemes of vertical and horizontal stripes, designed in shades of cream, beige and brown.
3 Effects obtained with decorative stripes
- Properly matched to the dimensions and proportions of the interior, the stripes create a regular rhythm and graphically arrange the space.
- A vertical pattern on the wall visually "stretches" the room in height, therefore, it is great for rooms with low ceilings.
- Painting the walls with horizontal stripes is an easy way to improve the visual proportions of an overly narrow space. It will be perceived wider, but the ceiling will visually appear lower.
- For small spaces small strips are more suitable, walls with a large surface are best divided into wide segments.
- A frequent, pulsating pattern drawn over a large area can cause nystagmus in a person, so it is better to limit it to one wall or its fragment for its application.
Such "touches" on the walls, like stripes, can be used in almost any interior. At the same time, the colors of the stripes can be either from one colors, as well as contrasting ones. When creating your interior, do not be afraid to experiment. Sometimes the bravest design solutions look especially elegant and beautiful!
Stripes on the walls have long been a classic. This technique can be found in many styles of interior design. It is especially often used in classical, vintage style, pop art and country. Although it is not necessary to design your interior in a certain style. The main thing is that the strip looks like an addition to it.
This design of the walls is appropriate when you need to visually adjust the room. For example, if the ceilings in the apartment are too low, then you can paint the walls in vertical stripes. She will make the ceilings visually higher. A horizontal strip will “lower” the ceiling a little and make the room longer. In this article, I will tell you how to paint striped walls
Paint or wallpaper?
In modern stores of furnishing materials you can find a fairly good selection of striped wallpapers. Of course, you can buy and paste wallpaper. But finding stripes of the right width and with the right combination of colors can be very problematic. That is why most often resort to painting the walls. To do this, they buy white paint and colors of the desired colors, with which you can easily make a shade of paint yourself desired color and intensity. Also, painting gives you the advantage of choosing the width of the stripes.
Coloring technology
Wall painting in stripes takes place in several stages.
Planning
At the first stage, you need to carefully consider how wide the stripes will be, how they will be located, what colors can be successfully combined. If you make multi-colored stripes, then the room may turn out to be too colorful. Therefore, most often the stripes are made in the same color, but in different shades. For example, blue and cyan or pink and red. In some cases, you can make an even less flashy transition by using paint of the same color, but different qualities, that is, take glossy and matte paint. This option is ideal for a modern or classic interior.
Three or more colors can be used when painting. But you need to be very careful in their combinations so as not to introduce an imbalance in the room.
Next, you need to make small calculations - measure the length and width of the walls that you are going to paint and divide them by the width of the strips. If an integer number of stripes does not work out, then you will have to work out their width a little. You can slightly increase or decrease it. Alternatively, the stripes can be made in different widths. For example, you paint a wall blue and blue. You can make the blue stripes a little narrower blue.
By the way, it is especially fashionable now to make wide stripes. Their width can be up to 30 centimeters.
Be sure to draw on paper a plan for the location of the stripes on the wall with the dimensions applied. This will help you not to get confused in the process.
base color
The base color is usually lighter. For example, if you are painting a wall with creamy brown stripes, cream will be the base color.
So, choose a base color and paint the walls in it. Since the base color, as a rule, is quite light, the wall should be light before painting. If you had dark paint on the walls, then you must first remove it or cover it with white paint.
Before applying the next layer, be sure to wait for the base color to dry completely.
Wall marking
Now you are waiting for a very important part of the work. You need to put markings on the walls. Be sure to use a spirit level so that the stripes are perfectly even. Vertical lines are applied from top to bottom, horizontal - from corner to corner.
masking tape
At the next stage, you need to stick masking tape inside the strips of the base color so that the paint does not get on them. Stick the tape exactly along the previously drawn lines. You also need to paste over the joints of the ceiling and walls, walls and floor with masking tape so that the paint does not get on them.
Painting
Now you can start painting the stripes with the second color. If your stripes are narrow, then you need to work with a comfortable brush. It is much more convenient to work with wide stripes, since you can use a roller.
If the strips do not differ much in color, then the paint can be applied in one layer. If they are very different in color, then you may have to apply two layers.
When painting stripes, don't be afraid to get on the masking tape. This even needs to be done so that the stripes are evenly dyed. Apply paint from top to bottom.
Removing masking tape
And finally, the final step. Now you need to remove the masking tape. And, without waiting for the paint to dry. If the paint dries, it may crack a little when the tape is removed, and instead of an even connection, you get ugly notches. Remove the tape very carefully so as not to damage the coatings. This work is completed.
Three color wall painting
When painting a wall in three or more colors, there will be no difficulties either. Coloring is done in the same way. The base color is sealed with masking tape. Next, each strip is painted in its own color and the tape is carefully removed. That's all wisdom.
Creative wall painting
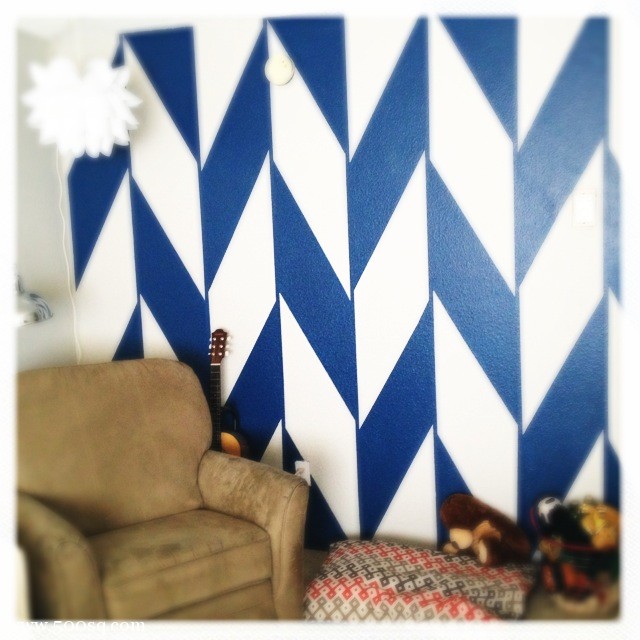
By the same principle, you can create a unique pattern. You just need to connect your imagination, and you can turn ordinary stripes on the walls into a herringbone, diagonal stripes, a cage, or whatever your heart desires.
For example, if you like thin stripes more, then cover the wall with a base color. Then apply masking tape and apply a layer of the second color. After removing the tape, you will have a wall painted in a thin strip.
You can stick tape in the form of squares or diamonds. As you stick the tape, you will get such a pattern. It all depends on your imagination.
So, on this our painting work is completed. If this is your first time painting striped walls, then it does not hurt to first practice on a piece of plywood. This will give you the opportunity to evaluate the quality of the paint and the result of the color combination. Then you can safely take on the coloring of the walls.
Tired of plain walls? Want to learn how to paint stripes or even checkered walls using just a roller and masking tape? Read our new article!
Choose a high quality tape that will keep the paint from bleeding underneath and that can be removed without damaging the underlying paint. For best results, paint on light layers, but be careful not to let the paint run too thin.
For streaks, use wide masking tape to divide the surface into parallel rows for neat painting. To get a checkered pattern, stick the tape and paint parallel rows in one color, first in one direction and then in the other.
TOOLS AND MATERIALS
- Level
- Pencil
- Roulette
- Small paint roller
- Brush or paint roller used to apply the first coat of paint
- Latex or art acrylic paint
- masking tape
- sponge applicator
Striped walls
Apply the first coat of paint in the desired color. Let the paint dry completely.
With a pencil, using a level, mark the first strip with light vertical lines. Place the masking tape between the lines and press the edges firmly to ensure a good grip.
Measure from the first stripe and draw parallel lines for the remaining stripes of the first color. Use a level to draw vertical lines. Apply painter's tape.
Color stripes brush, small roller or sponge applicator’ Allow the paint to dry.
Remove masking tape from painted strips. Repeat the process for additional colors.
Apply the first coat of a low to medium gloss latex enamel in the desired color. Let the paint dry. Measure and mark the vertical and horizontal lines for the rows of the first color. Draw light lines with a pencil on a level or level with a ruler. Use a plaid or plaid fabric as a template to determine the size and arrangement of the rows.
Place and firmly press the masking tape between the horizontal lines to give the edges of the tape a good grip.
Thin the first color with water, acrylic filler or latex paint conditioner. The paint should be slightly translucent when applied. Use the sponge applicator to paint over the horizontal stripes. Move the applicator from one end of the strip to the other, applying the paint in thin lines that mimic a fabric pattern. Let the paint dry and then remove the tape.
Apply masking tape to complete vertical stripes. With the same color and the same as for the horizontal stripes, paint over the vertical stripes. Let the paint dry and then remove the tape.
Mark with lines horizontal and vertical stripes that will be painted in a different color. Repeat steps 2-4.
Repeat this operation to color the horizontal and vertical stripes of all other colors.
TOOLS AND MATERIALS
- Paint brush or roller
- Roulette
- Level or level with ruler
- Pencil
- sponge applicator
- Low to medium gloss latex enamel used for first coat application
- Plaid or plaid fabric
- masking tape
- latex or artistic acrylic paints used for coloring stripes
Liked? Subscribe to the blog and get new articles!
- Choose the color and width of the strip
- We paint the walls ourselves
- We do the markup with our own hands
First of all, it is necessary to determine on which surface the strips will be applied. For example, it will be a wall painted water-based paint or enamel. The surface on which the strips are applied must be prepared: it must be cleaned of dirt and dust, the wallpaper must be well glued, the walls evenly plastered, primed and thoroughly dried. Painting striped walls is a very painstaking work, where it is very important to properly prepare the surface before painting, the final appearance of the composition depends on this.
Choose the color and width of the strip
What should be the strip, its color and width, depends only on the wishes of the owner of the premises. The most various options: stripes can be wide, narrow, one-color or multi-colored; they can be wall-to-ceiling or horizontal. With the help of one strip located along the perimeter, it is possible to separate the panel zone of the wall.
The color scheme that will be used in the composition has a great effect.
Various shades look original and stylish. It should be borne in mind that the dark bottom will give the impression of a “bowl”, and if the top is darker, then a pyramid effect will be obtained.
The use of different shades of the same color looks quite unusual. You can make the stripes multi-colored. The main thing is that all colors are combined.
Much depends on the width of the strips. It will be interesting to look strips of different widths. But if you make too many of them, then it will not be very comfortable for a person to be in such a room, the interior will put pressure on the eyes. The interval between the stripes should be determined in advance: this greatly affects the overall composition. Too wide a strip, and vice versa, can spoil the look of the whole composition.
Back to index
We paint the walls ourselves
In order to, you will need:
- pencil;
- dye;
- masking tape;
- level;
- roulette;
- rags;
- plastic bath;
- roller, preferably with a short pile;
- fly brush;
- chopping cord;
- a couple of buttons.
You need to prepare for painting the walls, because there are many subtleties of applying paint to the surface.
Painting stripes on the wall is an activity for two, it is much easier for two to do this work efficiently and quickly. It will be quite difficult for one person to cope with this, and working alone can negatively affect the quality and speed of the work performed. Working alone is possible, but then it will be much more difficult.


How to understand: will the kitten be fluffy?
What kind of light alcohol can be drunk for pregnant women: the consequences of drinking
Why do the legs swell in the ankles and ankles of the feet in pregnant women: causes and methods of treatment
The wedding of Prince Harry and Meghan Markle: scandalous and secret details of the marriage (photo) The future marriage of Prince Harry year NTV
How to close white plums for the winter