Payroll calculation in 1C is done in several stages. First, you need to formalize the hiring of an employee. It is also important to set up your payroll accounting settings correctly. Read this article to understand how to calculate salaries in 1C 8.3 Accounting.
Payroll calculation in 1C 8.3 Accounting begins with personnel records - registration of hiring, dismissals, personnel movements. You also need to make payroll accounting settings for the correct calculation of salaries in 1C Accounting 8.3. You will learn about all this in this article. Read on to learn how to calculate payroll in 1C 8.3 Accounting in 5 steps.
Step 1. Set up payroll settings in 1C 8.3
Go to the “Salary and Personnel” section (1) and click on the “Salary Settings” link (2). A window for changing settings will open.In the settings window, check the box (3) opposite the words “In this program”. This means that salary and personnel records will be kept in 1C 8.3 Accounting. Also check the boxes next to the words “Keep records of sick leave, vacations and executive documents” (4) and “Automatically recalculate the “Payroll” document” (5). In the personnel records section, check the box next to the “Full” field (6). This will allow you to maintain personnel records in the 1C 8.3 Accounting program.
 The settings for payroll calculation are set. Now start your payroll operations. But first, create personnel documents in 1C 8.3.
Step 2. Register the employee’s hiring in 1C 8.3
 In the window that opens, click the “Create” button (3) and click on the “Hiring” link (4). A window for hiring an employee will open.
In the form that opens, fill in the fields:
- "Division" (6). Select the department to which you are hiring an employee;
- "Position" (7). Specify the position of the new employee;
- "Employee" (8). Indicate the employee you are hiring;
- “Reception date” (9). Indicate the date of hire;
- “Test. Duration (months)” (10). Indicate how many months the new employee will be on a probationary period;
- “Type of employment” (11). Select the desired value from the directory, for example, “Principal place of work.”

After filling out the employment form, click on the “Record” (14) and “Post” (15) buttons. The employee has now been hired. To print the hiring order, click on the “Print” button (16) and click on the link “Hiring Order (T-1)” (17).

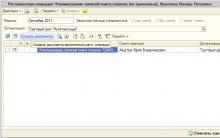
Step 3. Formalize the employee’s dismissal in 1C 8.3
Go to the “Salaries and Personnel” section (1) and click on the “Personnel Documents” link (2). A window for processing personnel documents will open.
In the window that opens, click the “Create” button (3) and click on the “Dismissal” link (4). A window for dismissing the employee will open.

In the resignation form, fill in the following fields:
- "Organization" (5). Please indicate your organization;
- "Employee" (6). Specify the employee to be dismissed;
- “Date of dismissal” (7). Indicate the date of dismissal;
- “Article of the Labor Code of the Russian Federation” (8). Select the desired article of the labor code from the list;
- "Date" (9). Indicate the date of the dismissal order.
After dismissal, an employee’s salary and contributions will not be calculated in 1C 8.3.

Step 4. Calculate your salary in 1C 8.3
Go to the “Salaries and Personnel” section (1) and click on the “All accruals” link (2). The accrual window will open.
In the window that opens, click the “Create” button (3) and click on “Payroll” (4). A window for calculating salaries will open.

In the window that opens, fill in the fields:
- "Organization" (5). Please indicate your organization;
- “Salary for:” (6). Indicate the month for which you are paying your salary.

In this list we see:
- employees who were hired by your organization (8);
- number of days worked for each employee (9);
- number of hours worked for each employee (10);
- amounts of accrued wages (11);
- amounts (12);
- amounts of accrued insurance premiums (13).
After making changes, click “Record” (14) and “Post” (15) to reflect the payroll entries in accounting. Now the accrual is reflected in the accounting and tax accounts in 1C 8.3. Let's check these wiring in the next step.

Step 5. Check payroll in 1C 8.3 on accounting accounts
Click on the “DtKt” button (1) to view the payroll transactions. The posting window will open.
In the window we see the wiring:
- for accrual of wages on account 26 for each employee (2);
- withholding personal income tax for each employee (3);
- accrual of 26 insurance premiums on the account (4).

Checking the entries showed that all salary calculation transactions are reflected in the accounting and tax accounts.
Good afternoon, dear blog readers. In this article I will continue overview of possibilities software product "1C Accounting 3.0" for calculating wages and maintaining personnel records. Today we will take a look at the available payroll tools. Let me remind you that in the previous article in this series we looked at. The full list of materials is presented below:
Payroll
Now let's see what payroll capabilities the program developers have provided here. Let me remind you that all documents and reference books for calculating salaries are located on the “Employees and Salaries” tab of the main menu of the program and are grouped in the “Salaries” section.
The first document we see is "Payroll". Its purpose is clear from the name. The document provides for its monthly entry; at least one document per month must be entered. Let's try to calculate the salaries of our three employees. To do this, create a new one and in the field "Accrual month" Let’s select “April 2014” (employees hired on April 1, 2014). In field "Subdivision" Let’s leave “Main division” (we have only one) and press the magic button "Fill in". As a result, all tabular sections will be automatically filled in.

Please note that in the document above the tabular part, fields have appeared that reflect the total amounts of accruals, deductions (including personal income tax) and the amounts of calculated contributions. In the tabular part itself on the tab "Accruals" The lines were automatically filled in in accordance with the data that we entered when hiring employees. I would also like to note that, despite the presence of such fields as “day.” (days) and "hours." (hours), the program does not provide time sheets and payroll calculation using the displacement method. In other words, the salary is not recalculated automatically if the month is not fully worked; this will require manual correction of the amounts and hours/days. If such a calculation turns out to be very labor-intensive and problematic for you, I advise purchase a specialized software product for payroll calculation “1C: Salary and Personnel Management 8”, which in the basic version will cost only at 2,550 rub.. You can get acquainted with the functionality of the software product in a series of articles -.

There remains one more tab “Contributions”. It automatically calculates insurance premiums. Insurance premium rates are stored in a specialized register and are always up to date if you regularly update the programs. Read about how to properly update 1C yourself. The rate of contributions for accidents is set differently for each organization; for this you need to open "Register of information" "Contribution rate for accident insurance."


I will note one very colorful solution by the 1C developers (I liked it). To view the total amount of contributions separately for each area, you can click on the question mark, which is located next to the “Contributions” field (see picture). The same goes for Holds.

Document "Payroll" When conducting, it generates postings for accrued wages (26 -> 70), for calculated personal income tax (70 -> 68) and calculated insurance premiums (26 -> 69).

Cost account 26, which is used in my example, can be changed. In a directory element "Accruals"(in 1C ZUP this is called "Type of accrual"), there is a field “Method of reflection”, where you can designate a different method of reflection for amounts accrued for this type of accrual.

Payroll in 1C Accounting 3.0
After the salary is accrued, it must be paid to our employees. 1C Accounting offers two payment methods:
- Through the bank documents - “Statement for salary payment through the bank”+ “Payment order” + “Debit from current account”;
- Through the cash register with documents - “Statement for payment of wages through the cash register”+ “Cash expenditure order” or “Salary deposit”.
Payment via bank
Let's consider the first option. It is used if the organization pays salaries to bank cards. In the document, you must select the month of payment (In our case, April 2014), Department, in the field "Pay" indicate what type of payment is to be made “Monthly salary” or “Advance”(we select the first option) and press the button "Fill in". In this case, the tabular part is filled in automatically with the amounts that the organization owes to employees. You can also print a list of salaries transferred to the bank from the document - "List of transfers"(You can also print from MicrosoftWord).

Pay attention to the field "Salary project". Using a simple example, I will try to explain how this field can be used. Suppose our director (Ivanov) and chief accountant (Petrova) chose to keep their salaries on the cards of the Sustainable bank, and the manager (Sidorova) in the Nadezhny bank. In this case, it is necessary to make two “Salary Payments” documents every month in order to make two different payment orders to two different banks based on them.
When an organization has three employees, you can do this manually, but if we are talking about hundreds of employees, then it is better, of course, to buy a 1C salary :-) or at least set up a salary project. Let’s add two banks “Stable” and “Reliable” to the directory of banks (section of the main menu "Bank and Cash" group "Directories and settings"). Now, let’s open the “Salary Projects” directory. I didn’t find a link to this reference book in the main menu, so I opened it from the general list of program objects. See picture.

If you do not have the “All functions” item, then go to the program settings settings and check the “Display the “All functions” command” checkbox.

So, the reference book “Salary projects”. You must enter the organization and name of the bank. In our case, there will be two elements of this directory.

Now you need to enter information about the personal accounts of three of our employees. To do this, in the “Employees and Salary” section of the main menu, open the “Entering Personal Accounts” item. First, enter information about the personal accounts of the director and accountant who have accounts with Sustainable Bank and the corresponding salary project. And then for a manager with an account at Reliable Bank.


Now you can return to the “Statement to the Bank” document. In field "Salary project" select “Salary project: “Stable Bank” and click the “Fill” button. As a result, the tabular part of the document will be filled in only by those employees who belong to this salary project. Thus, you can easily distinguish between people receiving salaries on cards from different banks.


Based on the document “Statement to the bank”, you can create a document “Payment order” and a document “Write-off from the current account”, which will generate transactions of the type 70 -> 51.

Payout via cash register
Moreover, it is possible to open the report for viewing not only in the program itself, but also in an external text editor Microsoft Word.

Based on the payment document, you can create a document “Cash receipt order”.

The document “Cash expenditure order”, when posted, generates transactions of the type 70 -> 50.01. The document also contains a printed form "Expense cash order (KO-2)".

Creation of several cash registers based on one document “Statement to the Cashier”
As you probably noticed directly from the document "Statement to the cash register" You can create one cash settlement document, where all employees of the payment document will be taken into account. However, sometimes it is necessary to create a cash register document separately for each employee on the list. For this, 1C developers have provided special processing "Payment of salaries by expense orders". This processing can be found in the main menu section "Employees and salaries" in the group of links by "Salary". Actually in processing you need to select a document "Statement to the cash register" and the cost item, then click the “Create documents” and “Post documents” button.

Salary deposit
Also, based on the “Statement to the Cashier” document, you can generate a “Deposit” document. This document is entered if an employee’s salary has been accrued, but for some reason he did not come to the cashier to receive it. In the document entered on the basis, it is necessary to leave those for whom the deposit is entered. The deposit document generates transactions of the form 70 -> 76.04. You can also print from it "Register of deposited amounts".

But when using this document, you must remember that you must first fill out and post the “deposit” document, and only then create and post the “Cash Expenditure Order” document so that it does not include in the postings the person whose salary was deposited.
Also in the section "Employees and salaries" the main menu of the program has a document “Write-off of deposited salary”, which generates transactions of the form . In this regard, it is not entirely clear why there is no document for payment of deposited wages, and if it exists somewhere in the depths of the program, then why is it not displayed in the menu.
Salary reports
And of course, the program provides a number of salary reports. These reports can be accessed via the “Salary Reports” link located on the “Employees and Salary” tab. I will list the most popular ones:
- Payroll (T-51);
- Pay slip;
- A summary of charges and deductions;
- A complete set of charges, deductions and payments.

In the screenshots I will present the appearance of the reports listed earlier.
Payroll (T-51)

Pay slip
Brief summary of charges and deductions

A complete set of charges, deductions and payments

That's all for today. If you liked this article, you can use social networking buttons to keep it for yourself!
Also, don’t forget your questions and comments. leave in comments!
This article will discuss in detail step-by-step instructions for accounting salaries in 1C: preliminary setup, direct calculation and payment of wages in 1C 8.3 Accounting, as well as a salary project. If you figure it out, everything turns out to be quite simple.
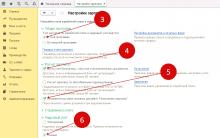
Before accruing and paying wages in the 1C 8.3 Accounting 3.0 program, you need to configure it correctly. To do this, select “Accounting Settings” in the “Administration” menu.
In the window that appears, select “Salary Settings”. This section allows you to set up not only your salary, but also personal income tax, insurance premiums and personnel records.

Let's look at these settings in more detail step by step:
- General settings. In this example, we selected the “In this program” item, since otherwise some of the documents we need will not be available. The second setup option involves maintaining personnel and payroll records in another program, for example, in 1C ZUP. The “Salary Accounting Setup” subsection specifies the method of reflecting salaries in accounting, the timing of salary payments, vacation reserves, territorial conditions, etc.
- Salary calculation. Here we indicate that we will take into account sick leave, vacations and executive documents. It is important to remember that this functionality will only work if the number of employees does not exceed 60 people. The types of accruals and deductions are also configured here. For convenience, we will also install an automatic recalculation of the “Payroll” document.
- Reflection in accounting. In this section, accounts are set up to reflect salaries and mandatory contributions from the payroll in accounting. Let's leave the default settings.
- Personnel accounting. In this example, full accounting was selected so that basic personnel documents were available.
- Classifiers. We will leave the settings in this paragraph as default. Here you configure the types of income and deductions used in calculating personal income tax and the parameters for calculating insurance premiums.
How to calculate and pay salaries in 1C
The second step is that the employee must be hired. In this case, we will look at an example of an employee who has a minor child. As you know, in such cases a tax deduction is applied. You can indicate an application for it in the employee’s card by going to the “Income Tax” section. Please note that tax deductions are cumulative. If they are not applied in one month, then in the next they will be taken into account for both periods.
Once all personnel documents are completed, you can proceed directly to payroll. To do this, select the “All accruals” item in the “Salaries and Personnel” menu.

In the list of documents that opens, select “Payroll” from the “Create” menu. Fill in the accrual month and department in the header and click on the “Fill” button.

The program will fill in all the necessary data. Manual adjustments are allowed. It is important to remember that the 1C: Accounting program does not maintain the “Timesheet” document. All absences from work (vacations, sick leave) must be filled out before the salary is calculated in order to correctly reflect the actual time worked in this document.
The “Employees” tab displays a summary table of the document broken down by employees.

The next tab displays accruals and deductions for employees and the amount of time actually worked. These data can be adjusted manually if necessary. You can also print a payslip on this tab.

The “Deductions” tab in this example is empty, since the employee did not have any. We'll let her through.
The next tab reflects personal income tax and tax deductions. This employee has a deduction for children, which we previously introduced. The data on this tab can be corrected by checking the appropriate flag.

The “Contributions” tab details contributions to the Pension Fund, Social Insurance Fund and the Federal Compulsory Compulsory Medical Insurance Fund. Manual adjustment is also available here.

The very last tab displays manual adjustments.
Click “Post and close” and here we will finish calculating the salary.
Statement for salary payment to the bank
Once wages have been successfully accrued, they must be paid. Let's consider payment through a bank, since this method is the most common in organizations.
In the “Salaries and Personnel” menu, select “Statements to the Bank”.

Create a new document from the list form. In its header, indicate the month of accrual, division, type of payment (per month or advance). There is also a field for indicating the salary project. It will be discussed later.

See also video instructions for paying in advance:
And the calculation and payment of wages in 1C:
Salary project in 1C 8.3
In the “Salary and Personnel” menu, in the “Directories and Settings” section, select “Salary Projects” and create a new document. It requires you to provide your banking information.

The salary project for an employee is indicated on his card in the “Payments and Cost Accounting” section.

In the window that opens, indicate the employee’s personal account number, the start period and select the salary project.

After this setting, when you select “Statement for salary payment through the bank” in the document, the employees’ personal account numbers will be entered.
Dear friends, today we will talk about how payroll is calculated. We will also look at how an advance payment statement is made. It's not very difficult to do this if you learn how to do it. Please note that the actions were performed in the 1C: Accounting 3.0 program. If the version of your product is different, there may be some discrepancies both in the names of some menu items and in their location relative to the application window.
It is worth noting that you can issue an advance only on an existing salary, which, in turn, is created when hiring an employee. That is, your system should already include a person who is hired for a job with a certain salary. It also immediately indicates in what form the advance payment can be issued: a percentage of the salary or a fixed amount. Only after your employee is in the database with all the information can you move on.
How to calculate wages?

- “Withholding” - if for some reason you are withholding accruals, they will be added either automatically or manually.
- On the “Personal Income Tax” tab, the accrual of personal income tax is automatically calculated. This amount can always be adjusted by setting the appropriate flag. View all employee deductions, also add new employee deductions here by right-clicking on this area.
- On the “Contributions” tab you can see all the accruals that are made for the employee.
- Near the item “Withheld” there is a question mark, by clicking on which the program will decipher the specified amount.

Statement of salary advance
Now we will learn how to write out an advance payment slip for any employee, as well as how the payment itself is made. After a detailed analysis of how to calculate salaries in 1C, it will be much easier for you to calculate an advance in 1C. And if you're ready, let's go:
- Let's go to the "Salaries and Personnel" tab. Select the item “Statements to the bank” or “Statements to the cashier” depending on how the process of issuing funds is carried out at your enterprise or firm.
- For example, you selected a cash register. Next, click the “Create” button and fill in the required fields (month, department, etc.). Please note that in the “Pay” field you must select “Advance”. If necessary, enable rounding of the amount.
- After all the settings, click the “Customize” button.
- Check that the information provided is correct and click on “Submit”. In the same window you can print the necessary pay slip.
- After this, you must enter the cash document. This can be done using the “Create based on” button and selecting “Cash withdrawal”. It can be seen that all details were filled out correctly. You can change the DDS article if you plan to account for this money under another article. It is also possible to specify the details of the printed form that will be entered in the cash receipt order.
- Check the document and click the “Post” button. Ready!
To keep wages accounting, you can use the 1C software product. But what does payroll automation look like in 1C? How to keep track of salaries in complex automation? And how is the statement generated, according to which the salary will be paid? Below we will find out the answers to these questions.
Preliminary operations
Before paying out money, you must complete preliminary operations. Preliminary payroll automation in 1C looks like this:
- Introduction of personnel orders. First, you need to enter all the information about the company's employees. To do this, open the 1C software product, select the “Personnel” line, and then the “Accounting Documents” line. Enter all the necessary information. To check orders, open the “Accounting Documents” journal.
- Introduction of additional payments. Now you need to enter regular and irregular additional payments (various bonuses, bonus payments, and so on). To do this, open the “Salary” menu, then click “Information” and “Enter information”.
 Note! If the salary differs from the average monthly earnings (for example, in the case of vacation), then you need to independently calculate the amount of the vacation salary, and then enter this information into the order.
 Accrual
Now you need to create a special document according to which the salaries of your employees will be calculated. To do this, open the “Salaries and Personnel” tab, click “Create” and “Calculation of salaries to employees” - a special menu will open that needs to be filled out:
- In the “From” column, indicate the accrual date (you must indicate the last day of the accounting month).
- Click “Fill” and select the desired filling method. If you clicked the “By planned accruals” item, then your document will be filled out in accordance with all the planned accruals that you specified when creating orders. You can also click the “List” line - then the document will be filled with charges that correspond to the specified parameters.
- Create the wiring. To do this, click “Perform” and wait until the operation is completed. You can check the results using the “Results” button.
- Complete your insurance premiums. To do this, click the “Add” and “Calculation of contributions from the payroll” buttons (payroll is the wage fund). Now indicate the exact month for which taxes will be calculated - to do this, in the “For” column, mark the appropriate month. Don't forget to appoint a responsible person. Make sure that the name of the relevant company is entered in the "Organization" column.
- Generate tax deduction entries. To do this, click the “Post” button, mark the corresponding tax document and wait until the operation is completed. You can also check the results using the “Results” button.

Formation of the statement
Comprehensive automation of payroll also includes the generation of the corresponding statement:
- To do this, you will need to create a special accounting document called the “Payment Statement.”
- To do this, click the “Add” button and select the desired item - a special menu will open that needs to be filled out.
- In the “From” column, indicate the date the statement was compiled.
- In the “Accrual month” section, select the appropriate month. Let's say you need to submit a statement for December 2017 - in this case, indicate the date 12/01/2017.
- Now you need to specify the payment method. To do this, in the “Payment method” item, select either “Through the cash register” (in the case of cash withdrawal) or “Through the bank” (in the case of transferring money to the card).
- Click “Fill” and specify the filling method. There are 2 options. In the case of “For debt at the end of the month,” the statement will be filled out in accordance with the accounting documentation at the end of the accounting period. In the case of “List of employees”, the statement will be filled out in accordance with the specified parameters.
- Click "Calculate" and wait for the operation to complete. A special table will be generated containing information about the employees. This data must be checked and corrected if an error is found.
Conclusion
Now you know what automation of payroll calculations looks like in 1C. Let's summarize. To transfer the entire amount of money, you need to enter information about personnel orders, as well as information about additional payments. Then you need to create and execute a special document called “Calculation of salaries to employees.” At the final stage, you also need to create an accounting sheet, which will indicate information about employees and their salaries for a certain accounting period.
Watch the video instructions to find out more information about paying salaries and automating HR records in 1C.
Payroll in 1C 8.3 Accounting step by step


Alexander Kodzoev Video: Alexander Kodzoev in the iron ranking
Man from the Future (Story)
Why do you dream about foundation - interpretation of dreams according to dream books
What to expect and what to prepare for if you dream of a loved one
Star of magicians in astrology